
Team Status Report – 4/27/24
- What are the most significant risks that could jeopardize the success of the project? How are these risks being managed? What contingency plans are ready?
The most significant risk during this final week will be running into any unforeseen complications as we finish system integration. This is finals week, so as much as we would like to be able to devote every waking hour to finishing the project, we have other finals, job interviews, and projects to complete this week. Issues will be managed, thus, on a priority scale basis; for example, if Bluetooth between the mat and lock malfunctions, we should be able to quickly physically wire the two systems together.
- Were any changes made to the existing design of the system (requirements, block diagram, system spec, etc)? Why was this change necessary, what costs does the change incur, and how will these costs be mitigated going forward?
Come Monday, there may be a new change to the lock, as mentioned in Jada’s status report. This change, if successful, will allow for a smaller lock footprint, better audio quality, and slightly more amplification; this change will incur minimal costs.
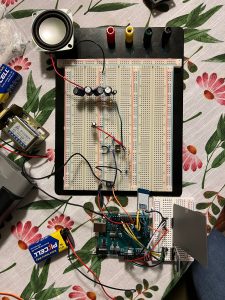
As seen in Brooke’s report, the board design underwent many changes to fix some strength and quality issues. A new system to distribute weight was added, and the pads were replaced with much stronger wood.
The mat dance will now be encoded based on the times between steps instead of the times of steps to account for the fact that we don’t know exactly when the songs will play, because the Bluetooth connection timing is not exactly consistent. In addition, an HM-10 BLE 4.0 module will now be used for the lock Arduino Uno R3.
List all unit tests and overall system test carried out for experimentation of the system. List any findings and design changes made from your analysis of test results and other data obtained from the experimentation.
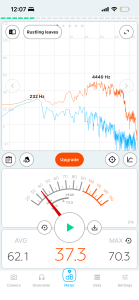
For the lock, the following items were tested: keypad functionality, servo functionality, SD card reader functionality along with song selection, Bluetooth module functionality, and speaker decibel levels. For the speaker, decibel readings were completed using an iPhone dB reader app in a moderately quiet room at 6″, 1′, 2′, and 3′ away from the uncovered speaker. Our goal was to have the speaker audible but no greater than 75 dB for safe hearing, and the current complete system achieves this specification. However, since the speaker will soon be covered, we are trying to amplify the speaker a little more to be at around 70 dB when covered.
For the dance mat, the strength and detection of steps were tested. Unfortunately, the original design of the pads was faulty in nicely distributing the weight and having strength for heavy weights, so we upgraded the final pads to newer and thicker plywood at around 12mm in thickness each. After this, things performed much better, with complete detection of the weights required and the strength to handle heavy weights and sudden strong forces of steps.
For the app, tests were conducted to measure how long it took for the app to connect to the mat. I ran each test 5 times for 6” distance, 1 foot distance, 2′ distance, 4′ distance (all on the floor), and standing height (around 4′ distance) above the mat microcontroller. I only tested without the antenna extension, because we could not access the extension at that time. The results from this test suggested that the antenna extension should be used, to ensure long distance connection is possible.
Jada’s Status Report – 4/27/24
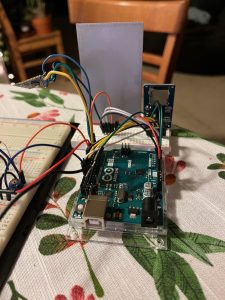
This week, I was able to fully integrate the servo motor as the locking mechanism. Quite a bit of iteration was required in getting the code to work, but I was also able to implement a locking function whereby the servo will move to the locked position whenever the “*” button on the keypad is pressed. This can be done at any point in the system, allowing for the user to lock their door easily. I also did research on linear actuators to attach to the servo motor to exhibit more of a “locking” behavior during the public demo next week. With Brooke, we 3D printed a linear actuator that I found on Thingiverse .
I also presented the final presentation, which took a bit of time to prepare for at the start of last week, in addition to losing two class periods to listening to presentations. Earlier this week, I also helped Brooke with choosing new materials for the mat after running into issues with materials flexing too little or too much. During this time, we consulted one of the wood shop operators in Techspark as well as my father, who works with polyurethane, to get an opinion on what materials and pliability we should be aiming for.
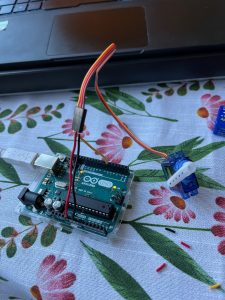
The other main thing I have been working on was testing and integrating a new DAC-amp module that Brooke ordered. During initial testing, I believe I found a hardware malfunction and read of a shortcut on an online forum that will circumvent this issue. This worked in testing the sound quality and amplification ability (which is much better than the amplifier circuit I built earlier), however, the functionality of choosing songs and setting the volume still does not work, as the shortcut does not address the main issue of connecting properly. This is an issue, as it won’t allow for song selection, will shuffle through the mp3 files endlessly, and is much too loud for our application. I am going to ask Brooke to take a look at it tomorrow, although I don’t plan to spend much more time on it, as the amplifier circuit works fine enough for the demo.
By Monday, I will settle either on the DAC-amp module or the amplifier circuit so that I can laser-cut the final lock housing and secure the servo in its linear actuator. I will also integrate the new BT module that Zoe ordered to work with the mat’s BT signal (this module is different from the one I originally tested, but did not work for Zoe in testing communication between the Seeed and the lock module).
I definitely feel that I am behind schedule, due to these new modules I am trying to implement not allowing me to finish the lock housing and work solely on the mat with Brooke. This week will be spent getting everything put together for the demo. As mentioned above, I will have settled on the lock electronics and cut out the housing by Monday. I will also be helping Zoe with the poster that is due Tuesday, and working with Brooke to produce the video by Thursday.
Team Status Report – 4/20/24
- What are the most significant risks that could jeopardize the success of the
project? How are these risks being managed? What contingency plans are ready?
The most significant risk at this point is not having enough time to recover if we run into significant issues with completing the full system, i.e., getting a single dance working with a song and ensuring that the backup system works when fully integrated. This risk is being managed as best as possible by recognizing what is and isn’t a priority, communicating between the three of us what we need from each other to be successful, and being careful to make the best decisions we can make in terms of design, knowing that the final demo is around the corner.
- Were any changes made to the existing design of the system (requirements, block diagram, system spec, etc)? Why was this change necessary, what costs does the change incur, and how will these costs be mitigated going forward?
The only changes in the lock within the past two weeks have been adding the amplifier circuit to the speaker and switching out the solenoid lock for the servo motor. These changes were necessary to hear the audio coming from the speaker and protect the Arduino from excessive strain, and make the lock/unlock transition much clearer while decreasing power consumption. At under $20 in total, these costs were minimal; since our project was relatively inexpensive, this cost is not a large concern. The only change that has really been made to the mat has been the expansion of the space for cables to ease assembly; externally, everything should be the same as initially planned.
- Provide an updated schedule if changes have occurred.
- This is also the place to put some photos of your progress or to brag about a component you got working.
Jada’s Status Report – 4/20/24
For the past two weeks, I have ordered additional parts that should bring the lock sub-system to completion. This included amplifier transistors, more robust speakers, and servo motors. Addressing the most pressing issue of the lock over the last two weeks, the lack of speaker amplification, I used an example circuit, the amplifier transistor I ordered, and various resistors and capacitors sourced from the 18-220 lab to build an amplifier circuit, modifying the resistance and capacitance values in attempts to improve the overall sound quality and volume. There is still some room for improvement here, and I hope to reach out to Prof. Sullivan to discuss possible adjustments if time permits. If I don’t have time, and since this is now a lower-priority item, the current speaker setup is sufficient for the final demo. I also added an elementary “song selection” function to the main lock code to select from different songs that are stored on the microSD card. In terms of testing the speaker, I downloaded a decibel reader onto my phone and checked for a safe reading (<75dB) at 6″, 1′, 2′, and 3′ away from the speaker, uncovered. All were under 75dB, and the 6″ reading is included in the images below.
Addressing the issue of the solenoid lock not having sufficient power and being an unclear indicator of the lock being locked or unlocked, the servo motor will soon replace the solenoid. The servo requires much less power and does not need constant power to be “unlocked”, meaning the system can be more efficient. It is also easy to make more clear with the servo what is “locked” and what is “unlocked.”
Another key item I began was testing possible coverings for the keypad to add another layer of security. With Brooke’s help, I was able to 3D print a 0.5mm thick sheet to tape over the keypad and hide the numbers. While the keypad still functions fully with this cover, I am unsure if it will be implemented in the final demo.
Every module needed for the lock is now physically added to the main circuit, aside from the servo which will replace the solenoid tomorrow. My next steps will be to move the amplifier circuit to a much smaller breadboard to consolidate space, solder any connections that I haven’t done yet, laser cut a box to act as a housing for the lock electronics, and 3D print a small part to connect to the servo and act as the lock piece that moves in and out. I am not a mechE, however, so I doubt I will be able to create a simple box or door to accompany the lock in a sufficiently short amount of time.
All of these tasks can be completed in this upcoming week, so I feel that I am on track to completing my tasks for the project. However, I am concerned about testing the full BeatLock system, as we are still working on connecting the three sub-systems. To catch the team up this week, I’m hoping to have the lock completely ready at the beginning of the week for Zoe to work on the Bluetooth functionality when she is ready to work on the connection between the mat and the lock.
Additional Considerations: Learning Strategies
As I have gone throughout this process of creating the lock subsystem this semester, I have gained new knowledge about how to work with Arduino, specifically the Uno R3, its specific architecture, and how to be flexible with finding modules to accommodate it, such as the Bluetooth and microSD card reader modules. My strategy throughout the semester for each new addition has been to read datasheets when available to get a sense of different design parameters and how the item generally functions, then to move from that to looking for examples of the item being used, either through reading through example code to get an idea of function or through videos of someone walking the viewer through an example circuit with the item used. From here, I tend to debug and optimize, using strategies such as googling Arduino IDE errors for understanding, reading forums when I run into specific hardware issues, and even downloading multiple libraries to try to get a specific component working. I have also learned through the short time span of this class that while certain ideas in theory will work best, when trying to debug for two weeks leads nowhere, it is time to pivot and choose another plan; this can specifically be seen in my attempts at getting the Seeed Xiao to work and switching to the Arduino Uno R3 after being unsuccessful.
Team Status Report – 4/6/24
- What are the most significant risks that could jeopardize the success of the project? How are these risks being managed? What contingency plans are ready?
The main risk still appears to be the Bluetooth connection between each subsystem, as we are still unable to thoroughly test that. There are a few more minor issues mentioned in Jada’s status report regarding the speaker and BT module, which controls song selection and audio output; however, those will likely be solved within the upcoming week. Another risk is that the mat system has not yet been put together (physical mat, electronics, and code), so there has been no testing to see if everything works together. With time running out, we will have fewer options if we realize there is something wrong with our system and we need to change something.
No changes have been made to the system’s existing design within the past week.
Updated Schedule:
April 8 – April 15
Finish mat construction: Brooke and Jada assist when needed
Play song through lock: Jada
Order rubber covering and battery for mat for installation: Brooke
Get BT connection between app, mat, and lock: all
3D print lock housing: Jada
April 15 – April 22
Get one dance functioning on the complete system: all
Testing: all
Now that you have some portions of your project built, and entering into the verification and validation phase of your project, provide a comprehensive update on what tests you have run or are planning to run. In particular, how will you analyze the anticipated measured results to verify your contribution to the project meets the engineering design requirements or the use case requirements? Validation is usually related to your overall project and is likely to be discussed in your team reports.
Additional Discussion:
The following tests have been or will be run on the comprehensive system for validation:
- Bluetooth connection—the connections between the three subsystems will be verified by checking for a connection. This will be more rigorously tested once the system is mostly completed by checking for connection when the user with the phone app walks up to the mat and locks.
- Timing and consistency—The timing between the song and the dance detection will be tested for consistent starting. They do not need to start precisely at the same time, but they need to start consistently at the same amount of time apart. This will be done by repeatedly measuring timing.
- Backup entry – The backup entry method (keypad) will be tested for entry time (under ten seconds) using a stopwatch.
- User experience—the dance experience will be tested and reviewed by multiple third-party people to gain unbiased opinions. We have already used this type of testing to help us make decisions regarding the size of the mat, and we plan to use it to test the dance experience once we have made the mat functional.
Jada’s Status Report – 4/6/24
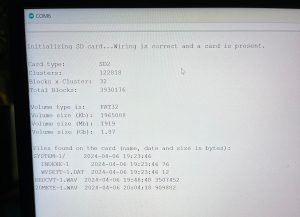
This past week, I have been working on the Bluetooth module and the microSD card module. I was able to solder speaker connections to the Bluetooth module as well as manipulate two audio files for testing the system; however, I’ve run into two problems that set me slightly behind schedule. Once the microSD card module and microSD cards arrived, I had some difficulty finding an SD card adapter until this morning (Saturday); once I had the adapter, getting test song mp3 files downloaded and wiring the microSD card module for testing was straightforward. The other, still standing, issue I’ve run into is getting the Bluetooth module to see the files that are on the microSD card. I believe the current library for the Bluetooth module was made for a specific adaptation of an Arduino Uno that includes built-in memory, so I’m currently researching how to get the BT module to reach the files. One step I’ve made towards getting this working is verifying that the microSD card module works; I found that Arduino has built-in example code for memory cards, which can both verify that there is a connection to the card as well as list files on the card (as seen in the photo at the bottom). I plan to take time tomorrow to learn from the example code how to see the files so that I can copy the paths for the BT module.
Another potential issue that may come up once I solve the file issue is wiring the speaker to the BT module since it has a useful audio function library. In the diagram given for the BT module, there are three connections (GND, VCC, and DACL) going from the BT module to the speaker; however, our current speaker only has two connections. This may be as simple as wiring only GND and DACL, but I won’t know until after I can get the BT chip reading from the SD card.
Because of these main issues, my progress is slightly behind schedule. To catch up, I plan on working most of tomorrow to get the BT and microSD card communicating, and maybe testing my speaker hypothesis if I have time. If the speaker doesn’t work, I will look for a speaker to order.
This upcoming week, I hope to have the speaker, microSD card module, BT module working together. After this, I hope to have these items integrated into the main lock system as well as begin testing the BT connection between the app and the lock.
Additional Discussion
In terms of verification of the lock subsystem, I have tested or plan on testing the following measures:
- Keypad functionality – this was completed by hardcoding a correct PIN and verifying that the keypad outputted a “correct” signal when the correct PIN was entered.
- Solenoid lock functionality – this was completed by connecting the solenoid to the 5V pin of the Arduino and verifying that it unlocked when powered.
- Bluetooth connection – this was initially confirmed by connecting my iPhone to the module without the rest of the system. Better validation will come by testing the connection between app/lock, and mat/lock.
- Audio quality and level – this will be verified in two parts. Quality will be qualitatively measured by listening to the audio files through my laptop and comparing to the audio quality from the speaker. Level will be measured hopefully through a decibel reader, likely through a downloaded phone app.
Team Status Report – 3/30/24
The most significant risk for the lock remains to be Bluetooth integration. To manage this risk, we’ve moved from the Seeed microcontroller in the lock to the Arduino Uno and have ordered a BT module that is looking promising. This is also the case for the app, because we might run into unexpected errors that would delay our timeline.
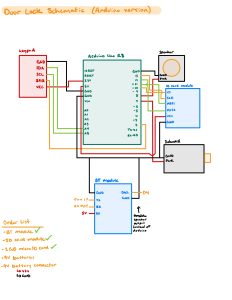
The lock block diagram has officially been changed to reflect the microcontroller switch and additional modules needed for full functionality. As reflected in the wire diagram in Jada’s status report, the new additions aside from the microcontroller include the BT module and the microSD card module. This diagram may still change depending on song functionality, potential future switching from lock solenoid to stepper motor, and adding a battery connection. This most recent change has incurred a small cost, but for parts that will hopefully be kept for the final product.
Updated Schedule:
April 1 – April 8
Finish mat construction: Brooke and Jada
Order rubber cover for mat: Brooke
Get BLE working: Zoe
Play song through lock: Jada
April 8 – April 15
Get one song functioning on a complete system: All
3D print lock housing: Jada
April 15 – April 22
Testing: All
Jada’s Status Report – 3/30/24
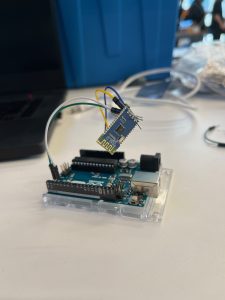
This past week, I mainly continued work on the lock, solidifying our use of the Arduino Uno by continuing to research compatible Bluetooth and microSD modules for the Uno, writing up an updated wiring diagram (as shown below) to visualize the potential additional parts, and ordering the Bluetooth and microSD slot modules as well as 2GB microSD cards.
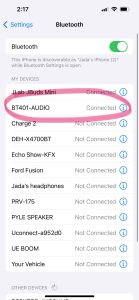
Beyond this, I was able to get the Bluetooth module running after downloading its respective library and example code. Surprisingly, my iPhone was able to discover and connect to it in this initial testing (as shown below). I also assisted Brooke with laser-cutting the boards necessary for the mat construction. Fun fact: the Rabbit lasers in Ideate are superior to the Techspark Rabbit lasers (good to know, but not a fun walk with heavy items).
I feel that I am a bit behind schedule, as Bluetooth is not integrated into the system yet. As long as Zoe and I can get the lock and the app communicating by the end of this week, I should be in a much better place, as getting song selection set up and a 3D-printed container for the lock *should* be relatively straightforward and not too time-consuming.
By the end of next week, I hope to have Bluetooth between the app and lock completed, including soldering the BT module for speaker connection. After that, if the microSD cards and module come in quickly, I will begin working on getting songs loaded and playing through the lock.
Also, Happy Easter!
Team Status Report – 3/23/24
The most significant risk is still getting the Bluetooth functionality integrated into each of the three parts of our system. For the door lock, at least, this risk is being managed by researching Bluetooth modules for the Arduino in the case that the Seeed (which has Bluetooth built-in) doesn’t integrate in a reasonable time. For the app, an Android phone has been acquired and set up for app development, so that we can avoid the restrictions placed on app development in iOS.
No changes were made to the existing design or schedule. In the event that the Arduino lock is kept, there will be additional modules in the door lock electronics than previously anticipated.