This week, we just focused on the filming of our video and polishing the project as much as we could. I met with Vedant and Alvin in the lab, and we gathered a lot of footage of the project in action, in addition to collecting logs of all the ROS communications for future processing in simulation. We planned out the length of the video and how we would break down each component of the design. Finally, I recorded my segments at home.
Alvin’s Status Report – 5/8/21
This week, I worked with the team to collect final test metrics and videos for our final presentation and demo video. This involved bringing the drone outside to fly and collecting data on the drone’s pose and the drone’s camera video for testing the motion planner offline and evaluating performance of the target detection.
This upcoming final week, I’ll finish video demonstration results and also record my video component for the demo video.
Team Status Report 5/8/21
This week we all worked on making the final video and poster.
Next week, we will continue to fine tune the video and poster and prepare for presenting on Thursday.
Vedant Status Report 5/8/21
This week I worked with the team to make final video and poster. I also reviewed for the final presentation.
Next week, I plan to refine the video and poster and prepare for the poster session.
Siddesh’s Status Report- 5/1/21
This week, I worked with the team in the final stages of integration. At the start of the week, I helped Alvin with the motion planner. I downloaded the Embotech Forces Pro license and software for the Jetson TX1 and tried to debug issues with the Forces Pro solver not respecting constraints and outputting motion plans with weird quirks (reluctance to move backwards or yaw beyond a certain angle). We tried to simplify the model, or switch to scipy.optimize.minimize, but the simplified models were very inaccurate and the minimize method took upwards of 17.5 seconds to solve a motion plan. Eventually, we decided to switch to the preliminary motion planner I had come up with two weeks ago, where we only changed the x and y position of the drone while keeping yaw and elevation fixed. This seemed to work well in simulation, and more importantly the drone’s motion was relatively stable, easing some of our concerns with safety.
I also worked on dealing with the local position issues with the rest of the team in lab. I collected local position data for a variety of test paths in order to understand how the drone’s position coordinates mapped to real world coordinates. I also helped in the camera calibration to try and debug issues in the conversion from pixel coordinates to real world distances. In the process of dealing with these issues, I helped the team reflash the drone’s flight controller with the Ardupilot firmware in efforts to make the position data more accurate by adding an optical flow camera. However, we eventually encountered issues with the GPS fix in Ardupilot and decided to switch back to Pixhawk.
The rest of the time spent with the team in lab basically involved debugging an assortment of miscellaneous issues arising with the flight controller, such as a loss of binding with the radio transmitter and a refusal to switch to auto mode mid-flight. Eventually, despite the turbulent weather, we got the drone airborne and hovering in place, but decided against running our full motion planning stack due to wild behavior of the drone. Instead, we focused our energies on getting as many metrics as we could from our actual setup (target precision and recall, video FPS, streaming latency), and getting the rest of the metrics from simulation.
Team Status Report- 5/1/21
This week we aimed to complete our integration and be able to run our full stack successfully on the drone. However, several issues presented themselves on our way to trying to complete this goal. Firstly, while we could issue positional commands to the drone in order to move to certain positions, we needed to understand how it’s own internal local position coordinates mapped to real world coordinates. After conducting tests moving the drone across different axes and sending the local position estimates through the Rpi to the TX1, we noticed some startling issues. Firstly, even while stationary, the positional estimates would constantly drift within +/- 3m in the x and y directions. Finally, the initial x, y and z estimates seemed to be completely random. The flight controller is supposed to initialize x, y, z to (0, 0, 0) at the location at which it turned on. However, each of these coordinates seemed to be initialized to anything between -2 and 2 meters.
We tried to combat these inaccuracies by downloading a different firmware for the drone’s flight controller. Our current Pixhawk firmware solely relied on GPS and IMU data to estimate local position. On the other hand, the Ardupilot firmware allowed us to configure an optical flow camera for more accurate local position estimate. The added benefit of this would be without a need for the GPS, we could even test the drone indoors. This was especially important since the weather this week was very rainy, and even when the skies were clear, there was a considerable amount of wind that could have been interfering with the position estimates. Unfortunately, there were many bugs with the Ardupilot firmware, namely that the GPS outputted a 3D fix error when arming despite the fact that we had disabled the requirement for GPS when arming. After troubleshooting this issue, we eventually decided to switch back to the Pixhawk firmware and see if we could fly despite the inaccurate position estimates. In doing so, the radio transmitter for manual override somehow lost binding with the drone’s flight controller, but we managed to address that issue.
In addition to the local position issues, the other major problem we needed to debug this week was our motion planner. The issue was the tradeoff between the speed and accuracy of the motion planner. Using scipy.optimize.minimize methods resulted in very accurate motion planning, but the motion planner would take upwards of 18 seconds to solve for a plan. Reducing the number of iterations and relaxing constraints, we could optimize this down to 3 seconds (with much more inaccurate plans). However, this was still too much of a lag to accurate follow an object. Another approach we took was acquiring a license for Embotech Forces Pro, a cutting edge solver library that is advertised for speed. While Forces Pro would solve for a motion plan in less than 0.15 seconds using the same constraints and optimization function, its results were less than ideal. For some reason, the solver’s results had a reluctance to move backwards and yaw beyond +/- 40 degrees. Eventually, however, we were able to create a reliable motion planner by reducing the complexity of the problem and reverting back to a simple model we made a couple weeks back. This model kept the yaw and elevation of the drone fixed, only changing the x and y position. The results of this motion planning and full tests of our drone in simulation can be found in the “recorded data” folder in our Google Drive folder.
Unfortunately, despite the success in motion planning, and finalizing a working solution in simulation, we were not able to execute the same solution on the actual drone. We tried pressing forward despite the inaccuracies in local position, but noticed some safety concerns. One simple test we used was we manually guided the drone to cruising altitude. Then, we switched off manual control and sent the drone a signal to hold pose. However, rather than holding the pose, the drone would wildly swing around in a circle. This is because due to the local position drifting while the drone was standing still, it would think that it was moving and try to overcompensate to get back. Because of this, we landed the drone out of concern for safety and decided to use simulation data to measure our tracking accuracy. However, in terms of measuring target detection precision and recall, we used data collected from the drone’s camera as we were manually controlling it.
Vedant’s Status Report 5/1/21
This week, I worked with Sid and Alvin on integrating all the systems together and debugging all the issues that came with integration. There were many issues we faced such as losing drone communication with the remote controller and the drone radio, flight commands using code broke down which we had successfully tested before, etc. Debugging and getting necessary data for our requirements was everything that I worked on this week. After taking our aerial shot, I helped code calculating the false positives and false negatives of the object detection code. everything together and debugging issues with drone communications. We faced a lot of strange setbacks this week. In the previous week, we were able to easily control the drone with remote control and even control the drone via code.
For next week, I am swamped with class work and most probably will work a little on trying to debug why the code functions sent for flight are not working.
Alvin’s Status Update – 5/1/21
This week, I worked with Sid and Vedant on integrating everything together and debugging issues with drone communications. We faced a lot of strange setbacks this week. In the previous week, we were able to easily control the drone with remote control and even control the drone via code. This week, both of these features broke down: remote control of the drone suddenly stopped working, and the drone ignored our flight commands through code.
Besides debugging, Sid and I set up a thread-based motion planner to account for slow planning times. Our drone requires motion commands at 2Hz, or one message every 0.5 seconds. Our motion plan originally took upwards of 17 seconds to solve for, and after various tricks with reducing planning horizon and floating precision from 64-bit down to 16-bit, we achieved planning on the order of 0.7 seconds. With our thread-based plan generation, the main planner can stream a previously generated trajectory at the required rate as a separate thread solves for a new trajectory.
Overall, the resulting plans from these flat system dynamics still resulted in somewhat shaky behavior, and we eventually used Sid’s more stable planning over x/y space.
For the upcoming week, I am completely booked with other classes, so we may end up sticking with what we have: all functional systems in simulation, but only manual flight on the physical drone. If we get lucky and the drone accepts our autonomous control, maybe we’ll have a full product.
Siddesh’s Status Report- 4/24/2021
(This status report covers the last two weeks since no reports were due last week).
At the start of two weeks ago, we all met in the lab but were struggling to get the drone flying and our camera image was entirely red tinted. Apparently, the auto white balance on the camera was completely screwed up. I created a main Python function on the Jetson that would automatically receive the images streamed by the Raspberry Pi, run the object detection and display the results on the monitor screen. I modified the main function so we could manually send white balance values to the Raspberry Pi and have it change these values for the camera on the fly so we could adjust the white balance of the photos. Still, the image was extremely desaturated no matter what we tried.
Eventually, we decided to get a new camera (and a Wi-Fi radio we could hook up to the drone to receive error messages while attempting to fly). While waiting, Alvin and I tackled drone motion planning- each one of us using a separate approach. The idea behind drone motion planning is that we already have a target detection algorithm and a target state estimator that can model the future movement of the target. We now need to model the future movement of the drone and create a motion plan such that:
- The target stays close to center of frame.
- The drone doesn’t have to make extreme movements
For my approach, I created a 3D simulator that simulated the target’s motion, the drone’s motion (based on our motion plan) and the drone camera output (based on the camera’s internal matrix). The simulator is pictured here:
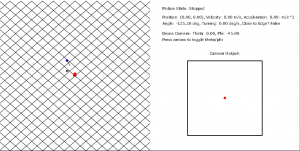
My approach to motion planning was to run optimization on an objective function, trying to minimize the following two quantities:
- The negative dot product between the unit vector of the camera orientation and the unit vector from drone to target. Basically, the higher the dot product, the closer the target is to center. Since this is a minimizer I took the negative dot product.
- A regularization term that aims to minimize the sum of the squared velocities in the drone’s motion plan (basically try and make the drone move as slowly as possible to accomplish our goals)
The relative proportions of these two can be tweaked. In our Google Drive folder, I’ve attached video of when we only try to minimize 1) and when we try to minimize both 1) and 2). The first case has more accurate tracking, but the drone’s movements are jerky and unrealistic. The second case has slightly less accurate tracking, but much smoother and achievable motion.
Finally, we received the new camera and Wi-Fi radio and began to set the groundwork for autonomous flight. First, we met in lab and actually got the drone to fly under manual control. We took test video, and to make things easier, I modified the main functions of the Jetson and the RPi so that the Jetson can send commands to the RPi that can handle events such as starting the camera or stopping the camera. I then modified the RPi’s config files so that the video streaming program would run at boot. This enabled us to easily start our video streaming. As soon as we connected the RPi to the drone’s battery it would start up the program headlessly, and then we could send it commands through the Jetson to start the video streaming.
After getting the drone to fly manually, I helped setup mavros on the RPi so we could connect via serial and finally start sending autonomous commands to the drone. Today, we were finally able to start sending basic autonomous commands to the drone and have it hover to a set position and remain there.
Alvin’s Status Report – 4/24/21
I finished the following this week:
- Set up our new wifi module for the drone and successfully used it to receive telemetry and error messages from the drone.
- Overall get the drone flying with remote control.
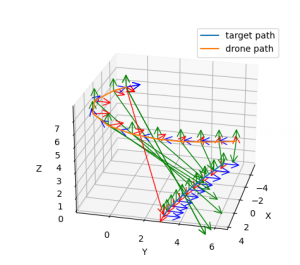
- Implement a first attempt at motion planning that uses MPC to solve for optimal viewpoint (keep target centered in image as target moves) with the drone flying to keep up. A picture of the resulting plan is shown below. The green arrows show the vector from the camera center to the ground. You can see how initially, the drone’s camera is not centered on the target, but over the next 10 steps, the drone executes a maneuver to properly focus on the target.
- Calibrate new camera’s intrinsic parameters
- Successfully send motion commands to drone through code. To do this, I set up UART communication between the drone and the flight controller and adjusted the flight controller’s baud rate to transmit messages fast enough.
- Set up safety protocols for the drone including low battery failsafe and boundaries for where the drone can fly. Currently, if the drone flies out of the boundary, it immediately enters a “Hold” flight mode and immediately stops moving and holds its current position in the air.
TODOs Next week:
- Get motion planning working on the physical drone. This means speeding up the code a lot (the above motion plan took 12 seconds to solve for, which is way too slow. We need to send motion commands at least every 0.5 seconds as a hard restriction by the flight controller).
- Calibrate the full 3D target pose estimation on the real drone. Conduct tests and verify performance