Alvin’s Status Report – 5/8/21

This week, I worked with the team to collect final test metrics and videos for our final presentation and demo video. This involved bringing the drone outside to fly and collecting data on the drone’s pose and the drone’s camera video for testing the motion planner offline and evaluating performance of the target detection.

This upcoming final week, I’ll finish video demonstration results and also record my video component for the demo video.

Alvin’s Status Report – 4/24/21

I finished the following this week:

  • Set up our new wifi module for the drone and successfully used it to receive telemetry and error messages from the drone.
  • Overall get the drone flying with remote control.
  • Implement a first attempt at motion planning that uses MPC to solve for optimal viewpoint (keep target centered in image as target moves) with the drone flying to keep up. A picture of the resulting plan is shown below. The green arrows show the vector from the camera center to the ground. You can see how initially, the drone’s camera is not centered on the target, but over the next 10 steps, the drone executes a maneuver to properly focus on the target.

  • Calibrate new camera’s intrinsic parameters
  • Successfully send motion commands to drone through code. To do this, I set up UART communication between the drone and the flight controller and adjusted the flight controller’s baud rate to transmit messages fast enough.
  • Set up safety protocols for the drone including low battery failsafe and boundaries for where the drone can fly. Currently, if the drone flies out of the boundary, it immediately enters  a “Hold” flight mode and immediately stops moving and holds its current position in the air.

TODOs Next week:

  • Get motion planning working on the physical drone. This means speeding up the code a lot (the above motion plan took 12 seconds to solve for, which is way too slow. We need to send motion commands at least every 0.5 seconds as a hard restriction by the flight controller).
  • Calibrate the full 3D target pose estimation on the real drone. Conduct tests and verify performance

Alvin’s Status Report 4/3/21

This past week, I worked on adapting the flight start up sequence and full pipeline to work with the real physical drone and not just the simulator. This included working with Sid to approximate the true transform from the drone’s frame to the camera frame on our real system using Solidworks.

I also worked on an initial implementation for using Model Predictive Control (MPC) to track the target’s predicted trajectory using existing code from another project. I realized that simply following the target and imposing distance constraints in the numerical solver would not achieve our desired results, since we really want the drone to always be facing the target. This means for every predicted future position of the target, we need to project this backwards to the optimal pose of the drone, since the drone’s camera is fixed. This will be a focus of next week.

Lastly, I worked with Sid to mount all the physical components on the drone. We tried doing a test flight this week, but realized that we had several key steps to finish before and made a list of task assignments to complete with a strict deadline of testing full flight this upcoming Friday. As a result, this task list is our primary objective so we can get the drone flying on Friday.

Alvin’s Status Report- 3/27/21

These past two weeks, I have built a functional launch sequence for the drone and verified its behavior in simulation. This sequence begins with arming the drone and having it takeoff to a set altitude of 3.2 meters (arbitrarily chosen for now)  using high level position commands (send desired position, drone’s flight controller handles orientation). The drone then switches to a lower-level control output of desired roll, pitch, and yaw to allow for more dynamic maneuvers.

In addition, I have spent this last week implementing the transformation from 2D target pixel location to estimated 3D position in the world. This involves a combination of back-projection (transforming 2D pixel location into 3D position with respect to the camera) and intersecting a ray with the ground plane. More details can be found on this document: https://drive.google.com/file/d/1Tc6eirIluif-NBqA5EThOGmiCBtPO4DY/view?usp=sharing

Full results can be seen in this video: https://drive.google.com/file/d/1Tc6eirIluif-NBqA5EThOGmiCBtPO4DY/view?usp=sharing

For next week, now that I have 3D target position, I can work on generating 3D trajectories for the drone to follow so that it keeps the camera fixed on the target as much as possible (our objective function). I will first make a very simple baseline planner and stress-test the system so it is ready for physical testing next week.

Alvin – 3/13/21

Earlier this week, I presented our design review, which was focused on the specifics of implementation and testing that would help us meet our metrics/requirements for a successful project.

On the project implementation side, I focused on connecting the simulator to the drone’s flight controller API, and was able to send motion commands to the drone and watch the results in simulation. This will be useful since any code testing in this simulation can be directly applied onto the physical drone with no change, the only tweak will be the communication port used.

Unfortunately, our old simulator of choice (Airsim) proved incompatible with the flight controller API. I was able to get the simulator and the controller’s Software In the Loop (SITL) framework to communicate  half of the time, but the other half of the time, the simulator would randomly crash with no clear reason. After extensive search through online forums, it was clear that Airsim was still addressing this bug and no solution was available, so I decided to just avoid the trouble and work with a more stable simulator, Gazebo. Shown in the  picture is a colored cube that we will treat as the simulated human target to test the integration of motion planning and target tracking.

Next week, our priority is to begin integration and get the drone up in the air with target tracking. In this case, I will focus on making sure we have a well-tested procedure for arming the drone, letting it takeoff to a height of 20 feet, and implementing a very basic motion plan that will just follow attempt to follow the 2D direction of the target.

Alvin – 2/27/21

Group:

I worked with my teammates to build a proposal presentation as well as Gantt chart to describe our semester schedule and general task division. We also worked together to pick out materials to buy and materials that are already owned.

Personal:

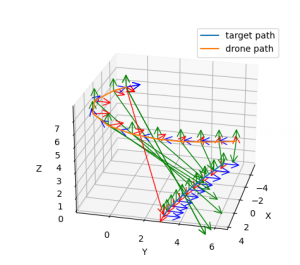
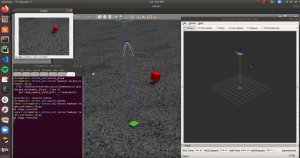
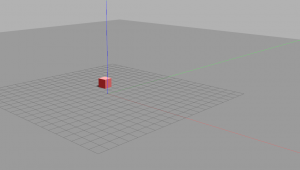
On my own specific task, I finished setting up the AirSim quadrotor simulator and familiarized with the API. The API provides both C++ and Python interface, but I will stick with Python since Computer Vision and various trajectory optimization packages use Python. I chose Airsim because it runs accurate nonlinear dynamics under the hood. Airsim can also simulate windy weather, which is important in testing the robustness of our motion planning and controls. Airsim most importantly interfaces with the Px4 Flight Controller API, which is exactly what is running on our real drone. This means that all my motion planning and controls can be tested and developed in simulation, and should run smoothly on the drone without any modification.

Next, I verified that one of our wifi modules functions properly by connecting it to a Raspberry Pi and accessing the internet. I then also double-checked that wifi can support communication between the ground compute and the drone through ROS . I set up my laptop as the “Master” that maintains ROS’s Publisher-Subscriber system, and the Raspberry Pi as one node. Because both devices were connected to my house’s wifi, as long as the nodes have access to the Master’s local IP address, they can communicate seamlessly. To demonstrate functionality, I had the Raspberry Pi publish a “Hello World” string and verified that the laptop could receive these messages over the network. This was just a proof-of-concept, and Sid will be handling the specifics of the code and software for the communications as well as compare bandwidth with other platforms.

Next Steps:

Overall, our team and my individual progress is on schedule. I’ve already shipped the drone from my house and will receive within the next few days, so the others can begin prototyping hardware on the drone. Since I can do all my testing on Airsim initially, this upcoming week, I will begin building our software pipeline for motion planning by assuming that I am given some predicted future trajectory of 3D positions of the human target. I will develop an initial implementation of trajectory generation and verify this works in simulation. In the meantime, we will prepare for our design presentation.

Alvin’s Status – 02/20/21

I helped contribute to project idea discussions and abstracts for each of our ideas. I helped brainstorm which goals on the robotics/AI side would be feasible for an MVP and which would be high risk but high reward. I also helped build the presentation slide deck. Next week, I will begin looking at open source drone simulators and revisit previously written code for drone trajectory optimization. I’ll work with the team to decide what components to purchase.