Jeremy’s Status Update for 03/07/2020

This week I assisted Chakara for the mechanical components of the rotating platform. I helped pick up components of our platform setup and test that they work. Chakara has included a table of the list of parts for his status report so I will avoid repeating that information here. I tested the laser strip diode and it seemed to work with an input voltage between 3 to 5 volts. The laser strip seems to be a bit wider at closer ranges so we will have to put the laser at a good enough distance for the strip to still be bright but not to be so wide as to mess up our laser detection algorithm. The camera also seems to be of a good resolution when we tested it with Facetime on Chakara’s Macbook, and should be good enough for our project. If not, we have a bit under $200 for getting a better camera or laser if needed.


For the mechanical subsystem of our device (see the design report), we will require significant physical pieces to build both the frame, motor components, and holders of the camera and laser line. This week we have gotten access to a bin to store our physical components as we work on them (bin #17). We have also attended the Tech Spark session to prepare us for laser cutting (for a sheet gear) and 3D printing (for the axis gear). If we find that these gears wear down over usage, we may need to allocate an additional part of our remaining budget to buy metal gears.


I also looked into the gear components and will be looking to create the files necessary to laser cut our acrylic piece as well as create the gear piece to fit onto the stepper motor. Throughout spring break, I will be out of town and will not work extensively on the project, as planned in the Gantt chart. However, I will still aim to create the files for the gear piece and the acrylic. I will also start to assemble our testing database by finding free 3D models online that fit our requirements. After break, I will start writing code for the triangulation step as well as ICP and pairwise registration as described in our design report and presentation.

Alex’s Status Update for 03/07/2020

This week our group was responsible for ordering components and setting up our work environment so we could begin implementation as soon as Spring Break ends. I was responsible for identifying that we were missing a couple required items in our order form, such as the microsd card, sd card writer, and power supply for our embedded system. We also considered availability of components that do not need to be ordered, such as wires and soldering irons to connect GPIO pins with the motor driver and to hook up the motor driver to the stepper motor. We will also require power for the stepper motor, which requires a 5V variable amp supply to the driver, which we need to figure out (the Jetson also takes 5V at ~2A, but this signal is rectified from a 120V AC wall signal). The last thing we want to do is burn our driver board, since it is not cheap and we would need to wait for additional delivery time and would lose an additional chunk of our budget. Because of this, we will prototype analogue circuits on a mini-breadboard (provided from the lab) with a potentiometer to ensure we meet the voltage and current requirements of the motor driver.


I have had a very busy week before mid semester break as many courses (including the one I am TAing) are rushing to gather grades for the mid-term report. I have also departed on a 10 day vacation starting Thursday morning to Europe (Norway), and will return on Tuesday the week after Spring Break, meaning I will be missing another mandatory lab session. Luckily, we have factored in Spring Break and additional margins for slack to account for this busy time of the year, and thus we are prepared to get back on top of this project after the break.


This week I have also been considering implementing the testing routines, so that by the time our prototype software has been completed we can get a sense of its accuracy and timing efficiency. Instead of this however, we first need to determine our intermediate data formats, such as what the partial point clouds look like before merging multiple scans or during a single scan. To provide unit testing on each software component in the pipeline, these formats must be determined so that our testing and benchmarking software understands how to interpret our results. Because of this, instead of writing the testing code first, I began planning the prototype implementation software first, to allow also Jeremy enough time to find ground-truth models for accuracy analysis.


When writing test prototype code, the only parts that matter to us are:

  1. Accuracy meeting our project requirements
  2. Ease of coding and simplicity

The second requirement of the prototype code is not important to the final implementation of our project, but it is important to the prototype development. This is because we do not want to waste all of our remaining resources writing code that will not be used in the final project.


To meet the accuracy goal, we will test our prototypes extensively. These same tests can be reused for our final GPGPU implementation, so we do not need to re-implement testing infrastructure. This also makes sense since the prototype implementation should be a “complete” implementation that does not fully meet our timing requirement. If we have trouble implementing the accuracy goal for a stage of the prototype, we may choose to implement the section directly as our final GPGPU optimized software.


For ease of coding, Python is unparalleled in both our team’s knowledge of it, and the amount of computation that can be expressed in small amounts of syntax. Because of this, we will choose to use Python libraries to implement the prototypes. We will also use popular Python libraries for the prototypes, since we do not want to get stuck on issues that cannot be resolved. The library we use must be open-source (to avoid licensing complications and fees), have good documentation (for ease of development), and have an active support community (for ease of debugging).


Because of these, and prior experience, we will be using the following Python libraries to implement our prototype pipeline:

  1. Numpy for representation and transformation of matrices
  2. Scipy for solving optimization problems on Numpy arrays
  3. OpenCV for image filters, point-in-image detection, and other calibration procedures


These three technologies cover our entire use-case. Once our prototype pipeline is completely implemented, we can use the Python library Numba to auto-generate GPGPU code from our pipeline. If this code is sufficient, we do not need to implement C++ by hand for the GPU. If sufficient optimizations cannot be found, then we will need to implement some sections by hand to meet our timing requirements.


As a summary, my next steps:

  1. Write a “formal” specification identifying how intermediate data structures are organized throughout each stage of the pipeline.
  2. Write calibration routines using Numpy and OpenCV to do intrinsic/extrinsic camera calibration using the CALTag checkerboard pattern on the rotational platform.
  3. Write global calibration parameter optimizationusing Scipy
  4. Write laser-line detection using OpenCV
  5. Write laser plane calibration using Numpy and OpenCV
  6. Write 3D scanning procedure, interfacing with the motor controller and camera in real-time. This procedure will use ray-plane intersection with Numpy. Once this is complete, we will not only have unit tests for each section, but we can do a complete integration test on a single scan (after mesh triangulation done by Jeremy)
  7. Write the integration testing code for accuracy. Unit testing procedures will have already been implemented during development for each of the above sections of the algorithm.

Chakara’s Status Update for 03/07/2020

This week I mainly was responsible for picking up different project components and making sure they work as they are supposed to. Below is a summary table of the components that arrived and have been tested. For most mechanical components, we just tested whether or not they are fragile, rotate as they are supposed to, etc. The laser is shown to have enough intensity and the camera capture quality is great. The laser is also class 3A, but as suggested by Professor Tamal, I still contacted CMU to make sure that we don’t need additional training or safety requirements or the laser (which we do not).


Ordered Arrived Tested Item
Yes Yes Nema 23 Stepper Motor
Yes Yes Yes 15 Inch Wooden Circle by Woodpeckers
Yes Yes Yes Swivel Turntable Lazy Susan Heavy Duty Aluminium Alloy Rotating Bearing Turntable Round Dining Table Smooth Swivel Plate for Kaleidoscopes Tabletop Serving Trade Show Displays(10 inch)
Yes Yes Yes Source One LLC 1/8 th Inch Thick 12 x 12 Inches Acrylic Plexiglass Sheet, Clear
Shaft’s Gear
Yes Yes STEPPERONLINE CNC Stepper Motor Driver 1.0-4.2A 20-50VDC 1/128 Micro-step Resolutions for Nema 17 and 23 Stepper Motor
Yes Yes Yes Lazy Dog Warehouse Neoprene Sponge Foam Rubber Sheet Rolls 15in x 60in (1/8in Thick)
Yes Yes ~ Adafruit Line Laser Diode (1057)
Yes Yes Yes Webcamera usb 8MP 5-50mm Varifocal Lens USB Camera Sony IMX179 Sensor,Webcam Support 3264X2448@15fps,UVC Compliant Webcamera Support Most OS,Focus Adjustable USB with Cameras,High Speed USB2.0 Webcams
Yes Nvidia Jetson Nano Developer Kit
Yes Yes Yes 256GB EVO Select Memory Card and Sabrent SuperSpeed 2-Slot USB 3.0 Flash Memory Card Reader


The main part that I tried to test were the motor and the driver board, but I didn’t want to potentially burn them, so I decided to wait until our Jetson arrives or when we borrow an Arduino with a potential mini breadboard and potentiometer (to make sure that the current going to the driver and motor are as specified by their specs). 


On top of this, I did more research on how to connect the motor and driver together and read more articles which use Jetson to control a stepper motor (although different models and drivers). I also talked to TechSparks about the use of their space. I would have to 3D print a gear on the shaft of the motor and all we need to do is create an STL file and estimate how many grams of 3D-printed material we would need. For the laser cutting part, I am not trained. However, I reached out to a friend outside of this class who is trained for laser-cutting and he agreed to help cut out our acrylic sheet to create our internal gear. 


I am currently on schedule. Luckily the parts arrived earlier than we expected even though our team ordered them a few days later than what we planned to. 


For next week, I would mostly be outside of the US for spring break. I would probably not be working on this project until I come back. When I come back, I hope to test out the motor and driver and start assembling the platform together so that Jeremy and Alex can see how the rotational mechanism affects the data capturing and see what adjustments we would have to make. 

Jeremy’s Status Update for 2/29/2020

This week I helped work on the design review presentation and design document. I also did a good amount of research into different methods to get their tradeoffs that we discussed in the design review presentation. I helped create a 3D render of what our project would approximately look like and also helped construct the block diagrams and other visuals for the presentation. I did some research into PCL and its tradeoffs, as well as some metrics we could use for the metrics and validation slide. I mainly helped with the overall design review presentation such as coming up with risk factors and unknowns, fixing different visuals and the Gantt chart, etc. The main time sink was just doing a heavy amount of research into considering different scanning methods and sensors, since we settled on using a laser projection with a camera as our sensor and needed some metrics and data to justify this choice, which took a fair bit of effort to find good papers on since most scanning approaches just use digital cameras or depth cameras. This approach will definitely be more challenging than just using a packaged depth camera like the Intel RealSense SR305, but it may be able to provide higher accuracy, since a lot of depth cameras don’t give very specific accuracy numbers. 

I did some research into noise reduction and outlier removal as well this week. Point clouds obtained from 3D scanners with any methods, including laser projection, would regularly be contaminated with lots of noise and outliers. The first step for dealing with raw point cloud data obtained after conversion from laser projection to depth would be to discard outlier samples and denoise the data. Alex mentions removing points in the background and in the foreground on the turntable; this step would come after that where the point cloud is already created. There have been decades of research in denoising point cloud data, which include methods categorized as projecting points to estimated local surfaces, classifying points as outliers with statistical methods, coalescing patches of points with nonlocal means, or local smoothing using other input information, and so on. There are generally three types of outliers: sparse, isolated, and nonisolated. Sparse outliers have low local point density that are obvious erroneous measurements i.e. points that float outside of the rest of the data. Isolated outliers have high local point density but are separated from the rest of the point cloud, i.e. outlier clumps. Nonisolated outliers are the most tricky – they are outliers that are very close to the main point cloud and cannot be easily separated, akin to noise. To remove sparse and isolated outliers, we can use a method that looks at average distance to k-nearest neighbors, then removes that point based on a threshold defined in practice. Let the average distance of point p_i be defined as:

d_i = 1/k * sum(j=1 to k) dist(p_i, q_j)

where q_j is the jth nearest neighbor to point p_i. Then, the local density function of p_i is defined as follows: 

LD(p_i) = 1/k * sum(q_j in kNN(p_i)) exp(-dist(p_i, q_j) / d_i)

with d_i defined earlier. Now we can define the probability that a point belongs to an outlier: 

P_outlier (p_i) = 1 – LD(p_i)

We can then take this probability and if it is above a certain threshold (one paper I read uses P_outlier (p_i) > 0.1 * d_i as their threshold in practice which is dynamic based on d_i), then that point will be removed from the point cloud data (PCD). 

I am certain that the PCL (point cloud library) will have a wide range of functions available for noise reduction and outlier removal but this methodology seems easily implementable and robust. I can implement our own outlier removal method and compare with some open source options available as well looking at the results qualitatively to see how well it removes outlier points from the raw point cloud. I will also need to make sure that I tune the threshold for removing outliers, since archaeological objects tend to have more jagged edges and be more abrupt in shape, so we definitely don’t want to over-smooth the object and lose too much accuracy in the data; the goal should be to increase our accuracy to the ground truth model rather than trying to over-smooth to make something that “looks nicer”. 

My progress is mostly on track, but I will be aiming to start finding and constructing our validation database (my main task from the Gantt chart) and potentially 3D printing some of the ground truth models out, and also start writing and testing the code for filtering the sensor data such as noise reduction and outlier removal, experimenting with the PCL library. I will also look into triangulation using the PCL library as it is too complex and unnecessary for us to implement triangulation ourselves in the scope of the project.

Team Status Update for 2/29/2020

This week, our team mainly worked together on preparing for the Design Presentation and writing the Design Document. 

Currently, the most significant risk that could jeopardize the success of the project is that we ordered our project components later than we planned to. This means that the parts would come later than expected and we would have less time to assemble all the parts together and test the components we ordered. This is a risk factor because we need to make sure that the Line Laser Diode we ordered has enough light intensity and our camera can capture that for our algorithm to work. If not, we would need to order a different laser. Another consequence here is that we are uncertain of the step driver and NVIDIA Jetson integration, so getting the component later means we get to test them together even later. We are managing these risks by adjusting our schedule. We moved up other tasks that could be worked on without the project components such as finding ground-truth, writing code to filter and triangulate point cloud data, and writing testing benchmarks to work on while we are waiting for the project components. 

There were no major changes made to the existing design of the system this week (we will be running with the design that comprises of a laser line projection combined with a camera to scan the object using a rotating platform).

This is the link to our updated schedule: https://docs.google.com/spreadsheets/d/1GGzn30sgRvBdlpad1TIZRK-Fq__RTBgIKN7kDVB3IlI/edit?usp=sharing

Alex’s Status Update for 2/29/2020

This week I have been practicing for the design review presentation, as well as working on the design review document. While we have figured out all of the components of our design prior to this week (the laser, the camera, and the algorithms to compute point clouds), many details needed to be ironed out.

Specifically, I worked out some of the math for the calibration procedures which must be done prior to scanning. First of all, intrinsic camera calibration must be done, which resolves constants related to the cameras lens and polynomial distortion that may have. This calibration helps us convert between pixel space and camera space. Secondly, extrinsic camera calibration must be done, which solves a system of linear equations to find the translation and rotation matrices for the transformation between camera space and world space. This system is made non-singular by having sufficiently many known mappings between camera space and world space (specific identifiable points on the turntable). Thirdly, the axis of rotation for the turntable must be computed in a similar manner to the extrinsic camera parameters. Finally, the plane of the laser line in world space must be computed, which requires the same techniques used in the other calibration steps, but since the laser line is not directly on the turntable, an additional known calibration object must be placed on the turntable.

The method for transformation between pixel space and world space is given by the following equation:

λu=K(Rp+T)

Where K and λ are computed during intrinsic camera calibration, and R and T are computed during extrinsic camera calibration. We can then map the pixel where the center of the turntable is to a point in world space, q, with a fixed z=0, and a rotational direction of +z (relative to the camera perspective).

To calibrate the plane of the laser line, we first need image laser detection. We will compute this by first applying two filters to the image:

  1. A filter that intensifies pixels with color similar to the laser’s light frequency
  2. A horizontal gaussian filter

Then, for each row, we find the center of the gaussian distribution and that is the horizontal position of the laser line. If no intensity above a threshold is found, then that row does not contain the laser. Note that this solution prevents detection of multiple laser points within a single row, but this case will only occur with high surface curvature and can be resolved by our single-object multiple-scan procedure.

Laser plane calibration then happens by having a flat object on the turntable to allow for image laser detection. This allows us to find a set of points which are on the plane, which we can use to then solve a linear equation to compute the A, B, C, and D parameters of the plane of the laser line in world space. There is a slight caveat here. Since the laser itself is not changing angle or position, the points we capture do not identify a single plane, but rather a pencil of planes. To accommodate this, we will rotate the known calibration object (a checkerboard) to provide a set of non-collinear points. These points will allow us to solve the linear equation.

Calibration parameters will be solved for in the least-squared error sense, to match our recorded points. Global optimization will then be applied to all the parameters to reduce reconstruction error. Our implementation of optimization will probably consist of linear regression.

Once calibration is done, to generate 3D point cloud data we simply perform ray-plane intersection between the ray originating at the world space of the pixel with the laser line away from the camera position towards the laser plane in world space. This point is in world space coordinates, so it must be un-rotated around the rotational axis to get the corresponding point in object space. All such points are computed and aggregated together to form a point cloud. Multiple point clouds can then be combined using pairwise registration, which we will implement using the Iterative Closest Points (ICP) algorithm.

The ICP algorithm aims to compute the transformation between two point clouds by finding matching points between the point clouds. It is an iterative process that may converge on local minima, so it is important that multiple scans are not sufficiently far from each other in terms of angles.

Background points during 3D scanning can be removed if they fall under an intensity threshold in the laser-filtered image, and unrelated foreground points (such as points on the turntable) can be removed by filtering out points with a z coordinate of close to or less than 0.

Since we will not be getting our parts for a while, our next steps are to find ground truth models with which to test, and begin writing our verification code to test similarity between our mesh and the ground-truth. To avoid risk related to project schedule timing (and the lack of significant remaining time), I will be writing the initial prototyping code next week so that once the parts arrive we can begin early testing.

Chakara’s Status Update for 2/29/2020

This week, I was mainly working on the Design Review. I was responsible for the main platform design and rotational mechanism. On top of working in parallel with other team members on the Design Review Presentation and Design Document, I was mainly responsible for ordering project components. From the Design Review Presentation, we did a tradeoff analysis and ended up with different project components that we need. From that, I started doing research on different suppliers and models of the components we need to get the most cost-efficient ones while getting the most appropriate shipping time. Below is a table of the project components we ordered this week.


Ordered Item Quantity Unit Price Total Price Shipping Cost Total Cost Description Expected Shipping
Yes Nema 23 Stepper Motor 1 $23.99 $23.99 $0.00 $23.99 2 Days
Yes 15 Inch Wooden Circle  1 $14.99 $14.99 $0.00 $14.99 Plywood for platform 2 Days
Yes Lazy Susan Bearing 1 $27.19 $27.19 $0.00 $27.19 2 Days
Yes Acrylic Plexiglass Sheet, Clear 1 $9.98 $9.98 $0.00 $9.98 Laser cutting for Internal Gear 2 Days
Yes STEPPERONLINE CNC Stepper Motor Driver  1 $38.99 $38.99 $0.00 $38.99 Motor Step Driver 2 Days
Yes Neoprene Sponge Foam Rubber Sheet  1 $14.80 $14.80 $0.00 $14.80 High-friction surface 2 Days
Yes Adafruit Line Laser Diode (1057) 1 $8.95 $8.95 $8.99 $17.94 Projected Laser Stripe 2 Days
Yes Webcamera usb 8MP 5-50mm Varifocal Lens  1 $76.00 $76.00 $0.00 $76.00 2 Days
Yes Nvidia Jetson Nano Developer Kit 1 $99.00 $99.00 $18.00 $117.00 3-5 Days
Yes 256GB EVO Select Memory Card  1 $42.96 $42.96 $0.00 $42.96 MicroSD card for Jetson with Reader Bundle 2 Days
Yes MicroUSB Cable (1995) 1 $9.00 $9.00 $8.99 $17.99 MicroUSB cable for Jetson 2 Days

I did not include the sources and full names of the components in the table above. For full details, please visit https://docs.google.com/spreadsheets/d/1AP4Le1eVNL51T8ovUJb9YF-H2u47EvRG4AHWqp7ULIM/edit?usp=sharing

This comes up to a total price of $401.83 including shipping. (This is the maximum cost. If we are able to order both items from DigiKey together then it would be $392.84 instead). This gives us at least $198.17 left in case we need other parts. We will still need to order wood for support of the platform later and some of the budget could be used if the laser we ordered doesn’t have the light intensity we need. 

I’m still a little behind schedule since I ordered the parts later than what our team planned for. Our team compensated for this by moving up other tasks that could be done without the parts up the schedule. We’ll be working on those tasks while waiting for the parts to come. 

As my work is mainly related to the project parts we ordered, for next week, I hope to get the parts by Thursday and started performing basic testing on them before leaving for Spring Break. While waiting for the parts during the beginning of the week, I also hope to help Alex write some testing benchmarks. 

Team Status Update for 2/22/2020

With our updated requirements (an effective Engineering Change Order (ECO) made by our group in a manner parallel to that of the manner by which P6 perhaps accomplished the same goals, with plenty of paper work and cross-team collaboration required), we began the week ready to once and for all tackle the issue that has plagued us for the last two weeks: choosing a specific sensor. From the quantitative results we require for our device to produce, we worked forward in a constructive logical manner to determine which components would be required. Our final project requirements are below:

Requirements

  • Accuracy
        • 90% of non-occluded points must be within 2% of the longest axis of the object to the ground truth model points.
        • 100% of non-occluded points must be within 5% of the longest axis of the object to the ground truth model points.
  • Portability
        • Weighs less than 7kg (weight limit of carry-on baggage)
  • Usability
        • Input object size is 5cm to 30cm along longest axis
          • Weight Limit: using baked clay as example – 0.002kg/cm^3 * (25^3 – 23^3) = 6.91 kg
          • average pottery pot thickness is 0.6-0.9cm – round to 1cm
          • for plastic the weight limit is 4.3kg
          • Our weight limit will be 7kg – round up of the baked clay
        • Output Format
        • All-in-one Device
          • No complex setup needed
  • Time Efficiency
        • Less than one minute (time to reset the device to scan a new object)
  • Affordability
      • Costs less than $600

Note that the only requirement significantly changed has been that of accuracy. The use case of our device is to be able to capture the 3D geometric data of arbitrary small-scale archeological objects reasonably quickly. We envision groups of gloved explorers with sacks of ancient goodies, wanting to be able to document all of their research in a database of 3D-printable and mixed-reality applicable triangular meshes. To perform scans, they will insert an object into the device, press the scan button, and wait a bit before continuing to the next object. They should not need to be tech experts, nor should they need to already have powerful computers or networks to assist with the computation required. In addition to this, the resulting models should be seen by these archeologists as true to the real thing, so we have adjusted our static accuracy model with a dynamic one, whose accuracy is based on the dimensions of the object to be scanned. We have chosen the 2% accuracy requirement for 90% of points by considering qualitative observational results that may be seen when comparing original objects to their reconstructed meshes. Since archeologists do not have a formal standard by which to assess the correctness of 3D models created for their objects, we took this freedom to use our intuition. 2% of a 5cm object is 1mm, and 2% of a 30cm object is 6mm, both of which seem reasonable to us given what those differences mean for objects of those respective sizes.

We have made an effort this week using these requirements to perform geometric calculations to compute the spatial frequency of our data collection, and in turn the number of points of data that must be collected. From this, we have narrowed down the requirements of our sensor, and began eliminating possibilities. Finally, from those possibilities that remained, our team has chosen a specific sensor to start with: a dual stripe-based depth sensor utilizing a CCD camera. In order to mitigate risk potentially imposed by errors of the sensor, our fallback plan is to add an additional sensor to act as an aid in correcting systematic errors, such as a commercial depth sensor. Since the sensor only costs under $20 + $20 + ~$80 = ~$100 (depending on our choice of camera, it may be more expensive), much less than our project budget, we will be able to add an error-correcting sensor should the need arise for our project.

From the behavior of this sensor, which is a laser triangulation depth sensor, we have derived the various other components of our design, including algorithmic specifications, as well as mechanical components required to capture the intended data (whose specifications have been computed during choosing of the sensor). We have chosen a specific computational device for our project, as well as most of the technologies that will be used. All of these details are covered in our respective status updates (Alex for data specifications and sensor elimination, Jeremy for determining algorithms and technology for computation, Chakara for designing and diagramming mechanical components). The board we have chosen is the NVIDIA Jetson Nano Developer Kit ($90), an on-the-edge computing device with a capable, programmable GPGPU. We will utilize our knowledge of parallel computer architectures to be able to implement the algorithmic components on the GPU with the CUDA library, in an effort to surpass our speed requirement. We will implement initial software utilizing software such as Python and Matlab, then transition into our optimized C++ GPU code to meet the timing requirements as the need arises.

Since we are behind in choosing our sensor and thus ordering components for our project, we have been designing all of the other components in parallel. Regardless of the specific sensor chosen, the mechanical components and the algorithmic pipeline would be similar, albeit with slightly different specifications. This parallel work has allowed us to have a completed design at the time we have chosen the specific sensor. However, much of our algorithmic work was based on camera-based approaches, and since we are utilizing a laser depth sensor, we will not need to perform the first few stages of the pipeline we proposed last week. We still need some additional time to flesh out our approach to translate between camera space coordinates and world space coordinates, as well as algorithms for calibration and error correction based on two lasers. Because of this additional time we are extending the algorithm research portion of our Gantt chart.

The main risk we have right now is that since we are designing our own sensors, it is possible that our sensors might not meet our accuracy requirements. Thus, we might need to have a noise reduction algorithm or might potentially have to buy a second sensor to supplement our sensors. 

Our design changed a little by using a laser instead of a depth-camera. This changes our pipeline a little but doesn’t affect the mechanical design and overall algorithm. 

Below is the link to our updated schedule. 

https://docs.google.com/spreadsheets/d/1GGzn30sgRvBdlpad1TIZRK-Fq__RTBgIKN7kDVB3IlI/edit?usp=sharing

Jeremy’s Status Update for 2/22/2020

This week I focused on some of the data pre-processing methods we will use for our algorithm. Note that the things mentioned in the first two paragraphs in this report may not be used for our current method which involves projecting a laser strip. I first looked at the geometry for converting between the data returned from a depth camera to cartesian coordinates. This involved doing some rudimentary trigonometry to get these calculations. The depth camera should return the z-distance to each pixel, but I also accounted for the case where the Intel SR305 camera would return distance from the center of the camera to the pixel instead. We will be able to see which one it is when we actually get the camera and test it on a flat surface like a flat cube. The math computed is as follows:

As mentioned in the previous status update, we were considering using an ICP (Iterative Closest Point) algorithm to combine different scans for the depth camera method and also accurately determine the angle between scans. The ICP algorithm determines the transformation between two point clouds from different angles of the object by using least squares to match duplicate points – these point clouds would be constructed by mapping the scanned pixel and depth to their corresponding 3D cartesian coordinates as shown from the math above. Similar to gradient descent, ICP works best when starting at a good starting point to avoid being stuck at local minima and also save computation time. One potential issue with ICP is that shapes like spheres or upright cylinders would have uniform point clouds across any angle – a good method to help with this risk factor is to start the ICP algorithm using the rotational data from the stepper motor, an area that Chakara has researched on this week. Essentially, we will have the rotational data from the stepper motor and then use ICP to determine the rotational difference more precisely between the two scans, then find duplicate points and combine the two point clouds this way. 

I also looked into constructing a mesh from a point cloud. The point cloud would likely be stored in a PCD (Point Cloud Data) file format. PCD files provide more flexibility and speed than other formats like STL/OBJ/PLY, and we can use the PCL (Point Cloud Library) in C++ to process this point cloud format as fast as possible. The PCL library provides many useful functions such as estimating normals and performing triangulation (constructing a triangle mesh from XYZ points and normals). Since our data will just be a list of XYZ coordinates, we can easily convert this to the PCD format to be used with the PCL library. The triangulation algorithm works by maintaining a fringe list of points from which the mesh can be grown and slowly extending the mesh out until it covers all the points. There are many tunable parameters such as size of the neighborhood for searching points to connect, maximum edge length of the triangles, as well as maximum allowed difference between normals to connect that point, which helps deal with sharp edges and outlier points. The flow of the triangulation algorithm involves estimating the normals, combining that data with the XYZ point data, initializing the search tree and other objects, then using PCL’s reconstruction method to obtain the triangle mesh object. The algorithm will output a PolygonMesh object which can be saved as an OBJ file using PCL, which is a common format for 3d printing (and tends to perform better than STL format). There will probably be many optimization opportunities or bugs/issues to be fixed with this design as it is just a basic design based on what is available in the PCL library. 

I also looked a bit into noise reduction and outlier removal for filtering the raw point cloud data. There are many papers that discuss approaches and some even use neural nets to get probability that a point is an outlier and remove it in that sense. This would require further research and trying out different methods as I don’t completely understand what the different papers are talking about just yet. There are also libraries that have their own noise reduction functions, such as the PCL library among a few others, but it is definitely better to do more research and write our own noise reduction/outlier removal algorithm for better efficiency, unless the PCL library function is already optimized for the PCD data format.

We discussed using a projected laser strip and a CCD camera to detect how this laser strip warps around the object to determine depth and generate a point cloud, so our updated pipeline is shown below.

By next week, I will be looking to completely understand the laser strip projection approach, as well as dive much deeper into noise reduction and outlier removal methods. I may also look into experimenting with triangulation from point clouds and playing around with the PCL library. My main focus will be on noise reduction/outlier removal since that is independent of our scanning sensors – it just takes in a point cloud generated from sensor data and does a bunch of computations and transformations.


Chakara’s Status Update for 2/22/2020

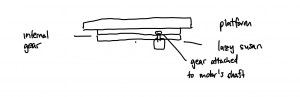
This week, on top of working in parallel with other team members to finalize our sensor, I was mainly responsible for the rotational mechanism and platform design. The individual work I did this week can be broken down into 3 main tasks. First is to design the overall design of the rotating platform. The platform would be mainly composed of the motor, a gear, a lazy susan bearing to reduce friction, a platform, a high-friction surface, an internal gear, and a support. The high-friction surface here is to simply help reduce the chance of the object slipping off-center while the platform is rotating. The support here is to give the platform itself enough height so that the motor can be put under. The motor with a gear attached to the shaft will be inside the platform. The lazy susan will be the base, and the internal gear will be attached on top of the lazy susan bearing, and the platform will be attached on the internal gear. The gear on the motor’s shaft will be connected to the internal gear, and when the motor rotates, the platform will rotate with it. Below is a rough diagram of the design. 

For the high-friction surface, I have done some research and reduced the materials down to Polyurethane foam, Isoprene rubber, Butadiene rubber, and Nitrile rubber which our team still has to analyze them together to see which one would fit our requirement best. 


After deciding on the rough design, I started choosing material that would work best for the platform itself. The platform will be a circular disc with a diameter of 35cm. I then did some rough estimation to compute the stress that the platform needs to be able to handle. From our maximum input object’s mass of 7kg, the maximum gravitational force that it can exert on the platform is around 68.67N. The lazy susan bearing our team might end up using has an inner diameter of around 19.5cm (or 0.0975 m radius). This would give us an area of around 0.03m2 that would not have any support. I simplified the stress analysis of this design down but it should still give a good estimation of the stress the object would apply, which is around 2300Nm. 


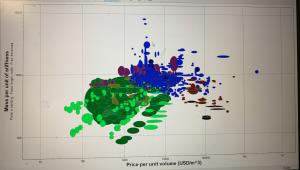
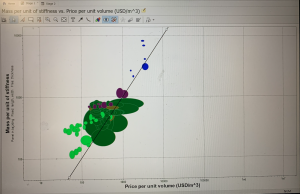
After that, I did more research on the material that would be able to handle this much stress, be cost-efficient and easily accessible, and easy to use (cut, coat, etc). I consulted with a friend in the Material Science program and we did some optimization based on cost and mass-to-stiffness ratio to narrow down the number of materials I had to do research on. Below is an image of the optimization graph. Note that we only looked into plastic and natural materials as they are easier to use and more easily accessible. The line in the second image is the optimization line. 


After that, I narrowed it down more to 3 materials: plywood, epoxy/hs carbon fiber, and balsa. The table belows shows the tradeoffs between different main properties that would affect our decision. Young’s modulus, specific stiffness, and yield strength are mainly to see if the material would be able to handle the amount of stress the object would exert on it or not. The price per unit volume is to keep this within our project’s contraint. The density is used to compute the mass of the platform (for computing the torque required and to stay within our Portability requirement).


Material Young’s Modulus (GPa) Specific Stiffness (MN.m/kg) Yield Strength (MPa) Density (kg/m3) Price per Unit Volume (USD/m3)
Plywood 3-4.5 3.98-6.06 8.1-9.9 700-800 385-488
Carbon Fiber 58-64 38.2-42.4 533-774 1490-1540 26200-31400
Balsa 0.23-0.28 0.817-1.09 0.8-1.5 240-300 1610-3230


From here, we can see that carbon fiber is the strongest but is very heavy and expensive and might not suit our project well. Balsa is very light but is not as strong (even if the values here are still higher than the stress I computed, it might be because of the simplified stress analysis I did). Thus, our group decides to use plywood which is strong, inexpensive, easy-to-cut, and not too heavy. With plywood, the maximum mass our of platform would just be around 0.6kg (computed using density and dimensions of the platform).


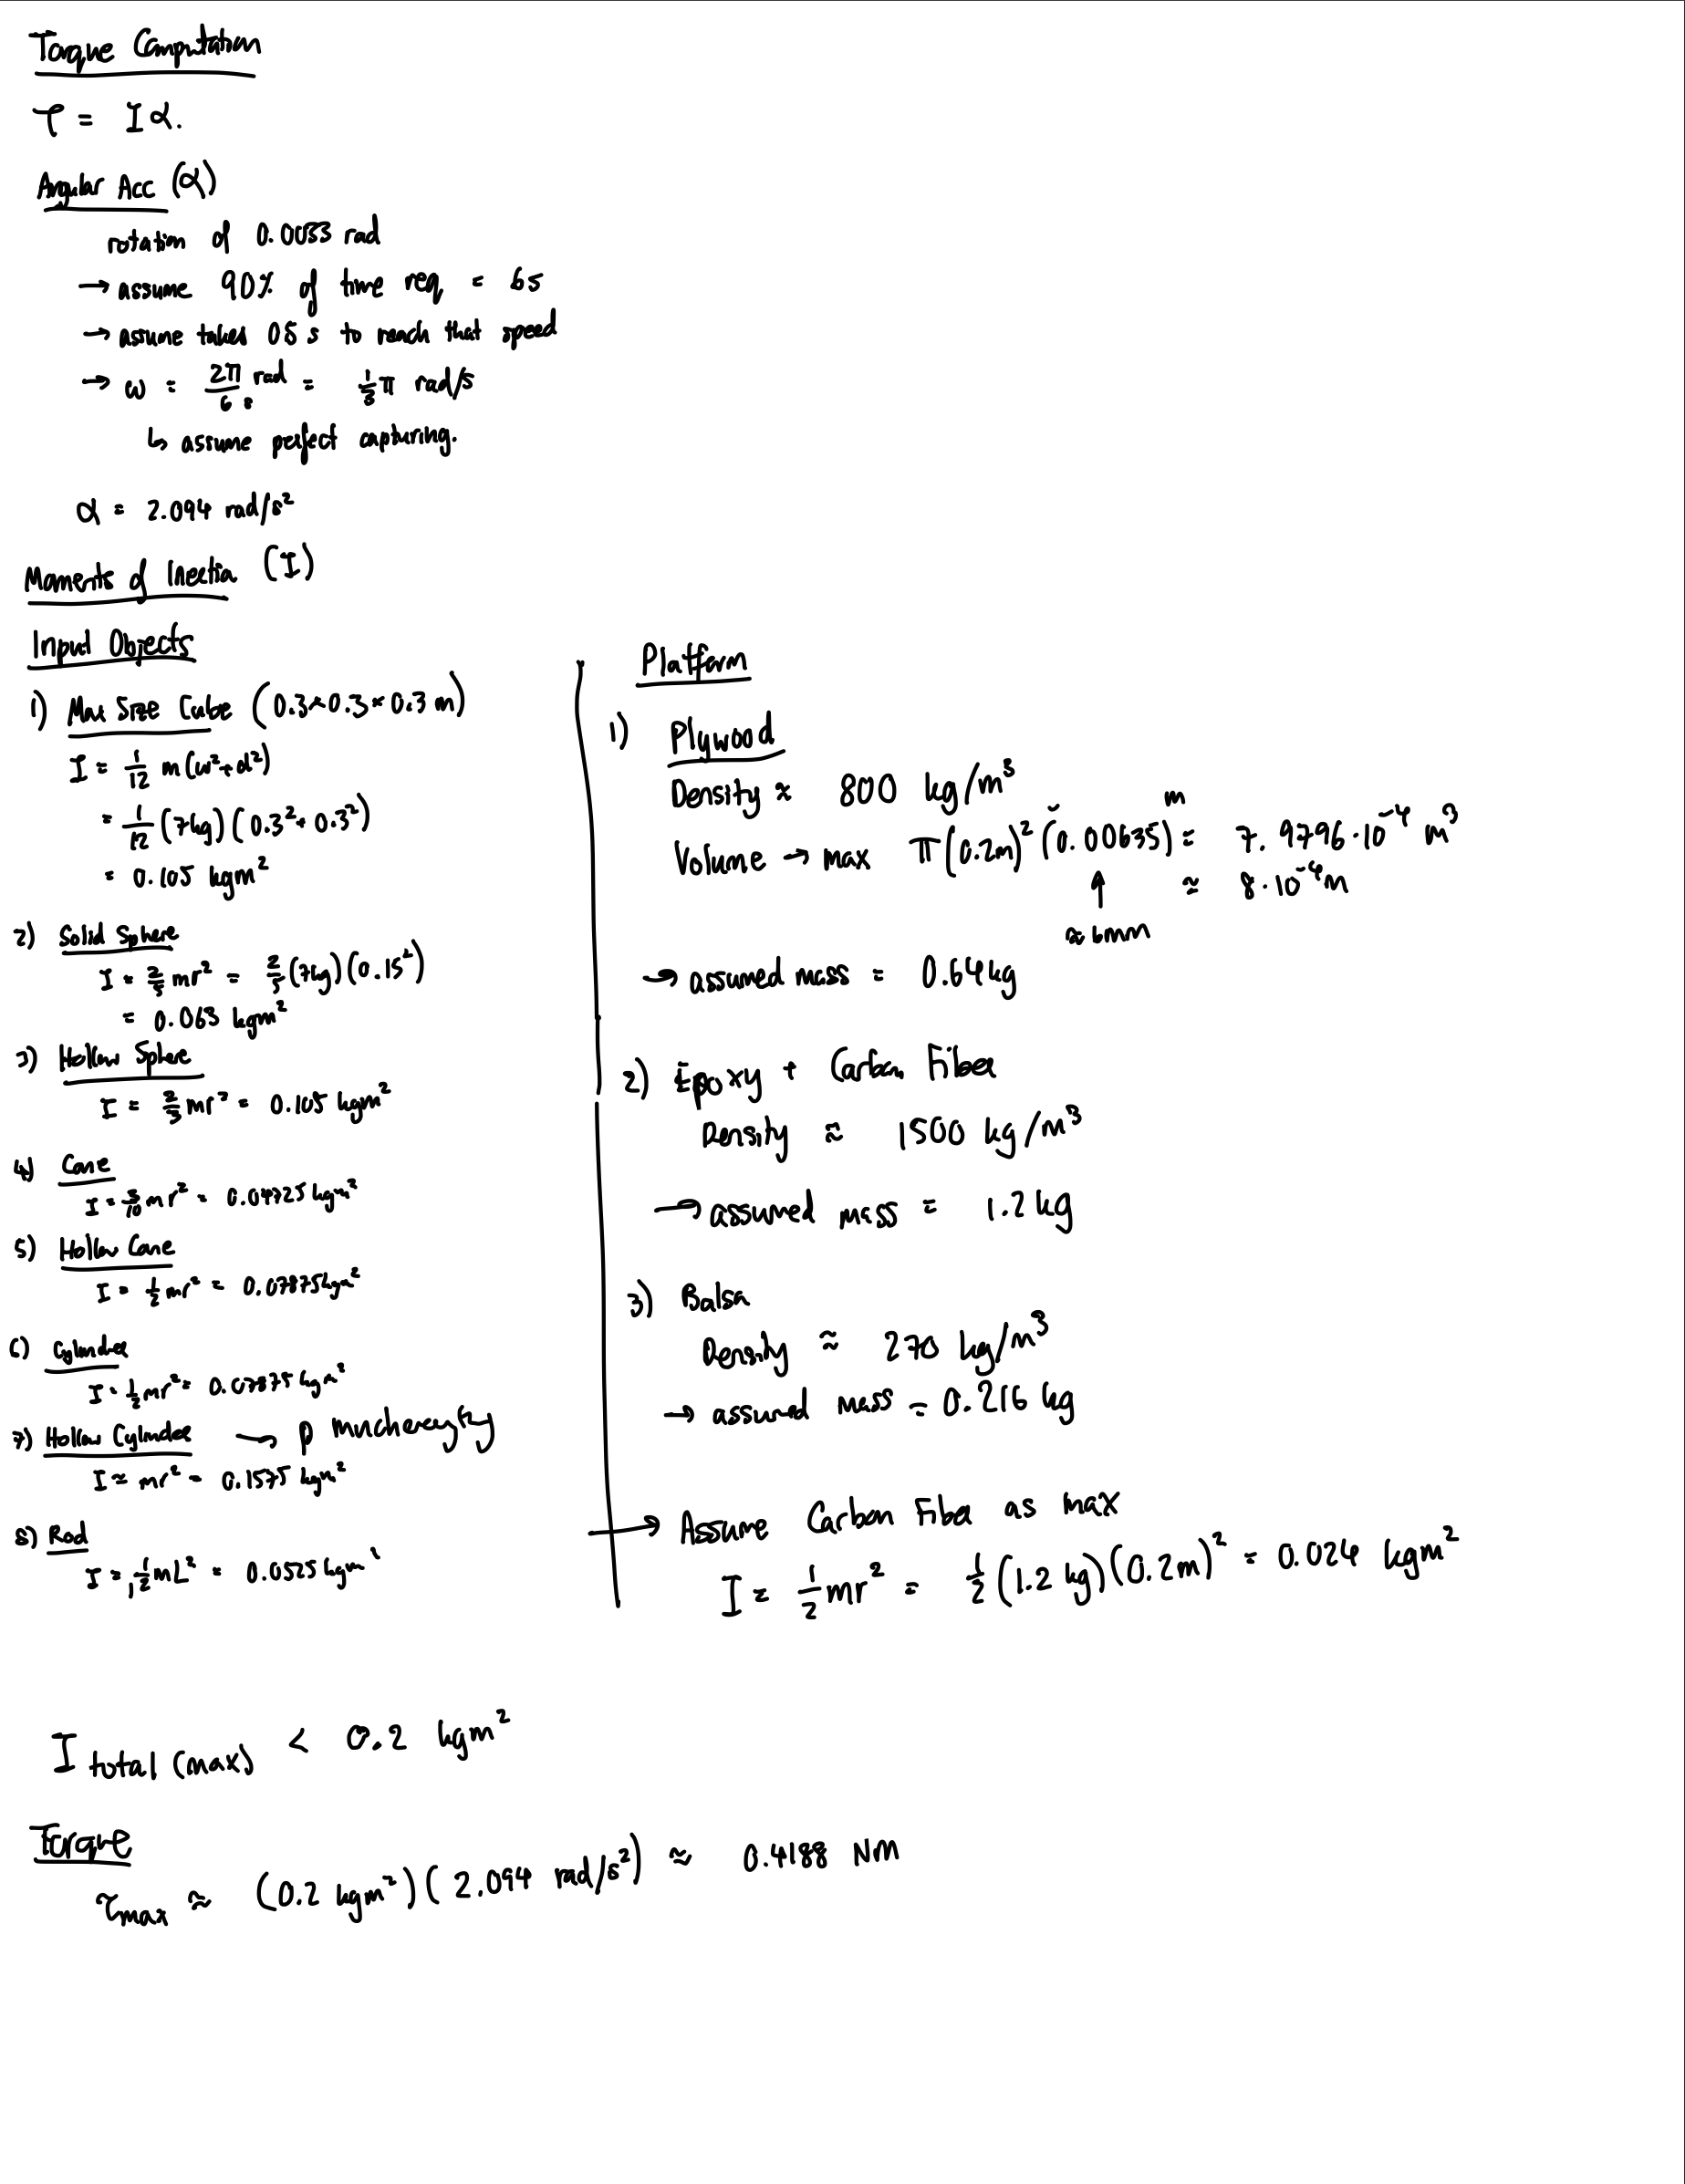
The final part of the main platform design is to choose the right motor for the project. The main 2 motors I looked into to rotate the platform are the servo motor and the stepper motor. A servo motor is a motor coupled with a feedback sensor to facilitate with positioning for precise velocity and acceleration. A stepper motor, on the other hand, is a motor that divides a full rotation into a number of equal steps. To figure out the motor used, I computed the torque required to rotate the platform with the maximum object size. From the density and dimensions of the platform, I computed that the plywood platform would weight around 0.64kg and carbon fiber would be around 1.2kg (I still accounted for the heaviest material and strongest material in case of a change in the future). From that I computed the moments of inertia which is around 0.024kgm2. For the input object, I used maximum size and different dimensions and shapes to cover most main and edge cases, the maximum moments of inertia computed is around 0.1575kgm2. Thus, the total maximum moments of inertia is less than 0.2kgm2. To get the torque, I also estimated the angular acceleration needed. From Alex’s computation, we need at least a rotation of 0.0033 rad per step to capture enough data to meet our accuracy requirement. Assuming that 10% of the time requirement, which is 6s, can be used for data capturing (so that we have more buffer for the algorithmic part since we don’t exactly know how complex it would actually be yet), we would get that the angular velocity is around /3rad/s. Assuming we want our motor to be able to reach that velocity fast enough (0.5s), we have an estimated acceleration of 2.094rad/s2. From here, the estimated torque needed to rotate the platform is around 0.4188Nm. Below is the rough computation made. 

Since we need a high torque and from our algorithm we would need an accurate step, the stepper motor is preferred. The two stepper motor I looked into are the NEMA 17 and NEMA 23. NEMA 17 has a holding torque of 0.45Nm, and NEMA 23 has a holding torque of 1.26Nm. Even though NEMA 17 seems like it might be enough, in my computation, I neglected the friction which would drastically affect the torque the motor has to supply. Moreover, I also neglected the energy that would be lost through using the internal gear to rotate the platform. Since NEMA 23 is not that much more expensive, I believed NEMA 23 would fit our project best. 

I’m currently still a little behind on schedule but I caught up a lot. Learning everything about stress, torque, and material took up most of my time for this week and computing different values and making sure the simplifications are not over-simplified were also a difficult task. I am a little behind in that I expected that I would have the gear and design fully drawn with dimensions written correctly. I would do that by putting in more work before the design reviews.


For next week, I hope to find all the specific parts for purchase and order them. I would also like to work on the design document. Once all the material and components arrive, I would start assembling the platform.