Yuhan’s status update for 10/10
I mostly focused on design review presentation this week. In preparation of the presentation, I improved on current user flowchart and system interaction diagram, and fleshed out web app mockups. I also made block diagrams for hardware and CV/ML portion of the project, so we have a visual representation of the implementation plan and materials to work on for design review report.
Echo Gao’s Status Update for 10/10
Computer Vision Optimization
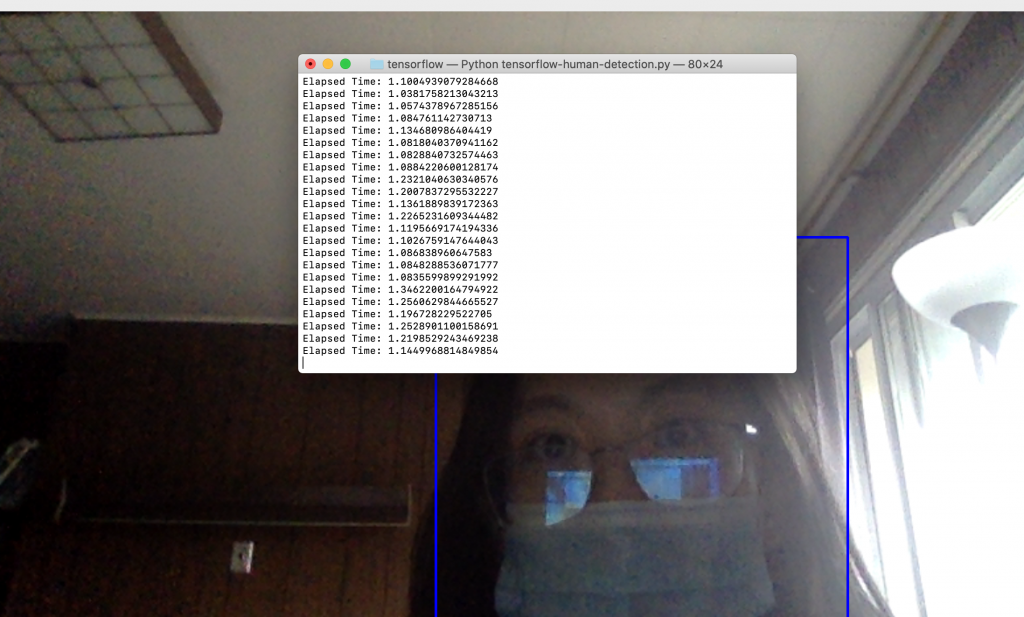
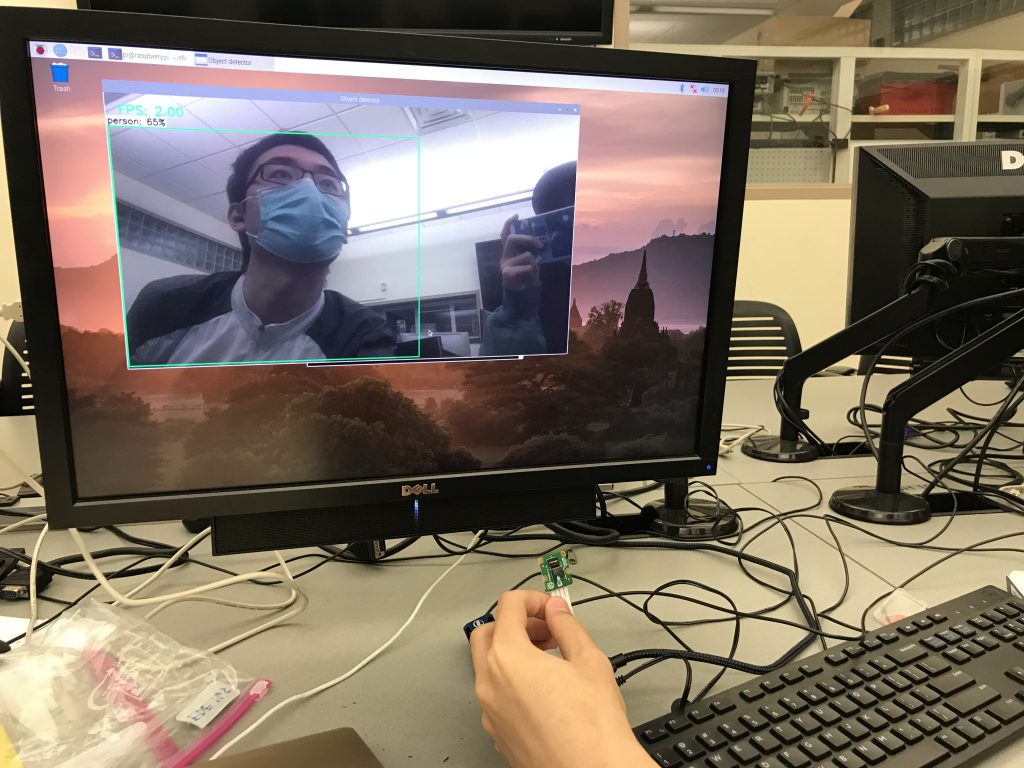
We successfully optimized our CV algorithm with our newly purchased hardware: Google Coral USB accelerator. Paired with our borrowed Raspberry Pi 3, our Tensorflow Lite CV library is able to run at 9 to 10 FPS, which is exactly what we were expecting in our initial requirements. If we find this FPS insufficient for future purposes, we will use our remaining budget to purchase a Raspberry Pi 4, which will run at a much higher frame rate.

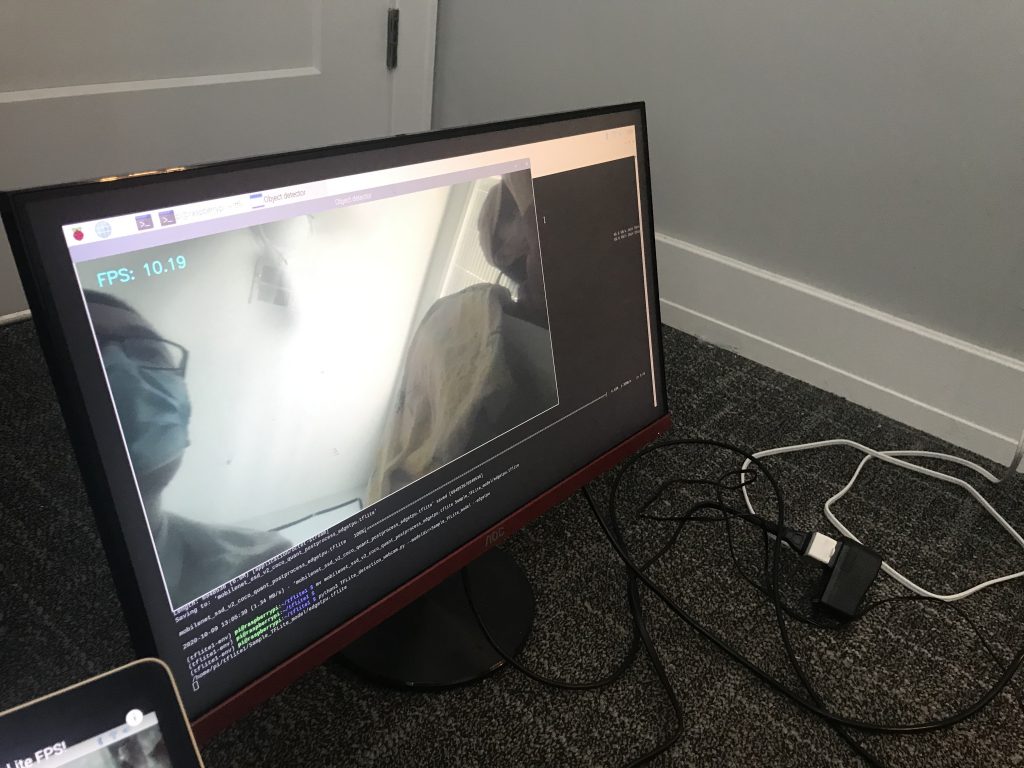

One issue we found with a bare Raspberry Pi 3 is that it overheats quite easily when running the CV algorithm. We had to wait in between tests on our CV algorithm since our Pi will activate overheat protection and reboot itself. We also experienced a dramatic frame rate drop to 3 FPS when overheated.
Communication with our iRobot Create 2
Since now we’ve successfully optimized our CV algorithm to run at a reasonable FPS, we started connecting the Pi to our robotic base and try to send instructions to it. Thankfully, we found existing library called pycreate2 that will allow us to do it within our CV script in Python3. We were able to send direction instructions, play songs, and receive sensor data that includes multiple cliff sensors and a wall sensor built in. We were also able to make the robot base turn according to user’s relative position to the robot.
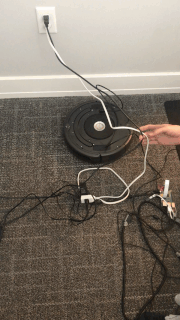
The problem with this part is that the CV algorithm is running in a giant while (true) loop, and if we want to let the robot move for a certain period of time, according to previous implementations, the most popular way is to call time.sleep(). But calling such function will affect our CV algorithm and drop our frame rate dramatically. We tried using multi-threading and calling os.fork() to do this but it seems like the Raspberry Pi has issues with multi-threading clients. We will try to solve this problem in the upcoming weeks.
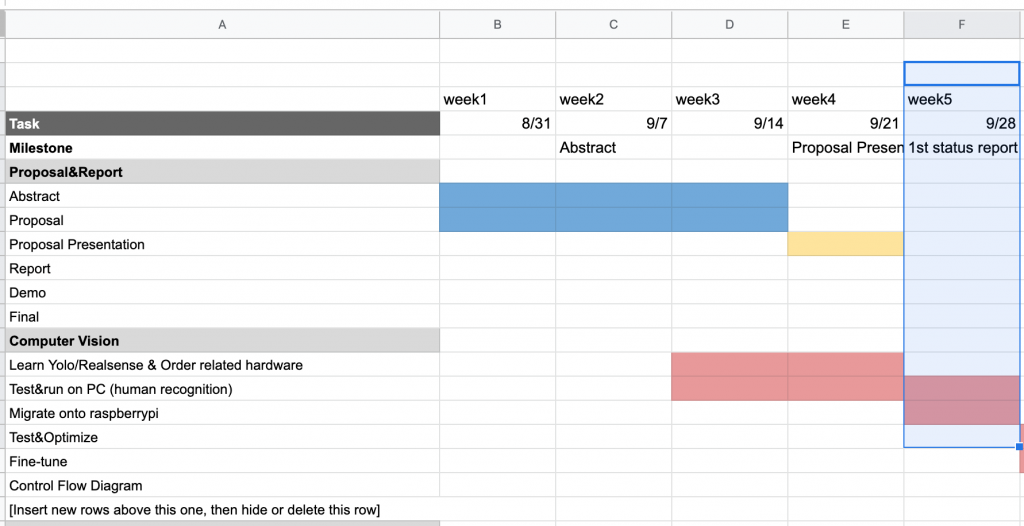
Schedule
According to the schedule, our planned finish time for optimizing our CV algorithm and communicating with our robotic base is intended to be next week. So we are more than one week ahead of our schedule, which makes room for unintended difficulties.
Peizhi Yu’s Status Report 10/10
Computer Vision Optimization
We successfully optimized our CV algorithm with our newly purchased hardware: Google Coral USB accelerator. Paired with our borrowed Raspberry Pi 3, our Tensorflow Lite CV library is able to run at 9 to 10 FPS, which is exactly what we were expecting in our initial requirements. If we find this FPS insufficient for future purposes, we will use our remaining budget to purchase a Raspberry Pi 4, which will run at a much higher frame rate.
One issue we found with a bare Raspberry Pi 3 is that it overheats quite easily when running the CV algorithm. We had to wait in between tests on our CV algorithm since our Pi will activate overheat protection and reboot itself. We also experienced a dramatic frame rate drop to 3 FPS when overheated.
Communication with our iRobot Create 2
Since now we’ve successfully optimized our CV algorithm to run at a reasonable FPS, we started connecting the Pi to our robotic base and try to send instructions to it. Thankfully, we found existing library called pycreate2 that will allow us to do it within our CV script in Python3. We were able to send direction instructions, play songs, and receive sensor data that includes multiple cliff sensors and a wall sensor built in. We were also able to make the robot base turn according to user’s relative position to the robot.
The problem with this part is that the CV algorithm is running in a giant while (true) loop, and if we want to let the robot move for a certain period of time, according to previous implementations, the most popular way is to call time.sleep(). But calling such function will affect our CV algorithm and drop our frame rate dramatically. We tried using multi-threading and calling os.fork() to do this but it seems like the Raspberry Pi has issues with multi-threading clients. We will try to solve this problem in the upcoming weeks.
Schedule
According to the schedule, our planned finish time for optimizing our CV algorithm and communicating with our robotic base is intended to be next week. So we are more than one week ahead of our schedule, which makes room for unintended difficulties.
Yuhan’s status update for 10/3
- I made an object diagram for the web app here.
- I compared a few MERN starting template alternatives, and decided to build web app based on this one because it provides user management. My current code is here (temporarily made public, but might revert back to private later).
- I set up the wordpress blog(project summary, tags, etc).
P.S: Sorry for the delay in status update submission.
Team status Update for 10/3
Echo& Page
We are on schedule.
This week:
- finished researching and testing out different CV algorithms on PC
- installed OS onto raspberry pi 3 and successfully ran Tensorflow lite
Next week:
- optimize Tensorflow lite on raspberry pi to reach our intended detection speed and accuracy
- finish up all CV part and start looking into the hardware
Yuhan
Peizhi Yu’s Status Update 3/10
Computer Vision:
Compared different Computer Vision libraries (YOLO3, Tiny-YOLO, OpenCV, Tensorflow) and their detection speed & accuracy on PC. Determined to use Tensorflow Lite for the highest frame rate.
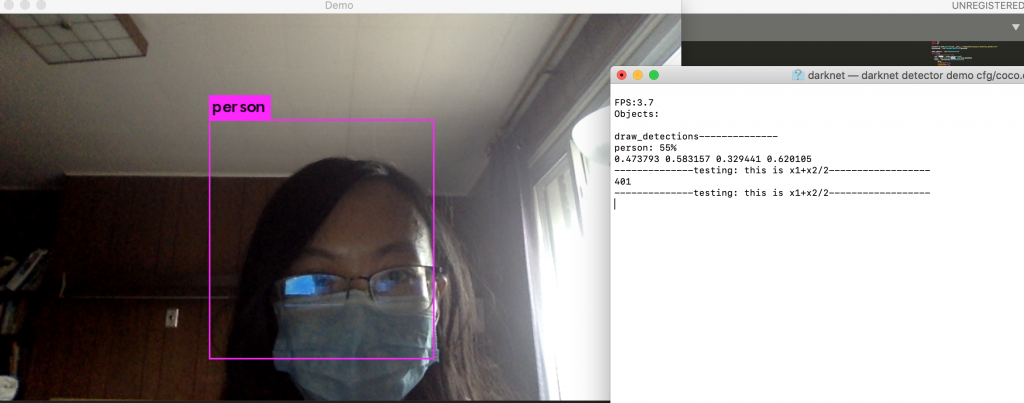
1.YOLO3& Tiny-YOLO
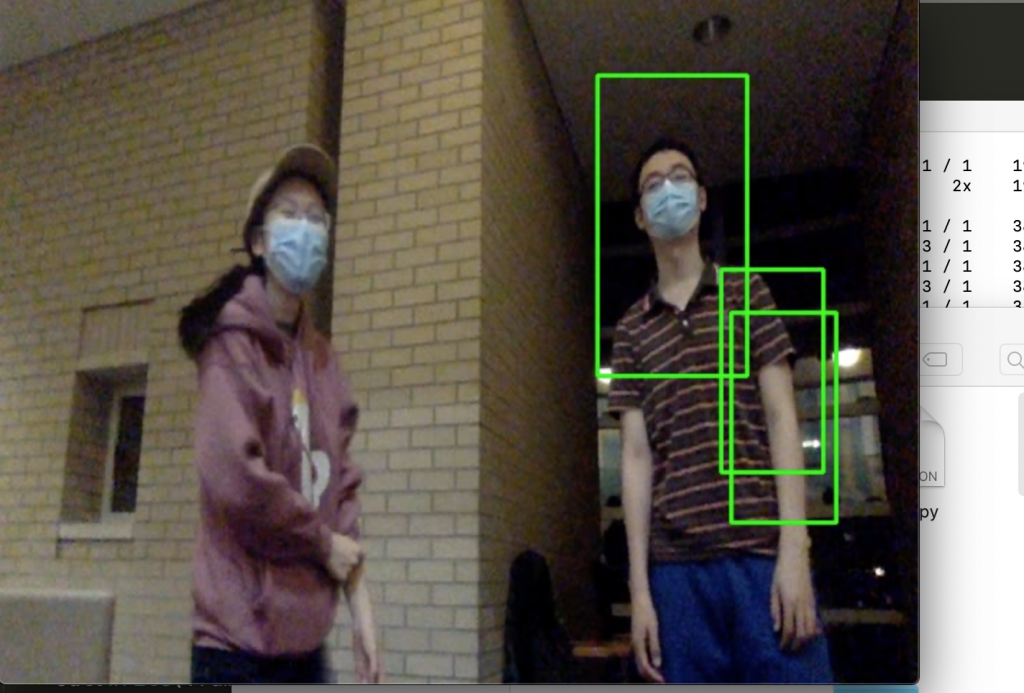
You only look once (YOLO) is a state-of-the-art, real-time object detection system. Tiny-YOLO is a variation of the Yolo object detector. It is much faster than Yolo, yet less accurate. For reference, Redmon et al. report ~51-57% mAP for YOLO on the COCO benchmark dataset while Tiny-YOLO is only 23.7% mAP — less than half of the accuracy of its bigger brothers (Rosebrock, Adrian).We used a pre-trained model from https://pjreddie.com. Then we optimized tiny yolo by letting it only detects person and reduced input resolution from 416×416 to 200×200. However, it still only reaches 3.7 fps on MacOS. (We also tested out printing the mid-x position of the detected person, which is a value we will need for the robot to rotate and move accordingly).
reference:
https://pjreddie.com/darknet/yolo/
https://medium.com/@madhawavidanapathirana/real-time-human-detection-in-computer-vision-part-2-c7eda27115c6
https://stackoverflow.com/questions/44674517/yolo-darknet-detecting-only-specific-class-like-person-cat-dog-etc
2.OpenCV
Haar Cascade Classifier is a popular algorithm for object detection. We used pre-trained Haar cascade models in OpenCV to detect human face in real time. It is the least accurate approach we’d inverstigated.
reference:
https://opencv-python-tutroals.readthedocs.io/en/latest/py_tutorials/py_objdetect/py_face_detection/py_face_detection.html
3.Tensorflow
TensorFlow™ is an open-source API from Google, which is widely used for solving machine learning tasks that involve Deep Neural Networks. We used Tensorflow Detection Model Zoo as our pre-trained model. It reached about 5-10 fps and its accuracy was good enough. Later, we found out that Tensorflow Lite is a even better optimized approach on raspberry pi.
reference:
https://medium.com/@madhawavidanapathirana/real-time-human-detection-in-computer-vision-part-2-c7eda27115c6
https://github.com/EdjeElectronics/TensorFlow-Lite-Object-Detection-on-Android-and-Raspberry-Pi/blob/master/Raspberry_Pi_Guide.md
Hardware:
Create2 robotic base, raspberry pi, NCS2 and the Pi camera were all received on Thursday, 30th Sep. We set up the Pi environment (installing the OS and relevant libraries) and run the CV algorithm on the Pi with low FPS.

Difficulties
The Pi we borrowed from the ECE inventory is a Raspberry Pi 3 instead of Raspberry Pi 4, and there’s a huge performance difference between the two. Also, the NCS2 we chose as CV module is a relatively outdated piece of hardware, and is very hard to set up to coordinate with our choice of CV algorithm, Tensorflow Lite. After researching, in order to run the library, we need to use the NCS SDK and convert the module into NCS2 compatible, then run it on NCS2. On top of which, we found a result demo on YouTube and the result the video uploader was able to achieve on his Pi3 + NCS2 platform was 9-10 fps, which barely reaches the FPS requirement we had in mind.
Intended Solutions
We found another platform that outperforms the NCS2 and is specially optimized for running Tensorflow Lite. It’s called Google Coral, and it’s also a USB accelerator that can be connected to our Pi. The expected result of such hardware optimization will lead us to be running our CV algorithm at around 20 FPS. We also intend to get a refund for the NCS2 if possible.
reference:
Echo Gao’s Status Update for 10/3
Computer Vision:
Compared different Computer Vision libraries (YOLO3, Tiny-YOLO, OpenCV, Tensorflow) and their detection speed & accuracy on PC. Determined to use Tensorflow Lite for the highest frame rate.
1.YOLO3& Tiny-YOLO
You only look once (YOLO) is a state-of-the-art, real-time object detection system. Tiny-YOLO is a variation of the Yolo object detector. It is much faster than Yolo, yet less accurate. For reference, Redmon et al. report ~51-57% mAP for YOLO on the COCO benchmark dataset while Tiny-YOLO is only 23.7% mAP — less than half of the accuracy of its bigger brothers (Rosebrock, Adrian).We used a pre-trained model from https://pjreddie.com. Then we optimized tiny yolo by letting it only detects person and reduced input resolution from 416×416 to 200×200. However, it still only reaches 3.7 fps on MacOS. (We also tested out printing the mid-x position of the detected person, which is a value we will need for the robot to rotate and move accordingly).
reference:
https://pjreddie.com/darknet/yolo/
https://medium.com/@madhawavidanapathirana/real-time-human-detection-in-computer-vision-part-2-c7eda27115c6
https://stackoverflow.com/questions/44674517/yolo-darknet-detecting-only-specific-class-like-person-cat-dog-etc
2.OpenCV
Haar Cascade Classifier is a popular algorithm for object detection. We used pre-trained Haar cascade models in OpenCV to detect human face in real time. It is the least accurate approach we’d inverstigated.
reference:
https://opencv-python-tutroals.readthedocs.io/en/latest/py_tutorials/py_objdetect/py_face_detection/py_face_detection.html
3.Tensorflow
TensorFlow™ is an open-source API from Google, which is widely used for solving machine learning tasks that involve Deep Neural Networks. We used Tensorflow Detection Model Zoo as our pre-trained model. It reached about 5-10 fps and its accuracy was good enough. Later, we found out that Tensorflow Lite is a even better optimized approach on raspberry pi.
reference:
https://medium.com/@madhawavidanapathirana/real-time-human-detection-in-computer-vision-part-2-c7eda27115c6
https://github.com/EdjeElectronics/TensorFlow-Lite-Object-Detection-on-Android-and-Raspberry-Pi/blob/master/Raspberry_Pi_Guide.md
Hardware:
Create2 robotic base, raspberry pi, NCS2 and the Pi camera were all received on Thursday, 30th Sep. We set up the Pi environment (installing the OS and relevant libraries) and run the CV algorithm on the Pi with low FPS.
Difficulties
The Pi we borrowed from the ECE inventory is a Raspberry Pi 3 instead of Raspberry Pi 4, and there’s a huge performance difference between the two. Also, the NCS2 we chose as CV module is a relatively outdated piece of hardware, and is very hard to set up to coordinate with our choice of CV algorithm, Tensorflow Lite. After researching, in order to run the library, we need to use the NCS SDK and convert the module into NCS2 compatible, then run it on NCS2. On top of which, we found a result demo on YouTube and the result the video uploader was able to achieve on his Pi3 + NCS2 platform was 9-10 fps, which barely reaches the FPS requirement we had in mind.
Intended Solutions
We found another platform that outperforms the NCS2 and is specially optimized for running Tensorflow Lite. It’s called Google Coral, and it’s also a USB accelerator that can be connected to our Pi. The expected result of such hardware optimization will lead us to be running our CV algorithm at around 20 FPS. We also intend to get a refund for the NCS2 if possible.
reference: