Peizhi Yu’s Status Update for 12/5

This week, we did our last demo on-class, and finished off testing. We found the following test results against our metrics:

  • Delay from web app sends signal, to raspberry pi receives signal < 1s: We tested this desired latency by setting an alarm at 1:00 at 12:59:59 and see if this message can be received by raspberry pi in the next second. 
  • From robot received message to robot activate < 5s: The time needed for the Raspberry Pi to initialize the camera stream and CV algorithm takes around 8.3s.
  • Delay from facial recognition to chase starting < 0.25s: Achieved
  • Fast image processing: ML pipeline FPS > 10: Achieved around 13 FPS running our algorithm on our Raspberry Pi.
  • Accurate human detection: false positive: Never occurs during testing.
  • Accurate human detection: false negative: Occurs under poor lighting conditions.
  • Effective chase duration > 30s, chase overall linear distance > 5m: Achieved.

We also decided our schedule and division of work for the final video, and filmed many runs of interacting with the robot.

Next Week:

Finish the final video, start writing the final paper.

Peizhi Yu’s Status Update for 11/21

This week, I exhaustively tested out the success rate and the limitations of our obstacle-dodging algorithm.

  • Due to limitations to the sensors on the robotic base, our algorithm can’t deal with transparent obstacles like a water bottle.
  • It works with a 80% success rate of not touching the obstacle and going around it. The obstacle should be with a diameter that’s less than 15cm, otherwise it will be recognized as a wall

I identify the problem as the following:

  1. The robot uses a optical sensor that’s based on reflections, and having a transparent obstacle will not be detected by the sensors.
  2. The algorithm we are using essentially makes the robot turn when it comes close to a certain object, and continue moving forward when none of the sensors have readings. Problem with this approach is that there’s only around 120 degree of the front that’s covered by the 6 sensors. Although I did do a 0.25s extra turning, the larger the obstacle is, the likelier the robot will scratch with the obstacle.
  3. Simply adding the extra rotation time will not fix the problem because it will make our robot look kind of silly.

Peizhi Yu’s Status Update for 11/7

This week, we were mainly dealing with 1. mounting hardware pieces together 2. implementing stop action for the robot. 3.adjusting the size of camera display on LCD screen 4. fixed the sensor data error we fixed last week

We started off by adding heat sink on raspberry pi and put it into a case. A mistake we made was that we realized the power pack we ordered was not what we expected. Therefore we need to reorder a new one, which dragged us a bit behind our intended schedule. (Without the power pack, raspberry pi cannot be fully mounted on top of the robot. But everything else were in place by now.)  Next, we spent a long time implementing the final stop action for the robot, which was not intended. That is, when the robot hits the wall, it should turn off. There is a “wall detection signal” in its sensor packet, which we thought could be used to accurately detect the wall. Yet that builtin function does not work as expected. So we need to figure out a way to make the robot distinguish between an obstacle and wall. If obstacle is detected, robot should rotate until the obstacle is not in its view and continue moving. If wall is encountered, robot should shut down. By looking at the sensor data values returned from the robot, we found that when wall is detected, 4 out of 6 of the sensor value will be greater than 100. The best approach was to find the median of all 6 sensors. If this number is greater than 50, we will say that wall is detected.

Last week, the problem we encountered was that if we excessively call the get_sensor function, the robot sometimes blow up and returns unintended values which messes up our entire program. This problem is solved by contacting IRobot Create2’s technical support. We followed the instruction provided, and our robot seems to be working fine now.


Next week, we will have our robot fully implemented with the raspberry pi mounted on top of robot so that we can give a cleaner and more elegant look of our product. We will also coordinate with Yuhan on making connections between raspberry pi and her website to setup alarm time and download user specified ringtone.

Peizhi’s Status Report for 10/31

Hardware portion almost finished:

After replacing our broken webcam with a USB camera, we continued our testing. This week, we combined our obstacle avoiding algorithm with our human avoiding algorithm together. Now, our alarm clock robot is fully functional with all our requirements reached. The complete algorithm is as followed: the robot starts self rotate at its idle stage while playing the song when no person is detected through camera. As soon as a person is detected through the camera, robot will start moving in the direction away from him/her while trying to fix this person’s position in the middle of the camera. Yet if obstacles are encountered, the robot will immediately start self rotate and move in the direction where no obstacles are detected through its sensors. At that point on, the robot will look back at its camera again to find the person. If the person is still in its view, it will perform the above action. If the person is not in its view, the robot will start self rotating until it finds a person again. As one might see, avoiding obstacles take priority over avoiding user. The “finish action/ alarm turn off action” will be done next week. That is, when the robot runs into a wall, the entire program finishes. A problem we encountered is that the distance information we received from IRobot Create2’s sensors to detect nearby obstacles sometimes blows up to completely inaccurate numbers. In that case, our entire program runs into undefined behavior and crashes. We have not yet find a solution to this problem.

(avoiding both human and obstacles demo)


(avoiding human only demo)

Integration with Webapp:

Now, we are stating to work on sockets and how raspberry pi communicates with Webapp from Yuhan’s website. Next week, we will work on how to let the Webapp controls the entire on and off of our program and how webapp sends ringtone and time to raspberry pi.

Echo Gao’s and Peizhi Yu’s Status Update for 10/24

Computer Vision: No change, raspberry pi keeps running at 10 fps anytime when testing.

Hardware & Communication between raspberry pi and Robot base: This week, we finished implementing the idle stage action: if the robot does not detect a person from the pi camera, it will keep self rotating. Next, we finished obstacle-handling algorithm: if an object is detect through the robot base’s 4 light bump sensors (right, left, front-left, front-right), it will first self rotate until the obstacle is not in its sensor’s detection range, then move forward for another second. At this point, the person is probably not in camera’s view. So the robot will return to its idle stage again: self rotate until the camera catches the person to perform the next move. Here, we are testing with all bottle sized obstacles scattered sparsely on the ground. We are assuming that during the “moving forward for another second” action, there are no other obstacles on its way. Else it would push the obstacles away instead of avoiding it.

This is a illustration of how robot moves away to avoid obstacles (no camera & person involved):

Accident encountered: Later when we were trying to integrate our obstacle-handling algorithm back to our main code, we realized that our raspberry pi camera was very likely broken. We identified that it is camera’s hardware problem from this error message: camera control callback no data received from sensor. We are now trying to verify our guess and buy a new pi camera.  Next week, we will solve this problem and start thinking about how Web App communicates with raspberry pi

Peizhi Yu’s Status Report 10/17

Computer Vision: No change, raspberry pi keeps running at 10 fps anytime when testing.

Hardware & Communication between raspberry pi and Robot base:

As mentioned in last week’s report, since we found out that multithreading does not work on Raspberry pi 3, we decided to use a counter to keep track of the time, that is, the robot does not move when it is in idle stage at first. When it first detects a person in the camera, it starts to perform the move away action by comparing the person’s position with the center of the camera. If the person is in on the left side, it will go forward right so that the camera keeps locking the person in its view while running away. If the person is on the left, it will go forward left as result. We used a counter in this process. When the robot is in the progress of performing such a move action, it will not receive any new instructions from raspberry pi. (For example, if the person first appears on the left side of the camera and suddenly jumps to the right side of the camera on the next frame, robot will only perform forward left action.) Now we set the counter to 5, which means that the robot will receive new instructions every 0.5 seconds. However, the only concern is that, now, the robot will have a little pause every 0.5 seconds, which is the time it takes to process new instructions. Even though it does not cause any issues for now, the pause is still quite obvious and is a little bit distracting.

We also made sure that the robot can keep playing songs while moving using its built in function calls: bot.playSong().

We are now starting to look into how Robot base sensors can be used to detect obstacles and walls. The problem we are facing right now is that: we realized when the robot encounters an obstacle, it will turn and move in another direction. Yet we need to make sure that after it turns, the camera still locks onto the person. For now we have not yet figured out a way to make the robot both move in the way to avoid obstacles and move away from the person.

Schedule

We are still ahead of our original schedule, which makes room for unintended difficulties.

Peizhi Yu’s Status Report 10/10

Computer Vision Optimization

We successfully optimized our CV algorithm with our newly purchased hardware: Google Coral USB accelerator. Paired with our borrowed Raspberry Pi 3, our Tensorflow Lite CV library is able to run at 9 to 10 FPS, which is exactly what we were expecting in our initial requirements. If we find this FPS insufficient for future purposes, we will use our remaining budget to purchase a Raspberry Pi 4, which will run at a much higher frame rate.

One issue we found with a bare Raspberry Pi 3 is that it overheats quite easily when running the CV algorithm. We had to wait in between tests on our CV algorithm since our Pi will activate overheat protection and reboot itself. We also experienced a dramatic frame rate drop to 3 FPS when overheated.

Communication with our iRobot Create 2

Since now we’ve successfully optimized our CV algorithm to run at a reasonable FPS, we started connecting the Pi to our robotic base and try to send instructions to it. Thankfully, we found existing library called pycreate2 that will allow us to do it within our CV script in Python3. We were able to send direction instructions, play songs, and receive sensor data that includes multiple cliff sensors and a wall sensor built in. We were also able to make the robot base turn according to user’s relative position to the robot.

The problem with this part is that the CV algorithm is running in a giant while (true) loop, and if we want to let the robot move for a certain period of time, according to previous implementations, the most popular way is to call time.sleep(). But calling such function will affect our CV algorithm and drop our frame rate dramatically. We tried using multi-threading and calling os.fork() to do this but it seems like the Raspberry Pi has issues with multi-threading clients. We will try to solve this problem in the upcoming weeks.

Schedule

According to the schedule, our planned finish time for optimizing our CV algorithm and communicating with our robotic base is intended to be next week. So we are more than one week ahead of our schedule, which makes room for unintended difficulties.

Peizhi Yu’s Status Update 3/10

Computer Vision:

Compared different Computer Vision libraries (YOLO3, Tiny-YOLO, OpenCV, Tensorflow) and their detection speed & accuracy on PC. Determined to use Tensorflow Lite for the highest frame rate.

1.YOLO3& Tiny-YOLO

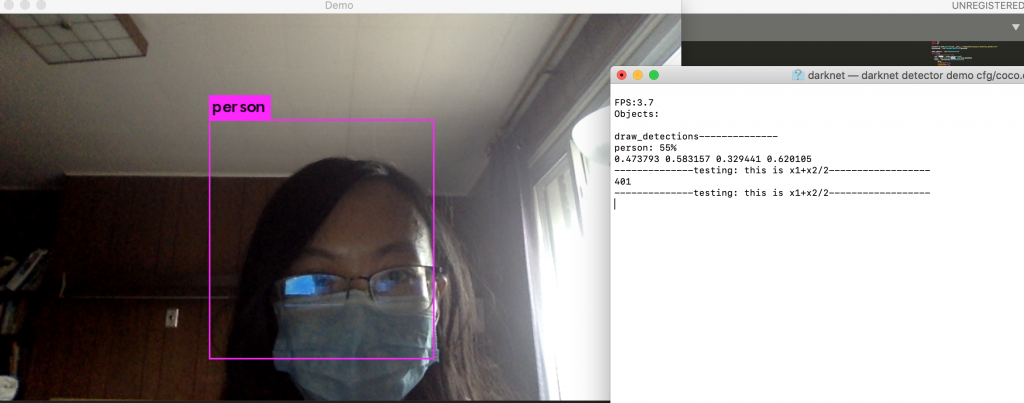
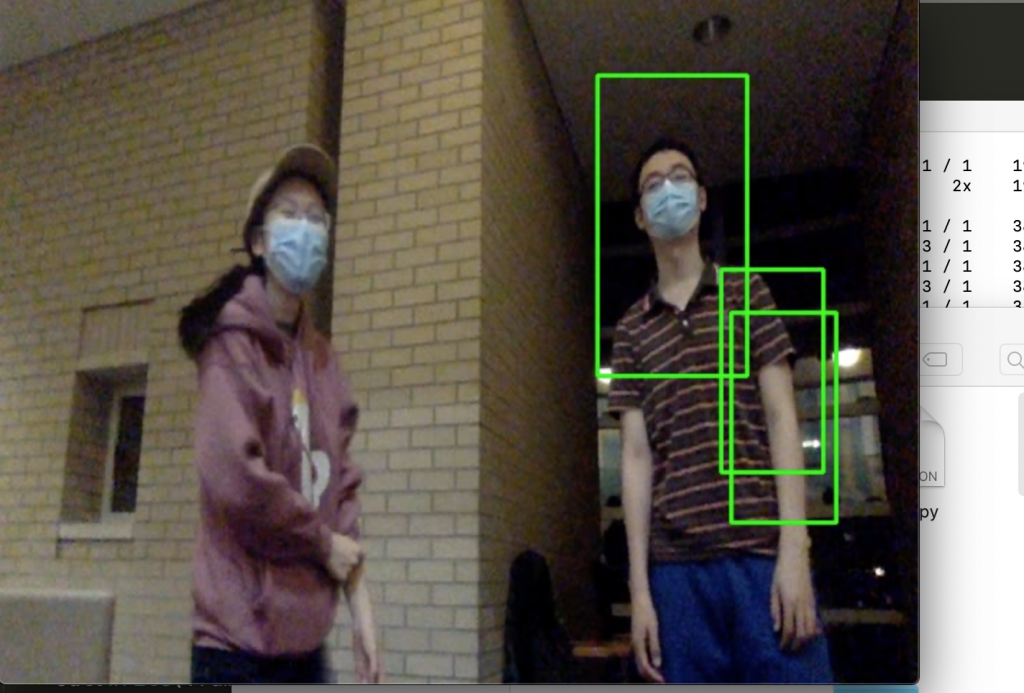
You only look once (YOLO) is a state-of-the-art, real-time object detection system.   Tiny-YOLO is a variation of the Yolo object detector. It is much faster than Yolo, yet less accurate. For reference, Redmon et al. report ~51-57% mAP for YOLO on the COCO benchmark dataset while Tiny-YOLO is only 23.7% mAP — less than half of the accuracy of its bigger brothers (Rosebrock, Adrian).We used a pre-trained model from https://pjreddie.com. Then we optimized tiny yolo by letting it only detects person and reduced input resolution from 416×416 to 200×200. However, it still only reaches 3.7 fps on MacOS. (We also tested out printing the mid-x position of the detected person, which is a value we will need for the robot to rotate and move accordingly).

reference:

https://pjreddie.com/darknet/yolo/

https://medium.com/@madhawavidanapathirana/real-time-human-detection-in-computer-vision-part-2-c7eda27115c6

https://stackoverflow.com/questions/44674517/yolo-darknet-detecting-only-specific-class-like-person-cat-dog-etc


2.OpenCV

Haar Cascade Classifier is a popular algorithm for object detection. We used pre-trained Haar cascade models in OpenCV to detect human face in real time. It is the least accurate approach we’d inverstigated.

reference:

https://opencv-python-tutroals.readthedocs.io/en/latest/py_tutorials/py_objdetect/py_face_detection/py_face_detection.html

Real-time Face Recognition with Python & OpenCV
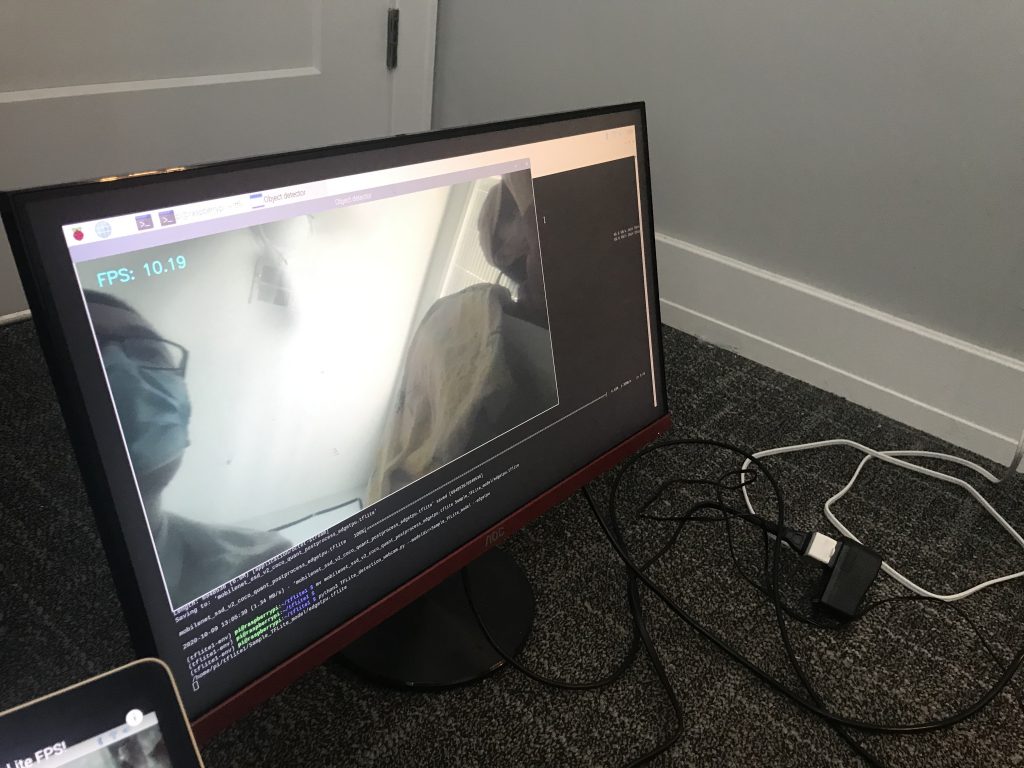
 

3.Tensorflow

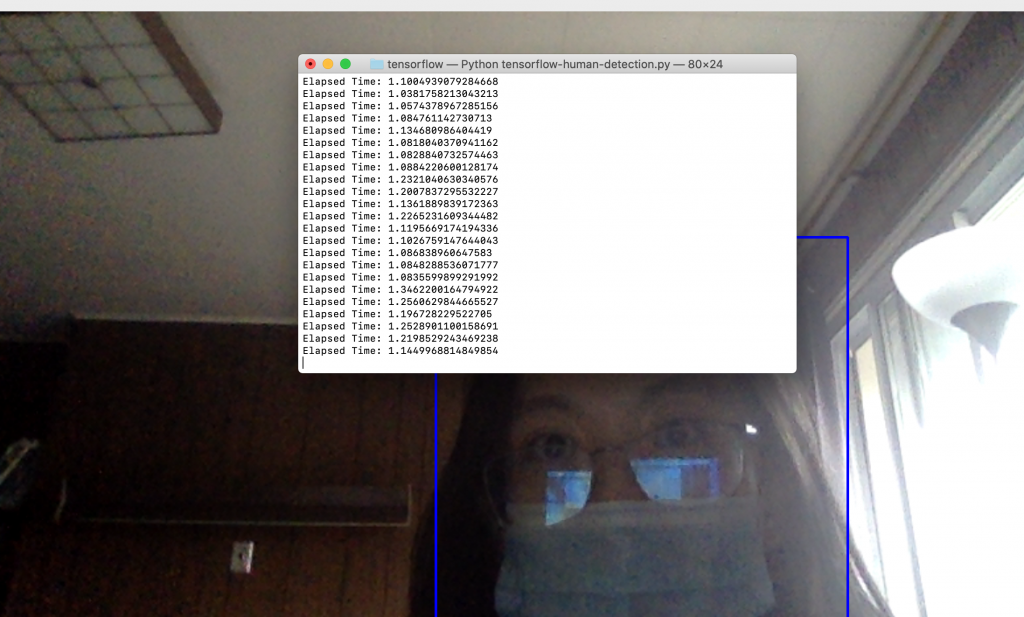
TensorFlow™ is an open-source API from Google, which is widely used for solving machine learning tasks that involve Deep Neural Networks. We used Tensorflow Detection Model Zoo as our pre-trained model. It reached about 5-10 fps and its accuracy was good enough. Later, we found out that Tensorflow Lite is a even better optimized approach on raspberry pi.

reference:

https://medium.com/@madhawavidanapathirana/real-time-human-detection-in-computer-vision-part-2-c7eda27115c6

https://github.com/EdjeElectronics/TensorFlow-Lite-Object-Detection-on-Android-and-Raspberry-Pi/blob/master/Raspberry_Pi_Guide.md
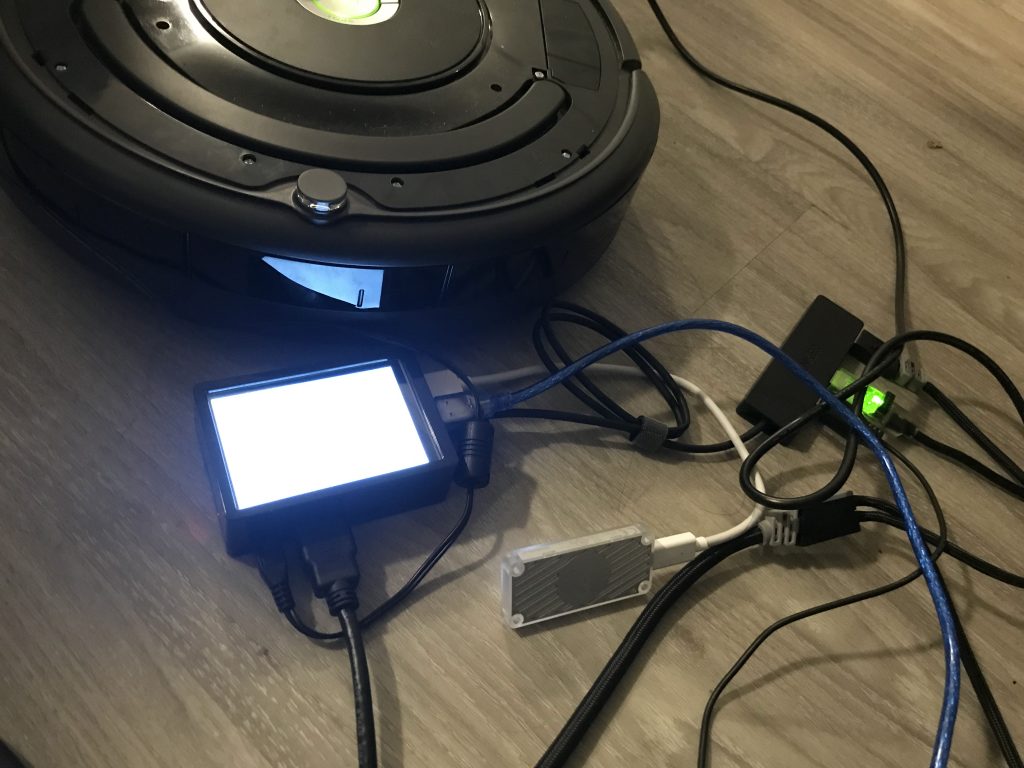
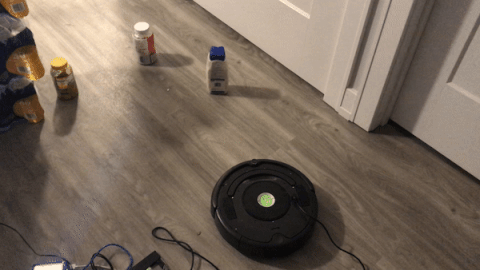
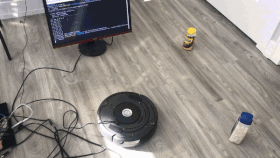
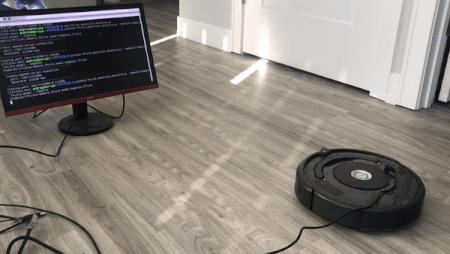
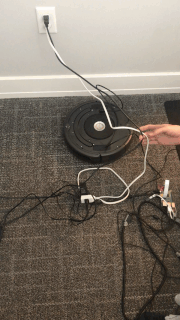
Hardware:

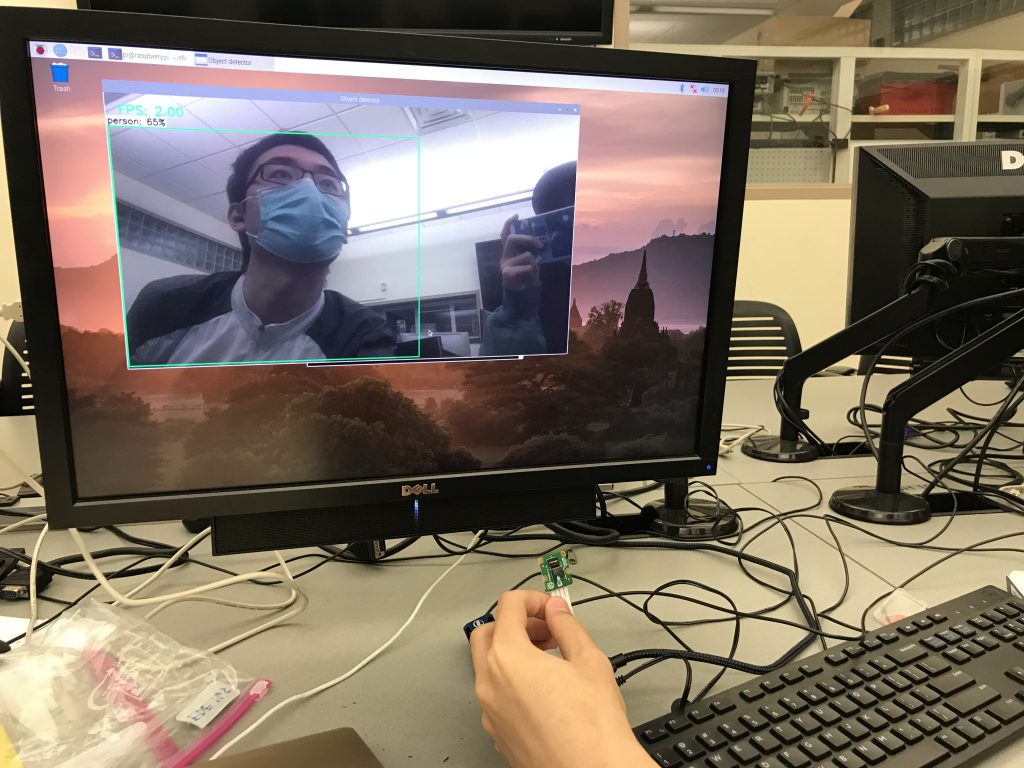
Create2 robotic base, raspberry pi, NCS2 and the Pi camera were all received on Thursday, 30th Sep. We set up the Pi environment (installing the OS and relevant libraries) and run the CV algorithm on the Pi with low FPS.

Difficulties

The Pi we borrowed from the ECE inventory is a Raspberry Pi 3 instead of Raspberry Pi 4, and there’s a huge performance difference between the two. Also, the NCS2 we chose as CV module is a relatively outdated piece of hardware, and is very hard to set up to coordinate with our choice of CV algorithm, Tensorflow Lite. After researching, in order to run the library, we need to use the NCS SDK and convert the module into NCS2 compatible, then run it on NCS2. On top of which, we found a result demo on YouTube and the result the video uploader was able to achieve on his Pi3 + NCS2 platform was 9-10 fps, which barely reaches the FPS requirement we had in mind.

Intended Solutions

We found another platform that outperforms the NCS2 and is specially optimized for running Tensorflow Lite. It’s called Google Coral, and it’s also a USB accelerator that can be connected to our Pi. The expected result of such hardware optimization will lead us to be running our CV algorithm at around 20 FPS. We also intend to get a refund for the NCS2 if possible.

reference:

OpenVINO, OpenCV, and Movidius NCS on the Raspberry Pi