Alvin’s Status Report – 5/8/21

This week, I worked with the team to collect final test metrics and videos for our final presentation and demo video. This involved bringing the drone outside to fly and collecting data on the drone’s pose and the drone’s camera video for testing the motion planner offline and evaluating performance of the target detection.

This upcoming final week, I’ll finish video demonstration results and also record my video component for the demo video.

Alvin’s Status Update – 5/1/21

This week, I worked with Sid and Vedant on integrating everything together and debugging issues with drone communications. We faced a lot of strange setbacks this week. In the previous week, we were able to easily control the drone with remote control and even control the drone via code. This week, both of these features broke down: remote control of the drone suddenly stopped working, and the drone ignored our flight commands through code.

Besides debugging, Sid and I set up a thread-based motion planner to account for slow planning times. Our drone requires motion commands at 2Hz, or one message every 0.5 seconds. Our motion plan originally took upwards of 17 seconds to solve for, and after various tricks with reducing planning horizon and floating precision from 64-bit down to 16-bit, we achieved planning on the order of 0.7 seconds. With our thread-based plan generation, the main planner can stream a previously generated trajectory at the required rate as a separate thread solves for a new trajectory.

Overall, the resulting plans from these flat system dynamics still resulted in somewhat shaky behavior, and we eventually used Sid’s more stable planning over x/y space.

For the upcoming week, I am completely booked with other classes, so we may end up sticking with what we have: all functional systems in simulation, but only manual flight on the physical drone. If we get lucky and the drone accepts our autonomous control, maybe we’ll have a full product.

Alvin’s Status Report – 4/24/21

I finished the following this week:

  • Set up our new wifi module for the drone and successfully used it to receive telemetry and error messages from the drone.
  • Overall get the drone flying with remote control.
  • Implement a first attempt at motion planning that uses MPC to solve for optimal viewpoint (keep target centered in image as target moves) with the drone flying to keep up. A picture of the resulting plan is shown below. The green arrows show the vector from the camera center to the ground. You can see how initially, the drone’s camera is not centered on the target, but over the next 10 steps, the drone executes a maneuver to properly focus on the target.

  • Calibrate new camera’s intrinsic parameters
  • Successfully send motion commands to drone through code. To do this, I set up UART communication between the drone and the flight controller and adjusted the flight controller’s baud rate to transmit messages fast enough.
  • Set up safety protocols for the drone including low battery failsafe and boundaries for where the drone can fly. Currently, if the drone flies out of the boundary, it immediately enters  a “Hold” flight mode and immediately stops moving and holds its current position in the air.

TODOs Next week:

  • Get motion planning working on the physical drone. This means speeding up the code a lot (the above motion plan took 12 seconds to solve for, which is way too slow. We need to send motion commands at least every 0.5 seconds as a hard restriction by the flight controller).
  • Calibrate the full 3D target pose estimation on the real drone. Conduct tests and verify performance

Team Status Report

We achieve many milestones in these two weeks:

  • Successfully conducted manual test flights with a remote control. This means we fixed our connection issues with the drone.
  • Made automated scripts that launch on startup for the raspberry pi. This includes automatically starting a video stream and publishing images over ROS as well as automatically shutting down the video stream with a simple ROS message
  • Created draft user interface with buttons on breadboard to change drone flight modes. This involves programming interrupts on the Jetson TX1 to trigger the sending of ROS messages to the drone.
  • Tested a new camera, which finally works as expected, and calibrated both the color filters for target detection and the intrinsic parameters with a chessboard.
  • Implemented two different motion planners and verified performance in simulation.
  • Successfully controlled the drone fully with code today. The code only told the drone to fly up to a certain height, but this means we fixed all other communication issues and verified that we can both stream commands to the drone and receive pose updates from the drone fast enough.

TODOs:

  • We need some more buttons and a longer cable connecting the TX1 to our user interface board. We then need to integrate this with sending ROS messages.
  • Integrate motion planning with drone
  • Test and verify 3D target estimation on the real system, not just simulation.

Alvin’s Status Report – 4/10/21

This week, I spent most of my time working with the team to set up various components for integration. We aimed to get the drone flying with at least video recording,  but various unexpected issues popped up.

Our raspberry pi 4 suddenly broke, so we were unable to get the drone flying with the video recording. Only today(4/10) were were able to borrow a new one,  and with this I was able to calibrate the extrinsic and intrinsic matrices for our camera opencv and a chessboard printout. At the same time, I helped Vedant set up ROS video streaming from the raspberry pi to the jetson tx1. I also spent a long time with Sid trying to connect our lidar laser sensor and px4flow optical flow camera. Unfortunately we had issues compiling the firmware on our version 1 pixhawk flight controller given its limited 1MB flash.

This upcoming week, I will focus on making sure our drone is up in the air. This involves solidifying our flight sequence from manual position control to autonomous mode and hammering out other weird bugs. Otherwise, basic autonomy involves flying up to the specific height and turning in a specific direction. This upcoming week will be extremely busy with other projects and exams, so the full motion planning may not be finished yet.


Alvin’s Status Report 4/3/21

This past week, I worked on adapting the flight start up sequence and full pipeline to work with the real physical drone and not just the simulator. This included working with Sid to approximate the true transform from the drone’s frame to the camera frame on our real system using Solidworks.

I also worked on an initial implementation for using Model Predictive Control (MPC) to track the target’s predicted trajectory using existing code from another project. I realized that simply following the target and imposing distance constraints in the numerical solver would not achieve our desired results, since we really want the drone to always be facing the target. This means for every predicted future position of the target, we need to project this backwards to the optimal pose of the drone, since the drone’s camera is fixed. This will be a focus of next week.

Lastly, I worked with Sid to mount all the physical components on the drone. We tried doing a test flight this week, but realized that we had several key steps to finish before and made a list of task assignments to complete with a strict deadline of testing full flight this upcoming Friday. As a result, this task list is our primary objective so we can get the drone flying on Friday.

Alvin’s Status Report- 3/27/21

These past two weeks, I have built a functional launch sequence for the drone and verified its behavior in simulation. This sequence begins with arming the drone and having it takeoff to a set altitude of 3.2 meters (arbitrarily chosen for now)  using high level position commands (send desired position, drone’s flight controller handles orientation). The drone then switches to a lower-level control output of desired roll, pitch, and yaw to allow for more dynamic maneuvers.

In addition, I have spent this last week implementing the transformation from 2D target pixel location to estimated 3D position in the world. This involves a combination of back-projection (transforming 2D pixel location into 3D position with respect to the camera) and intersecting a ray with the ground plane. More details can be found on this document: https://drive.google.com/file/d/1Tc6eirIluif-NBqA5EThOGmiCBtPO4DY/view?usp=sharing

Full results can be seen in this video: https://drive.google.com/file/d/1Tc6eirIluif-NBqA5EThOGmiCBtPO4DY/view?usp=sharing

For next week, now that I have 3D target position, I can work on generating 3D trajectories for the drone to follow so that it keeps the camera fixed on the target as much as possible (our objective function). I will first make a very simple baseline planner and stress-test the system so it is ready for physical testing next week.

Team’s Status Report 3/27/21

This week, our tasks were more related to integration, but still independent. Vedant and Sid were able to integrate target detection and state estimation and demonstrated impressive smoothing of the target location in 2D pixel space. Vedant also focused heavily on debugging issues with our new camera on the software side, while Sid developed CAD parts to attach this specific camera and other sensors to the drone. Alvin integrated both Vedant and Sid’s target detection and state estimation pipelines into a functional 2D to 3D target state estimation.

Our stretch goal was to begin physical testing this week, but we will push this to next week since we have faced unexpectedly long lead times for the 3D printing and connection issues with the camera. Once we can integrate all this hardware with the drone, we will begin physical testing.

Alvin – 3/13/21

Earlier this week, I presented our design review, which was focused on the specifics of implementation and testing that would help us meet our metrics/requirements for a successful project.

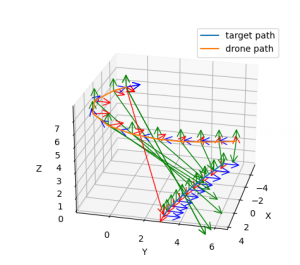
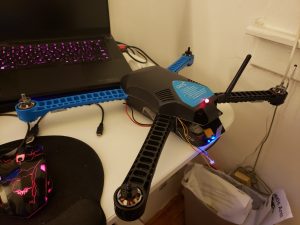
On the project implementation side, I focused on connecting the simulator to the drone’s flight controller API, and was able to send motion commands to the drone and watch the results in simulation. This will be useful since any code testing in this simulation can be directly applied onto the physical drone with no change, the only tweak will be the communication port used.

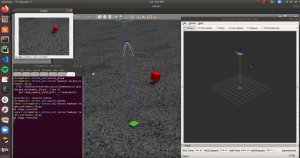
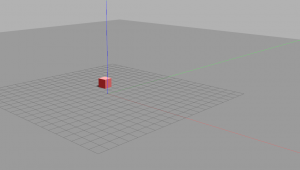
Unfortunately, our old simulator of choice (Airsim) proved incompatible with the flight controller API. I was able to get the simulator and the controller’s Software In the Loop (SITL) framework to communicate  half of the time, but the other half of the time, the simulator would randomly crash with no clear reason. After extensive search through online forums, it was clear that Airsim was still addressing this bug and no solution was available, so I decided to just avoid the trouble and work with a more stable simulator, Gazebo. Shown in the  picture is a colored cube that we will treat as the simulated human target to test the integration of motion planning and target tracking.

Next week, our priority is to begin integration and get the drone up in the air with target tracking. In this case, I will focus on making sure we have a well-tested procedure for arming the drone, letting it takeoff to a height of 20 feet, and implementing a very basic motion plan that will just follow attempt to follow the 2D direction of the target.

Alvin 3/6/21

I met up with Sid to help install the Jetpack SDK on the TX1 as well as install ROS, but weren’t able to finish the full setup due to a memory shortage. I also helped build the design review presentation for this upcoming week.

This week was extremely busy for me, and as a result I didn’t accomplish the goals I set last week: namely setting up a software pipeline for the motion planning and actually testing on the simulator. What I did instead was set up the drone’s flight controller and double-check that my existing drone hardware was all ready for use. The drone and flight controller already contain the bare minimum sensors to enable autonomous mode:

  • gyroscope
  • accelerometer
  • magnetometer (compass)
  • barometer
  • GPS

I used the open-source QGroundControl software to calibrate these sensors. The accelerometer calibration is shown as an example below:

I also wired up other sensors to the drone’s flight controller:

  • downward-facing Optical Flow camera
  • downward-facing Lidar Lite range-finder

This next week, I will finish installing the communication APIs on our Raspberry Pi to communicate with the flight controller and verify its success with ROS by sending an “Arm” command to the drone. I will also finish last week’s task to set up an initial software pipeline for the motion planning.