Joseph’s Status Report for 5/8/21

I finished the user documentation I assigned myself last week. This includes the “fpgame developer’s manual” and “fpgame getting started” guides. I have included these below. They are also available on the new public repositories.
fpgame_getting_started
fpgame_developers_manual

I split our development repository into two public repositories, one containing just the files and documents the typical user will need, and the other containing source files for advanced users.
https://github.com/FP-GAme

I changed the PPU kernel module as per Andrew’s request. In particular, the CPU’s virtual VRAM now clears upon de-initialization, allowing programs that run sequentially to start up without a modified VRAM. Andrew discovered this was an issue when switching games on his NES emulator port.

Lastly, I began work on the poster, video, and final report. We finished the poster just before writing this report. The final report is almost finished. The video has an outline written for it and a few recordings taken.

I plan to get the report and video finished sooner than later. The video will be my main focus as it has to be turned in by Monday. I have other presentations to prepare for next week, so my capstone work will be limited Monday-Wednesday.

Joseph’s Status Report for 5/1/21

This week I pretty much finalized the PPU User Library. Andrew and I worked together to debug the User Library functions related to the Sprites and the Sprite-Engine itself. Most notably on the Library’s side, the way I was writing patterns to Pattern-RAM (holding graphics data) was incompatible with the Sprite-Engine. This has been fixed. Now the library is fully tested with all parts of the PPU. Any further updates to this library will be for user experience / convenience.

I wrote an updated test tech-demo for use in the final presentation. Features “The Mall” demo again, but with updated graphics, world animation, foreground objects, and new sprites. Currently, the tech-demo is missing audio, but this will be included by the final presentation.

I finished the snes_controller_mod_instructions document. This will be included in the fpgame-usr public repository when the project is ready. Unfortunately it cannot be included here since it is larger than 8MB (it is an image-heavy step by step guide). In next week’s status report, I’ll add a link to the repository where it will be included.

I got the kernel modules to autoload. This required minor modifications to the kernel module source code. More importantly, these kernel modules are copied to the SD Card image file in a new automated build process. Steps to use this build process are included in the Work-in-progress build_from_source_guide. This document will be kept with our source files in a separate repository from the user repository called fpgame-src. This repository is for advanced users (or Andrew and I) to build the hardware and kernel modules from source. Regular users will not need to do this. The work in progress document is included below:
build_from_source_guide_WIP

Lastly, I started updating some diagrams for the final presentation slides. There were some major system interconnect changes since the design review report and presentations. These changes will be covered briefly in the final presentation.

Unfortunately I didn’t get a chance to write the “high-level guide to FP-GAme document” I was assigned in the last status report. This was dropped in favor of two new documents: Getting Started, Developer’s guide. Neither of these documents have enough information in them yet to show. They will be done by the end of next week.

Joseph’s Status Report for 4/24/21

My last progress report was posted on 4/10/21. A lot has happened in the meantime.

First, I fixed and tested the PPU DMA Engine using a new tool (Quartus SignalTap), which lets me probe various signals from the hardware while it was running. Very useful in helping me debug the DMA Engine while it was actually connected to the FPGA-to-SDRAM Bus.

I added buffering of PPU Control registers so that they sync whenever VRAM syncs (after a completed DMA transfer). This prevents screen tearing because background/foreground scrolling registers cannot be modified while a frame is being drawn, only in-between frame drawing. This wasn’t very visible over the Zoom live demo from last week, but it was there and is now fixed.

Next, I implemented the PPU Kernel Module. Andrew’s prior research and development in the APU and controller kernel modules streamlined my learning process. Unfortunately, while most of the kernel module worked okay, I ran into an issue with the FPGA-SDRAM bridge blocking DMA transfers from completing. Originally, we ran into this issue with the APU. Our solution back then was to simply move the APU to the FPGA-HPS bridge. However, I really wanted to use the SDRAM bus for PPU DMA transfers (especially since I spent significant time developing the DMA-Engine for that purpose). After long hours of debugging and trying out various things, I finally found a solution. It turned out that none of the bootloaders I had used enabled the SDRAM bridge, even though they were documented to. I had to make the PPU kernel module write to a hardware register on the HPS to enable the specific ports we were using on the SDRAM interface.

In the last few days, I’ve designed and partially implemented a User Library for interacting with the PPU kernel module. I’ve attached the WIP doxygen reference below. Feel free to take a look at the “Functions” section on the 1st or 2nd page, as they are the most legible in that PDF upload. Currently, enough of the library is written to enable a software version of the Interim Demo.

fpgame_ppu_user_library_doxygen_v1

Next week, I will

    • Test/Debug the remaining User Library functions.
    • Write an instructions document for modding an SNES Controller extension cable to work with FP-GAme GPIO.
    • Finalize an SD Card image with FPGA program file and Kernel modules.
    • Write a high-level guide to FP-GAme (FP-GAme user manual).
    • Work on Final Presentation Slides.

Joseph’s Status Report for 4/10/21

My initial task for this week (finished on Sunday/Monday) was to fix the Tile-Engine scrolling and Y-Mirror issue. Last Saturday, Andrew helped me find the bug in the Y-Mirror feature of the Tile-Engine. Every tile entry in Tile-RAM has a Y-Mirror bit, which reverses the order in which rows of a tile are fetched from Tile-RAM when it is time to display that tile in the video output. This causes the final rendered tile to be vertically flipped. The bug was that the tiles were being reversed in chunks of 2 tile rows (instead of every tile row being reversed). As for the scrolling bug, I saw artifacts when scrolling in the horizontal direction, but the vertical scroll was working just fine. I found, after much simulation and debugging, that the way I had been applying the horizontal scroll needed to be rethought. The correct behaviour was to use the most-significant-bits of horizontal scroll to determine which tiles were fetched for a given row, and then use the least-significant-bits of that horizontal scroll to determine which pixels were fetched when it came time to render.

This week, I finished the video demo used for the interim demo. It features a scrollable pixelated world modeled after “The Mall” (at CMU), with the scroll inputs controlled by the SNES controller.

I also began the rework of the PPU-CPU communication, this time using DMA over SDRAM. So far, I’ve split the VRAM into a PPU-Facing VRAM (which is accessible only by the PPU) and CPU-Facing VRAM (accessible only to the DMA Engine). Note that there were always 2 VRAMs in our implementation, but their connections were not fixed as they are now. Most notably, the CPU-Facing VRAM has had its data-width extended to 128-bits to be more compatible with the SDRAM bus and DMA Engine. Next week, I will be finishing this implementation, and (hopefully) beginning some work on the PPU driver.

Joseph’s Status Report 4/3/21

Early this week I integrated Andrew’s I/O Subsystem into the main project. This was incorporated into a work-in-progress scrolling demo on Saturday.

The majority of my week was spent on implementing the Tile-Engine and Pixel-Mixer.

The Tile-Engine is almost finished, there are just a few bugs remaining with the mirror and scroll features. Andrew helped me find the source of some of these, and I will be implementing the fixes tomorrow (Sunday 4/4/21).

The Pixel-Mixer module currently only has a background Tile-Engine attached to it, with a dummy Sprite-Engine and foreground Tile-Engine – which simply output transparent tiles.

On Saturday, I began to put together a hardware-only demo involving controller-input and scrolling of the background layer as a Minimum-Viable Interim Demo. The background tile-data, pattern-data, and color-palette-data are planned out using Tiled (https://www.mapeditor.org/), drawn using Piskel (https://www.piskelapp.com/), and then converted into .mif files via a few python scripts I wrote.

Next week I will primarily work on the video demo, fixing the remaining bugs with the Tile-Engine, and implement one of either the DMA or Sprite-Engine. Unfortunately, some of the time spent on the CPU-VRAM interface last week was misguided (my fault). The CPU interface I designed uses MMIO to write data to the PPU, which after a short discussion with Andrew, I learned was terribly inefficient. I will be doing some research to see if I can reuse one of Intel/Altera’s DMA IP blocks to copy VRAM data from DRAM.

Joseph’s Status Report for 3/27/21

Since the 13th, I have made some major changes to the PPU task schedule. Due to some design decisions made in the design review report, and most notably our decision to replace our DRAM interface with an M10K VRAM, I have decided to combine the Tile-Engine implementation tasks into a single task, and add several new tasks relating to the PPU FSM.

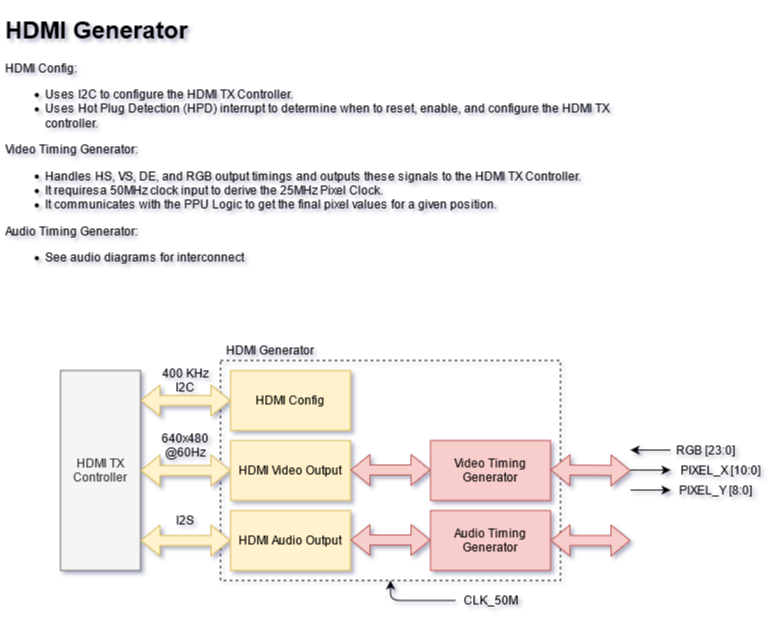
Firstly, due to the new PPU FSM design, I was required to re-implement the HDMI Video Timing. This effectively combines the HDMI Video Output and Video Timing Generator blocks into one custom block. The reason was to gain better access to important signal timings such as DISPLAY, or VBLANK, as well as to read and swap the new row buffer.

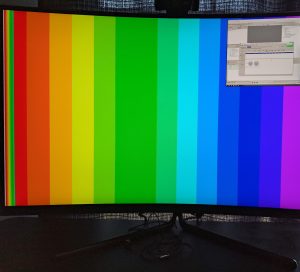
The row buffer currently initializes with a test pattern (shown in the image above). The new HDMI Video Output block reads this buffer for every row. The goal (due next week by Wednesday) is for two row buffers to be swapped in and out, and the PPU-Logic (Tile Engine, Sprite Engine, and Pixel-Mixer) will fill the buffer not in use. The important progress made here is that the HDMI Video Output automatically fetches pixel data in the row, extracts an address from that pixel data to a color in the Palette RAM, and then reads from Palette RAM to obtain the final color. This sequence occurs 320 times in a row, with each result held for an additional 25MHz clock cycle to upscale to 640px resolution.

The next task I completed was the Double-Buffered VRAM implementation. Our VRAM consists of two identical VRAMs, one which is used by the PPU during the DISPLAY period, and one which the CPU can write to during the DISPLAY period. The VRAMs must be synchronized at the start of the BLANK period so that the CPU can write to a VRAM which accurately reflects the changes it has made since the previous frame. The Double-VRAM was implemented using a SystemVerilog Interface to manage all 36-per-RAM signals. The reason there is such a large number of signals is because we use the native M10K dual-port RAM configuration, which allows for an extra port for every signal, and our VRAM is split into 4 segments (each with their own controls). The VRAM Sync is implemented in a new block called VRAM Sync Writer. The VRAM Sync Writer controls all ports of each dual-port VRAM in order to speed up the copying.

Test-benches and simulations with RAM models provided by Altera were used to verify that the synchronization works. I instantiated RAM modules with pre-initialized data, sent the start signal to VRAM Sync Writer, and compared the resulting RAMs using ModelSim’s interface.

Lastly, I’ve implemented the PPU FSM and CPU write. No physical hardware tests have been done with respect to CPU write, but a dummy CPU module was used to write values to each VRAM location, and the results were confirmed via ModelSim. I’ll hopefully finish this after this report is due tonight, and get started working on the Tile-Engine tomorrow.

I am almost on track with the progress expected on the schedule, after communicating with Andrew, I’ve decided to push back the final PPU Kernel Module until after the interim demo and focus on a user-space (non-kernel-module) software driver instead.

Joseph’s Status Report for 3/13/21

After feedback on our design review presentation on Monday, it was decided that I should look into an upper-bound access time on SDRAM from the FPGA. For context:

  • The CPU uses an SDRAM controller to schedule and arrange simultaneous SDRAM requests. Since there are multiple input read/write command ports (from FPGA and CPU) and only a single output read/write command port (TO SDRAM), the SDRAM is a contested resource.
  • Since the SDRAM is a contested resource and the order of requests is essentially non-deterministic, we must assume the worst-case access time for our FPGA so we can design our hardware to meet HDMI timing constraints.
  • Unfortunately, few details on the SDRAM controller IP are provided by Intel. This means some assumptions have to be made regarding the SDRAM controller’s internal delays.
  • We can, however, read the datasheet on the actual SDRAM chip – which gives us ideal CAS timings. The CAS latency is the time between a read command being sent by the SDRAM controller and the data being received by the SDRAM controller from the SDRAM. The CAS latency provided by the datasheet is only accurate for accesses in the same row. Actual latency increases if memory accesses are far enough from each other. This makes it important to utilize burst reads to achieve the nominal CAS latency.

In my notes, I make some assumptions about the timings introduced by Qsys interconnects and the SDRAM controller. See my notes below:
http://course.ece.cmu.edu/~ece500/projects/s21-teamc1/wp-content/uploads/sites/133/2021/03/Upper-Bound-on-SDRAM-Read.pdf

To summarize the findings:

  • The CAS latency is 7 cycles on a 400 MHz clock. This is less than a clock cycle on our 50 MHz clock.
  • The RAS-to-CAS latency is about a clock cycle on our 50MHz clock.
  • 10 commands can exist in the command FIFO in the SDRAM controller. Assuming ours is picked last (in the worst case), we have to wait the equivalent of 10 RAS-to-CAS latencies + 10 CAS latencies.
  • I’ve assumed interconnect latencies adding up to 3 clock cycles.
  • A single read with a row-miss (accessing a different row), along with 9 other row-miss reads is our worst case latency. This adds up to a latency of 23 50MHz clock cycles.
  • The actual timings can be made better by doing burst reads or pipelining reads.
  • We will need to be careful about how much data we transfer. Transferring all of the PPU data over DRAM is infeasible. Transferring only the data needed by a scan line may be more feasible, but still difficult.

On Saturday, I brought this information along with a few PPU design ideas to an internal “Design Review” with Andrew. We came up with an alternative design using M10K memory – the main advantages over the original idea include less overall data transfer, and a safe timing failure condition: If the CPU somehow cannot finish its writes to the PPU’s VRAM in time before the frame must be rendered, then the frame is dropped and the previous frame is displayed (essentially dropping to 30FPS if this pattern continues).

My original goal for this week was to implement a tile engine prototype which accesses SDRAM for some tile data and displays it to the screen. Unfortunately, while I have made progress closer to a full PPU design, I have not implemented this yet. This means I will have to complete the simple Tile-Engine altogether next week. I am behind this week, but now that we’ve decided to move the PPU’s VRAM from SDRAM, the actual PPU design should be a little bit easier. I should be able to catch up (written design report time permitting) with the Tile Engine implementation by the end of next week.

Joseph’s Status Report for 3/6/21

I spent time early on in the week learning about the bus interfaces that the DE10-Nano development environment provides as soft IP. Intel has an hour and a half video on the subject that I took notes on:
https://www.youtube.com/watch?v=Vw2_1pqa2h0

These notes include the most important elements to discuss during next week’s team meetings:
http://course.ece.cmu.edu/~ece500/projects/s21-teamc1/wp-content/uploads/sites/133/2021/03/Tools-Platform-Designer-Updated-3-6-21.pdf

These bus interfaces will be extremely important for us next week when we begin to implement DRAM fetching and HPS to FPGA communication.

On Thursday and Friday, I did research on I2C configuration of HDMI. This is important as we want to change the video and audio data formats from their defaults. To study I2C configuration of HDMI, I modified the HDMI_TX demo and read the ADV7513 programming/hardware guides. I’ve included my notes on this below. Warning: the notes have unfinished sections with highlights to remind myself to look into them after this status report is due.
http://course.ece.cmu.edu/~ece500/projects/s21-teamc1/wp-content/uploads/sites/133/2021/03/I2C-Config-Updated-3-6-21.pdf

On Friday and Saturday, I began preparation of various system diagrams. I’ve included links to the diagrams and their notes below.

System-Interconnect Diagram:
http://course.ece.cmu.edu/~ece500/projects/s21-teamc1/wp-content/uploads/sites/133/2021/03/System-Interconnect.png

HDMI Config Diagram:
http://course.ece.cmu.edu/~ece500/projects/s21-teamc1/wp-content/uploads/sites/133/2021/03/HDMI_Config.png

HDMI Generator Diagram:
http://course.ece.cmu.edu/~ece500/projects/s21-teamc1/wp-content/uploads/sites/133/2021/03/HDMI-Generator.png

Joseph’s Status Report for 2/27/21

This week I did research on HDMI for our project. I specifically wanted to know what protocols/interfaces the PPU needed to support on the video output. Knowing this will help narrow down possibilities for an actual PPU design. For example, we can determine things like signal timings, clock rate, and other constraints that will get us started on designing and testing the Tile Engine and other PPU features.

The DE10-Nano uses an HDMI Transmitter Controller IC called ADV7513. The link below is the datasheet containing the general features and some electrical characteristics for the chip:
https://www.analog.com/media/en/technical-documentation/data-sheets/ADV7513.pdf

I logged my research notes on HDMI in a document. The resources page contains links to the various websites, datasheets, and manuals I used. The version for 2-27-2021 is linked below:
research_PPU_HDMI_2-27-21

To summarize the document:

  • There is an HDMI demo for the DE10-Nano which showcases a simple pattern graphics test and simple audio output.
  • Interestingly, it shows that we must interface with the ADV7513 using a VGA-like signal protocol (Horizontal Sync, Vertical Sync, Data Enable, 24 bits of RGB).
  • Even more interestingly, it may serve as a complete, standalone module to use with our other PPU features. This means we have the option to avoid dedicating time to the HDMI implementation if we reuse the implementation from the demo.

After reviewing the demo code for HDMI on the DE10-Nano, I decided to swap the HDMI-bring-up task on the schedule to this week and design the PPU interface next week. I still intend to work on the PPU interface this week (on Sunday 28th – past the due date of this post), however, ensuring that HDMI could be taken care of was more important for me so that I could begin to gauge what kinds of PPU designs were possible. This schedule swap was mainly done as a mitigation strategy to prevent HDMI implementation (something I am unfamiliar with) from becoming a problem later on in the project.

The last interesting note about this week: I reached out to the TAs and course staff Thursday to get the DE10-Nano boards ordered. I hope to get access to these boards early so that we can test our code on actual hardware as soon as we are able to write it.

I was unable to design the PPU interface this week, so I am slightly behind schedule. I still have time to do it on Sunday (28th), but I expect it to be completed regardless by the next status report.

Next week I will be finishing the PPU interface as well as helping to design the system call interface. We also will have to be careful and plan around the time we must spend on the design review presentation.

Joseph’s Status Report for 2/20/21

This past week I was tasked with doing research on retro-console audio. We specifically wanted to know:

    1. How is audio typically generated on retro consoles?
    2. What should our audio requirements be?

Firstly, I had gathered some great resources on retro console architecture, featuring several of Nintendo’s consoles. The sound specifications (along with some graphics and CPU specs) can also be found from these links:
https://www.copetti.org/writings/consoles/nes/
https://www.copetti.org/writings/consoles/game-boy-advance/

I had also found a good resource for the Game Boy sound interface from the software perspective:
https://gbdev.gg8.se/wiki/articles/Gameboy_sound_hardware

In short, the audio can be synthesized digitally using counters and a digital mixer implemented using adders. An implementation similar to the Game Boy Advance (GBA) seems feasible. To summarize the specifications for the GBA’s audio, there are 6 channels for digital sound synthesis:

  • 2 square wave generators with programmable frequency.
  • A noise channel.
  • An arbitrary waveform generator (which outputs a pre-programmed sequence of 4-bit samples).
  • 2 8-bit PCM channels.

After bringing these findings to the team meetings mid-week, we decided on requiring a single 8-bit PCM channel. This is the most feasible option given the heavier requirements of the graphics PPU.

I spent Friday night and Saturday morning setting up and customizing the project website.

I am currently on schedule. However, I still have to plan on the individual deliverables to complete next week.