Last Sunday we confirmed our Gantt chart and schedule. Then we divided up the components we planned on using to research so we could place an order . I researched the display we would use and how we can integrate the start/stop button with the TX1. For the display, I concluded we should buy a small 5 inch HDMI display from Adafruit.

The display can be powered by micro USB. The TX1 has an HDMI port and a micro USB that can supply the 500 mA current required by the display. This display was ideal as it is small, so it can be something we can wear on our arm, and requires no custom power management circuity as it can be powered through USB. Since right now we are planning to place the TX1 in a backpack and display on the arm, it is important to minimize the wiring between the two components.
Next, I created a simple circuitry to connect our start/stop button to the TX1.
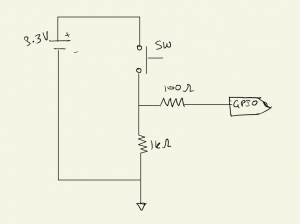
The J21 header pin 13 on TX1 has a pull down network which will complete the circuit when the button is pressed. The 3.3V is provided by the TX1 GPIO pin 1. I initially plan to have this circuitry on a small breadboard next to the display for testing and later transitioning to through hole assembly. I plan to get all the components for the button circuitry from the ECE lab.
I also researched a JTAG debugger we can use for the TX1 as the kit we have did not come with a JTAG debugger.
Next week I hope to start researching on the color/blob filtering. I want to get a basic filter implemented on the TX1 using the built in camera to detect a bright orange sticky note. Since we do not have the camera we will use on the drone, I am using the TX1 built in camera as the processing will be done by the TX1 in any case. I also plan to help my team place the order for some of our critical components like the camera and display.