Team’s Status Update 11/19

This week the team was working on  individual parts of the project. Mehar   labelled the images we captured on Friday and began doing custom training on AWS. Chen began implementing the filter feature for the UI and Aditi finished integration between the camera and CV code. On Friday we revisited our goals with the MVP and a discussion with Prof Tamal has started a conversation about how our MVP would reflect a scaled version of our project and what narrative/ explanation will we have when asked about the scalability/adaptability of our MVP.

This may result in some internal restructuring of our project, like adding in a cloud server for the website or Raspberry Pi for running the server on the local network. Additionally this would affect how our database would function.

Aditi’s Status Update 11/19

This week I continued fo work on integration. The Jetson has continued to give me trouble. After exhausting my options for install of pytorch vision that would work at runtime, I decided to start from scratch. I had already followed the instructions for install from scratch Pytorch.org, YOLOv5, NVIDIA Developer website and the NVIDIA forums with no luck. I sat down with Adnan and Prof. Tamal to help me debug my current issues. I had a feeling there were some compatibility issues between library module versions, versions of python and versions of jetpack. After reflashing I decided to use the latest version of Python that was supported by Jetpack 4.6.1 which comes preinstalled when you flash the Jetson. I was very meticulous with reading the installation pages and finally managed to get YOLOv5 inference to work on the Nano! This is a big win for me as I have been trying to set this up for weeks. It can take a photo with the USB camera, do inferencs and output the bounding boxes and object labels. Unfortunately we had run into a new road bump. Our Django app is written for version 4.1 but Python 3.6.9 only supports 3.6 of Django. Our existing code will need to be rewritten to support 3.6.

Output from USB Camera and YOLOv5 — all done on Jetson

Team’s Status Update 11/12

This week our group as a whole was working on integration and data collection. On Sunday – Wednesday we worked on getting our various components working together. We refactored some of the existing code and created a virtual environment to ensure our code did not have unknown dependencies. Later in the week, we worked on creating the custom dataset for YOLO. We made a set of images we were hoping to capture. We also reworked our Gantt chart to better reflect our tasks and current status.

Aditi’s Status Update 11/12


On Sunday I attempted to connect the Jetson Nano to CMU’s local network. There were a lot of issues while trying to get the Jetson connected. It appears that a device with the same MAC address was registered on CMU’s wired network already . Looking more into this, it appears to be a known Jetson issue, where there was a manufacturing error where multiple Jetson Nano’s were given the same unique MAC address, it’s also possible that this Jetson has already been registered on the network . I tried to remedy this error using various suggestions given by the Jetson blog and stackoverflow but I was unable to solve this issue. I switched to connecting the Jetson to CMU’s local network using the Wifi adapter. After finding the correct drivers and appropriate library I was able to set up a WLAN connection. I was able to register the wireless MAC address with CMU’s network and connect successfully. The web application is now accessible using Jetson’s unique IP on CMU’s network.

During the week I was trying to get YOLO working on the Jetson. There is a known numpy issue with the latest version which results in an invalid instruction. I was forced to downgrade torch and torchvision. Once making these changes, new errors appeared where loading the YOLO weights using torch.load caused a segfault. I was unable to solve the compile time issues but I am now trying out a Jetpack docker to see if I will have more luck with that.

Chen’s Status Report for Nov12, Nov 5 & Oct 30

Updated the perspective algorithm, so that it can now 1. crop image, 2. better adjust the perspective by applying an offset(the divide ratio/offset ratio)3. Better boundary check. The current function still needs to manually set the cropping dimensions but it is soon expected to crop automatically.  This simply means that the code will crop the image based on the left/right/up/down most objects. The code still needs cleaning up.

The parameters needed for the perspective algorithm also includes the ratio of the length of the upper side of the table and the lower side of the table, or similar; This parameter has currently set manually. This not only adjusts the x coordinates, according to its y coorinates(the top 2 vertex of a trapezoid is stretched to the side), it also adjusts the y coordinates(the farther it is to the back of the image, with the same amount of pixels, it represents more distance in reality).More work could be done so that such ratio could be calculated automatically, such as image segmentation algorithm. However, it does not perfectly address the case where there is no table/the table is at angle to the left/right/ the table is just a smart part of the room.

One thing we can do is just to set the scope of this project, so that such parameter is given when setting up the camera.

Figure 1: original plan without straightening

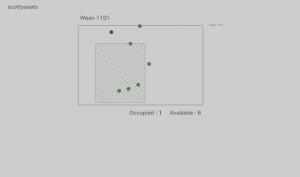
Figure 2: adding perspective adjustment(not effective due to how man white space there is top of the image, thus adding crop is necessary)

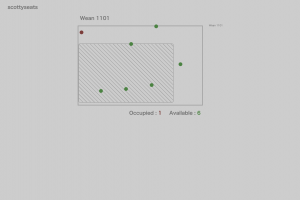
Figure 3: adding cropping(Focus on the seats, the seats are more aligned, but the table is a problem)

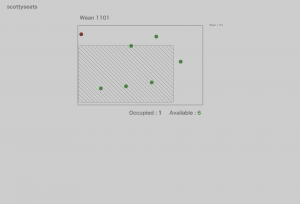
Figure 4: Applying offset

Another thing we realized during the demo is that we are currently only using portrait images to test out the results. While landscape images will work, it will be stretched to make it fit in portrait mode. We could set it so that we only allow for a specific kind of import, or, from the user perspective, the “stretched” result does perfectly reflect where the seats and tables are and all other vital information for them to make the decision. Thus, this is not too big a problem.

I also updated tables during the past week. Tables will not be displayed. But there were 2 problems I encountered:

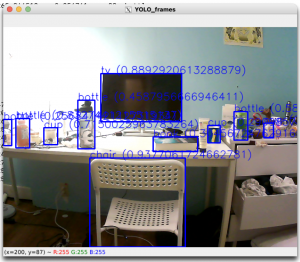
  1. Tables might look “fat”. This is because yolo is not capable of getting the outline of the table, namely a rectangle instead of a trapezoid. This is solved partly today, by when calculating the length of the table and feeding the left-bottom coordinates and the right-top coordinates into the straightening method algorithm, for the right-top coordinate, we use the x value of itself but the y value of the left-bottom coordinate. I understand that this sounds confusing, but this is to counter the problem that since the right-top point it farther “back”, it will be stretched out more, making it “fat”.

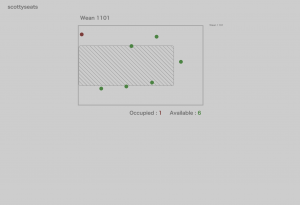
    Figure 5: after only using the y value of the bottom vertex of the bounding box of the table(since its a rectangle)

  2. Seats might appear in the table. As a side effect of the problem above, seats could be in the table. This can be countered by either
  • a. shortening the table : This means that the table is decreased in width and height based on the y and x coordinates of the seats that are in the table. This might be dangerous where there actually is a seat in the table, making the table look too thin.
  • b. moving out the chairs.: This method is implemented. However, the problem is that we can only choose to move the seat either to the left/right/top/ or bottom. This is currently determined by the distance of the chair to the closest border of the table, so whichever is the closest, it will be moved out in that direction. This distance is determined by the pixel ratio, so a number between 1 and 0, so it does not perfectly reflect the actual distance. For example, if the image is super thin, then the same change in the x coordinate will have a much larger ratio than that in the y coordinate.

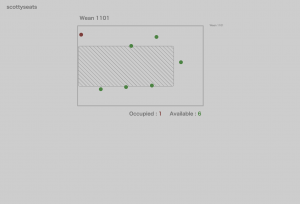
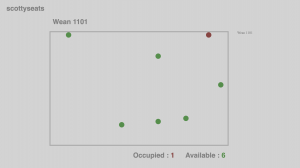
Figure 6: after moving out the seats

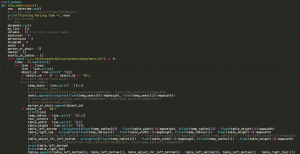
Figure 7: code for parsing the file and store seats and tables information

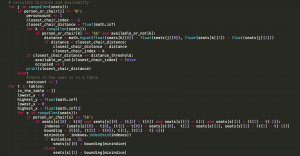
Figure 8: code for calculating the availability of seats and moving seats out of tables

The availability is calculated according to the closest seat to a person. However, there are a few problems I encountered:

  • We wanted so that if the person is far away from the seat, the seat won’t be occupied, thus we want a threshold. This is applied at first, but the threshold value varies from different rooms to different rooms, so it is likely impossible to have a fixed value for threshold.
  • The distance is inaccurate due to perspective issues
  • We can not differentiate between a standing and a sitting person, thus we would mark a standing person as sitting.

Other parts of the views.py file is not included since it is not the core/critical part but only performs systematic functions

Database will be implemented this/next week, so that we can proceed with multiple rooms. The database model:

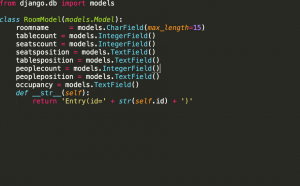
Figure 9: database model

sn.js file

This basically sends request to the backend and runs on load. Related functions are sendRoomRequest.

Figure 10: initialize(the setInterval function might change afterwards)

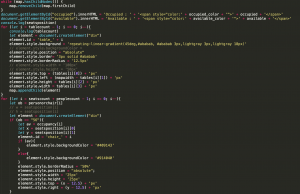
Figure 11: parsing the JSON response, and put a dot on whereever there’s a seat and drawing the table

Other functions include updatePage.

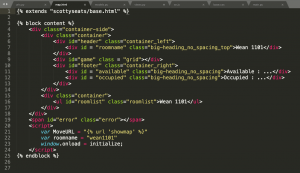
Figure 12: Other files. (html/css)

Plan: after we have data from different rooms, we can easily parse through all the files, store it in database, and when ever the frontend requests it will only be a “GET” method , the backend will only respond will all the information from the database, and then filter/search functions for rooms will be implemented.

This Friday will collect more training dataset and label images will LabelMe.

Mehar’s Status Update for 11/5

This past week most of my work has been in integration and environment setup for training. I caught the flu earlier in the week and wasn’t able to work until about Thursday, so training has been pushed back by about a week now. But I am working on finishing environment setup and training will be done this week.  In terms of integration – I spent time writing code to connect the camera, preprocessing and model together. I spent another 5-7 hours on my own rewriting and tweaking the code to integrate seamlessly with the web app. In this next week, I will need to work more this week to get us back on track for model training.

Aditi’s Status Update 11/05

This week I worked on integration of all of the various components onto the Jetson Nano.

  •  I attempted to create a virtual environment and install the required libraries but ran into errors due to different versions of python3 
  • I upgraded python3, there were additional steps as it was an Ubuntu system. 
  • Following this, there were a few more errors regarding specific libraries which took  to resolve on the whole
  • Once all the requirements were met, I tried to start the django and apache front-end. 
  • I had to setup a tightserver so that I could headlessly access the local website
  • I had to change the port the website was being hosted on as it was on the same port as the VNC remote access
  • Setup the website to be accessible via LAN
  • Issues with the way we were load YOLO weights which affected front-end, these also needed to be debugged.

Overall, I spent 8+ hours on integration. I had surgery earlier this week so I did not make much other progress.

Website being access via LAN

Team Status Update 11/05

No changes were made to the existing design. We worked mainly on integration this week. Mehar and Chen were able to push all changes to a shared repository and get their parts working together. Aditi ported the code to the Jetson Nano, setting up the environment and getting access to the website through the local network. We are all a little behind when compared to the Gantt chart so we need to be careful of how we spend the following weeks.