Team Status Report 3/27

This week JP and Logan linked up in person to begin the fabrication process. We laser cut our external housing and modeled the internals. The external housing is cut from 1/4″ plywood with 8x8x21 inch dimensions (external length). We decided that it would make fabrication and mounting the camera easier if we constructed the housing as a rectangle and just made the internal parts with an internal circle that can freely rotate. Currently it is clamped and we are giving the glue time to dry properly.

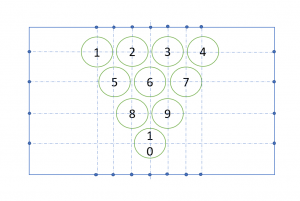
We also discussed an algorithm for displaying cups in the proper place on our UI. We decided we need to make a simple calibration map/image so the camera and place the cups in pre-defined cup locations based on each formation. As seen in the image below, our calibration map will line up cups based for far way a cup ellipse center is relative to the closest intersecting lines.

The codebase is fit to cross compile for windows x64 and linux arm64 so this will make integration and testing easier since we use both personal laptops and the jetson nanos to run our application.

Logan Status Report 3/27

This week JP and I modeled and fabricated the external housing for the robot in TechSpark. It took a little bit longer than we expected to get familiar with the laser cutter and we ended up making a few small mistakes but came out of it with all 6 sides cut, including the mount on the rear for the tablet. As far as electronics, the stepper motor and the drivers arrived on Thursday. I am still awaiting the DC motor delivery however. I was able to begin soldering the control board for the stepper motor and put together a test setup with my Arduino and the motor along with some example code to check everything is working. I did make a small mistake soldering though, and will have to correct it in TechSpark on Sunday because I don’t have a desoldering tool. The board works though: a small LED in the corner glows when I turn the motor.

Stepper Motor with control board:

I also made a lot of progress on the 3D model and assembly. After the DC motor gets here and I can get the dimensions on that I can add that to the upper mount and get it printed. The launcher is likely the only thing we will print, the outer circle we can just cut out of acrylic and the bottom we can do the same. Pictured is the main launcher assembly where the balls will roll in and be launched by the motor spinning at the bottom.


My biggest blocker right now is still not having the DC motor. I’ve been waiting over a week for that part now and I’m wondering if the best option would be to just drive to a hardware store to buy one temporarily or check if there is one in inventory I can use.

Juan Pablo Status Report 3/20/21

This week I ordered another Jetson Nano and tablet online so I can work on the UI at home and make sure my implementation will actually work on the Jetson when we move to integrate all the pieces. I also started working on the game state management. This will act like an fsm in which the system will move from state to state based on binary decisions. 

This week I will continue working on the game state code and will start putting together an initial UI with basic cup selection and a settings page.