Team Status Report for 10/17/26

For the week of October 4th–11th, our team moved Iteration 1 from completed design files into fabrication and early assembly. We finished printing all of the planned robot-arm components and began assembling the base. This allowed us to begin validating the physical fit of the printed pieces rather than relying only on the SolidWorks assembly and simulation results.

We also refined the CAD representations of the motors, bearings, shafts, power components, and other purchased hardware so that the model more closely matches the parts used in the physical build. Updating these measurements reduced the risk of mounting, clearance, and alignment problems during assembly and gives us a more accurate reference if any components need to be revised or reprinted.

The modeling and printing work planned for Iteration 1 is complete. However, the physical assembly is slightly behind our original schedule because the fabrication work took longer than expected and several additional parts have not yet arrived. Our next priority is to finish the base and joint assemblies as the remaining hardware becomes available, then verify the arm’s alignment, clearances, and range of motion.

For next week, our team plans to:

  • Finish assembling the base and continue building the remaining arm sections.
  • Install the motors, bearings, shafts, and power components as the remaining hardware arrives.
  • Verify that the purchased components match the refined CAD models.
  • Test joint fit, alignment, and range of motion during assembly.
  • Update or reprint any components that require dimensional corrections.
  • Continue the ROS2, URDF, and control-system integration for the physical arm.

Week-Specific Considerations

Part A was written by Jonathan Waller. Part B was written by Aaron Tang. Part C was written by Bryan Hong.

Part A: Global Factors — Jonathan Waller

Our 6DOF drawing robot addresses global factors by making physical surface-drawing automation accessible to non-academic, non-technical creators far beyond specialized robotics environments. Traditional six-axis industrial arms require specialized programming knowledge and heavy capital investment, isolating advanced automation tools within large industrial facilities or technical research institutions. In contrast, our system is designed for independent artists, small business owners, and creators anywhere in the world. It features a simple browser-based web interface that allows non-technologically savvy users to upload standard SVG files and execute jobs without needing coding or robotics expertise. Furthermore, by leveraging an open-source ROS2 software stack, 3D-printable structural components, and affordable off-the-shelf hardware, the solution can be deployed, repaired, and operated globally without reliance on specialized regional supply chains or high-cost industrial infrastructure.

Part B: Cultural Factors — Aaron Tang

Cultural concerns can be addressed in the design of our 6DOF drawing robot by providing users the option to select the images, scripts, writings, symbols, or other visuals they would like the robot to recreate without having to resort to an established library of drawings meant to represent a particular culture. Since the web interface of the robot accepts common SVG files, it gives creators the freedom to submit any content that is relevant and meaningful to their culture or community. Additionally, the use of the browser interface for input means that the user does not have to become familiar with specialized robotics instructions and can use the interface in multiple languages.

Moreover, we are aware that drawings can include culturally sensitive images or materials protected by intellectual-property laws. We design our drawing robot as a tool meant for user control rather than a system capable of selecting or interpreting cultural material on its own. Providing clear documentation and allowing user control can facilitate responsible usage of the product while still giving each community the ability to adapt the open and 3D printable design to their own materials, culture, art practices, and legislation.

Part C: Environmental Factors — Bryan Hong

Our 6DOF robot arm does not require complex machining and commercially-inaccessible hardware that is typical of larger robotic systems. Instead, by using 3D-printed parts and relatively-inexpensive hardware, our robot arm generates less material waste during its lifespan. For example, if a component on our system breaks, it can be easily reprinted and refitted, whereas other robotic arm systems would require the purchasing of replacement parts or an entirely new system. Factoring in the energy consumed to machine these replacement parts and/or an entirely new system, it is clear that our robotic arm will result in less natural resource consumption.

Additionally, the robot arm’s ability to reproduce drawings directly onto a surface can help reduce the need for repetitive manual work. Because our system is fully programmable, it allows users to produce multiple designs with a consistent process, potentially reducing errors and wasted materials during repeated drawing tasks.

Although our 6DOF robot arm is not designed specifically for environmental conservation, simple construction and use of accessible components provide opportunities to reduce material waste compared to more complex robotic arm systems. As we develop the system further, factors such as material selection, efficient power management, and proper disposal/recycling of electronic components and 3D-printing waste will be important considerations. These practices can help reduce the robot’s environmental footprint while supporting its long-term usability.

Bryan’s Status Report for 10/17/26

For the week of October 4th – October 10th, my main focus was preparing for hardware integration of our 6-DOF robot arm. Some of our ordered components arrived on October 6th, later than expected, which left limited time to begin configuring the power supply and motors. I was also unable to continue working starting October 8th due to travel, further limiting the time available for implementation.

With the parts now becoming available, I am preparing to begin configuring the power supply and motors to support the next stage of integration. This will be my primary focus for the upcoming week alongside helping with Iteration 1 assembly, since we cannot move forward with our project unless all electrical components are working properly.

I have not yet started implementing the OpenCV AprilTag detection and tracking system on the NVIDIA Jetson Orin Nano with the Intel RealSense D455, since we did not finalize our Iteration 1 design on schedule. Therefore, since the size of the base was undetermined, the location of the camera was likewise undetermined. Now that we are beginning system integration, I intend to begin prototyping AprilTag detection this week.

Note that I am submitting this individual status report and my part of the team status report past the slated deadline. I have been traveling internationally since October 8th and intended to complete my status reports while on my flight back to the US on October 17th, but the airplane WiFi was unfortunately inoperable.

For this upcoming week, I intend to:

  • Configure and test power supply and motors.
  • Begin prototyping OpenCV AprilTag detection and tracking on the NVIDIA Jetson and Intel RealSense D455.
  • Work with Jonathan on Iteration 1 assembly.
  • Continue preparing the hardware and software components for integration into the Iteration 1 system.

Aaron’s Status Report for 10/17/26

For the week of October 4th–11th, I focused on moving our ITERATION 1 design from completed CAD files into 3D printed parts to assemble. We finished printing all of the designed components for the arm and began assembling the base. Reaching this stage was an important milestone because it allowed us to start checking how the printed pieces fit together outside of the SolidWorks assembly.

Alongside the printing process, I started refining our CAD models for a few purchased components now that we have received the physical measurements, including the motors, bearings, and power system. I updated these models to match the parts we plan to use as closely as possible so that the mounting locations, clearances, shaft dimensions, and enclosure measurements remain accurate during assembly, as we realized the motor enclosure for one of the bases was too tight. This helped reduce the risk that differences between placeholder models and the real components would require larger redesigns later.

All of the modeling and printing work planned for Iteration 1 is now complete with revisions still to be printed. However, the physical assembly is slightly behind our original schedule: we’ve started with the base, but still need to complete the rest of the arm and are waiting for several additional parts to arrive. Once those parts are available, I will need to verify the fit of the motors and bearings, complete the joint assemblies, and correct or reprint any components that do not match the purchased hardware.

I am on schedule with the CAD and printing portions of my Iteration 1 responsibilities, but we will need to make up some time during assembly. The completed model and printed parts give us a solid foundation, and the remaining work is primarily integration and fit verification.

For next week, I plan to:

  • Continue assembling the base and remaining arm sections.
  • Install the motors, bearings, and power components as the remaining hardware arrives.
  • Measure the purchased components and compare them against the refined CAD models.
  • Test joint alignment, clearances, and range of motion during assembly.
  • Update or reprint any parts that require dimensional corrections.
  • Document the completed Iteration 1 assembly and any design changes needed for the next iteration.

Jonathan’s Status Report for 10/17/26

For this week, I dedicated my time toward structuring our ROS2 repository on the Jetson Nano, developing custom kinematic and torque analysis scripts in Python, and helping finalize our hardware parts list for Iteration 1. A major milestone for this week was creating a comprehensive mathematical simulation model of our 6DOF arm to verify that our selected serial bus servos can handle expected joint loads across our workspace (see below).

On the software and simulation side, I expanded our ROS2 environment on the Jetson Nano by installing necessary development utilities, creating our team’s official GitHub repository, and laying out the core software framework for our project. To validate our mechanical design before 3D printing, I wrote a dedicated Python robot class to process our arm’s link lengths, joint limits, and component masses. Using this class, I implemented forward kinematics, Jacobian matrix calculations, and inverse kinematics solvers, sampling various coordinate points across our 3D workspace. By coupling these kinematic transformations with static load physics equations, I confirmed that our calculated joint torques fall comfortably within the operating limits of our smart serial bus servos for Iteration 1 (see below for graph of workspace points tested).

Beyond simulation, I collaborated with the team to finalize our master hardware parts list for Iteration 1 so we can get all necessary servos, bearings, and power components ordered. We also wrapped up the remaining CAD design details for Iteration 1. While finalizing the CAD model took longer than anticipated and pushed the start of 3D printing to this weekend, we now have a solid design ready to manufacture.

I am mostly on track with my individual software and analysis tasks, though as a team we are slightly behind schedule on physical assembly for Iteration 1, so we will need to pick up the pace once parts finish printing and hardware arrives.

For next week, I plan to:

  • Clean up and document the Python torque and workspace calculation scripts.
  • Expand our ROS2 software framework and construct a preliminary URDF model to visualize the robot arm in RViz2.
  • Begin setting up the initial tf2 frame tree structure for coordinate transformations between the robot base and end-effector.
  • Collaborate with Bryan on 3D printing execution and begin physical assembly of Iteration 1 as motor hardware arrives.

Team Status Report for 10/3/2026

For the week of September 27th – October 3rd, our team made significant progress toward finalizing the Iteration 1 design of our 6-DOF robotic arm. Our main focus was completing the mechanical design, validating the robot through simulation and torque analysis, finalizing the hardware parts list, and preparing for physical implementation when our ordered parts begin arriving.

A major area of progress was remodeling our robot around the dimensions and geometry of the UR3e model from last week. We used the UR3e’s dimensions as a reference for our own kinematic model, allowing us to use a proven robot configuration while adapting the design to our 3D-printed links and selected smart bus servos. The updated SolidWorks assembly now contains modeled representations of the purchased smart bus serial servos, power supply, shafts, and other components. The end effector was also modified to support a pen for our intended testing.

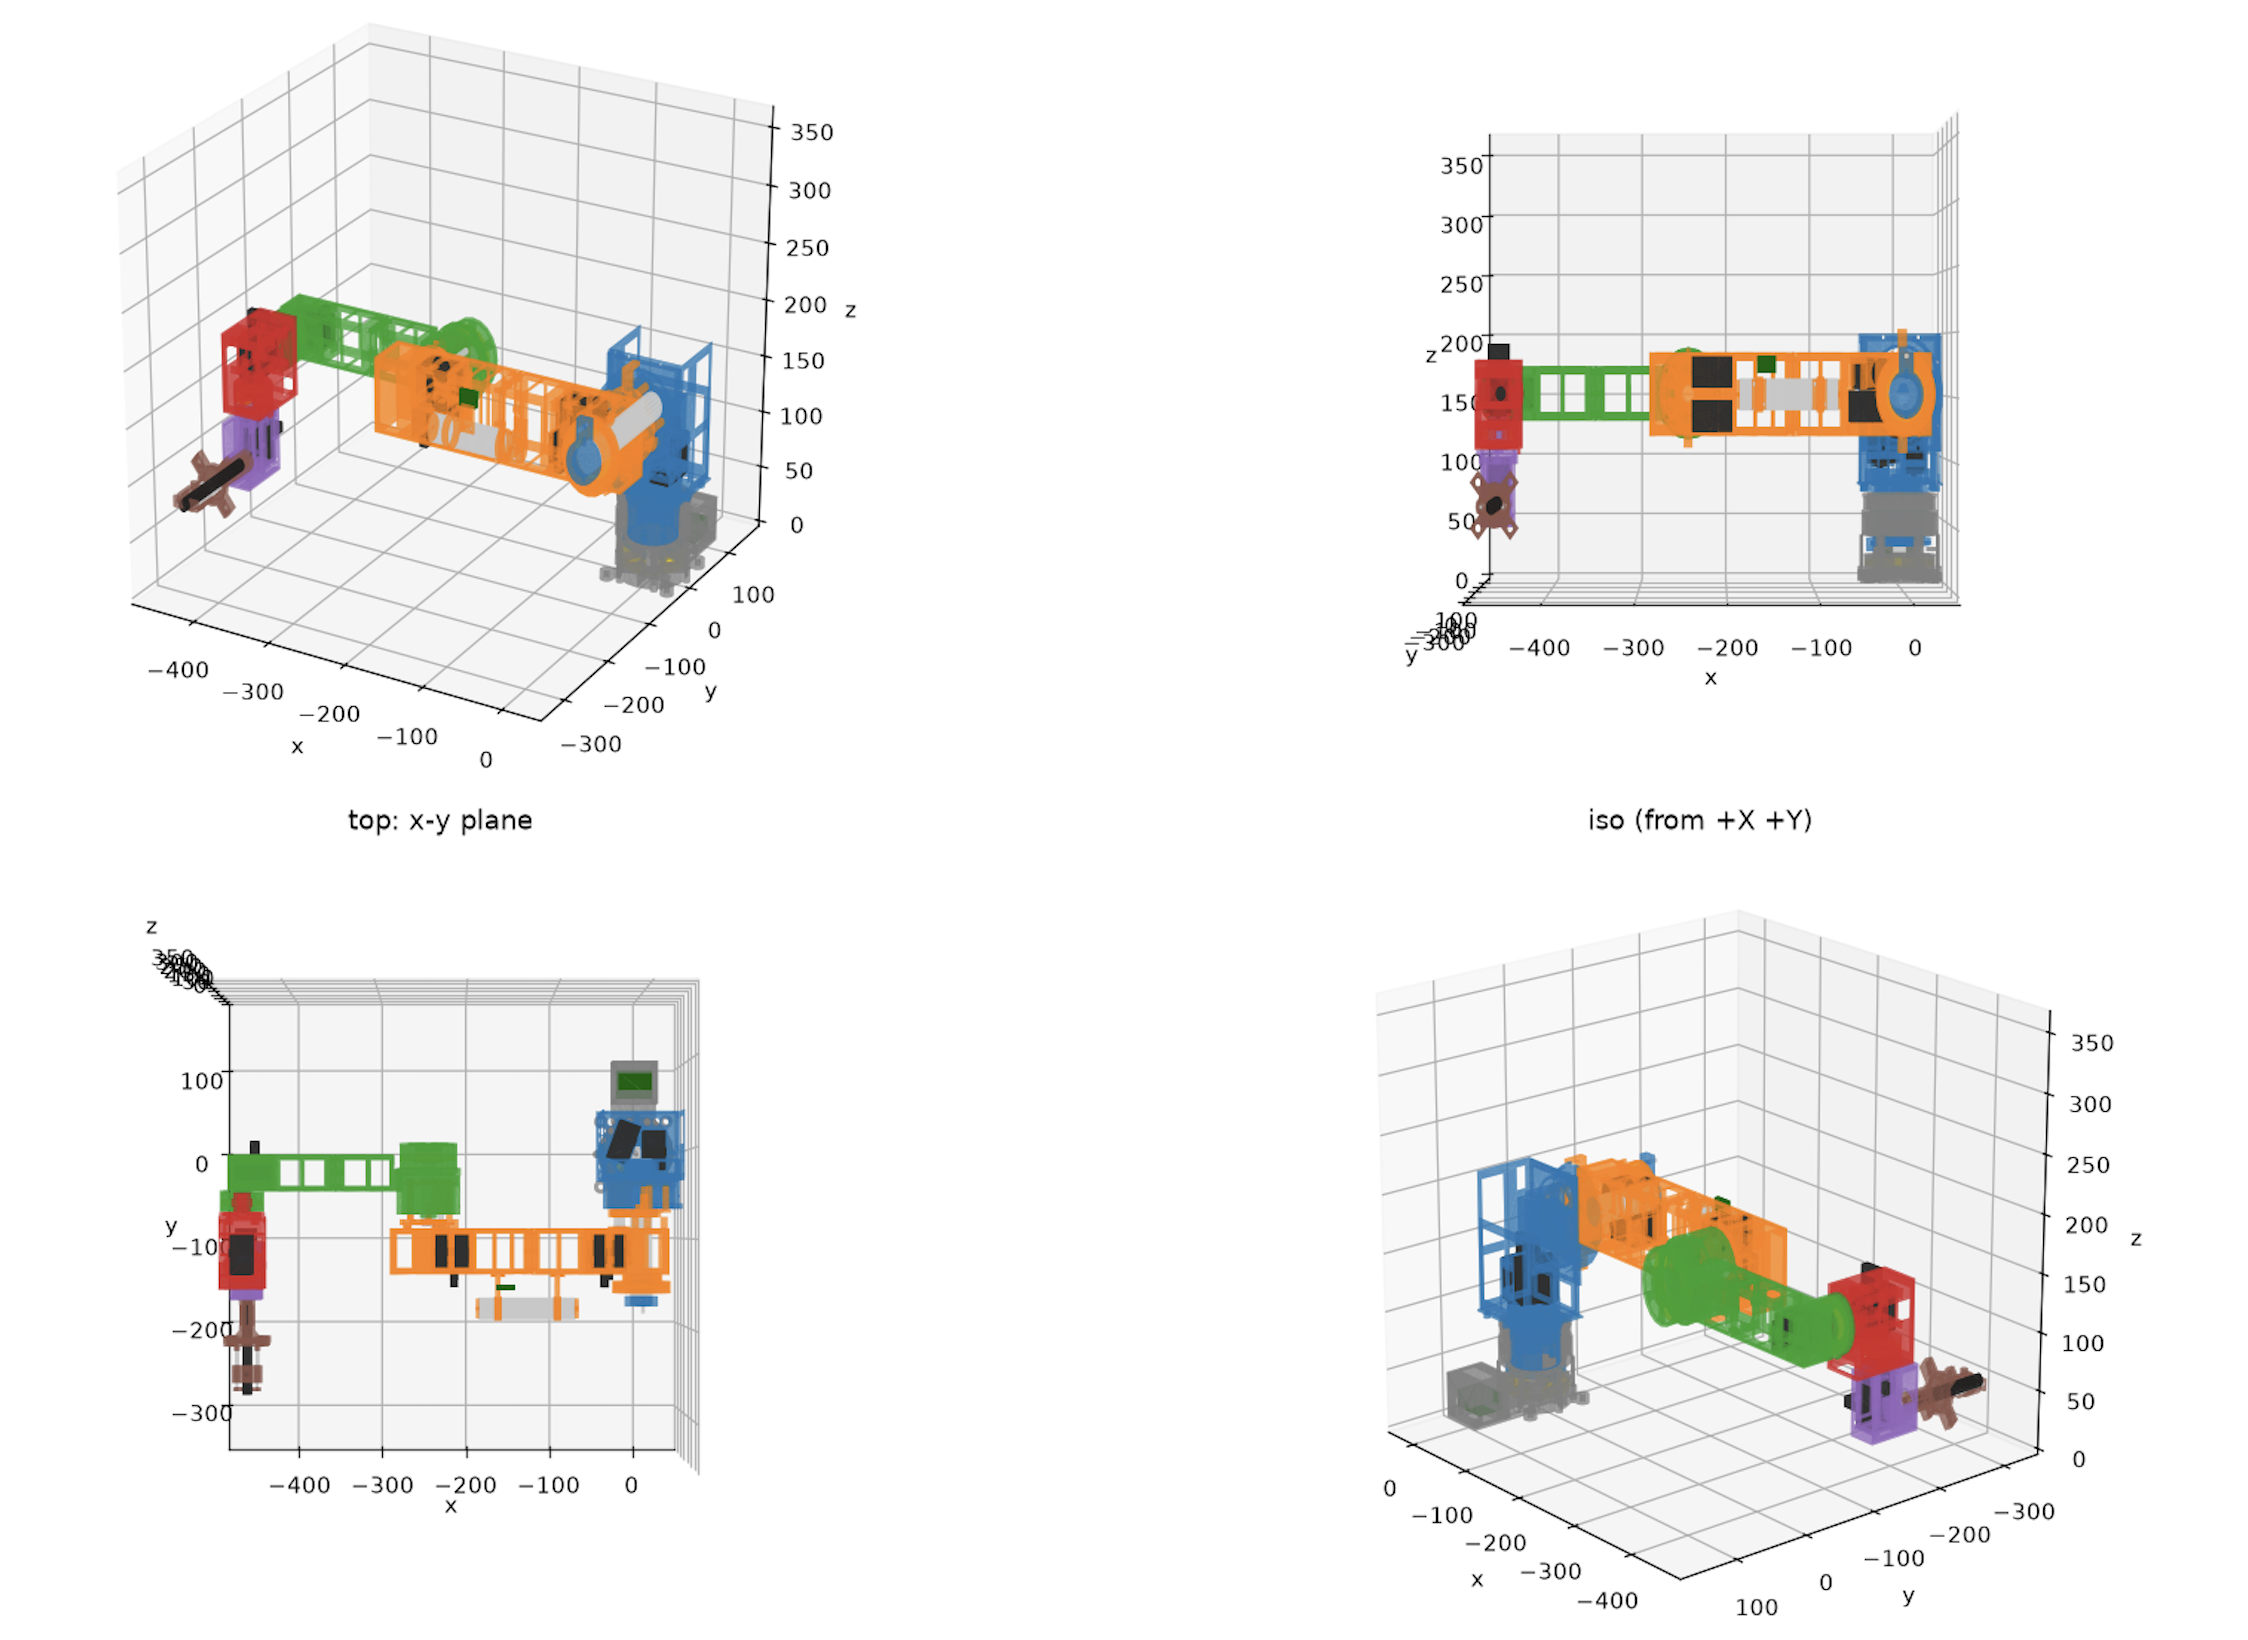
We also performed several simulations to validate the updated design. FEA stress testing was used to identify and strengthen weak areas of the printed components, while MuJoCo was used to visualize the robot and verify its motion and geometry with the SolidWorks assembly. Simultaneously, Python kinematic and torque analysis tools were used to evaluate loads at every robot joint and confirm that the purchased servos can support the weight of the robot arm. The results of these showed that the shoulder and elbow joints are near the practical limits of our selected servos at the full UR3e dimensions. To address this, the current design uses two servos at each of these joints, along with a reduction mechanism and counterbalance spring to reduce the load and side forces on the servos.

On the software side, we continued developing our ROS2 environment on the Jetson and established the project’s GitHub repository and initial software structure. We also determined that OpenCV AprilTag detection is a better fit for our vision system than using a YOLO26 model, since AprilTags can be detected directly (using the apriltags OpenCV library) without training an object detection model. This should provide a simpler and more efficient solution for our Jetson Orin Nano and Intel RealSense D455 camera setup.

Finally, we worked together to finalize the Iteration 1 master parts list and identify remaining hardware such as bearings, screws, shafts, tubing, and additional filament. With the mechanical design and simulations largely complete, our primary risk is now transitioning successfully into fabrication and assembly. The first print runs are expected to require approximately 35 hours and 900 g of filament, so we will need to carefully prioritize the initial parts and quickly iterate on any components that require redesign.

Our project is slightly behind the original schedule since the CAD design and subsequent validation took more time than anticipated. Therefore, we have had to push back most of our schedule by about a week, so printing and assembly will commence this following week.

For next week, our team plans to:

  • Begin printing the finalized Iteration 1 components, starting with the base.
  • Measure and test initial prints before committing to the full build.
  • Order any remaining hardware and additional filament required for assembly.
  • Begin assembling the printed components and servos as parts become available.
  • Continue developing the ROS2 framework, including the URDF and tf2 structure.
  • Begin prototyping AprilTag tracking using the Jetson and RealSense camera.

Bryan’s Status Report for 10/3/2026

For the week of September 27th – October 3rd, I focused on helping finalize the Iteration 1 system design and narrowing down the CV approach for our 6-DOF robot arm. In addition, I helped finalize the master parts list, including the required components, quantities, and pricing. With our overall Iteration 1 design done, we are now in a better position to move forward with more implementation-related work.

One of my main areas of research was determining the best approach for AprilTag detection. After looking over documentation and comparing OpenCV-based AprilTag detection with using a YOLO26 model, I determined that OpenCV is the better choice for our application. Since OpenCV already has a library dedicated to detecting AprilTags, a YOLOv26 model trained on these tags would be less appropriate. OpenCV should also provide a simpler and less computation-heavy on the NVIDIA Jetson Orin Nano while integrating well with the Intel RealSense D455. This approach will allow us to focus the vision system on reliable AprilTag detection and tracking without adding unnecessary model-training time.

I also continued working with the team on the overall Iteration 1 design and component selection. With the parts list now largely finalized, we have a clearer picture of the electrical and mechanical components required for the system. This will help us move toward integrating the camera, computing hardware, servo motors, and other components into the final design.

For next week, I aim to:

  • Prototype OpenCV AprilTag detection and tracking on the NVIDIA Jetson and Intel RealSense D455.
  • Start configuring motors and power supply once they come in.
  • Continue refining the Iteration 1 design and preparing components for system integration.

Aaron’s Status Report for 10/3

For the week of Sep 27th – Oct 3rd, I focused on remodeling our robot to the dimensions of the UR3e robot from last week’s decision. Jonathan and I looked at the UR3e resources online and discovered a spreadsheet containing the transformation matrices for the robot’s positioning and movement of each joint. We wanted to take the dimensions from something that has proved to work and apply our own torque calculations adjusted to our motors and 3d printed links and joint housing.

First, I checked the specifications of our purchased components for the Hiwonder and Feetech smart servos to see if they had compatible communication protocols, which would allow one controller to operate all twelve servos on the same bus.
UR3e Denavit-Hartenberg parameters and coordinate transformations

Above is the UR3e parameters and coordinate transformations that we adopted; the spreadsheet contained variable inputs and visualizations of joint positions on the right, so we could experiment with different positionings. Universal Robotics’ website also contained the downloadable CAD models.

Initial UR3e-based robot rendering with the exterior casing removed

In SolidWorks, I was able to adapt the model’s end effector to hold a pen, then deconstruct the outer casing (since they would require too much filament to print) to preserve the UR3e’s dimensions 1:1.

I then checked whether the servos we got could actually drive the arm with 1:1 dimensions, where I discovered that the shoulder and elbow are close to the servos’ practical limits. To prevent those joints from overheating, I designed for two servos at both the shoulder and elbow, which creates a 3:1 reduction in force and a counterbalance spring based on several joint designs online. My hypothesis is that this reduces unnecessary side loads on the servo shafts and should keep the arm stable since we don’t want it to wobble too much.

I built the updated assembly in SolidWorks with some AI assistance using a scripted workflow; our model now contains 46 printable parts as well as AI-assisted CAD reconstructions of our purchased servos and PSU, as well as some shafts, screws, and tubes that we will likely need to purchase as well to replace sections in which 3D printed parts would bear too much load.

For testing, I tested the assembly by:

  1. I performed von Mises stress testing through finite-element analysis (FEA) and redesigned weak parts with thicker transitions and rounded bottoms  (fillet bottoms) which I’ve seen in the past help with structural integrity
  2. I used MuJoCo simulations to assemble and visualize the finalized robot, check its motion, and compare the simulated geometry with the SolidWorks assembly

MuJoCo robot simulation from four viewpoints

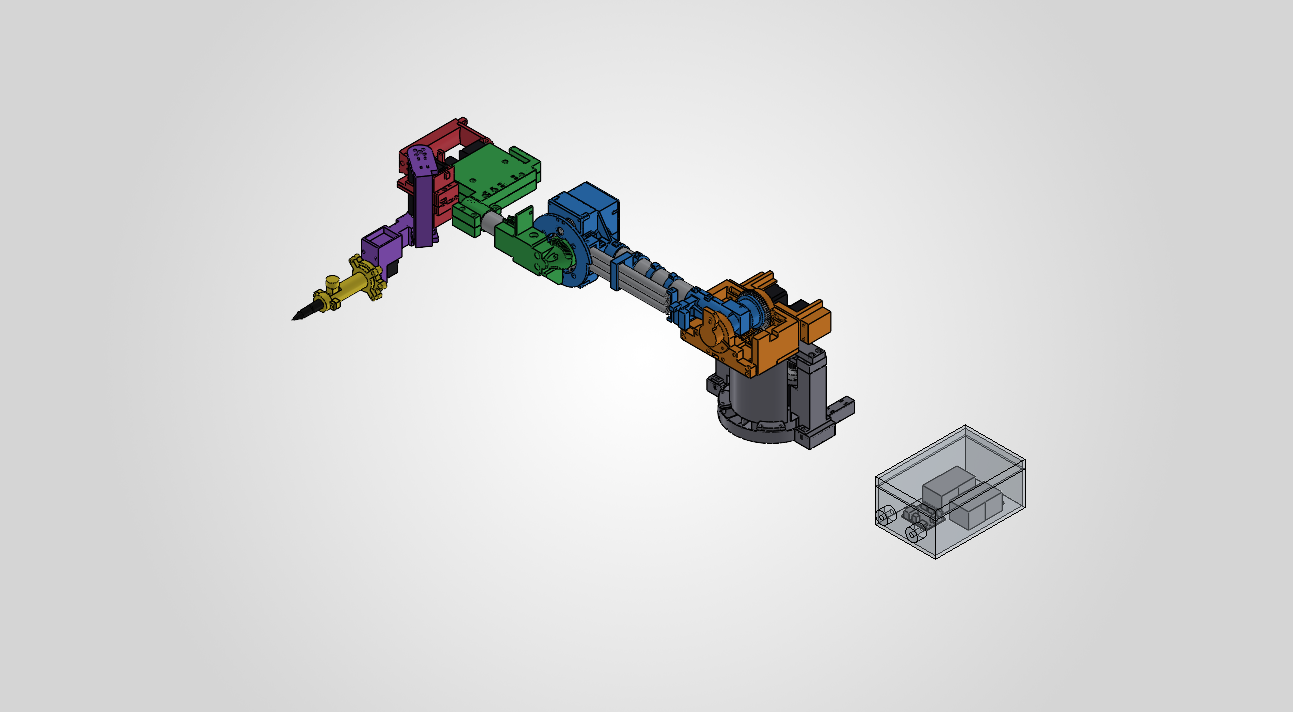
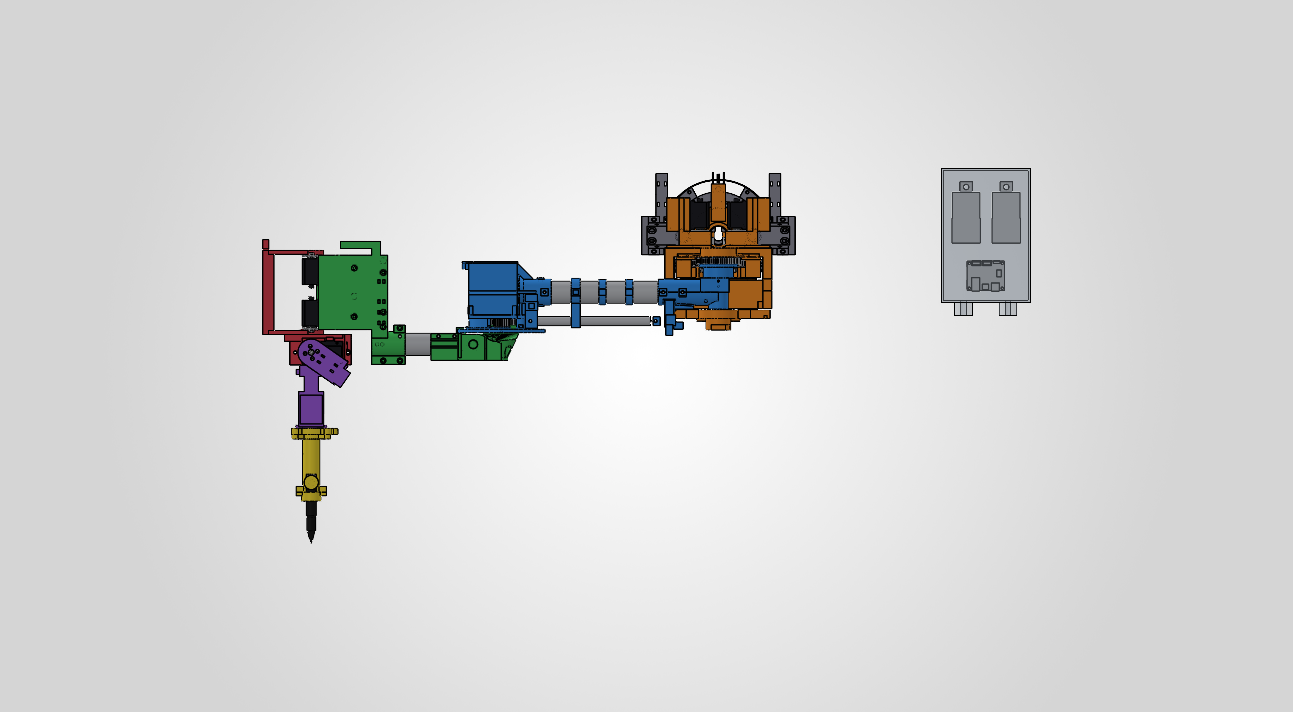
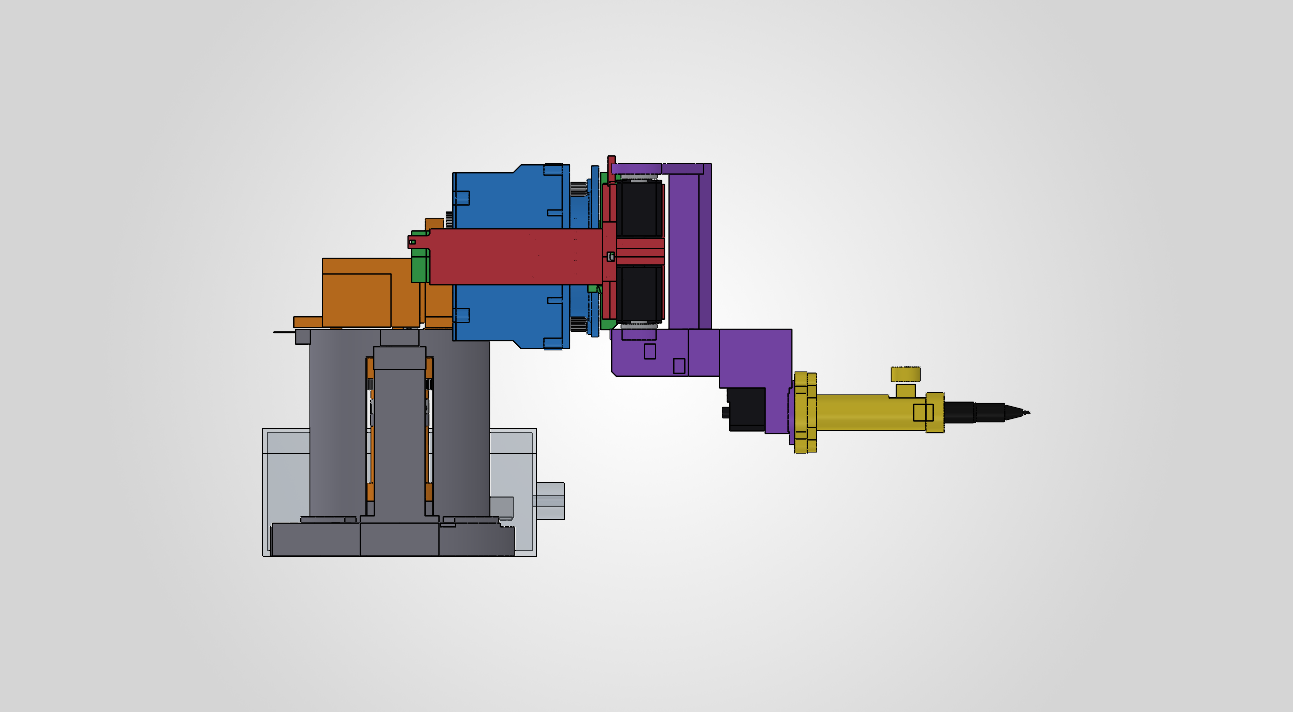
Our final representation in SolidWorks looks like this, with the gray parts being purchased rods and everything else 3D printed links and a manually adjusted end effector for Iteration 1:

Isometric view of the deconstructed robot arm CAD assembly

Top view of the deconstructed robot arm CAD assembly

Side view of the wrist and pen end effector

We have started printing the first plate tonight, and it would likely need around 40 hours of printing, approximately ~900g of filament, which is very close to the 1kg we purchased, so we may need to account for a few more rolls.

Overall the CAD design and simulation work is essentially complete and on schedule, but the biggest risk is with printing and iterating on the prints, as well as ordering the additional parts needed for assembly.

For next week, I plan to:

  1. Print and measure the base and print the base plates first before printing any fully sized arm parts
  2. Outline the remaining order form for additional tubes, screws, filament, and bearings we may need to purchase
  3. Begin printing the finalized build plates in order from bottom to top (with exception of the end effector which we should test early)
  4. Start assembling the printed components and iterate on redesigns quickly

Jonathan’s Status Report for 10/3/26

For this third week, I dedicated my time toward structuring our ROS2 repository on the Jetson Nano, developing custom kinematic and torque analysis scripts in Python, and helping finalize our hardware parts list for Iteration 1. A major milestone for this week was creating a comprehensive mathematical model of our 6DOF arm to verify that our selected serial bus servos can handle expected joint loads across our workspace (see below).

On the software and simulation side, I expanded our ROS2 environment on the Jetson Nano by installing necessary development utilities, creating our team’s official GitHub repository, and laying out the core software framework for our project. To validate our mechanical design before 3D printing, I wrote a dedicated Python robot class to process our arm’s link lengths, joint limits, and component masses. Using this class, I implemented forward kinematics, Jacobian matrix calculations, and inverse kinematics solvers, sampling various coordinate points across our 3D workspace. By coupling these kinematic transformations with static load physics equations, I confirmed that our calculated joint torques fall comfortably within the operating limits of our smart serial bus servos for Iteration 1 (see below for workspace points tested).

Outside of that, I collaborated with the team to finalize our master hardware parts list for Iteration 1 so we can get all necessary servos and power components ordered. Aaron is still working on the the remaining CAD design details for Iteration 1, but I have been giving feedback along the way. Finalizing the CAD model took longer than anticipated, and this pushed the start of 3D printing to this weekend which is a bit later than expected based on our schedule.

I am mostly on track with my individual software and analysis tasks, though as a team we are slightly behind schedule on physical assembly for Iteration 1, so we will need to pick up the pace for printing and using the hardware.

For next week, I plan to:

  • Clean up and document the Python torque and workspace calculation scripts.
  • Expand our ROS2 software framework and construct a preliminary URDF model to visualize the robot arm in RViz2.
  • Begin setting up the initial tf2 frame tree structure for coordinate transformations between the robot base and end-effector.
  • Collaborate with Bryan on 3D printing execution and begin physical assembly of Iteration 1 as motor hardware arrives.