Mehar’s Status Update for 12/10

Most of my work this week was in trying out further model training configurations to account for some false positives we discovered in our design.

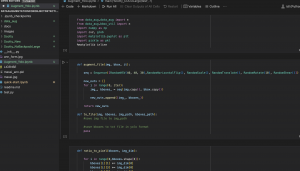
On Sunday,  I worked on adding details of our old approach and restructured approach, our computer vision training accuracy – the complete solution and the final gantt chart for up until the last week. From Monday to Wednesday I was busy with exams and deadlines for some other classes, so I instead put some time into figuring out what tasks we had left as a group and assigning overall priorities to tasks during this time. Work between these few days took about 4-5 hours to compile everything together.

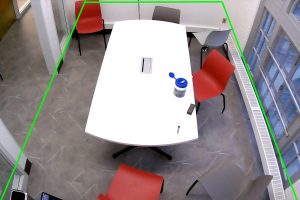
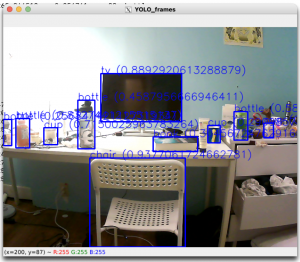
From Thursday onward, we noted that the model was giving some high confidence false positives that the sample thresholding couldn’t account for. Specifically, some occurrences of backpacks were detected as people with >60% confidence or the TV in the room came up as a dining table with >60% confidence as well.

This was when I realized our custom dataset didn’t have enough background information, or samples of objects not to look for in the images – such as TV, or phones etc. Aditi suggested using the Pascal VOC dataset to add to our training, adding in some needed background information. So from Thursday onward, I worked on retraining the model with various combinations of the VOC dataset and our custom dataset. To prep, I wrote a script to eliminate images without tables/chairs/people from the VOC dataset, drop instances of classes we weren’t looking for and to switch the class mapping to our custom class mapping. With the larger dataset I decided to switch over to a larger AWS training instance (P2.xlarge -> P3.2xlarge). I encountered some problems with training as my Allocated CPU limit on AWS didn’t account for the larger instance. Unfortunately, I found this out in the middle of training with my connection closing out and I was unable to restart any instances to save any data. i immediately sent in a new CPU limit increase request to AWS but most of my time during Thursday/Friday was thus spent trying to save all the training data that was stored across the two instances I had (solved using an S3 bucket). In total, I spent about 8-10 hours from cleaning the Pascal VOC dataset to running training on Pascal, to dealing with the AWS server issue.

Another thing we noted with regards to training was how switching class mappings and the overall output layer requires some retraining from the model to remap to the new mapping scheme while also training for higher accuracy in the target classes. Because the classes we are targeting are already part of YOLO’s pretained class mappings (COCO labelling), training using those existing mappings and our dataset will help with the overall accuracy of the model (specifically lowering the rate of false positives as those items now have a specified class). I spent up to 7-10 hours on Saturday reprepping our data to work with the COCO labelling scheme. This involved redownloading our re-labelled custom dataset, running my random data augmentation script to increase the dataset size, writing a new script to switch  to the COCO mappings and running the dataset through the remapping script. On the VOC side as well, I rewrote the VOC remapping script to remap to COCO labellings. From here, I backed up the datasets to an S3 bucket as well.

Remapping scripts for VOC and Custom Dataset to COCO mapping
s3 bucket files
s3 bucket files
s3 bucket files

On Saturday as well, there was an issue trying to use my spot instances to train/move data. Spot capacity works with leftover available CPUs, and no spot capacity was available in the us area regions where my instances were.  I thus also spent time Saturday working with Google Colab to set up a notebook to move our training to. By the night however,  there was spot capacity available so I was able to start training.

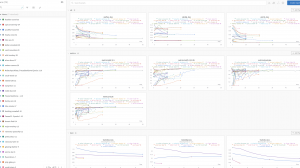
I tested 4 configuration of training to start off with,  to test how the model would train in terms of accuracy improvement:

  • Custom for 50 Epochs w/Backbone (Layers 1-10) Frozen
  • Custom for 50 Epochs w/Backbone (Layers 1-10) Frozen + Custom for 10 Epochs w/Layer 1-22 Frozen
  • Pascal VOC for 50 Epochs w/Backbone (Layers 1-10) Frozen
  • Pascal VOC for 50 Epochs w/Backbone (Layers 1-10) Frozen + Custom for 10 Epochs w/Layer 1-22 Frozen

Training is still ongoing, but so far the Custom Training using COCO labelling for 50 epochs with just the backbone frozen seems to have good performance.

Moving into the final demo and onward, I will be training the rest of these configurations and working on compiling my training data for the final report. In addition, working with my team to test remaining metrics and work on the final report/video.

Team Status Update 12/10

This week as a team we worked on integration. We got the pip line working for a single-camera but needed to test the 2 camera pipeline. We found after running simple tests that our machine learning model requires new training as it is overly sensitive. Maehara and Aditi met on Saturday to work together on the remaining tasks. We need to complete the 2 camera pipeline testing by porting our code to Tensor RT. we also need to do the special accuracy testing as well as taking full pipeline metrics.

Aditi’s Status Update 12/10

This was a very eventful week for me. I spent over 24 hours this week working on various aspects of the project.

On Monday, I gave our final presentation.  Later in the week, I tested hosting both the web server and camera on the Jetson which worked as expected. Once I had completed that I tested our pipeline with live video footage. I found that our object detection algorithm was quite good at detecting chairs but was too sensitive and mistakenly marked a backpack as a chair.  Keeping this in mind, I wrote a script to capture images with extra chairs to serve for test images for later. I was able to do this as I knew how many chairs I expected it to find. After this, I brainstormed how we might fix this issue. I looked into some inference parameters first and tried playing with the confidence threshold, NMS IOU threshold (which dictates how closes 2 bounding boxes can be before being considered as the same object) and lastly the model classes. Playing with the confidence threshold and NMS IOU did not make a significant impact but using model classes increased the confidence in chairs and people which was a helpful asset. That being said, the output classes for our custom trained model only looked for people, chairs and tables. I had a feeling that the algorithm was still identifying objects as we had frozen most of the earlier layers but since it only had 3 classification options it was trying to fit the object to one of the classes. With this in mind, I re-annotated our custom dataset to match all the classified objects in COCO including backpacks and laptops. I additionally tried to see if there were other dataset with less classes but had the classes we were looking for and found that possibly using PASCAL’s VOC dataset may be a better fit. I tried training with an increased number of classes with the relabelled data but my initial results gave undesirable results. I also wrote our sample thresholding algorithm. 

Later on in the week, I tried integrating the 2 cameras.  I got both cameras working with the pipeline separately but when I ran them at the same time the Jetson was taking a very long time to load the model. I used a resource called jetson stats to monitor the activity on the Jetson and found that the CPU’s and GPU’s were not being overloaded but the memory was maxing out. After reading a little bit more I figured I might have to switch from PyTorch inference to TensorRT or DeepStream. I spent 5+ hours on Saturday working on this but managed to get YOLOv5 working with TensorRT. I will need to port our code to work with TensorRT but I am quite proud of this accomplishment along with everything else I managed to get done this week.

Chen’s Status Report for Dec 10

At the start of the week, I rewrote the script for front end, so now the front end just parses through the data the server sends back, update the list of rooms, and then update the map with the room that is current selected. Thus, the function of switching rooms has been achieved.

As explained in the pervious report, due to the difficulty, what we currently have is this psuedo depthconcept where we view the room as a 2d plane, and assign a depth to the coordinates based on the y coordinates, to simulate the straightening vertically. I believe this is similar to what the cv.warpPerspective provides.


Mehar’s Status Update for Dec 3 (11/12, 11/19, 11/26)

This past week the majority of my time was spent cleaning uo our custom dataset, further training the model and tying together the computer vision pipeline as an independently running module.

The past few weeks before I had tried to retrain the YOLO model using transfer learning with various existing image datasets. Looking between ImageNet and OpenImages and running a few test runs on the existing dataset, i found that existing datasets actually didn’t prove to be extremely helpful in training.

Both datasets have many more classes than those we need to train for. While it is possible to run a simple script to relabel the training data only for our target classes,  the image sets themselves are also too varied to help with training for our specific use cases. As the models are already pertained, training on a custom dataset for our use case is what will help with further increasing accuracy and the confidence level of the system’s detections.

One other thing that came of note was that YOLO was initially pertained with 80 classes instead of our target 3, the change in the output dimensions is also something extra training will need to count for. One consideration was to maybe continue training with the 80 class scheme and to add an extra output layer to only consider the results of the target three classes. However, I also noted that this introduced more overhead in creating the custom dataset – as instances of all 80 classes will need to be labeled for training. So I determined it was best to use transfer learning with only our custom dataset with just the 3 classes.

After collecting the data as a group, I went through and labeled the data for training purposes using roboflow – a cv platform with functionality to label data. Our initial dataset was only around ~40 images, so as per TA suggestion – I looked into Data Augmentation to introduce noise, contrast change (etc) to artificially produce more data. One issue that came up was looking into how the bounding box detection txt files in the training could be augmented as well. I found a Github codebase https://github.com/Paperspace/DataAugmentationForObjectDetection

with functionality to augment the images and the txt detections. Writing a script to augment our data, I used the codebases augmentation features to artificially increase the dataset to 264 images.

Custom Data Augmentation Script to Work With Our Custom Data

For the training itself, I noted that he YOLO architecture has a 10-layer base a s backbone for feature detection and an additional 13-layer head for object detection and classification (in the same step).  So for training, I tested freezing just the backbone  and also leaving the last 1/2/3 layers unfrozen in training. Finding that  training largely stalled at a precision (portion of detections that were true positives) of about 0.5 on most rounds.

Wandb logger results from all runs

This past week specifically, I committed this by removing our extraneous backpack class to try to we had initially put in to account for extra cases of people temporarily leaving a room (a backpack would then be used to indicate that the seat was occupied). The backpacks were easily conflated with some of the chairs and we were choosing to let go of this extra case in rescoping – so I removed the class. One other change in the dataset was limiting the data augmentation to in place changes (removing any changes that messed with scale/shear/tranlating the image data). With that I removed the backpack class and ran the dat augmentation script again to have the 264 training samples.

Training from there, I was able to achieve >0.90 precision with training just the backbone.  This was all that I had worked on until Wednesday specifically, From there, I was mainly writing code to tie the CV module components into standalone module that could run on its own. This took about another 3-4 hours to write out and debug fully.

Chen’s Status Update, Dec 3 and Nov 19

This week, I wrote the function that handles requests from the CV module and store it in a JSON format file, and integrated my code with Mehar, meaning that no like before, the server tells the CV module to run when the client requests, and then read from the data file the CV module outputs, now the server will only have to handle requests sent from the CV module and then update it in the JSON database file with the JSON data the CV module sent me, and handle requests from the user and send the whole database to the user. This way, the server and the CV module can run seperately. This has been tested out and made sure it work, as we spent hours debugging and made sure we can send data in a local network.

Additionally, for the spatial accuracy metrics, as explained below, it is better for us to change the metrics. The loss function we are going to use is the quadratic loss function, namely, the

where, as suggested by Adnan,  yi is defined to be ratio of “the y or x coordinates of each chair to the table in pixel values of the predicted image”, dividing “the y or x coordinates of each chair to the table of the overhead true image “. This ratio should be similar, thus we use the “yi hat” to imitate the true value, which is the average of all the ratios as defined above. This the larger the MSE, the more it deviates from the “normal” value, the more loss it has.

Perspective Adjustment:

Apply a perspective warp to a picture, the basic thing we need is the coordinates of the 4 points of the shape we want to warp.

Inside the CV library there are ways to do this. For example, cv2.getPerspectiveTransform, along with cv2.warpPerspective, or utilizing functions such as cv2.findHomography.

The problem with this is that the output is an image, thus it has to be perspective adjusted before feeding the image into the image recognition algorithm, in other words pre-processing. Then, in this case, it would be hard to recognize the objects. If we put it in post-processing, then it is hard to get the exact coordinates of the warped image.

More over, to warp it in the first place, we need to get the 4 corners, and to get that, we need to find the 4 corners of the ground. Additionally, applying warp if we crop it to only include the ground is not enough, because chairs have heights, so if we only crop it to include the ground, some chairs will be cut off. We have to cut it so that the upper chair and lower chairs are included, this means that some of the wall must be included. This means that error is inevitable in applying perspective adjustment, as shown below.

Since the lower 2 points are not visible, we assume it is the lower 2 corners of the image. For the upper 2, there are basically 3 way to gain it:

  1. Hardcode it when setting it up
  2. Detectron2 image segmentation
  3. edge detection

1.  First one is what we have now. I updated the algorithm this week. Before, the x coordinates are stretched to the side to form a rectangle,  but the y coordinates, since the more you go into the image the more distance the same amount of pixels represent, I applied a linear function in the real distance it represents according to the y coordinate of the point. This week, realizing that 

according to the above image, the “P” point is always the real center of the plane, that means that when the y coordinate is located at that point, in other words the ratio of the upper and lower edge of the trapezoid times the height of the image, the adjusted y coordinate should be 1/2. According to this, we form a y = ax^2+bx+c function and solve for it to gain a function that maps y coordinates to real y coordinates, with then x = 0, y = 0, x = “P”, y = 1/2, x = 1, y = 1.

2. Detectron2, however, might be an overkill to our case. I spent lot of time trying to implement detectron2 but was stuck on CUDA. Anyways, since detectron2 is trained on COCO dataset, it does not include the ground category, thus to use it we have to gain training data on floors to detect the grounds. Additionally, the standard output 

as shown here, is similar to YOLOV5 – it only includes the bounding boxes coordinates. To access the exact outline, we have access the variable where the outline is stored, while it is stored in a “Tensor” format. Then, to utilize that to gain the corners of the ground, we will have to change in a cv2 readable format, in other words, a “numpy array” format, then some analyzation could be used to simplify it and potentially gain the corners. For example, cv2.approxPolyDP()  could help us in shaping it into simple shapes, then the 4 corners can be easily retrieved. However, a more fatal problem is that, even if we have all of the above realized, our ground doesnt have a boundary, which will be shown in the next section.

This also rules out the possibility of applying feature recognition, a common way when working with homographies.

3.  

as shown in the image, I played around with CV methods endeavoring to get the outline of the upper 2 corners of the table or ground.

We first convert it into grayscale, and then apply cv2.bilateralFilter  to accentuate edges but blur the rest,  a better version of Gaussian blur in edge detection.

Then, I ran Canny Edge Detection and Harris Corner Detectioncv2.Canny and cv2.cornerHarris respectively.

Then, I look for the longest edge, however, I was stuck here as no matter how i adjust the numbers, the edge of the table is not continuous. To fix this, I adjusted the Canny Edge Detection so that it detects even the smallest edges but this will just not form an enclosed edge of the table. Another way is to merge close up edges, but this means that all the chairs and bags will also be merged into the edge.


Canny Edge Detection

Canny Edge Detection Longest Edge

Harris Corner Detection

Additionally, as you can see the ground doesnt have a clear boundary. Also, since the table is just part of the room, if we rotate the table, that means that the corners of the tables will change, and thus the ratio of the upper and lower half of the trapezoid will change, thus meaning that the perspective adjustment will change, leading to unpredictable results.

As above, the most stable way is definitely hardcoding the ratio of the upper and lower edge, or another good way to think about it is to gain the cos angle of the line of the edge of the table, since we are applying the perspective shift to the whole image instead just the ground or just the table anyways.

Team Status Report

After our talk with Professor Tamal, we decided to restructure our implementation. Originally, this was an element that we had overlooked. We had the webserver calling the CV algorithm. In this scenario, the time elapsed between a user requesting a room’s status and seeing the change was quite large. This system was also not scalable – what if multiple users wanted to access multiple rooms? This implementation did not include multithreading so users would have to wait until their request was serviced. Now, the CV algorithm and the webserver run as separate processes. The CV algorithm interacts with the webserver via post requests. Every 10 samples, it takes the best sample and sends it to the server as a JSON file. When a user requests a room’s status, the webserver will send the entire database of room and filtering will be done on the front end. This way there is less load on the webserver for both pre and post processing and its ability to service requests from a user is not affected by the overall traffic. A majority of our discussions in the last 2 weeks have pertained to this. Mehar and Chen have been adapting their code for this change and Aditi has been working on measuring metrics and testing various methods to speed up these processes on the Jetson.

Aditi’s Status Update 12/3

On my last update I was having issues running the Django webserver, since then I have been able to debug the issue and have been successful in running the webserver and taking images and running inference on them. That being said, due to implementation choices, the entire pipeline is not working yet. The CV and Web modules are in the process of being reworked to work independently of each other so that this will not be an issue. This week I worked on measuring some of the metrics for the Jetson like YOLOv5 inference and time for image capture.. I have also been playing around with various parameters on the Nano to see if it affects  inference time and image capture. This includes running inference using the cpu vs gpu, and capturing images of different dimensions. Interestingly, using larger dimensions did not change the inference time. I am still in the process of debugging, but I am trying to see if doing inference using the NVIDIA DeepStream will speed up inference. I am also planning to look into differences in inference time between batch processing and single image inference.  I also spent time planning what tasks we needed to get done before the presentation and report and assigning each team member with a task. In the week prior to Thanksgiving we had spent a lot of time restructuring our implementation to have a more modular code structure and a more cohesive story which as a team we spent many hours on.

Team’s Status Update 11/19

This week the team was working on  individual parts of the project. Mehar   labelled the images we captured on Friday and began doing custom training on AWS. Chen began implementing the filter feature for the UI and Aditi finished integration between the camera and CV code. On Friday we revisited our goals with the MVP and a discussion with Prof Tamal has started a conversation about how our MVP would reflect a scaled version of our project and what narrative/ explanation will we have when asked about the scalability/adaptability of our MVP.

This may result in some internal restructuring of our project, like adding in a cloud server for the website or Raspberry Pi for running the server on the local network. Additionally this would affect how our database would function.

Aditi’s Status Update 11/19

This week I continued fo work on integration. The Jetson has continued to give me trouble. After exhausting my options for install of pytorch vision that would work at runtime, I decided to start from scratch. I had already followed the instructions for install from scratch Pytorch.org, YOLOv5, NVIDIA Developer website and the NVIDIA forums with no luck. I sat down with Adnan and Prof. Tamal to help me debug my current issues. I had a feeling there were some compatibility issues between library module versions, versions of python and versions of jetpack. After reflashing I decided to use the latest version of Python that was supported by Jetpack 4.6.1 which comes preinstalled when you flash the Jetson. I was very meticulous with reading the installation pages and finally managed to get YOLOv5 inference to work on the Nano! This is a big win for me as I have been trying to set this up for weeks. It can take a photo with the USB camera, do inferencs and output the bounding boxes and object labels. Unfortunately we had run into a new road bump. Our Django app is written for version 4.1 but Python 3.6.9 only supports 3.6 of Django. Our existing code will need to be rewritten to support 3.6.

Output from USB Camera and YOLOv5 — all done on Jetson