What did you personally accomplish this week on the project?
For this week, I wrote a system to address the streams that are sent to the FPGA. This is needed for the FPGA to identify where it should draw a picture when it gets a frame from the central ESP. With the addressing scheme in place, we are now able to run 6 simultaneous streams at once and have them all show up in the same place.
In addition, I also added some pacing code into the central ESP as well. We need to pace the frames at around a 20-25ms interval since the FPGA only has one instance of the decoder and it runs sequentially. It therefore can only accept a new image to draw every 20-25ms. Since it is much easier for the ESP to buffer this data, we decided to have the pacing and buffering code on the ESP side.
The last loose end that needed to be cleaned up was to black out the unused picture locations. At 720p we have divided the frame into 12 individual 240p streams. Since we are not using half of them, we need the ESP to send a black frame on initialization to those locations to make the system look nice. Without sending the black frame we will just get random colors in the unused locations which just looks bad.
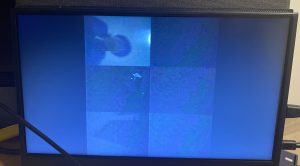
Finally, I also integrated the whole system with Varun. We were able to get all 6 streams working simultaneously. The video below is of the system working with all 6 streams. Note that the code to black out the unused locations is not active in the video.
As you’ve designed, implemented and debugged your project, what new tools or new knowledge did you find it necessary to learn to be able to accomplish these tasks? What learning strategies did you use to acquire this new knowledge?
I had to learn about the specifics of ESP32 development. The toolchain and configurations methods were all new to me. Along with that I also had to learn about the intricacies of how Wi-Fi worked on the ESP32s and how to debug them when the performance wasn’t were we wanted it. I mostly learned by reading the espressif programming manual and the provided example code. It also helped that I could learn by drawing from on my previous class work and work with microcontrollers to help me along.
What did you personally accomplish this week on the project?
For this week, I used a multimeter to check the power consumption of the ESP-32 to verify the claimed values on its data sheet. I got a measurement of 1.5W maximum power draw for the remote camera node. This was with the camera continuously transmitting imagery which is an absolute worst case situation. The average power draw was more around the range of 1w which is inline with our initial assumptions based on the manufacturer’s datasheet. The power consumption for the remote camera node was also measured and it was slightly lower at only about 0.8w maximum.
I got the change detector running on the ESP-32. The change detector is implemented as a separate task than the main sending task so it doesn’t block the main sending task. Since the ESP32 has two cores these two tasks are able to be run simultaneously to provide maximum performance. The change detector works by computing the number of pixels that have had significant changes. If the number is above a threshold then change is assumed to have happened and video streaming will commence.
I also got all 6 camera nodes sent to the central node at the same time. I checked the SPI output with a logic analyzer to verify the data and the frame spacings. Even with 6 nodes, the system is able to reliably deliver frames at 100ms intervals with only slight variations. The SPI clock rate was also bumped up to 20MHz to account for the time needed to decode the image on the FPGA side
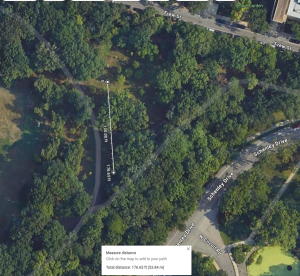
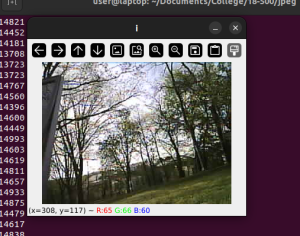
Finally, I also got a range test completed for the remote camera nodes sending to the central node. The current system with omnidirectional antennas is able to hit the targeted 50m while maintaining a stable 10fps stream. The range test was done in Schenley park to simulate the system being used in an outdoor environment. For the test, the remote node was mounted to a small tree and I walked slowly away with the central node. I stopped walking when the video stream stopped working consistently
Range Test DistanceImages from Range Test
Is your progress on schedule or behind? If you are behind, what actions will be taken to catch up to the project schedule?
Currently on schedule
What deliverables do you hope to complete in the next week?
For next week, I hope complete final integration with Varun’s FPGA with the new stream addressing system schema
What did you personally accomplish this week on the project?
For this week, I wrote a python script that would simulate the central node’s function so I could test the Wi-Fi link for stability. The script will listen for an incoming packet and then perform the needed decompression steps before it displays it as a live video feed. The script also allowed me to explore the limits of the current Wi-Fi systems by adjusting the stream quality to see at what level we start seeing dropped frames. I found that the Wi-Fi is robust enough to support the encoder running at nearly the highest quality without significant frame drops.
In addition, we also switched the antenna jumpers on the ESP over to the external IPEX connector. This is so that I can use an external patch antenna for better transmission quality. Previously, I was just using the built-in PCB antenna which is suboptimal since it is so small and limited by the PCB area. With this new external antenna, I was able to get about 30 meters of range while maintaining a good video feed. The test was performed indoors with a noisy RF environment and in a non-line of sight situation with two brick walls between the receiver and the transmitter. I’d expect this number to increase significantly when I run this test outdoors and in a line-of-sight environment. The current patch antenna that we have on it is a 3dBi omnidirectional one. This can always be switched out to a antenna with higher gain if we need better performance
The final thing that I was able to get done this week was verify that I could connect to the receiving ESP32 and have it read valid data. There were a few things that had to be fixed on the receiving side which was mainly to enable IPv4 fragment reconstruction. Fragment reconstruction is needed since the packet size exceeds that of Wi-Fi MTU of around 1550 bytes.
Link to video of streaming python script: https://drive.google.com/file/d/1OHjypw3lSpivNJLjFea4oVtCaHKOl_wL/view?usp=sharing
Is your progress on schedule or behind? If you are behind, what actions will be
taken to catch up to the project schedule?
Currently on schedule
What deliverables do you hope to complete in the next week?
For next week, I hope to run the range test outdoors to verify my assumptions
What did you personally accomplish this week on the project?
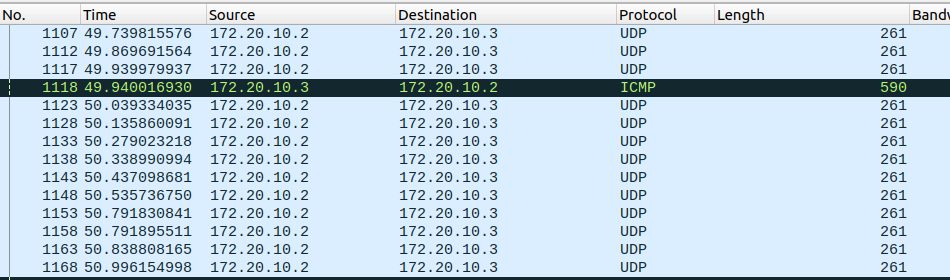
For this week, I got the performance of the JPEG pipeline working at a sufficient level to enable 10fps streaming and verified it using wireshark. Since integration has not yet happened, I used the hotspot of my phone to act as an access point and have the ESP32 join that access point. I also then joined my computer with wireshark. The ESP32 was then commanded to send data to my computer via the phone’s access point. When the packet reached the laptop, the time was noted down for measurement purposes. Since the maximal transmission unit is 1500 bytes, there is a need for packet fragmentation. Therefore, to measure the time correctly, those packet fragments must be discarded. The picture below is the measurement result showing that we are able to hit a frame interval of about 100ms which corresponds to 10fps.
Is your progress on schedule or behind? If you are behind, what actions will be taken to catch up to the project schedule?
Currently on schedule
What deliverables do you hope to complete in the next week?
For next week, I will begin integration with Neelansh for the receiving node. The remote node is now functionally complete with the only thing that is missing being the detection of movement using the luminance channel data.
What did you personally accomplish this week on the project?
For this week, I finally got the compression code ported over to the EPS32. This means that we now have all the steps that are needed on the remote camera node coded up and working. The remote camera node is now able to take a picture, compress it and then send it over via Wi-Fi to a receiver. Porting this over was significantly harder than I thought since we kept running into issues with the camera driver co-existing with Wi-Fi code. In integrating these two, we kept running into issues where the Wi-Fi sending code would stop transmitting at random intervals which would then incur a packet fragment time to live exceedance error message on the receiver. After a lot of debugging and configuration changes, I was able to solve the issue by making some changes on the encoder side and pinning the Wi-Fi task to core 1, which leaves core 0 free to handle the camera. However, this performance is still on the lower side since we are not limited by the bandwidth to the PSRAM. The PSRAM lives on a QSPI bus that runs at 80MHz. Thus, we are limited to a maximum of 40 MB/s of memory bandwidth and unknown latency. The internal data DRAM is only 320KB of size thus it is not an option for us to store a complete frame buffer. Keep in mind that this PSRAM is shared between LWIP, camera, Wi-Fi, and compression.
Image captured, encoded, and then transmitted from ESP32
Is your progress on schedule or behind? If you are behind, what actions will be
taken to catch up to the project schedule?
Currently on schedule
What deliverables do you hope to complete in the next week?
For next week, I hope to begin integration with the FPGA. This will mostly entail me providing a bunch of test data to Varun which he will then run through the FPGA to make sure that we are in agreement in regards to the data format and algorithm stages
What did you personally accomplish this week on the project?
For this week, I got the Wi-Fi transmission code working on the ESP32. I have tested it and we are able to reach about 17 Mbit/s. The 17 Mbit/s is more than what is needed to stream 240p video, which is our project’s initial requirement. However, this may actually be limited by the iPhone hotspot that I am using to serve as an access point. Since I don’t have an actual Wi-Fi access point to test with, I will have to accept that 17 Mbit/s is the speed of the ESP32. The transmission code did take significantly longer than I expected. In the beginning I kept running into issues associated with the iPhone’s hotspot. It turns out that you have to be on the hotspot screen to have the hotspot be actually visible when there is no one actively connected. After this, I ran into more issues regarding sending packets at a high rate or large packets (>1000 bytes). The ESP would complain that it was running out of memory and return a failure code. After debugging it for a long time, it turns out that there was a misconfiguration in the ESP SDK and the station power saving mode was too aggressive. After these issues were resolved, the ESP was finally about to hit the aforementioned 17 Mbit/s.
Is your progress on schedule or behind? If you are behind, what actions will be taken to catch up to the project schedule?
Currently on schedule
What deliverables do you hope to complete in the next week?
For next week, I hope to finally finish porting the JPEG code over. I stopped working on it this week since the Wi-Fi portion hasn’t been explored at all and we were not sure if there would be hidden issues. The delay from the debugging Wi-Fi ate up any time that was left over for JPEG porting
What did you personally accomplish this week on the project?
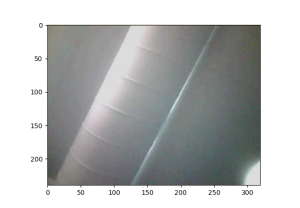
For this week, I got the camera driver working on the ESP32. The code that I have currently works at the 240p resolution that we are targeting.I also tested it at 360p, 480p, and 1080p to make sure that it is able to accommodate future extensions if need be. In addition to writing the camera code, I also have some code written that will write the image data from the camera into a microSD card. While this is not needed for our project, it serves as a useful debugging and development tool. Since the Wi-Fi communication has not yet been written, the microSD card is how we are currently testing the camera driver and pulling images from it. Finally, I also made a couple of small modifications in the JPEG encoder and decoder programs to change the pixel format to match the pixel format of the OV2640. The OV2640 outputs images with a 5-bit red and green channel and a 6-bit blue channel. The three channels are then packed together into 2 bytes before being stored. Such a configuration is commonly referred to as RGB565. However, the proof of concept JPEG encoder and decoder uses 8-bit for all three channels, also known as RGB888. To eliminate the need to convert from RGB565 to RGB888, I decided it was easier to just modify the proof of concept to handle a RGB565 format. With the camera driver and JPEG pipeline modified, we are now able to take a picture, compress it, then decompress it. The following image shows the end result after going through all those steps. The reflection in the camera are from the screen that was displaying the color test bar images
Is your progress on schedule or behind? If you are behind, what actions will be taken to catch up to the project schedule?
Currently ahead of schedule by approximately 2 weeks
What deliverables do you hope to complete in the next week?
For next week, I hope to finish porting the encoder over to the ESP32. After this, we should only have to run the decoder on the laptop and also test out the encoder performance when running the ESP32
What did you personally accomplish this week on the project?
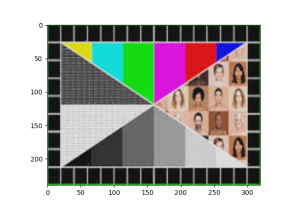
For this week, we have the proof of concept JPEG encoder and decoder written and tested end to end. The current code is able to take in an array of RGB values and then compress them using methods inspired by the JPEG specification. The decoder is also there to aid in Varun when he implements the JPEG decoder on the FPGA. The current code is able to achieve a compression ratio of about 5.75:1 which is in line with our design assumptions.
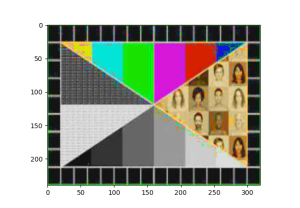
It is possible to improve this further by truncating the lower bits of Cr and Cb values so that only the most significant 4 bits of each channel are left. With this implemented the compression ratio rises to only slightly above 6:1. My hypothesis is that the bit packing of Cr and Cb is significantly increasing the entropy compared to just encoding Cr and Cb separately. Therefore even though we save encoding an entire channel, the rise in entropy wipes out most of the gains. Since the human eye is only very sensitive to the luminance encoded in the Y channel, the loss of the lower bits shouldn’t significantly degrade the quality issue.
The only big advantage of this bit packing is the run time. The one where the Cr and Cb values are truncated is almost 25% faster than the regular version. Therefore, I have saved a copy of the code in case we need a little bit more performance and are willing to sacrifice some quality
On the toolchain setup front, I was also able to verify my toolchain installation by flashing one of the hello world examples on the boards that arrive earlier in the week and verifying its output if what is expected.
Image Before CompressionImage After CompressionImage Compressed Using Packed Cr & Cb
Is your progress on schedule or behind? If you are behind, what actions will be taken to catch up to the project schedule?
Currently on schedule, the JPEG encoder and decoder didn’t present too many bugs in the process of writing it
What deliverables do you hope to complete in the next week?
For next week, I hope to run the JPEG encoder and decoder across a more rigorous set of test images to verify its functionality. Assuming all goes well, I plan to also start porting the JPEG encoder code on the ESP32 in anticipation of integration with the camera driver.
What did you personally accomplish this week on the project?
For this week I got the Espressif IDF for ESP32 setup on my laptop. The IDF is needed for us to compile and flash code to the ESP32 once we have the hardware in hand. The order for ESP32 was also put in on Monday along with the camera module. I hope to get that in hand soon so I can test out the toolchain that I have installed and debug any issues that may arise.
I also started writing the JPEG encoder code while I am waiting for the ESP32 to come in. My hope is that once the ESP32 comes in, I can immediately port the code over to the ESP32, saving us some time later on. Coding it up on my laptop also serves as a proof of concept on our modified JPEG algorithm and allows us to begin to make optimizations so that it can better run a low power ESP32. So far, I have the RGB to YCrCb color space conversion code done and verified along with an unoptimized version of the discrete fourier transform algorithm. For each one of the encoder components, I also have to write a decoder for it as well to verify functionality
Is your progress on schedule or behind? If you are behind, what actions will be taken to catch up to the project schedule?
Currently slightly ahead of schedule but it is possible that unforeseen bugs on the compression pipeline can result in it taking longer than initially expected
What deliverables do you hope to complete in the next week?
For next week, I hope to verify my toolchain installation on an actual ESP32 when it arrives. On the compression front, I hope to have a fully working version of the code so that our initial assumptions can be verified.
For the remote camera node, I looked at the possible options that could fit our needs. I looked at TI’s CC3200, Raspberry Pi Zero W, and the ESP32. Ultimately, I settled on using the ESP32 mostly because there is a robust ecosystem that has been built up to support the chip while offering a high degree of flexibility to accommodate our needs should they evolve. I specifically chose the ESP32-CAM development kit mostly since it has a built-in camera connector, making wiring very easy and hassle free. The ESP32-CAM also has one of the highest clock speeds of the entire ESP32 lineup and has two execution cores, which should help to avoid any compute limitations
I also looked into camera options and decided on using an OV2640 camera. The OV2640 camera is able to support standard VGA resolutions up to 1600*1200, giving us a lot of flexibility in choosing resolutions. The OV2640 is able to use the camera connector on the ESP32-CAM without any modification, a very important metric at the current stage.
Next week, I plan on putting the initial order for one complete module (OV2640 and ESP32-CAM) and begin setting up the toolchain in anticipation of parts arriving.