Zhejia’s Status Report – 2/25

This week, Korene and I worked on finding ways to improve the power delivery of the magnetic charging system since from last week, we discovered that a simple circuit would not deliver enough current to charge the seeed xiao board. We first spent some time trying to look for power amplifiers that would work at the high AC frequencies that we would be amplifying as well as a voltage-controlled sine wave oscillators, which were a bit elusive, and a lot of circuit diagrams came up instead. Many of the ICs that came up turned out to generate non-sine waves (many trapezoidal looking waves – basically square waves with rise and fall times) and figuring out which waveform the VCO outputted was often not on the datasheet. After talking a bit with Professor Tamal about using an ecosystem, we switched direction to looking into Qi wireless charging compliant ICs and boards, where we found a couple small sized wireless charging kits (Wireless Charging 10mm Coil 150mA Wireless Transmitter + Receiver Power Charger 5V Output (10mm Coil 150mA) (amazon.com)) on amazon and zoomed in on the product pictures to get the board name/chip name – XKT-412. This chip’s datasheet was only in Chinese and could only be found on AliExpress and Amazon. After some attempts at deciphering it, we moved on to trying to find Wireless Charging ICs on digikey. From there, we found some good ICs on digikey that came with an example project but those chips were obsolete and could no longer be bought. Then, we went over our seeed board’s battery management system requirements and ordered wireless charging transmitters by current, and many of them had quite low (3-3.6V) voltages, which we thought was too low at the time, and the ones with higher voltages either had tiny currents, no listed current, or were obsolete and were not sold anymore. We then looked on mouser and looked through many viable options, and unfortunately, many of them were not stocked (BD570xx Qi / PMA Wireless Power ICs – ROHM | Mouser). We eventually found a chip that had 4.5-24V along with 87mA current that was stocked, but that chip had 68 pins and was very complex and the datasheet did not give us a lot of information on how to use it or how the many pins worked. This was when we reached out on slack for help and moved to looking at the application notes instead. We then had a meeting with our instructors about this, and tried to look for more simple ICs since that IC had many components we do not need, and in the end we circled back to the amazon wireless charging kits, and found another variant of the XKT series, the XKT-510, which actually had a datasheet in English, although not with perfect translations (XKT-510.pdf (sakura.ne.jp)) along with example wiring circuits of both the transmitter and receiver to go along with it, and we decided that ideally, we would go with these chips as their pinouts and circuits were much more manageable than the 40-68 pin wireless charging ICs we found on digikey and mouser.

Our progress is slightly behind as although I hoped to resolve the power and current issues by this week, the extensive amount of research we had to do as well as the shipping time for the XKT ICs will push the power integration and PCB manufacturing on Korene’s part further back than we anticipated. With this adjustment in schedule, in the meantime, I can find the resonance for the official coils we ordered as well as start working on my other task, the design of the keyboard configuration software instead and shift around my schedule a bit.

Next week, I hope to record the required capacitor values for resonance for the industrially made coils we ordered, which should arrive soon (?) and work on the design and plan for the software configurations that will go on the main microcontroller, which for now is just another seeed xiao board. We should also order samples to test the XKT chips as soon as possible due to their weeklong shipping times.

Ben’s Status Report 2/25

This week I rewrote the entirety of the BLE code such that each key peripheral device “daisy chains” off the previous one, forwarding the values of each key to the central controller. However, I was unable to get this fully working as I had to solve a few issues with getting ArduinoBLE to make a device act both as a central and a peripheral. The current code can be found here: bojuns/FP-Key-A_BLE (github.com)

Still, however, I believe my progress is on track since after some more debugging, I believe I should be able to get multiple connections working before the end of next week.

Next week I hope to finish the daisy chaining protocol and test it for latency measurements.

Korene’s Status Report 2/18

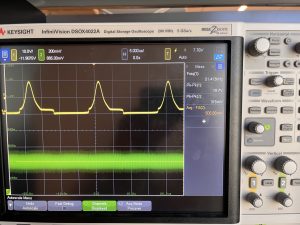
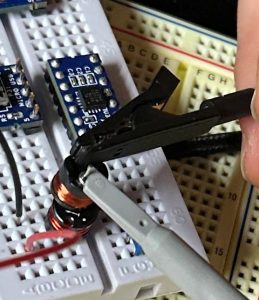
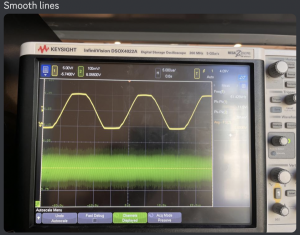
Over the past week, Zhejia and I have developed the plan for the inductive charging and created the proof of concept circuitry for it. Currently, we are now searching for the specific parts for the rest, but have found the inductive coils to buy (buying because it is more reliable to have the same inductance rating and be more consistent). Photos of the circuitry are on Zhejia’s Status Report. Some unknown results are why the current input and output appear to be so low and when measuring output current the voltage readings on the oscillator become warped. (top picture below is as normal measurement, bottom photo is when we measure for output current)

Next we need to make our calculations based around the 8.32uH inductors and then we can make a base schematic for the PCB. We plan to buy materials at beginning of the week to get them at the end of the week. Then test on the breadboard and complete the schematic and layout of the PCB to be sent out for fabrication(week after getting parts to buy)

We should be on schedule, but in practice a bit late in terms of when to send out a PCB board to fabricate. I hope there is still enough time to order one and then order another just in case.

A lot of 220 is being used here as it provided the best overview of a diverse number of components. We used Lab2a handout to build the full bridge rectifier and voltage regulator and lab4a to build the circuit to measure for resonance frequency. It’s a lot easier the second/third time around and cool to see it used to actually charge inductively! Some 18310 and 18320 knowledge is being used because of knowing about mosfets (and soon 18421 when we start looking at what power amplifiers to use in order to boost our power)

Weekly Status Report 2/18

We believe the most significant risks currently involve getting the custom PCBs in on time and getting the wireless charging current high enough. We would like to have a 50mA charging current minimum, which would hopefully reach our target of under 8 hours charging time with buffer to spare. However, our current charging capabilities of < 1mA would mean that charging the battery to full would take astronomically long. Like last week, our backup plan if the PCBs do not get here on time, is to use one of the SEEEDs as a central receiver. For the charger, our backup plan is to use the USB port attached to a wireless charging pad.

There were some changes to the wireless charging setup, which are documented in Zhejia’s individual status report. This change was necessary to reach the minimum charging voltage on the SEEED. This does not incur many additional costs, as we still need to design the custom PCBs.

Our schedule remains unchanged.

Wireless working:

https://youtube.com/shorts/qfVXAoujZhY?feature=share

Ben’s Status Report 2/18

https://youtube.com/shorts/qfVXAoujZhY?feature=share

This week, I got a single key to communicate via BLE to a controller. When the key was pressed, an LED on the switch and receiver will light up. I first started by finding an appropriate BLE library for arduino, which ended up being ArduinoBLE. From here, I defined a ledService for turning on and off the LED with a ByteCharacteristic to send the key press state. Debugging and troubleshooting took a lot of time because sometimes the device would fail to connect, but after a reset or a reflash, would work all of a sudden. This was solved after removing the serial initialization, when I realized that the device would lose power after being unplugged and before switching over to LIPO power, which caused the code to run again, which led it to continuously wait for a serial connection to the computer.

I believe my progress is on schedule, as I am scheduled to have a single key working this week. From what I gathered, I believe implementing multiple keys will not be too difficult.

Next week, I will try to implement multiple keys communicating with the central microcontroller, where each key module will be able to wireless transmit the pressed or unpressed state to the key.

18-220 was a great help to the progress this week, as it introduced me to the Arduino IDE and how to install various packages and program the correct board. Additionally, I applied my 18-349 experience of reading datasheets to determine pinouts and functionality (which is how I determined which pins to hook up the switch and the battery to). Additionally, Embedded taught me how to use minicom, which helped with debugging (since the Arduino IDE only lets you open a single serial terminal at once). Finally, the programming knowledge was learned during the last 2 weeks when I was researching the BLE protocol and how to implement it through arduino.

Zhejia’s Status Report – 2/18

This week Korene and I troubleshooted our resonance issues from last week and found that the signal generators in the 220 Lab increased in voltage as the frequency increased, leading to being unable to spot the peak amplitude on the oscilloscope (the math->division menu item was also quite noisy). However, we moved to using the ADALM’s spectrum analyzer and found the resonance with no problem after setting that up.

After that, we also constructed the rectifier/receiver and transmitter circuits on breadboards and got it to output ~6V, which is the lowest charging voltage the Seeed Xiao microcontroller’s battery management system can take, but at too low of a current.

These are skills we learned in 18-220 and 18-100.

Here are some pictures and diagrams of our constructed circuits:

I also worked on the design PowerPoint slides with everyone else.

My progress is on schedule, and next week, I plan to try to increase the current delivered and try attaching the battery to microcontroller to a breadboarded circuit and get the microcontroller charging.

Zhejia’s Status Report 2/11

I worked on the inductive charger, first making my own coil, then trying on some coils I acquired for more testing. I first calculated that the resonant frequency would be around 24 kHz, with the inductance of 43 microhenries in series with a capacitor of 1 microfarads. However, experimentally, I found that the real resonant frequency was very difficult to measure accurately as simply switching the direction of the probes would change the frequency at which I measured the highest output voltage for a given 5v input. Eventually, I settled on a ~41kHz resonant frequency for the inductor, which gave me an output voltage of ~3.4v (with a 5v input), which is close to the charging voltage for our planned small LIPO batteries, but I believe more investigation is required for the strange resonant measurement behavior.

We are mostly on schedule, having ordered/acquired the experimental parts needed, but the strange resonant behavior did put us a little behind schedule for proof of concept, which I will work on more with Korene next week to resolve. Asking staff may be an option as well.

In the next week, we will finish the proof of concept and create the circuit that integrates and stabilizes the magnetic charging for integration with the boards *when* they get here. (To be clear, the boards will likely not get here next week).

Korene’s Status Reports 2/11

This week I had presented the proposal and rehearsed the speech in order to deliver in an engaging manner and also read through the application notes of several microcontrollers to see what will be the base microcontroller to use for our main pcb. In addition, Zhejia and I researched on inductive vs resonant charging and decided we best make an inductive charging station as that appears to have a more straightforward design. I found a test schematic for Zhejia to then test out to make a proof of concept.

We solidified our plan that the microcontroller be a USB-C that will plug into the computer with ease and that we can just have it run on BLE instead of having the conversion from BLE to Bluetooth, this can reduce latency and switching between too many protocols.

The magnetic charging will require the PCB so it’s debatable on whether we can use that for the hardware component of capstone and or I could focus more on optimizing the space for the key PCBs, I’ll consult with the TAs and faculty on whether this is a good idea. Either way using the NRF52832 will be useful as it’s a small microchip with great specs, speedy and small.

Next week I’ll research harder into how PCB layout works, as that is probably the subject that is of most concern for the keys.

Originally was thinking stacking the key PCB with the SEEED and the magnetic receiver pcb would be enough but I’ll look more into how the connection would work.

This week I did not get as much progress in depth research into the PCB making, but next week shall be full send.

Team Status Report 2/11

We believe the most significant risks to the success of the project currently are the feasibility of wireless charging, the maximum number of devices possible through BLE, and the integration of all the components into the 22mm height permitted. For wireless charging, our backup plan is that the microcontrollers can pass through charge to the LIPO batteries via USB. For the BLE issue, we are managing the risk by looking into alternative BLE standards such as bluetooth mesh, with the backup plan to make some of the keys act as receivers pair multiple of the receivers with the central microcontroller. For the integration, we can use low profile cherry switches and cut down on some of the “nice to haves” such as hot swap capabilities to reduce the Z-height.

There have been no changes so far to the design of the system so far as we have not gotten enough parts in to experience any real integration challenges yet.

We have some pictures of a small inductive charger working posted in Zhejia’s status report.

Ben’s Status Report for 2/11

This week I worked on ordering the parts and reading up on the BLE programming protocol for the Seeed XIAO nRF52840. I placed an order for 16 microcontrollers through the order form, which are on schedule to get here next week. Additionally, I did research on the BLE protocol and the role of devices in communication. I found that the microcontrollers would be best used in peripheral mode, with a specific GATT (Generalized Attribute) and service for each key. Each key should also only have notify and read permissions.

I believe that I am on schedule to begin programming the basic single key interface with the computer next week when the parts hopefully arrive. In the meantime, I will be continuing to work on the starter code so that once the board gets here, I can begin programming and debugging right away.

For next week, I hope to program a single microcontroller with the ability to determine whether or not a key is pressed and send that data over BLE.