Korene’s Status Report 4/8

This week Question:

  1. Now that you are entering into the verification and validation phase of your project, provide a comprehensive update on what tests you have you run or are planning to run. In particular, how will you analyze the anticipated measured results to verify your contribution to the project meets the engineering design requirements or the use case requirements?
    Inductive coil testing: We’ve been making tests at the outputs of the transmitter coil to see what wave is outputted and what is the output voltage by using an oscilloscope to measure at the two inductor points. This allows us to know if the period is what we expect, if the peak to peak voltage is not being shorted or other reasons it may be lower than anticipated and if our output is still a sine like wave. This is primarily for debugging currently, but later on this will be useful to measure what our power efficiency is when we also measure how much current there is going through as well.
    With power efficiency, we’ll also be testing the duration of how long it takes to charge and this will also be related to the power transfer. One method is through using a stop watch and timing how long it takes to charge fully one (as of now it seems to be relatively quickly through a USB-C, so we may be able to measure the whole battery journey from start to finish). It’s important to measure the entire battery charge as it is a curved relation and not linearly, as it becomes more full, it becomes slower to charge.

    For 3D housing, that is just using calipers to measure. We can see how large it is and then also take into account in usage of whether it is comfortable to type on. Perhaps as an addition to the case we will include a wrist rest as the package of components is quite tall, however this is also a normal occurence in high end keyboards. Stability wise has not appear to be an issue either, but we will take into account of a wobble factor (perhaps measured by multiple people seeing how much effort it takes to knock a key down?)
    This week Progress
    This week I made another iteration of changes to the 3D housing and testing for the inductive coiling to determine what configuration the circuit is in. 

Inductive coil: Issues this week were unfortunately soldering issues to create a good pin output to the breadboard with the inductive coils. A few of the solder pads were ripped off due to uncareful measures, but that is just technical difficulties. That’s caused some slow down with circuit testing

We were able to measure the output of the oscillator chip directly (XKT-412) which we determined is similar to a 555 Timer due to it’s constant output. This denotes that our issues with inductive charging is with the power amplifier. Because of the larger resistance of the smaller coils, it affects how the power is transferred. We are still looking through some literacy to understand what could be helped with this, I’ve been referencing some of my 18-421 notes about common source amplifiers to see what the specific remedy could be and if it is just the common source amplifier or if it could have multiple power amplification stages.

3D Housing: After multiple runs through faulty 3D printing machines and a good print, I’ve determined the walls were made much too thin. I’ve thickened the walls to go from 1mm to 1.25mm and the back wall (which was thinner to account for a longer piece) to be at least 1mm now.

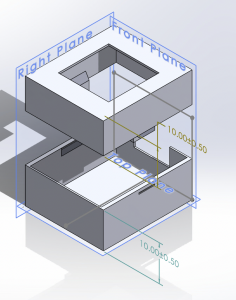
Printing a 1mm wall works fine, but a .6mm wall did not print anything out. Changes shall be printed out on Sunday to see if the results have changed. The picture below is a photo of the schematic of the housing, a hole at the top fit to the key switch to pop out, two sides of locking to fit the top to bottom, and a half hole through the wall for the USB-C port.

I’ve also learned VMware is much more useful than realized so that is a new tool I’ve been using.

Progress has been a bit slow. It’s been a bit frustrating as we thought buying and making changes to a prebuilt board would be easier but I see now that looking at chips like a magic box is not the whole picture. It’s important to know what is necessarily going on in each portion to gain understanding and make changes accordingly. The previous tests have mainly been checking what changes if we change what but that doesn’t necessarily add to understanding as we need to know how each different result is being made.

Leave a Reply

Your email address will not be published. Required fields are marked *