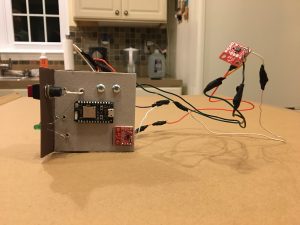
This week, I made a significant stride in binging the project closer to completion. My first task this week was to add in the second IMU from which we tell the release point. I was having trouble getting the AD0 pin to change the address of one of the IMUs, however, and was extremely fortunate to get some great help from Jiaqi. His discovery of SJ2 and the need to desolder it was the definition of being a great TA and I’m extremely grateful.
I sat down with a soldering gun and some spare pieces of cardboard and plastic to make a container for the 2 IMUs. After desoldering SJ2 and testing my setup with 2 IMUs connected, I began to drill holes and connect wedges to create space for the button and led. After that, I redrew my schematic, cut wires, and spent several hours connecting the photon to the various parts. Unfortunately, I poorly estimated the wire length I needed to bring the 2nd IMU to my finger so I needed to correct for that by splicing wires. To finish things off, I used nail polish and electrical tape to isolate the connections.
After all of this, I tested my setup and I was able to get data out of both IMUs while keeping everything contained. Tomorrow, I’ll be connecting my construction to a glove via a piece of foam and some dual-sided velcro.
I included some pictures below.

0 Comments