Marco’s Status Report 12/10/2022

This week, I finished implementing the audio reconstruction pipeline which allows us to listen to the audio being extracted by the SDFT bins.

As a reminder, my goal was to take an original audio of someones voice (see first audio sample below), and the extract the frequencies present in a user’s voice that correspond to the frequencies of piano keys. However, we’d have no idea if we’re extracting enough information by only using the power present at the piano key frequencies — therefore we needed to somehow reconstruct an audio file using the frequencies we picked up.

Marco’s Status Report 12/3/2022

Before Thanksgiving break, we re-scoped our project to use a fully digital interface, and I also laid out my approach to collecting accurate information about the frequencies present at the corresponding piano keys. Since then, I finished implementing the library and have been generating the tab separated duty cycle values we’re hoping to pass onto Angela for her work. Here’s screen shot confirming the frequencies we’re getting match the one’s we saw originally at the beginning of the semester! Now I’m trying to reconstruct the output audio using the averaged frequency components we’re collecting.

Marco’s Status Report for 11/19/2022

This week, we decided to pivot away from the physical interface — more information on that can be found on our team status report for this week. In light of this, I’ve been working with John and Angela to figure out how my works changes.

Here are my expected contributions “re-scoped” for our virtual piano interface:

  • Take in recorded audio from web app backend
  • Generate three files
    • A series of plots that give information about the incoming audio and frequencies perceived by the system
    • A digital reconstruction of the original wav file using the frequencies extracted by our averaging function
    • The originally promised csv file
  • Metrics
    • Audio fidelity
      • Using the reconstructed audio from the signal processing module, we can interview people on whether they can understand what the reconstructed audio is trying to say. This provides insight into how perceivably functional the audio we’ll generate is (reported as a percentage of the successful reports / total reports).
      • Generate information on what percentage of the original frequencies samples are lost from the averaging function (reported as a percentage of the captured information / original information)

Team Status Report 11/19/2022

This week, we decided to pivot away from our physical interface. There are unfortunate news, as we were making progress in various areas. However, after ordering a first round of materials for testing, we realized it would take too long for our final batch of supplies to arrive in time for the end of the semester.

Luckily, we accounted for this in our initial proposal, and can now pivot towards a fully virtual implementation — one that uses the web application John has been working on to display the results of Angela and Marco’s work so far.

To that end, we’ve listed out some of the re-worked scopes of our project below:

  • Note Scheduling:
    • Pivot from 5 discrete volume levels to more volume levels
    • Take advantage of newfound dynamic range at quieter volumes: no longer limited by 5N minimum threshold
    • Latency from input to output: 2% of audio length
    • Threshold for replaying a key: 15% of max volume between each timestamp
  • Web App:
    • Take in recorded audio from user (either new recording or uploaded file
    • ‘Upload’ recording to audio processing and note scheduler
      • (Stretch goal) → Save csv file on backend (in between audio processing and note scheduler) for re-selection in future.
    • Upon completion of audio processor, web app displays graphs of audio processing pipeline/progress
    • Run ‘Speech to Text’ on audio file and support captions for virtual piano.
      • Probably run in conjunction with audio processing such that we can more immediately display the virtual piano upon finishing the processing.
    • Shows virtual piano on a new page that takes the audio playback, shows keys ‘raining’ down on keys using inspiration from ‘Pianolizer’ (https://github.com/creaktive/pianolizer)
    • In order to optimize latency → Web app would prioritize processing just the audio and playing it back on virtual piano
      • On a separate tab, we will show graphs
    • Metrics:
      • Latency
        • Time between submitting audio recording to processing and return of graphs / audio for virtual piano
        • Defined as a function of input audio length
  • Signal Processing
    • Take in recorded audio from web app backend
    • Generate three files
      • A series of plots that give information about the incoming audio and frequencies perceived by the system
      • A digital reconstruction of the original wav file using the frequencies extracted by our averaging function
      • The originally promised csv file
    • Metrics
      • Audio fidelity
        • Using the reconstructed audio from the signal processing module, we can interview people on whether they can understand what the reconstructed audio is trying to say. This provides insight into how perceivably functional the audio we’ll generate is (reported as a percentage of the successful reports / total reports).
        • Generate information on what percentage of the original frequencies samples are lost from the averaging function (reported as a percentage of the captured information / original information)

Marco’s Status Report 11/12/2022

This week I started designing the PCB for the physical interface and sourcing parts from JLCPCB.com, which is where we’ll be manufacturing the PCB. Here is a list of all the parts I found. For the PCB, I had to design the receptacle that will hold the shift registers we ordered, below is a screen shot of the 3D model I generated for the receptacle.

This week we also presented our interim demo, after which we talked about some issues we’ve run into with the audio processing module. I’ll try to introduce the issue here, but some further investigation might be necessary if the reader is unfamiliar with certain signal processing concepts. I’ll try to add some links to further information where I can!

Our physical interface has a play rate, i.e the rate at which we can play keys with a solenoid, of 14 times per second. This rate dictates the number of samples we can extract from the original audio signal which is being recorded with a sampling rate of 48kHz. We’ve called these samples our window size, which results in a window size of 3428 samples per window. These are the number of samples we can use to perform the Fast Fourier Transform (FFT). One thing to note about the FFT is that our window size dictates how many frequency bins we have access to within a given window. Frequency bins are the number of evenly spaced points along the frequency domain that we can use to divide the range of possible frequencies recorded. For example, in our case with a range of 0Hz to 48kHz and a window size of 3428 samples, there are 3428 frequency bins which gives us a step size of 48kHz / 3428 ≈ 14 Hz. This means that each sample is separated by 14Hz in the resultant array we get from the FFT of our window. This is unfortunate because the step size amongst the frequencies of piano keys has a step size with 3 decimal points (e.g Key 1 that has fundamental frequency of 29.135Hz).

We’re currently investigating solutions to this issue, some of which include:

  • Rounding the piano key frequencies to their nearest integer, giving our piano keys domain a step size of 1. With that we can interpolated the 3428 frequency bin range of [0, 5000] with a step size of 1.
  • Filling our time domain window with 0’s
  • Reducing the sample rate to around 16kHz, since it would help us work with smaller datasets, have faster computation speeds, and isolate the frequencies we care about better

I’ll be implementing these avenues and investigating if they help us with our issue at hand.

Marco’s Status Report 11/5/2022

Hello,

On Monday I prepared for our ethics discussion. We had some really interesting points brought up surrounding adversarial use of our project and questions about what we would do in those situations. The remainder of the weekend I was away from campus at the Society of Hispanic Professional Engineers national convention in Charlotte, North Carolina. Now that I’m back in Pittsburgh I’ll be working on finishing our deliverables for the demo on Wednesday of this week.

Marco’s Status Report 10/29/2022

This week we also worked through some safety concerns with the physical interface. Each solenoid is rated for 400mA and 12V, with 69 solenoids we’d need 69*0.4A = 27.6A of current to power all of them. Running ~30A along one bus is extremely dangerous if exposed to human contact. Anything over 10A will likely result in death.

I did some digging into what others in the player piano community had done for their physical interface’s, and what I discovered was a bit shocking. Many of the the builds online I saw used 2 power supplies, at 15A each. This is still incredibly dangerous, but it got me wondering whether or not we could continue divvying up the supplies. I realized was could also make use of power strips, that can in total supply 15A across all its outlets before an internal breaker is set off. In order to make sure we’re being safe while building our physical interface, we’ve divided the 69 solenoid array into 9 segments of 8 solenoids (the last segment will only have 5). Each segment will have their own individual power source, and with 9 segments, each segment needs 27.6A / 9 = ~3.1A. 3A and 12V is a very common power supply specification, which means we can plug in an array of 9 3A/12V power supplies onto a power strip, and still power our entire system safely.

Team Status Report 10/29/2022

This status report involves work done for the last two weeks since we were off on Fall Break last week.

Since we went off for Fall Break some significant progress has been made on  several aspects of the project. We’ve met our interim Proof of Concept milestones for the Physical Interface. Originally we intended to build a prototype of the physical interface as a proof of concept for the final build. However, timing constraints and the fact that we could only get 5N solenoids on hand quickly through Amazon made us pivot toward a series of tests that would give us the confidence we needed to commit towards the final build.

John, Angela, and I worked on developing some Arduino sketches and test circuits on a breadboard that could control the solenoids we ordered using shift registers. The goal was to prove we could control multiple solenoids at once using a single output pin from an Arduino. This goal was met after , check out this video where John shows the solenoids being actuated to different bit patterns (i.e 01010, 11111, 00101, …).

Our next goal was figuring out how many times per second we could actuate a single solenoid. In our previous posts, we talked about how most high-end piano keys can pressed 15 times per second, as well as how the average human speaker pronounces 7 syllables per second. This means we need our physical system to at least be able to play the keys on our piano somewhere between 7-15 times per second. Using the 5N solenoids we got from Amazon, we were able to find that we can actuate the solenoids 16 times per second without any significant temperature rise! Check out this video where John demonstrates the solenoid being actuated at 16 times per second.

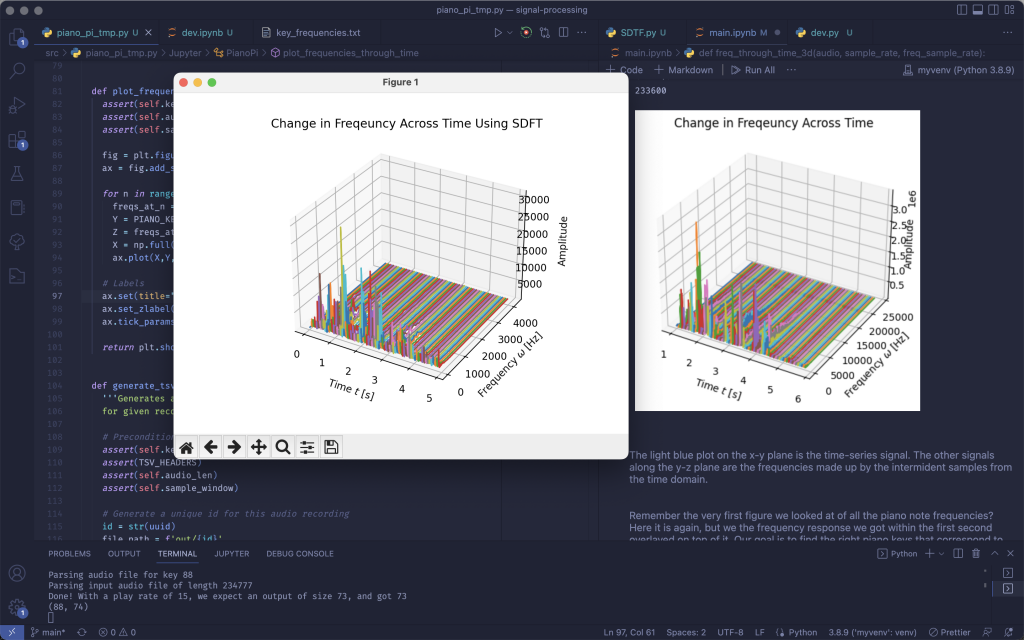
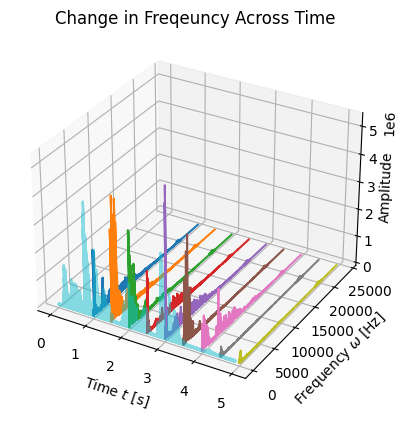
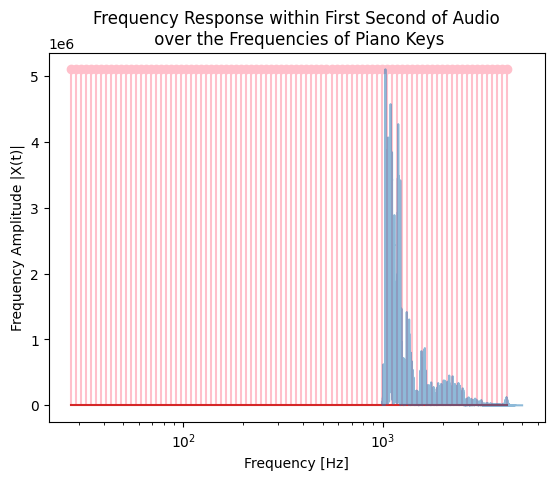
We’ve also made progress on the audio processing module that controls the keys being played! Marco’s been working on making a Jupyter Notebook that walks us through all of the signal processing involved with the audio processing module. If you’re interested in learning more about that, the notebook file can be found here!

This week we also worked through some safety concerns with the physical interface. Each solenoid is rated for 400mA and 12V, with 69 solenoids we’d need 69*0.4A = 27.6A of current to power all of them. Running ~30A along one bus is extremely dangerous if exposed to human contact. Anything over 10A will likely result in death. In order to make sure we’re being safe while building our physical interface, we’ve divided the 69 solenoid array into 9 segments of 8 solenoids (the last segment will only have 5). Each segment will have their own individual power source, and with 9 segments, each segment needs 27.6A / 9 = ~3.1A. 3A and 12V is a very common power supply specification, which means we can plug in an array of 9 3A/12V power supplies onto a power strip, and still power our entire system safely.


Marco’s Status Report 10/22

This week, we met our proof of concept milestones. Although we had to move the goalpost a little bit. Originally we intended to build a preliminary frame using 5 solenoids and single shift register. However, the solenoids we ordered were too weak (5N instead of 25N) for us to get a granular output force, so we decided to forgo building the preliminary frame since we’ll have to design that to the specifications of the 25N solenoids. Instead, we set out to complete a set of milestones for the project that would give us the confidence needed to build the final interface. Those included controlling a series of solenoids using bits loaded in from a shift register, and figuring out what the “play rate” of our solenoids were (i.e how many times can we actuate the solenoid ever second).

This week I started taking some very important steps towards building the signal processing module. I’ve begin writing a script that will generate the output text file containing information about what keys should be pressed in order to reproduce an audio recording.

The entire script has been implemented as a jupyter notebook, with captioning and explanations in between code samples.

Link: https://gist.github.com/aceamarco/9ec5c12c7ecedc07ea55a951e4483284

Here are some of the plots I’ve generated from the script:


Marco’s Status Report, 2022/10/08

This week, I gave our design review presentation. Before that, I met with the team to prepares our slide deck and go over some dry runs of the presentation. We received our parts for the proof of concept build earlier this week. That included solenoids, MOSFET transistors, and the shift registers we’ll be using to control all 69 solenoids later in the build. I’ve been CADing a boot for the solenoids that will allow the solenoids to rest higher above the keys and reach the keys better. Alongside that I’ll be writing some Arduino sketches to practice working with the shift registers.