Marco’s Status Report 10/29/2022

This week we also worked through some safety concerns with the physical interface. Each solenoid is rated for 400mA and 12V, with 69 solenoids we’d need 69*0.4A = 27.6A of current to power all of them. Running ~30A along one bus is extremely dangerous if exposed to human contact. Anything over 10A will likely result in death.

I did some digging into what others in the player piano community had done for their physical interface’s, and what I discovered was a bit shocking. Many of the the builds online I saw used 2 power supplies, at 15A each. This is still incredibly dangerous, but it got me wondering whether or not we could continue divvying up the supplies. I realized was could also make use of power strips, that can in total supply 15A across all its outlets before an internal breaker is set off. In order to make sure we’re being safe while building our physical interface, we’ve divided the 69 solenoid array into 9 segments of 8 solenoids (the last segment will only have 5). Each segment will have their own individual power source, and with 9 segments, each segment needs 27.6A / 9 = ~3.1A. 3A and 12V is a very common power supply specification, which means we can plug in an array of 9 3A/12V power supplies onto a power strip, and still power our entire system safely.

Angela’s status report, 2022/10/29

This week, I completed writing the preliminary code for the note scheduler. This module will parse the output of the signal processing module and convert it into discrete keypresses on the piano. This was done in Python. I have committed the code to Github for view by my teammates.

Firstly, the way we’re currently separating syllables is a bit clumsy. We only look at the differences between volumes for each time period. I believe that a more elegant solution is to use something like a k-dimensional difference in volume between one note and the next (where each dimension is a frequency on the piano). We could also employ machine learning for this. A K-th nearest neighbours algorithm would work well to determine the k-dimensional difference in volume. We could also use a neural network since there are so many inputs. I initially proposed a decision tree but I decided there were too many keys/frequencies for this.

Secondly, during my work, I made note of the spatial and temporal locality of the list accesses. Should we decide to convert our project to C to improve timing, I will make sure to take advantage of these to optimize the runtime. There is also much potential for multithreading since we do the same operations on different entries in the list.


Team Status Report 10/29/2022

This status report involves work done for the last two weeks since we were off on Fall Break last week.

Since we went off for Fall Break some significant progress has been made on  several aspects of the project. We’ve met our interim Proof of Concept milestones for the Physical Interface. Originally we intended to build a prototype of the physical interface as a proof of concept for the final build. However, timing constraints and the fact that we could only get 5N solenoids on hand quickly through Amazon made us pivot toward a series of tests that would give us the confidence we needed to commit towards the final build.

John, Angela, and I worked on developing some Arduino sketches and test circuits on a breadboard that could control the solenoids we ordered using shift registers. The goal was to prove we could control multiple solenoids at once using a single output pin from an Arduino. This goal was met after , check out this video where John shows the solenoids being actuated to different bit patterns (i.e 01010, 11111, 00101, …).

Our next goal was figuring out how many times per second we could actuate a single solenoid. In our previous posts, we talked about how most high-end piano keys can pressed 15 times per second, as well as how the average human speaker pronounces 7 syllables per second. This means we need our physical system to at least be able to play the keys on our piano somewhere between 7-15 times per second. Using the 5N solenoids we got from Amazon, we were able to find that we can actuate the solenoids 16 times per second without any significant temperature rise! Check out this video where John demonstrates the solenoid being actuated at 16 times per second.

We’ve also made progress on the audio processing module that controls the keys being played! Marco’s been working on making a Jupyter Notebook that walks us through all of the signal processing involved with the audio processing module. If you’re interested in learning more about that, the notebook file can be found here!

This week we also worked through some safety concerns with the physical interface. Each solenoid is rated for 400mA and 12V, with 69 solenoids we’d need 69*0.4A = 27.6A of current to power all of them. Running ~30A along one bus is extremely dangerous if exposed to human contact. Anything over 10A will likely result in death. In order to make sure we’re being safe while building our physical interface, we’ve divided the 69 solenoid array into 9 segments of 8 solenoids (the last segment will only have 5). Each segment will have their own individual power source, and with 9 segments, each segment needs 27.6A / 9 = ~3.1A. 3A and 12V is a very common power supply specification, which means we can plug in an array of 9 3A/12V power supplies onto a power strip, and still power our entire system safely.


John’s Status Report 10/29

This week, I was focused on 2 main things: helping to restructure our circuit power design to be much safer and getting a basic web app interface initialized.

In terms of the power redesign,  Professor Tamal pointed out the large safety issue with our power supply in his feedback for our design documentation. Originally, we wired all 69 of our solenoids in parallel to a main power bus that would carry current to distribute amongst all the solenoids. This would mean that the bus would need a whopping ~30A supplied to it. This introduced a large safety concern and difficulty getting large enough wires for the bus that we could connect the solenoids to directly. Luckily, with some help from the player piano builders Discord we are a part of, I got some inspiration from the pictures showing people using multiple power supplies. With this we decided to split our large power supply into 9 smaller ones. This would allow us to group together batches of 8 solenoids and power them each with a 3A power supply. This is a much safer option since household and microcontroller electronics run on this amperage. This also allows us to also use more standard wire gauges and connectors for the solenoids.

In terms of the web app initialization, I created a preliminary app using Django as the overall framework and sqlite3 as the backend database. For our web app, we will be hosting a basic user audio playback interface consisting of controls to upload recordings, save recordings, and pause/play the piano playing. The only data we need to store are processed .wav files saved as text files describing the scheduled notes. We are using sqlite3 for the backend management engine since it is simple to use and I am familiar with it from learning web development in the CMU webapps course. With sqlite3, it is not very tailored to storing large files, however we will be keeping our processed files in a media folder on the AWS EC2 instance, as it can hold more data anyways, then we will store file references in the sqlite3 backend.

For the next week, I will begin  getting our audio processing modules on the web app and being able to interact in basic ways. I will work with the team to flush out an interface protocol to know how the user interface will be sending commands to the audio processing and note scheduler.

Angela’s status report, 2022/10/22

During the beginning of the week, I worked with John to write arduino sketches and test our solenoids to ensure that a physical implementation would be feasible and practical. We were concerned firstly with ensuring the utility of the shift registers and secondly with making sure they were able to send bits to the solenoids. Firstly, we tested the shift registers with LEDs. We wrote test cases and passed them through an arduino and out to the shift registers, and finally to the LEDs. We struggled with the timing of the bits. Though it was apparent that the bits were indeed reaching the LEDs, their timing was off and some bits “stayed” for too long; ie. the LEDs did not turn off in time. I deduced that this was due to a timing issue. We were only pulsing the signals to the shift registers, and the time was too short for it to be consistently registered, thus the unintended behaviour. We added small delays between enabling and disabling signals and the LEDs behaved as intended.

On the software side, I began to think of classes with which to store the output. I wrote some class definitions and preliminary class functions with which to use for the time:frequency format of the data we will be working with.

Marco’s Status Report 10/22

This week, we met our proof of concept milestones. Although we had to move the goalpost a little bit. Originally we intended to build a preliminary frame using 5 solenoids and single shift register. However, the solenoids we ordered were too weak (5N instead of 25N) for us to get a granular output force, so we decided to forgo building the preliminary frame since we’ll have to design that to the specifications of the 25N solenoids. Instead, we set out to complete a set of milestones for the project that would give us the confidence needed to build the final interface. Those included controlling a series of solenoids using bits loaded in from a shift register, and figuring out what the “play rate” of our solenoids were (i.e how many times can we actuate the solenoid ever second).

This week I started taking some very important steps towards building the signal processing module. I’ve begin writing a script that will generate the output text file containing information about what keys should be pressed in order to reproduce an audio recording.

The entire script has been implemented as a jupyter notebook, with captioning and explanations in between code samples.

Link: https://gist.github.com/aceamarco/9ec5c12c7ecedc07ea55a951e4483284

Here are some of the plots I’ve generated from the script:


John’s Status Report 10/22

This past week, I worked alongside Marco and Angela to clearly scope out our entire project design, identify trade-offs in our choices, and redefine our priorities to finish the design doc, begin our audio processing, and ultimately finish our project on time. In the week before fall break, we set a team deadline to finish and test our proof of concept design before our design doc was due and start on the audio processing component of our project.  I was tasked with writing various sections of our design doc as well as those pertaining to my specialized areas (web-app and physical system).

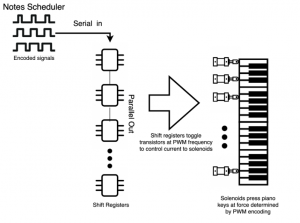
Along-side writing our design doc, I put my time into defining what a successful proof-of-concept design looked like for our physical system and how we could go about designing it. To recall, our physical system will consist of 69 cylindrical solenoids fixed to a solid chassis that will be placed on top of the keys of a piano and activated electronically to press the keys. The solenoids will be controlled from a Raspberry Pi and several shift registers connected to MOSFETs that allow or block current flow into each solenoid. For our proof-of-concept, we ordered 5 smaller solenoids of similar type as our final product, MOSFETs, and Shift registers. Our plan was to use an Arduino and simple programs to drive the shift registers connected to each solenoid to prove that we could not only drive multiple solenoids at once and correctly calculate power-needs, but also to input patterns for solenoid activation that closely simulates the note scheduling we would be doing for the final physical system. After deep diving into spec sheets for our solenoids and shift registers, we were able to successfully program several patterns of activation for our solenoids and time them appropriately. (A video is linked showing the activation of 3 solenoids each second in a simple pattern).

Link to my drive for video showing 3 solenoids activating in pattern.

On top of the proof-of-concept tests with activating solenoids in a pattern, I also implemented a test for seeing how fast the play-rate is for  1 solenoid. This would affect how many sounds we could produce per second. As Angela found out, the English language can speak up to 15 phoneme (a phoneme is the smallest unit of speech distinguishing one word / word element from another) per second, which may require us to produce up to 15 sounds per second. This test confirmed that we are able to reproduce this upper bound if necessary. (A video is linked below showing the solenoid play rate at 16 times per second).

Link to my drive for video showing play rate at 16Hz.

Overall, these experiments have given us confidence in our ability to design and create the overall physical system reliably. We have also discovered some helpful resources along the way (thanks to an online forum of self playing piano makers that Marco found) that have allowed us to focus less on the physical design of the chassis and more on our unique circuity idea, audio processing, note scheduling, and web app.

For the remainder of the Fall break and the following week, I will be helping to plan out the audio processing and note scheduling as well as setting up the web app for hosting the above mentioned systems.

Marco’s Status Report, 2022/10/08

This week, I gave our design review presentation. Before that, I met with the team to prepares our slide deck and go over some dry runs of the presentation. We received our parts for the proof of concept build earlier this week. That included solenoids, MOSFET transistors, and the shift registers we’ll be using to control all 69 solenoids later in the build. I’ve been CADing a boot for the solenoids that will allow the solenoids to rest higher above the keys and reach the keys better. Alongside that I’ll be writing some Arduino sketches to practice working with the shift registers.

John’s Status Report for 10/8

This week, I helped the team discuss our plans for the physical system and review the concepts and action plans we laid out through our design presentation. I am planning to write Arduino sketch code to simulate data serially flowing into the shift registers that encode the data for which solenoids to trigger and at what speeds. This will first involve sending the solenoids binary, on-off data to test how to trigger the solenoid at different rates. Next we will add in PWM encoding into our on/off signal to try and trigger the solenoid at different speeds, thus trigger different volume levels from the piano note. We will simulate sending different encodings to different solenoids and test if we can create a simple pattern of key pressing. This will give us good data on just how to interact with the physical system. This will inform the audio processing on how to best encode the note data as well.

Team Status Report for 10/8

This week, after scoping out our project extensively for our design presentation, we began focusing on our proof of concept design.  We also received the raspberry pi, five solenoids, transistors, and shift registers we ordered for testing out specific metrics for our physical system. To accomplish this, we defined what metrics we want to collect and how we can determine a successful proof of concept. For the metrics, we plan on first testing the extension length of the solenoid piston and how far we will need to position it on top of the keys. This will impact our overall physical design and help us understand the structure of the system. Next, we will write simple test programs on a microcontroller to drive the solenoid at different rates and with various PWM encodings to get an optimal range of pressing speed and power. We will use this data to map the amplitude data gathered from the audio processing to how we press the piano key to best represent this. Additionally, we will create preliminary circuit to isolate the whole physical system pipeline within just 5 solenoids. In our testing, we will serially send out bits to our SIPO (Serial-in, Parallel-out) shift registers representing which notes to play. The parallel output is connected to the transistors, which control the flow of current from the power source to the solenoids.(See diagram below from our design presentation)

Building a scaled-down version of our physical system pipeline will allow us to not only understand how to use our parts and tools to create the whole flow of data, but also to measure our current draw and voltage requirements and extrapolate the proper power source requirements for the whole system for our 5- solenoid test. By colleting all these metrics, we will have a good understanding of the feasibility of scaling the system up to 69 keys and it will highlight any design choices that we need to focus from the rest of the project to best facilitate the physical system.