Week of 10/22 Progress Report

Bill:

The first HX711 amplifier was not giving me any readings, and I think it might have gotten damaged from the several soldering and desoldering attempts. I decided to just try again with the second amplifier. I soldered a 5×1 female header pin to the amplifier, as well as the leads from the load cell, and connected the amplifier to the Arduino to try and see if I could get reading with the second amplifier. I used the HX711 interface that was provided by Sparkfun, and wrote code that just constantly read from the amplifier in an infinite loop. I managed to get readings from the amplifier, but for some reason, I was getting negative readings despite the fact that everything was connected correctly. After reading up a bit online, it turns out that in the case of the readings being negative, I can just switch the positive and negative outputs of the load cell. I had to desolder and resolder the leads, and that fixed the issue with the signs. I tested the load cell by just gently pressing on it with my fingers.

The readings look like this. The calibration of the load cell is off because I just picked a random value for the calibration. This is not important in our case, as we do not care about the actual weight of the glass. We just need to detect whether there is a glass or not. The next step would be to build an actual platform with the load cell and then test it with some glasses.

The readings look like this. The calibration of the load cell is off because I just picked a random value for the calibration. This is not important in our case, as we do not care about the actual weight of the glass. We just need to detect whether there is a glass or not. The next step would be to build an actual platform with the load cell, and then test it with some glasses.

Connor:

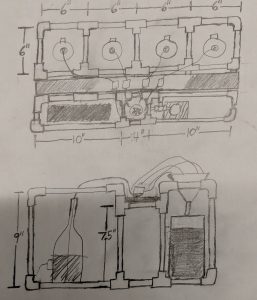
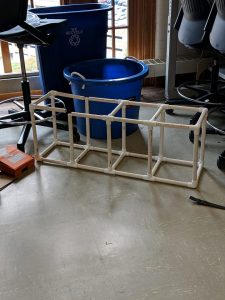
This week, I built part of the scaffolding. We, unfortunately, ran out of the joints needed to build the rest of the scaffolding. You can see that current status of the scaffolding in the picture below:

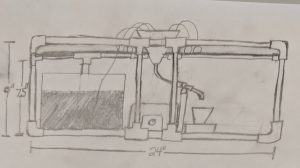
In addition, we did get in our power supplies and were able to test out the valve, which worked as expected. I also worked on the design for the mixing station this week. Below is a drawing of what we expect to put together.


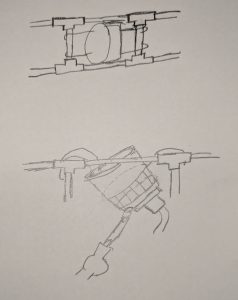
Essentially, the most of the motor that we took apart from the magnetic mixer stirrer is still intact. We will glue the platform that holds the magnets to the bottom of the beaker. From there, we will suspend the beaker in air using metal wires (such as chicken wire). This should allow us to stabilize the mixing motor and the beaker. We will also have a ring of wire go around the top of the beaker to stabilize. In addition, we will drill a hole in the bottom of the beaker to allow liquid to flow out. We will use an adapter to connect the silicone tubing to the valve and the beaker.

For this upcoming week, I will go to Home Depot to purchase some more of joints that we need for our scaffolding. We will also purchase the metal wiring needed for the mixing station. We should be able to implement the rest of the scaffolding and the mixing station by the end of this upcoming week. 

David:

For this week, I worked on cutting out the PVC piping and designing/testing the mixing station with Connor.

Moreover, since the power supply came in, I was able to connect the power supply to the hat and program the hat to drive the big pump that we are going to use for rinsing system for certain amount of seconds. I still get I/O error sometimes when driving the bigger pump, and I couldn’t figure out the reason. After reading the specs of the pump and the hat, I think the reason might be the overheating with the chip on the hat. Since our system won’t be in use all the time and the pump was working properly in most of my testings, I think it wouldn’t be an issue in the end.

With some testing, I think we would pump enough water with the bigger pump to rinse off the residue in less than 2s.

For next week, I would prepare the mid-semester demo with the team and start working on the database.

Overall:

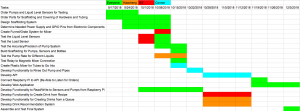
At this point, we only have $61 left to purchase parts for our project. While we have purchased most of the parts that we need for our project, that will most likely not cover the rest of the parts that we need to make the project a success. However, we have agreed as a team that we pool from our own money to purchase any additional parts. One thing that we have to address is how to slow down the spinning of the magnetic. We used to be able to control the speed of the spinning of the magnet using a potentiometer. However, the potentiometer broke off once we were trying to get it loose from the casing that the motor was in. We can solder on a potentiometer or a resistor to the motor such that there is less current flowing through the system. On the other hand, we could manually add some kind of weight to the spinner to make it spin slower. While we have laid out these various options and the implementation should be minimal, we need to make a decision in the next couple of weeks. With regards to the overall schedule, we don’t need to make any major change to the schedule and are still on track to complete everything that we need for the project.

Week of 10/15 Progress Report

Bill:

As you can see in the gif below, we ran an Arduino sketch that turned on the outlet for five seconds and then turned it off for a second and repeated this. Unfortunately, because we did not have the right-sized screwdriver, we had to manually hold the wires from the Arduino to the pins on the power relay.

Animated GIF - Find & Share on GIPHY

For this upcoming week, I will be working on constructing the platform with the load sensor using the wood that we got from home depot. The first amplifier was giving me a lot of issues. When I tried measuring the output of the amplifier using a multimeter, it wasn’t reacting at all to the change in weight. We bought another amplifier and load cell, so I will try again with those. It I get those connected up properly, I will then connect them to the Arduino and see if I can get any readings. I already have the code for reading from the amplifier, so as long as I can get the load cell and the amplifier hooked up properly, we should be set. Afterwards, I will look more into having the Arduino communicate with the Raspberry Pi using a USB connection. If I manage to get any readings, I will move on with testing with glasses of different weights to see how to calibrate the cell to be able to detect glasses of various weight.

Connor:

During this past week, I was able to work on beginning to assemble the scaffolding. This involved cutting some of our PVC pipes to the exact lengths that we have specified in our design with a machine saw that we found in the machine shop in Hammerschlag. While I was able to make a few cuts with the PVC pipes that we had bought last weekend, we, unfortunately, did receive the joints that we needed to connect the parts yet. Also, the machine shop was closed this weekend as we needed to cut more PVC pipes that we had bought this weekend. With regards to the valve that we are using for the mixing station, we realized, with the help of our TA, that we didn’t have the power supply necessary to operate the valve. With that said, we ordered a power supply, 12V/5A, to operate the valve. Also, I also did some testing with the magnetic stirrer. We hooked it up to our AC/DC power relay, and it seemed to work as designed. However, we have thought about our design recently and thought that there might be an easier way to handle mixing. Instead of having the funnel hover above the mixer, it might make more sense to have some kind of cup titled a bit sideways and then have the magnet and motor that was apart of the magnetic stirrer mixer attached directly to the bottom of the cup. We would then no longer have the potential issue of the funnel being too far away from the magnetic stirrer mixer to mix the drink. To drain the liquid into the cup, we would make a hole in the cup, caulk an adapter to the cup which will attach to some silicone tubing. I also changed some of the dimensions of the scaffolding such that each bottle resides in an 8” by 8” square of tubing, instead of the original 6” by 6” that we described in our last weekly report.

For this upcoming week, I plan to cut the rest of the PVC piping, since the machine shop is open during weekdays. We should also receive our PVC joints sometime early in the week. With that said, my goal is to finish assembly of the scaffolding (the PVC piping). In addition, I will begin working on finishing the details of our design and the begin the implementation of the new mixing station. We will test some possible ways to keep the beaker slightly tilted (possibly chicken wire).

David:

This week I ordered the three power supplies that we need for our design. We are currently using the power supplies in the lab to provide power for the motor hats, but they don’t quite meet the power requirements for the hat if we are driving four pumps simultaneously. Moreover, we won’t be able to test the bigger pump we had for rinsing system because it requires even more power than the hat. I tested out controlling the pumps to turn on and off for a certain number of seconds. We also tested out controlling the power relay using Arduino, which would turn the mixer on and off, as you can see in the gif below. I was also able to connect the Raspberry Pi with the Arduino and control the Arduino using RPi.

With regards to the rinsing system, since we don’t have the power supply or the pumps yet, we won’t be able to quite test them and make decisions on the design. However, it should have the same mechanism as pumping other kinds of liquid (with or without the stirring part).

We were able to take the stirrer apart and show that the stirrer still works in our new design as Connor mentioned above. The gif below shows how it would work in our design.

Animated GIF - Find & Share on GIPHY

For next week, I need to finish testing the pumps and power supplies and decide whether we can use the big pump for rinsing water or not. Also, I should try to figure out how to drill a hole at the bottom of the beaker and find a matching adapter for the hole and the valve.

Overall:

We have made some progress this week in regards to the design of the subsystems. We did make some design changes, which will not increase our total amount by a lot, as well as the mixing station, which has been described above. However, we believe we can finish working on the scaffolding early in the week, which will allow us to begin implementing our mixing station design and provide a nice foundation and visual for the mid-semester demo. While we believe that the new mixing station design will use chicken wire to stabilize the cup and won’t cost a lot of money, we need to begin the implementation process. If we run into issues with the PVC piping, then we can still build the system without a foundation. It will just be more of a hassle, and we may have trouble later on with trying to build a foundation after connecting the inner system. If the PVC piping for some reasons does not work, we also have access to wood in the cages area. While it will be harder to build, and possible less stable, it should be sufficient for our device.


In the following weeks, we are going to try and get the Raspberry Pi to completely control a single pump, as well as the mixer to see if we can get the system working with just a single bottle. We believe that as long as we can get it working with a single bottle, it should not be too much trouble to expand to multiple bottles. The possible problems are with the power and the motor hat, since we will have to power more devices.

Week of 10/8 Progress Report

David:

This week, I worked on the functionality of having the Raspberry Pi control the pump. I created a python script that was able to turn on/off the pump and also control the flow rate of the pump with PWM.

I tested out the small peristaltic pump on different kinds of liquid and under different conditions.

Water at different voltage(all close to 12V): varies in undefined behavior, but all in the range of 62-78ml/min;

Water with pump at different heights relative to the water level: not much difference (at most 2ml);

Water with pump connect to different pins: not much difference (at most 2ml);

Other kinds of liquid compared to water at the same pins and same voltage: alcohol or alcohol mixed with water (about the same: 2ml difference); soda (I used sprite) (much slower: less than 40ml/min); coffee (cold brew: mixed with honey and cocoa) (faster: about 5ml).

I also worked on testing the other peristaltic pump that we had purchased, which is able to pump liquid much faster but with a lot less accuracy (100ml in less than 2s). The issue with this pump is that the hat doesn’t have enough power to drive the pump, so if we were to use it, we would have to use a seperate power source and a relay to turn it on and off. This pump will be used for the cleaning water as the amount of water that we will clean the funnel with does not need to be exact. I also was able to control two pumps at the same time with the Raspberry Pi. While we still need to make sure that the Raspberry Pi is able to handle more than 4 pumps due to the pin limitation on the hat, this was a good start for us.

For this upcoming week, I will be responsible for purchasing more electronic components for our project. For example, we need to buy three more peristaltic pumps for the drink liquids. In addition, we need to buy a ADC converter for the 12V power supply to the Raspberry Pi HAT.

Bill:

I tested the liquid level sensor. I used a plastic cup filled with water and moved the sensor up and down the cup. Whenever the sensor came in “contact” with the waterline, the sensor lit up, alerting us that it sensed the liquid. I also tested the liquid level sensor with other kinds of liquids. We wanted to make sure that the sensor was versatile enough to be able to detect liquids besides water. We were fairly confident that it would be but wanted to be certain. When we did test it, we found out that the sensor was able to accurately detect the various liquids, except for pure isopropyl alcohol. The sensor sometimes gave false negatives when put on a plastic container of isopropyl alcohol. I tried pouring the alcohol into different containers, but I still having issues with the sensor. I tried diluting the alcohol, and after that the sensor was surprisingly able to detect the liquid, which suggests that pure isopropyl alcohol has some chemical properties that makes it hard to detect.

In addition to testing the liquid level sensor, I also went to Home Depot to purchase the necessary materials for the platform for the glass (where the drink will be poured).

For this upcoming week, I will be working on constructing the platform with the load sensor. I will build out the platform from a physical standpoint and then hook said platform up to a power supply and multimeter to output the change in load on the sensor. If I am able to get done with that, I will go onto connecting the Raspberry Pi up to the load sensor see if I can get accurate digital readings of the weight. I will test glasses of different weights to see how to calibrate the cell to be able to detect glasses of various weight.

Connor:

This week, I designed the scaffolding for the bottles, pumps, funnel, and valve. We are working on the skeleton of the project and will work on the covering in the subsequent weeks. The skeleton of the project will allow us to show our MVP for the midterm demos. Here are the drawings of the design of scaffolding:

As you can see above, this is the front view of the system. As you can see, you have a basin of water used for the cleaning water. In addition, we have the valve slightly offset from the funnel. The rationale behind this is that we can allow the magnetic mixer stirrer to get as close to the funnel as it needs to mix it while the valve can be clamped to some PVC piping a be a natural position to pour into the glass. If the base of the stirrer is too low for the system to properly mix drinks, we can add a false bottom to it to have it be closer to the funnel and thus the magnetic pill.

For the top and side views, you can see that we added a plank of wood in the middle of the system. The reasoning for this is to have a place for the peristaltic pumps for the bottles to be situated in such a place that allows their tubing to go to the bottom of their bottles while having access to the funnel. 

I also tested the gravity-feed solenoid valve, but I was having some difficulty in getting it to be functional. When I hooked it up to the 12V DC power supply, the power supply would say that it was overloaded and would only output ~2.5V.

Next week, in addition to finish building the scaffolding of PVC piping, I plan on getting the valve to function properly, as in having it hooked up to an external power supply and having it properly open and close. Once I have the valve working, I will then begin working on connecting it to the Raspberry Pi and being able to control the valve from it. In addition, we hope to receive the magnetic mixer stirrer sometime early this upcoming week. With it, I will test it’s connection to the AC/DC control relay and then have it work with the Raspberry Pi and control turning the magnetic mixer stirrer from it. I also plan to design and construct the funnel in such a way that the tubes for the drink liquids and cleaning water can be used in the funnel. This will include drilling holes in the funnel and stabilizing the tubes at such an angle to ensure that they dispense liquid directly into the funnel as opposed to shooting out of the funnel.

Overall:

After the course of this week, we feel that we have made adequate progress. While we have made a decent amount of progress this week, we still need to further derisk certain aspects of our project. For example, we need to ensure that the valve that we purchased is a possible solution. If by the middle of next week we are having no luck in getting the valve to function properly, we will search for a valve that will meet our needs. Also, we need to make sure that we can control and pump multiple liquids simultaneously. To test such, we need to order the necessary parts on Tuesday to get them in as quickly as possible. By getting starting on testing as early as possible, we can increase the margin of error to ensure that we have adequate time to build out the hardware. Moreover, we need to further design the functionality of rinsing using either the bigger peristaltic pump which isn’t very accurate or another peristaltic pump (such as the one we are using for the drinking liquids).

Some parts of our system have been changed and/or elaborated upon, such as the scaffolding, and the explanation for such has been made in our individual responses.

For our schedule, we were able to get all the necessary parts for the scaffolding. However, we are holding off on ordering the covering for Bartendo for reasons that I mentioned above. So in that sense, we will separate this into a separate task and work on it a few weeks from now. On the other hand, we have already begun working on writing capabilities to the pumps and that is showing great promise so we are a bit ahead of schedule on that front.

Week of 10/1 Progress Report

Bill:

I hooked up the load cell to the power supply and the multimeter to test whether it worked properly or not. I plan on further testing it by hooking it up to the load cell amplifier and using the multimeter to check the output and then connecting it to our Arduino to see if it can read from the amplifier.

Next week, I also would like to test out the larger but more inaccurate peristaltic pump. We would like to use this pump for our cleaning water supply as it will allow us to quickly dispense the water we need into the funnel. Also, next week, I would like to work on creating the funnel with the grate inside of it.

David:

This week I mainly set up the hardware and software parts related to the Raspberry Pi. I soldered the parts of the hats and also researched on drivers and installation related to the pumps and the valves. Moreover, I have started setting up the environment on the Pi.

Next week, we should be able to put the pumps and the Pi together and control them using the Pi. Thus, I plan to mainly do the coding related to setting this up and test using the Pi, and then we should be able to decide the design and put together onto the report.

Connor:

This week I tested out one of the peristaltic pumps. We pumped water from a container to a beaker. To pump approximately 70 mL of water, it took roughly 52 seconds to do so. We were able to do this without using a Raspberry Pi. To simplify things, we simply hooked up the peristaltic pump to a power supply in the lab (at 12V DC) and manually turned the power supply on and off.

Next week, I would like to have us come up with the basic scaffolding system for the pumps and bottles. This needs to be done as we need to submit our design review by next Sunday. In addition to that, we can begin building out our scaffolding design next week. I plan on going to the local Home Depot to pick up some items for scaffolding and tubing. In addition to this, I would like to test out the gravity-fed solenoid valve that we should be getting sometime this week.

Overall:

I believe that although we might be slightly behind schedule on some items, we are on track with others. Bill has begun testing out the load cell, and we have tested out some of the pumps that we will need for our design. While we were supposed to finish the design the scaffolding system this week, we feel very confident we can complete and begin implementing it by the end of this week.

The scaffolding design could change, but any deviations should be cheap and cause little to no delay in the schedule. We can most likely go to a local home improvement store to purchase any materials (PVC pipes, screws, etc.) with ease. While the scaffolding design is something we have to take some time to thoroughly think through, we have a bit more margin of error than with the electrical components due to price and accessibility. Also, by working on the design of the scaffolding this week, we can make online purchases if we are somehow not able to find such items at a local store. We also didn’t have any major changes happen to the design during the past week.