Emanuel’s Status Report for 4/27

Personal Accomplishment:

Mandatory Lab (4 hrs)

  • Listened and gave feedback for each group’s final presentation

Team Meeting (8 hrs)

  • Combining each subsystem together
  • Look into alternative solutions for flaws found when combining systems together

Progress:

Since we were limited to still one portion of the track and waiting for the other portions of the track to be printed, we tested where the coil produced the most distance for propelling the carrier across the track while producing a smooth transition. I found that a little bit past the middle of the coil is where the coil produces a strong and smooth magnetic propulsion where the carrier doesn’t do a nose dive into the track. While combining these subsystems together, I realized that the carrier couldn’t pass over the coil since, at first, we anticipated 1 inch of levitation, but now that the carrier has more weight, especially with a battery and breadboard, we are at around 0.5 inches of levitation, which is shorter than the height of the coil spool. This is an issue for now since that means we can’t produce a smooth propulsion for the carrier over the track. So, with that issue existing, I worked with Angel and provided measurements of our current spool in order to produce a shorter spool to allow the carrier to pass over the coil properly. The print of the coil is finished now, and I have to remove the support from the print and then bring it into our next group meeting in order to put this together. Now that we have a new spool print, I have to create a new spool key that can attach to the new spool so that I can add the spool to a power drill in order to produce a new coil in such little time that can achieve tighter turns than creating the coil by hand.

Schedule:

We are on schedule

Team Status Report for 4/27

Tests

Response Time: 

We found that we had a response time of 50ms. This estimate is what we found to be a ceiling estimate of the longest response from the carrier to track. Based on the results we believe that we should be able to position the stops between the carrier and coil to be able to account for the delay and properly propel the coil in a sightly manner.  We anticipate that the Arduino response time will be somewhat variable and should be fast enough for our needs despite the added delay that comes from the serial Bluetooth communication. No design changes are needed based on the results of this test. 


Risks

Speed-Up Coil

When it comes to the coils, it seems like the height of the coil is to big for the carrier to pass over, which was not anticipated until recently as previous tests showed that just the carrier itself could go over the coil, but now with the circuitry added and weight being an issue now, this is a risk since if the coil isn’t short enough, then we run into the issue where the carrier would just stop at the speed-up coil, and not be accelerated by the coil, which are detrimental to the project. The point of the coil is to allow the carrier to be propelled across the track and if the height is an issue such as now, then we can not propel the carrier across the track. With this being an issue, we arrear now looking into altering the design of the spool for the coil as well as considering other changes like reducing components on the carrier as well as removing the battery form the carrier in order to reduce the weight of the carrier which would then increase the levitation from the track for the carrier, which would then allow the carrier to pass over the coil easily.


Design Changes

Decided to go with a smaller height for the speed-up coil spool in order to allow the carrier to pass over the coil when traveling on the track, since weight is now a huge factor to this project.


Schedule

No change in our schedule.

Test

Response Time: 

We found that we had a response time of 50ms. This estimate is what we found to be a ceiling estimate of the longest response from the carrier to track. Based on the results we believe that we should be able to position the stops between the carrier and coil to be able to account for the delay and properly propel the coil in a sightly manner.  We anticipate that the Arduino response time will be somewhat variable and should be fast enough for our needs despite the added delay that comes from the serial Bluetooth communication. No design changes are needed based on the results of this test. 

Speed Up Coils

When it comes to testing the speed-up coil, we tested which coil produces the most magnetic field based on the radius, the type of AWG Copper Wire, the amount of current going through the coil, turns, etc.

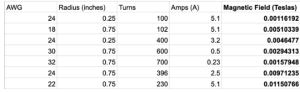
With these results, we can easily tell that the coil with 22 AWG with a radius of 0.75 inches, 230 turns and 5.1 Amps which produces .012 Tesla, that this coil is the one that produces the most magnetic field. When it comes to the final product, we know that this coil produces a powerful magnetic field, but we need to consider the smoothness of the carrier when it passes over the coil. With that being said, we tested where on the coil the back end of the carrier should be positioned to maximize smoothness and distance traveled from the propulsion. We marked the spool with a sharpie and confirmed visually that the carrier can smoothly travel about one section of the track in length without nose diving and maintaining stability.

Levitation and Stability

The remainder of our test was completed through visual inspection. We looked at how well our carrier levitated and propelled on the track to determine whether they meet our standards. For levitation, we wanted our carrier to continuously levitate regardless of its location on the track. With our final design—2cm magnets with no spacing for the carrier and 2.5 cm rectangle magnets no spacing for the track—we were able to achieve this. For stability, we wanted our carrier to continuously and evenly propel, regardless of location on the track. This was also achieved with this current prototype. Past prototypes magnet shapes caused parts of the track to be attracted to edges of the magnets, causing irregular propulsion. The new design has eliminated this issue.

Angel’s Status Report for 4/27

  • Team Meeting (4 hrs)
    • Worked on final prototype
  • Mandatory Meeting (4hrs)
    • Watch Final Presentation
    • Provide Final presentation feedback
  • Independent Work (4 hrs)
    • Work on final presentation
    • Create final carrier prototype.
    • Work on creating remaining parts of the track

This week, I worked on creating the final version of the carrier. We decided on making the final version of our carrier 7 cm (sanded down to reduce to friction) to fit on a 6.5 cm track. The carrier has linear hall effects on both sides of the track to detect stops on either side of the track. We also placed the breadboard on a particular part of the carrier to ensure that the weight was balanced. This meant the carrier would properly propel when stimulated by the coil and levitate evenly.

We also worked on making progress on our track. Due to issues with 3D printers, we were not able to print the remainder of our track. Because of this, we were limited in how we were able to test our track. We attempted to test our propulsion  on 1/3 of the track (the current prototype we have). We did so by attaching our coils to H-Bridges, setting up the code to progressively propel the track, and seeing how successful the propulsion was. This propulsion was successful for the carrier if there was no battery attached. While we can power the carrier circuit through a long wire opposed to a battery, this would look messy and force us to continuously mindful of the wire as the carrier propels. We have created alternative spools that will create shorter speed coils. We hope that with this design, the carrier w/ a battery can propel successful. We plan to test these new spools with our new, longer track.


Next Week

We will print the rest our track and finish integration of our system.


Myles’s Status Report for 4/27

Personal Accomplishments:

  • Lab Meetings (4 hrs ):
    • Watched final team presentations.
    • Provided team feedback
  • Indiviudual Work (8 hrs):
    • Met with team to integrate subsystems for final demo

Progress:

This week I worked on integrating our subsystems with the work I have been doing with the Bluetooth modules. We can programmatically send signals from the hall effect on the carrier to the track to ignite the coil to propel our carrier. The goal for the next week is to integrate this with our track and carrier which we are going to print. I believe that we are going to have stops along our track with alternating polarity. Based on the polarity the hall effect reads will determine which coil will get the signal to propel the carrier. We are on track for the demo on Friday and just need to finish up the details.

Next Week Deliverable:

Finish up final demo logistics

Emanuel’s Status Report for 4/20

Personal Accomplishment:

Mandatory Lab (4 hrs)

  • Fixing the readings from the Linear Hall Effect Sensor to turn on the coil based on readings
  • Creating new coils with 30 and 32 AWG and testing Ampere output with a power source

Design Research and Self Time (8 hrs)

  • Adjust newly printed carrier and track to fit coil
  • Attach magnets to newly printed carrier and track
  • Create a 3D printed tool to fit the spool to power drill for creating coil
  • Make a new coil with new, tighter turns and a new AWG Copper Wire
  • Work on working with H-Bridge and Coil in terms of turning on the coil based on readings

Team Meeting

  • Meet and work on the final presentation
  • Discuss how to implement different systems together

Progress:

I continued working on the readings from the Linear Hall Effect sensor as an “imitator” from Arduino to Arduino to act like Bluetooth communication to see how I can use those readings to affect the current going through the coil. After researching and mapping data from one Arduino to the other, I could finally allow the current to go through the coil whenever the sensor read a magnetic field for a specific range. I also worked on creating a key tool that can attach to the spool and attach to a power drill to easily create new coils since I had been using my hand, and the recent coils have not had tight turns as desired. Once that was created, I made new coils with the 30 and 32 AWG Copper Wire since those wires are thin enough to have really tight turns and an even larger number of turns in general. After doing calculations on these coils and running tests on the coils, I realized that these were not the proper wires to use and needed to go back to ranges from 20-24 AWG. I created a new coil with 22 AWG Copper Wire that achieves around 230 turns and can transmit above 5 amps with only 10 volts instead of the preferred 15 volts, as that is the limit for the H-Bridges. Since a new design for the track and carrier was made and the prints were done at my apartment, I could start working on gluing the new magnets onto the carrier and tracking and adjusting the carrier itself since there was no space to allow the coil to slip in.

Schedule:

We are on schedule

Additional Information:

Throughout this project, I needed to learn more about using Arduino and the libraries that exist for this tool, more about the different kinds of AWG wires that exist, and understand how each kind of wire has a limit on how much current can pass through it. I also learned more about the magnetic field and its formula for solenoids to record the magnetic field of every coil I created. I also learned more about magnets and readings of the magnetic field from these magnets when using Linear Hall Effect Sensors. The learning strategies I used to acquire this new knowledge were reading articles and graphs, watching videos, asking the TA and professor questions, practicing when creating the coils, and learning from my mistakes throughout the process.

Team Status Report for 4/20

Risks

Speed-Up Coil:

When it comes to the speed-up coil, the potential risks that are in play are the strength of the magnetic field being produced by the coil, as well as how far the coil propels the carrier along the track. For the strength of the magnetic field, if what is being produced is not strong enough, then that means that we would probably need to alter our design of the project the remove the speed-up coil since that would mean we need to allocate more time and money towards creating morrer coils, and with such little time remaining of the project, is something we would need to consider in terms of potentially removing such coils. As for how far the coil propels the carrier along the track, if the distance is not great enough, that means that we would need to allocate more money towards buying more resources to produce more coils for the track.


Bluetooth Communication:

We currently have implemented a circuit that sends signals between a receiver and a sender. The sender takes readings from the hall effect sensors and outputs a string to the receiver to determine which LEDs to light up. The main risk with Bluetooth communication making sure we can send the signals from the carrier to the track in a timely fashion. There’s a slight delay between sending a signal and the receiver registering it. We need to make sure that the signals are transmitted fast enough to make sure that our carrier does not experience a significant slowdown on the track. We want our carrier to exhibit constant speed throughout the demo at least. To mitigate this we will need to be very precise with how and when decide the hall effect sensors are high enough to transmit. Trial and error are likely needed. 


Small Gap Between Track and Carrier:

Our new carrier design has less space between magnets but still has a small gap between the track and the carrier. This gap is limiting space for the speed up coils and limits levitation. If this is not fixed, the speed up coils will not be able to adequately propel the carrier and the lack of room for levitation can cause the rails on the track and the hook on the carrier to have a lot of friction, causing damaging to both. We plan to cut the hooks from the carrier.


Design Changes


Track now has rectangle magnets spaced out 1cm. The carrier use circle magnets that have no spacing betweening each other.


Schedule:

We are currently on schedule.

Angel’s Status Report for 4/20

  • Team Meeting (3hrs)
    • Worked on final presentation
    • Discussed how we will combine the different components of the project
  • Mandatory Meeting (4hr)
    • Make design changes for the track
    • Work on final paper
    • Work on final presentation
  • Independent Work (8hr)
    • Work on final presentation
    • Work on paper
    • Make design changes for the track


This week, I worked on editing design changes to the track and carrier. The previous carrier had 1cm of space between magnets. We removed the space between the magnets to increase the magnetic field and make the carrier more stable. Also, the height of the carrier was increase to leave more room for levitation and the speed up coils. This design was printed along side our track with rectangular magnets. These were tested and we saw significantly more stability with this version. Also, since we are not using circle magnets for the track, the carrier does not get stuck in gaps along the track, something that previously made stability and levitation difficult.

I also worked on updating the final paper and final presentation. I used the feedback we received from the design review to edit sections that need more detail for the final paper. I worked with my teammates to complete the different sections of the presentation.

Next Week

Next week, I will work on the final paper, final poster, and prepare for the live demo.

Additional Guidance

In order to complete this project, I needed to relearn how to use CAD . I have used CAD  in a  Mini Course to complete a final project but have not used the software since. We needed to create 3D printed models that meet particular design requirements to meet our minimal viable product. This meant I had to spend a significant amount of time relearning the basics of CAD and learning how to implement the features we specifically needed.

To relearn CAD, I focused on looking over documentation, working through designs inclemently, and reaching out to an expert when I was confused.  For this project, I decided to use Fusion360 for my CAD designs. Given that Fusion is used widely in engineering, I was able to find documentation online. It went over the basics of the software and showed how to inclemently combine features to make particular designs. This information allowed me to start testing my knowledge of the software through making parts of the track and carrier design. Working inclemently through particular designs like the rail or the magnet spacing allowed me to better understand features in CAD and how they can be used collectively. However, given I am still a beginner in the language, I often ran into problems. Luckily, I have a friend in the Mechanical Engineering that helped explain difficult features and debugged  my CAD errors.

Myles’s Status Report for 4/20

Personal Accomplishments:

  • Lab Meetings (4 hrs ):
    • Fixed and integrated Bluetooth communication between the track and carrier microcontroller with hall effect sensor
  • Indiviudual Work (6 hrs):
    • Met with TA and worked individually debugging Bluetooth communication
  • Team Meetings
    • finalized final presentation poster and plans for the final demo video
    • coordinated with the team for CAD decisions.

Progress:

This week I worked on debugging the Bluetooth communication between our carrier and track microcontrollers. I had issues reading the bytes I was receiving from the microcontroller that was processing the readings for the hall effect sensors. When i would do to read the bytes being sent I would receive decimal values that exceed the expected values for ASCII. When i would try to convert these bytes to a string the serial monitor would give me bogus output. I checked my circuit setup multiple times and ensured I had paired my HC05 modules correctly and found that the issue was resolved when I replaced the receiving HC05 with a spare. Mostly a component within the HC05 stopped working.

When it came specifically to debugging Bluetooth communication, the Arduino blogs were most helpful, where people would document issues that seemed very similar to mine. Generally reading technology blogs when it came to finding tutorials was also very helpful as well. I generally found the blogs to be more helpful than the videos I came across because the steps were much more heavily documented and often times steps were skipped when it came to creating the video. While I tried implementing the solutions found on the Arduino blogs what really helped me, was going through systematically and replacing components in the circuit. The tutorials only on the blog sites were helpful for high-level understanding

Next Week Deliverable:

Add additional functionality with Bluetooth to enable the carrier to propel based on signals alone.

Team Status Report for 4/6

Now that you have some portions of your project built, and entering into the verification and validation phase of your project, provide a comprehensive update on what tests you have run or are planning to run. In particular, how will you analyze the anticipated measured results to verify your contribution to the project meets the engineering design requirements or the use case requirements?

Verification is usually related to your own subsystem and is likely to be discussed in your individual reports.
Validation is usually related to your overall project and is likely to be discussed in your team reports.

Use Case Requirements, Testing Plans: 

Fast response time of under 3 seconds (Tentative)


  • We will measure the time it takes from signal dispatch to the actual stopping by logging in to the Arduino terminal


  • We know we will have satisfied the use case requirements if our response time is less than 3 seconds
  • We anticipate that because of the responsiveness of the Arduino and the speed it can transmit signals achieving a response time below 3 seconds should be very feasible

Levitation System


  • We will manually verify our carrier’s height above the track with physical measurements. 
  • We will have met our design and use case requirements if we can achieve a levitation of 0.8 inches. 
  • The levitation distance will be measured from the track’s top to the carrier’s bottom
  • We currently have achieved a levitation of 1 inch, meeting our requirement


Object Obstruction Module


  • We will manually set up instructions on the track and measure the distance at which the carrier stops before the obstacle. 
  • We ideally want the carrier to stop at least one carrier length before the obstacle at a minimum of 2 centimeters (design requirement) before the obstacle given the limitations of our ultrasonic sensors. 
  • Overall we want our carrier to be 75% accurate when detecting obstacles.


Speed (Tentative)

  • We will use a speed detector as well as look at the peak points of the linear hall affect sensor to detect how fast the carrier travels from one coil to the next
  • We previously stated that we would want our carrier to travel around 2 mph


Risks:

Strength of Magnetic Field From Coil

Our track relies on solenoid coils to help propel the carrier across the track. With the limited budget for the project, we are hoping to maximize the magnetic field so then it would be strong enough to propel the carrier a large enough distance, to decrease the amount of coils needed on the track. Since it is unknown of the effects of the currently designed coils with the track and carrier, we run the risk of having a coil not being strong enough, thus the need to redesign the coils which will only take up more time and more resources.


Friction from Design

Our current 3D-printed track has a guiding rail. This was created to support the carrier but it is limiting the carrier’s mobility. Currently, several gaps between the carrier and track are too small. This has created little room for the carrier to levitate, limiting the levitation magnets. Additionally, the friction between the track and carrier would make it harder for the speed-up coils to propel the track. 


Wireless communication

Our project is dependent on the carrier circuit communicating with the track circuit. The stop, start, and speed system requires that the linear hall effect can communicate with the H-bridges to adjust the speed of the carrier through the speed-up coils. The obstruction system requires that the ultrasonic sensor can communicate with the H-Bridge to stop the carrier if there is something within 10 cm of the carrier. We are attempting to do this through the HC-05, a Bluetooth communication — that can allow Arduino to communicate. We are still working on writing the code that would allow this communication to take place. Not being able to complete this code would mean there is no way for either sensor to communicate with the track.


Design Changes:

None to be reported


Schedule:

No update to schedule. We are on track.


Emanuel’s Status Report for 4/6

Personal Accomplishment:

Mandatory Lab (4 hrs)

  • Interim Demo
  • Discuss adjustments needed from interim demo for final demo

Design Research and Self Time (8 hrs)

  • Create small circuitry to prepare for demo
  • Started working on timing aspect for start and stop system

Progress:

I started working on the timing aspect for the start and stop system. I was able to deal with the issue of the coil heating up by limiting the time the coil is on to 1/10th of a second, and can confirm by holding the coil with my hand for long periods of time to make sure it stops heating up. Certain aspects, such as the carrier and the track not being printed, have caused a little delay in not being able to continue working on the timing aspect of the start and stop system. For now, I am manually pushing the carrier at a speed I believe is reasonable for the carrier to be traveling, in order to set boundaries such as the distance it takes for the linear hall effect sensor to detect change in magnetic field, the time it would take from detecting the change to tell the coil to either turn off, or to turn back on, etc. I also made a new coil since I realized when running tests with previous coils that there was a really strong reaction from the core of the coil, and would attract and repel a magnet at a stronger rate than before. I also made sure the coil didn’t slopply overlap a layer so then it would produce a stronger magnetic field.

Schedule:

We are on schedule, we are just waiting for the carrier and track to be printed