Zhejia’s Status Report 4/29

This week I worked on the testing and verification of our design and use case requirements, as well as ensuring that my software was able to reprogram the keys successfully. Since last week I developed the communication protocol, this week was focused on the testing of the protocol to ensure that it was reliable and consistent, and could assign all values to all keys without issue. I began by specifying a set of values which each key could take. Next, I generated a few random keymaps to program onto the keys, testing that a mixture of possible key assignments would work without issue on the keyboard. I then tested the functionality of the key to receive duplicate values by programming all 16 keys with the same functionality. I also tested modifier keys such as shift and control, which had a few issues, especially with control having different values for Windows and Mac. However, as there isn’t really a good way to easily detect the system that the keyboard is connected to and have it reprogram itself on the fly, I opted instead to simply document the abnormality for the user to take care of. While this isn’t a perfect solution, because of the time constraints, I was unable to develop a better approach. During the week, I also helped with additional testing, using the keys to assist in my editing of the video final project for another class, which did not end up raising any issues.

I believe I am on schedule, and there is nothing really planned left other than more rigourous testing and the final deliverables.

Next week I plan on finishing the final deliverables for this class, including the report and poster.

Team Status Report 4/29

List all unit tests and overall system test carried out for experimentation of the system. List any findings and design changes made from your analysis of test results and other data obtained from the experimentation.

The unit tests done were the testing of Battery Life, Stability, Size, Reliability, Hot-Swappability, and Wireless Connectivity. Battery life was tested by measuring the current draw over a period of time, and determining the average active and passive power draw. Stability was measured by taking a video of the key being pressed while secured to the plate, and measuring the side to side wobble recorded from the video. The size was measured with calipers. The reliability was measured by pressing each key 10 times and ensuring that all 10 keypresses were received. We found that pressing the keys very quickly in this test would cause issues with key presses not registering, so changes to the receiver code were made such that these rapid keypresses would still be registered.

Overall system tests carried out were Layout Freedom, Weight, and Latency. We tested the layout freedom by moving the 16 keys around in various positions and ensuring that all of them were still able to transmit a keypress back to the receiver. We tested the weight by putting all 16 keys and baseplate onto a scale, and recording the resulting weight. No changes were made as a result of any of these tests.

Testing images found in final presentation.

Currently, the most significant risk is that we will not have time to finish the various assignments on time, as we all have finals and other assignments due the same week. However, if we manage our time well, we should be able to finish everything on time.

No updates to the schedule or design requirements have been made.

Ben’s Status Report 4/29

This week, I first worked on the presentation and practiced presenting the slides at home. I also made sure the keyboard receiver was robust enough both in transmission rate and latency to be able to be used as the presentation tools. During the presentation, I noticed that sometimes when pressing the key extremely quickly, it would take multiple keypresses for a key to be registered. After the presentation, I looked into this issue more, as it did not show up during testing. Eventually, I found out that quick keypresses would often times not register correctly. To remedy this, I added a functionality for tap detection, where the key would be pressed and unpressed more rapidly than the time it took to change the characteristic value. The issue was that if two consecutive keyevents were to happen very close together, only one of them would end up registering and being sent to the receiver.  First, I tried decreasing the debounce time but found that even without debounce, it would still only send a single keyevent. Next, I tried briefly going back to a polling method rather than an interrupt method, but that still did not work. Finally, I added a special case where if a keyrelease was detected without it’s corresponding keypress, it would register as a tap, and send a print character command over the keyboard. This ended up working, and even with rapid taps, would still output the correct number of letters. After doing this, I tested with 10 rapid taps, and found that it was much more consistent than before without any lost keys.

My progress is on schedule.

Next week, I hope to finish the final report, poster, and video on time and have nothing go wrong during the final demo.

Team Status Report 4/22

This week we believe the most significant risk is that we will not be able to get enough 3D printed housings to enclose every switch. So far, we have not been able to get the settings down so that the switches housings will not fall apart during or after the print. Additionally, even if we were able to get the prints to work, we would need to print 16 housings without issue. If we end up not having enough time to print all the housings, then the rest of the housings can be made out of paper or cardboard as a last ditch replacement.

We had to change the 3D housing design slightly, making the housing skinnier and with less wall thickness. However, this ended up causing the 3D prints to fail more often, so we had to redesign the housing a third time with the original 2mm wall thickness. These did not incur any additional costs besides the increased 3D printing costs from the prototyping. In fact, since the overall housing is smaller, it would actually be slightly cheaper due to the reduced

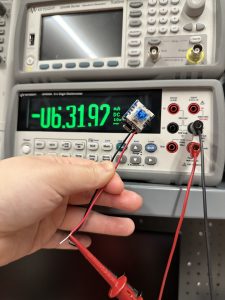
The schedule remains the same. Attached below is a picture of the reading of the current the switch draws once the switch is on. This week, we also performed almost all of the testing required to verify that our use case requirements were met. The only test that we did not perform was the test of whether or not the switch would be stable on the base, as we did not have the 3D printed housings or the 3M Dual-Lock on hand. However, this test will be performed next week as soon as we have both of the items.

Zhejia’s Status Report 4/22

This week I worked on the software programmer, the testing/validation, and the slides for the final presentation. For the software, I sketched up and implemented the UART transport protocol to program the keys. The interface first sends a bracket, followed by a comma separated list of key assignments, followed by a closing bracket. I also devised special codes such as RAISE for layer and other modifier keys. I then programmed the software to be able to send this set of assignments to the receiver microcontroller over UART. On the pure software side, I updated the application code to allow the dynamic resizing of the window, as well as the ability for it to remember where each key is after a resize. Next, I worked on the testing and verification of the various requirements. I first tested the wireless charging capabilities by connecting an ammeter in series with the wireless charging module and then measuring the current received by the battery. Next, I tested the latency of the overall system by connecting all the keys and recording them being pressed using the slow motion option on Ben’s phone. The latency was measured from the instance the key was pressed down to the bottom to the time the letter took to show up on the screen of the connected computer. Through this measurement I found that the typical latency is no more than 9 frames in total. Next, I tested the power consumption of the switch assembly by connecting an ammeter in series with a power supply set to provide 3.7v to the battery input of the Seeed XIAO board. Through this method, I found that the keys drew around 6.5mA when active and 0.7mA when sleeping. With this series of tests finished, I updated the final presentation to reflect these changes. Finally, I tested the ultimate range of the BLE receiver by taking a key as far as possible without losing connection. Ultimately, I was able to take the key around 45 feet back before running out of space indoors. However, the key was still connected despite this.

I am slightly behind on the software, as I was supposed to test the integration of the software and hardware components this week, but unfortunately I did not have time to verify. However, since the protocol should be the same, I do believe that there should be minimal issues. I will catch up by performing this test and then fixing any issues that arise before the presentation next week.

Next week I plan on working on the final report and the poster, as well as ensuring that the keys work correctly under a variety of conditions.

Ben’s Status Report 4/22

This week I worked on getting the forwarding of connection and keypress data from the auxiliary BLE receivers to the main BLE receiver. I also modified the software of the main BLE receiver to be reprogrammable over UART. The first thing I did was consider the possibility of setting up a network where the 2 secondary BLE receivers would then connect to the main BLE receiver and forward the keypress data. However, I decided that this idea would not be feasible since the BLE latency from a direct connection was already over half the use case requirement of 50ms at 37.5ms, so adding a second jump for the connection would not be feasible. My solution to this issue was to physically connect the 3 microcontrollers. Since they all have the same pin footprint, I simply soldered headers that allowed the microcontrollers to stack on top of each other, transmitting the key press data in the form of pin signals. Receiver 1 is tied to pins D2-D6 and receiver 2 is tied to pins A2-A6. Whenever a key event is detected, the pin is set to the corresponding level. This adds a negligible latency, as when testing with the 240 fps slow motion camera on my phone, the latency was still 9 frames even when connecting to the bottommost receiver in the stack. Additionally, I implemented the protocol to receive the programming commands over UART. The main receiver will then parse the received string and determine what the new key assignments should be.

My progress is on schedule, and I have finished pretty much everything needed for the project.

Next week I will be working on the presentation, final report, and preparing everything for the demo.

Ben’s Status Report 4/8

This week I worked on getting more than 7 devices to connect to one central BLE receiver. However, I was ultimately unsuccessful. The first thing I tried was to modify the values in the MbedOS configuration for the Arduino Nano33 BLE boards that I received this week. However, the issue was that to recompile the MbedOS required installing a certain set of depenedencies that were no longer possible. After failing to modify the MbedOS configuration, I instead looked towards trying to modify the ArduinoBLE library to allow multiple connections. I tried changing the ATT_MAX_CONN value first to 8, but that ultimately ended up not doing anything. Then, I dug deeper and looked into what exactly the library was calling, and where connect was failing. I found that the problematic function was in the HCI class’s leCreateConn function, which had would return the value of a call to sendCommand. sendCommand would return the value of _cmdCompleteOpcode, and after some digging, I found that this value was set by the handleEventPkt function, specifically in the EVT_CMD_COMPLETE case. However, I was unable to locate where exactly the value was being written, since the value is assigned to a value passed in through an array that was read into from HCITransport.read. However, I was unable to determine where this value was being read from and how I could ensure that it would not return a result that would lead to the connection failing to be established.

I am still on schedule as it is not essential to have one device connect to more than 7 keys, as multiple receivers can be used. However, I would like to get the number up to at least 8 since that would mean that only 2 receivers would be needed.

Personally, I will be running the tests involving latency and battery life. I will measure latency by recording the process of pressing a key with my phone slow-motion mode, and then counting the frames until it shows up on the screen. Each frame would be 1/120th of a second, so multiplying the frames by 833uS would give me the latency. Next, for battery life, I will be testing the overall battery drain over a period of 1 hour. By measuring the analogue input from the battery pin, and comparing it with the max and min values of the LIPO battery, I will be able to measure the battery level. Then, simply by using the keys for 1 hour I will be able to tell how much battery has drained, and thus how much battery life the device has.

Next week I plan on acquiring more Nano33 IOT boards and developing the connections further. This way, I will be able to test the receiving of more than 7 keys. Additionally, I will also be helping with the housing design and fabrication, and I will be making a few more keys. I can also begin preliminary testing of the latency through frame counting.

Team Status Report

What are the most significant risks that could jeopardize the success of theproject? How are these risks being managed? What contingency plans are ready?

Currently some of the risks are that we will be unable to connect all 16 intended keys in an efficient and timely manner. This is because if we are unable to increase the limit on the number of keys that can be connected to a single receiver device, it would mean we would have to network multiple receiver devices together to receive all the signals from the individual keys. While this may work for our proof of concept, it would be impractical for an actual, scaled-up keyboard. To manage this risk, we are considering using one of the Seeed BLE boards as the receiver instead, since the nrf52840 can support up to 20 simultaneous BLE connections.

An additional risk is the wireless charging. While the receiver coil is working, the transmitter coil has been giving us issues all week with it either shorting or not outputting a nice sinusoidal signal. To address this, we plan to buy a new transmitter module with a coil that more closely matches the dimensions of the receiver coil and see if that is able to work. If not, then we plan on redesigning the housing slightly to accommodate the slightly longer receiver that comes with the smaller coil.

A change in the receiver microcontroller may be necessary as the Arduino Nano 33 IOT does not seem to be able to support the number of switches we want connected. Additionally, the width of the housing may need to be increased to accommodate the PCB for the wireless charger. Since we already have the BLE boards, no additional cost is borne there. However, we will need to spend an additional 11 dollars on the wireless charger. The schedule remains the same at this time.

https://ibb.co/S6DHYrk <- Pictures of Coil readings

Zhejia Yang Status Report 4/1

This week I worked on the wireless charging system with Korene. We started out by trying to find out the resonant frequency, but the frequency we read on the oscilloscope was not the resonant frequency of the capacitor and inductor. Specifically, we measured 65kHz for the frequency, and 22uF for the capacitor and 30uH for the inductor, which do not match our resonant frequency. Regardless, we first tried to replace the coil and the capacitor with the resonance coil and capacitor, which worked fine for the receiver, but for the transmitter, when we replaced it, we set the power supply between 9v and 12v at a current limit of 500mA and it would always max the current limit without reaching the required voltage. Additionally, one of the chips would get really hot, indicating that the current was shorting through the coil. After various experiments, we found that for this board, you must both have within 5uH of 30uH and a low enough resistance in order for the transmitter board to not max out on the current draw from the power supply. We tried various things including chaining 4 small inductors together to create a 30uH inductor to test if the inductance alone was the issue, but that did not work since the small inductors have more resistance than the original coil, and the higher the resistance, the more current it would draw from the power supply. Additionally, we looked at various example circuits on the datasheet, and the capacitor that the inductor is supposed to be in resonance with does not change value, remaining constant at 47uF across all the example circuits, which is quite confusing. After discovering that it would impossible to tune either the capacitor or inductor alone to get the transmitter board to work, since the inductor needed to be both lower resistance and higher inductance (thus preventing us from putting multiple coils in series or parallel for them to work), we moved on to trying to understand the resistors on the board and the different pins on the transmitter chip, which can be seen in the datasheet. The thing about these resistors in the example circuits is that there are multiple circuits with the same inductance and capacitance, but slightly different resistor values, due to the difference coil sizes, which I hypothesize has something to due with the extra coil caused by the larger coil size. However, the datasheet only labels each of the pins and we have no idea how the pins work or how they calculate the output frequency. Additionally, there is one circuit in the datasheet (the last one) that almost exactly matches the configuration on our transmitter board, except for the capacitor value, which we eventually changed to match the circuit. The resistors were all the same, except that circuit was configured for 3.7uH coil transmitters, while the current circuit only worked at around 30uH.   this circuit was exactly the same as the one on the board, but when tried to put two of our coils in parallel and attach it, which would give us a 4uH lower resistance coil, the board still did not work and we measured the output through the oscilloscope, and it looked exceedingly strange, and non sine-like.There is a lack of documentation on the functions of the XKT-412 pins and there is no documentation on the XKT-335 which I believe is a power MOSFET. 

I met a roadblock due to the documentation of the chips. As a remedy, I intend to discuss this with the TAs and the professor as to a remedy for this. Additionally, since the receiver board works, I have placed an order for a transmitter board with smaller coils in the hope that it would allow us to sidestep the troubleshooting of the transmitters entirely.

Next week I hope to work on the software and implement more functions. Additionally, I hope to proceed on the magnetic charging with the new transmitter boards. 


Ben’s Status Report 4/1

This week I worked on assembling an additional 5 BLE stacks to bring the total to 9. To do this in an efficient way, I devised a method where the boards could be secured by the header pins into a breadboard to ensure they are aligned correctly after soldering. I also updated the KeyPeripheral code such that the keys will now go into a deep sleep mode after either 10 minutes without activity while connected to the central receiver or 1 minute without connecting to anything after being turned on. This reduces the battery consumption significantly, such that the keys can stay unplugged for multiple days and still be able to connect when pressed again to wake them up. However, I encountered an issue with the Arduino Nano 33 IOT, which is that it only seems to be able to connect to 7 peripherals simultaneously. There doesn’t seem to be a lot of documentation online specifically about this board and how to raise the limit, but there does appear to be some in place for the Arduino Nano 33 BLE. I have tinkered with some of the mbedOS files to increase the thread stack size and also some constants but the number of BLE devices that can be connected simultaneously remains hard capped at 7. Additionally, I have modified the receiver code so that it can identify and connect to new keys after the scan period is over. It does this by storing a copy of all the hardware IDs of each of the keys it’s connected to, and it then periodically attempts to connect to the new modules if it finds that they are available. The updated code can be found on bojuns/FP-Key-A_BLE (github.com)

My progress is on schedule this week.

Next week, I hope to unlock the connection cap to allow at least 8 boards to connect simultaneously to a single receiver. This way, it would be possible to connect all 16 switches simultaneously with only 2 receivers. If this does not end up working, then the next solution would be to make a two tiered design, where the switches connect to an intermediary receiver, which then forwards the signal to the central receiver.