Updates

Team A1 Weekly Update 3/31-4/6

We got to demo this week, where we got to showcase much of the hardware features. The system is mostly reliable, but needs polishing and actual formal construction, e.g. heat shrink, gluing, printing out cases, soldering, before we can consider the hardware components done. We are waiting on the last 2 LIDARs to come in so we can mount everything onto the bike.

We are a little behind on the mobile app, but the software should be easy to finish once we fix some bugs there.

Ben’s Weekly Update 3/31-4/6

Monday:

  • Designed protoboard layout for the bike circuit

Tuesday:

  • Worked with Michael to establish communication between the jacket and the pi
  • Wrote moving average collision detection algorithm
  • Implemented and tested the communication protocol between the pi and the jacket

Wednesday:

  • Demoed the jacket and pi communication, showing off all the features
  • Discussed possible improvements for collision detection and integrating the device onto the jacket

Michael’s Weekly Update 3/31-4/6

I worked on putting the demo together to show our project progress.

I constructed the jacket with all of the essential components we aimed for, the LED matrix, buzzers, and vibration motors. The Arduino nano on the jacket was the microcontroller for all actions, and it received instructions via Bluetooth.

After some basic testing, we did a full wireless test, and got the jacket to work as expected. We did not permanently glue or sew anything directly on the jacket yet, because we wanted to gather feedback from our demo first.

For future steps, I will have to finish constructing the jacket, and make sure all the connections stay in as expected. I might also have to consider printing out a small case for the circuitry, since having exposed wires is potentially dangerous.

For next week, we are planning to mount all the LIDAR and ultrasonic sensors onto the bike. I am starting to design some mounting templates for these devices.

A1 Weekly Update, Mar 24-30

The components are coming together for the demo. The demo will probably involve a frontal collision demo with most of the functionality for this aspect included (time-to-impact calculations will activate the buzzers on the jacket). The ultrasound sensors will provide proximity detection.

We finished ordering the rest of the components we need after testing the LIDAR outdoors. The battery seems to be plenty to power the LED matrix with, so that’s a good sign.

Ben’s Weekly Update, Mar 24-30

  • Wrote functionality tests for the LIDAR, the ultrasound, the bluetooth connection to the jacket from the Pi, and the speedometer.
  • Tested the ultrasonic sensors in an array of 3. Works well.
  • Tested the LIDAR outdoors, and has good response up to about 20m in the rain (we all did this on Monday).
  • Tested the polling rate of the LIDAR, the polling rate is more than sufficient.
  • Tested the Pi’s bluetooth connection with Arduino, programmatically connecting and transmitting messages. Success.
  • Wrote the libraries to interface with the various components easily.
  • Wrote a primitive distance algorithm for frontal collision detection.

Michael’s Weekly Report March 24-30

In preparation for the demo this upcoming week, I have focused mostly on integrating all the hardware components on the jacket.

One of the major components is the LED matrix, which is large, making it hard to place on the jacket, and has the highest power consumption, requiring careful wire management. We decided that we wanted to put the battery pack on the top of the jacket, so we had to move the LED matrix down a bit on the back.

For putting the LED strips on the jacket, I considered several attaching mechanisms, including:

  • Sewing pulley joints to zig-zag the strip
  • Gluing the strip directly on
  • Gluing the strip onto a clothe and then sewing the strip on
  • Sewing the strip directly on

I went with gluing the strip onto a clothe and then sewing the clothe on the jacket. The reason for this choice is that the pulley joints depended too much on the sewing for the joints, which is risky. Gluing the strip directly on is not flexible, and sewing the strip directly on is not secure, and if we pierce the waterproofing sleeve, then we don’t have waterproofing anymore.

Gluing the LED strip sleeve was no easy task though…the following glues did not work:

  • Hot glue
  • Super glue
  • EPOXY
  • Acrylic Glue
  • Gluestick
  • Electrical tape
  • Duct tape

You get the idea…it was a struggle. But it turns out there’s a special glue called Silpoxy that works brilliantly, and tada…

I also heat shrinked the LED strip wires for additional waterproofing protection.

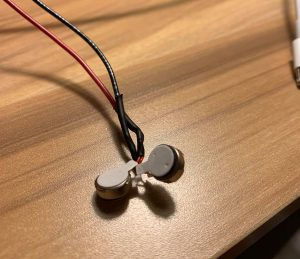
I also soldered the vibration motor component of the jacket as well, and will finish the integration before the demo. Next steps are to sew everything onto the jacket, and do a quick Raspberry to Arduino comm test via Bluetooth.

Sid’s Weekly Update March 10-23

Sid Lathar, A1 | Progress Report #5

Accomplishment:

Last two weeks have been spent debugging the app. The implementation was changed from using google maps API to smart-location-lib (https://github.com/mrmans0n/smart-location-lib)

This change was made because google maps API turned out to be very inflexible to tweak and required a lot of overhead.

Changes to schedule:

The progress is on schedule.

Upcoming work:

Apart from debugging the current implementation of the app, I plan to set aside time for making the UI for the app. I plan to get started on talking with the Pi and concretely describing what control signals we we need for customization of the notification system.