Joshua’s Status Report for 4/25/2026

Teleoperation Success!

There were two issues that I ran into upon integration testing the frame housing that prevented locomotion:

  1. The space between the front plate and the wheel attachment piece was too large, and it caused the wheel to twist and get caught on itself when spun. This was fixed by increasing the thickness of the bottom front plate ring to hold the wheel piece down. I thought having more would be okay with the wheel holding it on the other side, but then it would have been more friction as the wheel being the primary method of holding it in place would drag much more.
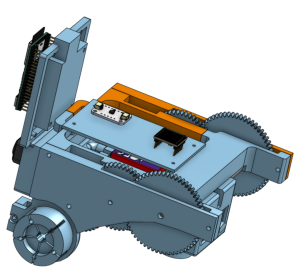
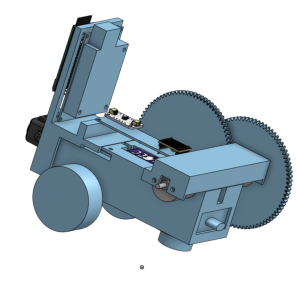
  2. The gear train required too much torque from our motors. As a run down of the diagnostics: a) the friction was minimal with PLA on PLA (after fixing issue 1). b) The rods we used were very form fitting with the gears spinning very nicely (I had made another little piece with various hole sizes to test which would be best before making the full print). c) The spacing between gears was all correct, as the gears could spin well using our hands, but it was difficult to spin them. So the solution for this was to change the gear ratio between the gears. I made the motor gear smaller, and the corresponding one larger to match, so the design didn’t have to change much and we could still use the rest of the print we already had.

Old:                                                                     New:
(there are also a few other issues that were addressed, that weren’t strictly necessary, but just make the bot better to work with. 1) Some holes were hard to screw into, so I made them slightly larger. 2) the sensor frame holder broke, so while duct-tape does work, I went ahead and made the frame a little thicker with more support. 3) the 3D model from online didn’t match the motors perfectly in length, so the snug fit works, but is slightly misaligned and required some physical *ahem* adjustments to mitigate that.

And now it works!! We have minimal media space for our website, so linked below is a full teleoperation integration test over WiFi using our keyboard and ROS topics:

teleop-spinning

teleop-extended

Next Steps

Mainly, print our second bot with the now fully verified design. Then as that prints, also to help the team in refining our algorithms for the actual movement (and getting our actual full system documentation together). At the moment, it just maxes the voltage output forward, backward, left, right based on arrow key presses. This isn’t too conducive for autonomous or waypoint following. We have begun this process already, and Adrian talks to it more in his report.
Joshua’s Status Report 04/18/2026

Full gear train housings printed and tested with our wheels and all other parts as necessary also in place. Housing adjustments also made to make space for wires and solder imperfections.

Final assembly is slated to be finished tomorrow, where proper integration testing can finally ensue!

Team Status Report 04/04/2026

Completed work:

Housings are in progress, and electrical condensing is following suit.

UWB locationing is largely completed, only identifying air tags is left, and then coming up with a calibration process for the full bot setup once completed.

UI is successfully taking the data generated by the UWB and other sensors and displaying those data points on a map. Next step is to add a Kalman filter to combine our data properly over time to refine itself.

Goal for this Week (Teleoperation Prospects):

The goal is to have a bot fully operational and teleoperated by this Wednesday! That way Brooks and Adrian can move from testing in simulation to testing in reality. Housing has good progress, and I believe it reasonable to finish by Wednesday.

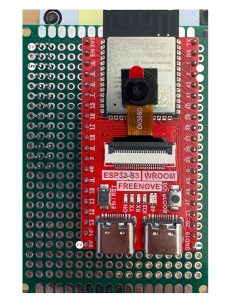
For electronics, we have already tested motors and getting data over WiFi, so it is now a matter of combining those principles to become teleoperation. We also have a camera on our ESP board, so that is a new thing to get working, but should not prove too difficult.

Risks:

Most risks have been seen and mitigated for. One of the bigger ones for our system is the fact that we only have 4 bots at best, and therefore are limited in our demo. However, we decided to separate the precision localization from our search algorithm to show off how the system will perform with many more as intended.

We will in one case have most bots still acting as anchors, while one or two move, and show the level of precision you can have. Then, in the other case, we will just have them all go out and search, without caring as much about the localization with respect to the global frame (as that was already proved possible with the first part)

Joshua’s Status Report 04/04/2026

Mechanical:

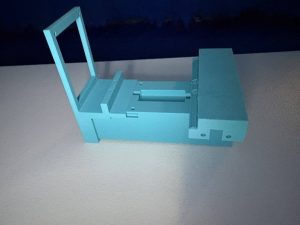
My method of developing the housing is iterative, where I make pieces, make sure they work, then move on to the next piece that uses the previous. I have gone through three different prints now (only the third having the “motor cap” once I was confident that the motor shape was form fitting), making adjustments as needed. I have gotten a housing that successfully houses the battery, snap fits together, all of the sensors and PCB boards have mounts. The only thing left is the gear box and wheels!

Here is the third print:

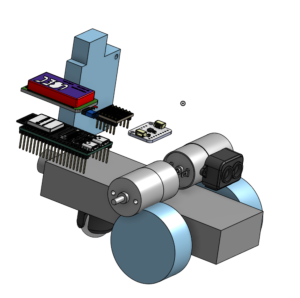
Here is a view of the current Full CAD assembly view:

Electrical:

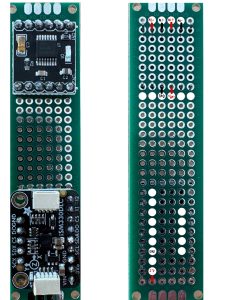
We will be using the following empty PCB boards to hold our electrical components:

(Note that annotations of wirings are not yet completed, but they will be soon using our past diagram:)

We need to have a short meeting together still to discuss adjusting pins to make housing wiring easier, but since the housing specifics are mostly done by the end if this post, it should be done by Wednesday.

Next Steps:

I want to have a full bot up and running this wednesday!

Joshua’s Status Report 3/28/2026

Electrical Developments:

Before getting to the CADDing, I wanted to be sure how we were wiring this all up, and then therefore what wiring space I would need to take into account while making the housings.

IMU / I2C wirings:

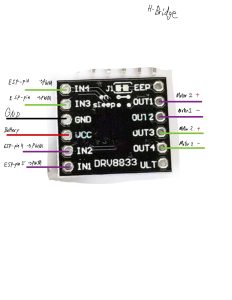
H-Bridge specific Wirings:

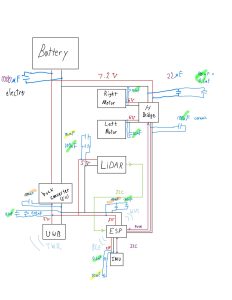
All components wiring diagram updated to included capacitors:

Y-splitting the battery connector out so we can easily distribute to all other parts.

There’s more, and I believe we may have some videos for our team post, but basically I oversaw all the electrical work (so it was a group effort in soldering up all our parts, but I was delegating, as this is the part we’ve ascribed to me having ownership over), and it’s all looking great!! This last complicated one we only did for one battery, as it felt a bit sketchy, but all our motors and sensors have their wires and pins soldered up!

I know we spent a lot of time considering all components, and making sure that it would all work. However, I was pleasantly surprised that when we actually put it all together it just worked. Props to brooks for getting software working near first try!

Housing Developments:

Due to spending more time on the electrical work, the housings are unfortunately not finished yet. It is looking unlikely that a first print will be finished by Monday, but I want to still have a 3D model to show for the presentation (to also talk about improvements/extensions), then a print done Wednesday.

A few new things that also caused reworking:

1) our motors are 20 RPM, not 20 RPS. So a gear up is in order. Figured out how to make and port over gears, so now just need to figure out what ratio we actually want/need. (see double_helix gear below, using a plug-in for onshape I found:)

2) we need to order wheels / a ball caster. I thought we could 3D print them, for some reason, but for good grip we really should just order them. I found a good set that should work for all 4 bots, and submitted an order to them. It will take some fenagling to get it on nicely.

3) our electrical components are rather loose. I was thinking we would make use of the pins as a sort of holder for them, and then use female to female jumper cables, but this takes up a lot of space. Instead, we will be using a series of empty holed PCB boards with mounting holes. This makes it much easier to connect all our components together and hold them in a compact fashion.

current tentative placement of all electrical components (plus wheels) in onshape:

Joshua’s Status Report for 3/21/2026

CAD Progress

Started CAD files for the robots. For this week, mainly searching for existing models and importing all parts I could find. Then, measuring and making approximate stand-ins for the remaining parts. Also shared it with my teammates, so they can see the progress as we go, and maybe also help the design process if need be.

I have already been considering how we will be attaching things, gathering standoffs and such. The next step is to arrange the models around for proper CAD housings.

Electrical Progress

We got our LiDAR working! Adrian and I are mostly up to speed with Brook’s programming stack he started working on earlier in the semester, and now we’ve started using it to get our pieces working.

^^schematic for easier understanding of the mess of wires (not including 5V power lines, just the pulled up I2C wires)

Deliverables

Next week I want to have the full CAD done and printed for demo. I want to have a first prototype print done by this Wednesday (2/25). Robo Club had to order new filament, so this may be pushed back, but it hopefully won’t impact the critical path, as I can just do other class work first instead.

By the Interim demo (2/29) I want to have started integration testing the electronics with the finished CAD model.

Joshua’s Status Report for 03/14/2026

All our parts came in! (minus H-Bridge) With the parts in hand, it is much easier to come to a complete arrangement of what our system will look like.

This post will give a play by play of each components update, here’s the electrical chart again for reference:

Physical Connections:

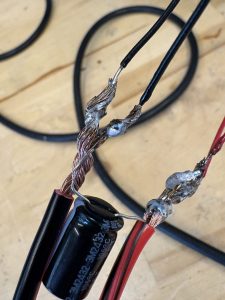
Battery Connections: While RoboClub had batteries, we need to connect them to the rest of our system. First step is getting some wires with female tamiya connectors. the Tamiya blocks were available in RoboClub, but I had to strip and crimp some wires to them for us. See below. (While we don’t need all of these right now, it felt inefficient to just do one and leave the rest as a task for later)

The next step plan for each of these is to t/y-split them into their own step down and H-Bridge components. H-Bridge isn’t here as needed, so we will do that later. No impact to critical path.

LiDAR Connections:  Cord was provided in the purchased kit. They easily plug into the ESP pins.

IMU: the LiDAR pack had extra wires displayed, so I had initially hoped I would be able to repurpose them, but unfortunately we cannot, as the LiDAR is SPI compatible, which means it has extra wires and is not a purely I2C connector with only 4 (doesn’t fit into the IMU plug). Therefore I need to make new wires.

UWB: UART connection to the ESP is being handled by Brooks, seems to be going well.

H-Bridge: Problem was caught upon closer inspection of this choice once I had all our parts in hand. Our current option takes 5V for it’s control input, which is problematic for our ESP 3.3V option. This does not impact critical path, as other components have sufficient work to complete amidst reordering.

Drivers:

Battery: No drivers needed for battery connections.

LiDAR / IMU: Drivers will have to be made by us (me lol), I2C protocol will use a library for data package delivery and initialization.

UWB: Again, Brooks is largely doing this.

H-Bridge: Pivot to new component means we can’t do this yet, but it will need a driver.

Housings:

While considerations have been made (and standoffs/screws acquired for some components from RoboClub), I believe it best to have our electronics working and wired before I build housings for them. Evidence of this being a good decision already is our H-Bridge change. While components are very unlikely to change now (I am fairly confident we won’t), I would like to evaluate things like how far the LiDAR can actually see for position and placement considerations.

Next Steps:

Our critical path is getting strained. I anticipated this, and as Adrian has limited work he can do before this is done (and is the subject to which this strain effects), I have asked Adrian to help with the effort of this integration.

Team’s Status Report 03/07

Design State:

The largest point completed was our design document, in which we didn’t necessarily make a lot of changes to our design, but we did finalize our particular parts/algorithms to use to satisfy our design.

All together, we refined our Design Requirements using detailed Use Case Requirements (see our design doc). With these linked, all of our design decisions are much more easily justified, and clearly purposeful. Also, Josh picked and ordered all final parts and Adrian researched and decided on the frontier-based exploration strategy. (See their respective posts for details)

Because we got access to an ESP early on from roboclub, Brooks has been continuing work preparing code we can port over to the incoming parts that will work with our system.

Risks:

The current critical path is getting our parts. All parts have been ordered, so it’s just a matter of waiting, but Brooks can’t test certain aspects of his work on the UWB module until he has that in hand. Josh also can’t test his housing designs until parts are here. Then, Adrian can’t test his algorithms in the real world until Josh has completed a full prototype with parts.

A risk that also comes with this is that some parts may be dead on arrival. However, since we have multiple parts for multiple bots, but only need one of each to start, this risk has minimal effect. A bigger risk is if the parts don’t function as needed, but substantial effort has been made to evaluate the parts being used, and all vendors are trustworthy, so this risk has hopefully been mitigated.

Schedule Changes:

Despite waiting on parts, progress is steady and on schedule, as we all have work we are doing while waiting.

Global/Cultural/environmental considerations

As described for this particular report’s rubric, we have split these considerations between us and appended our considerations to our individual status reports. Part A was written by Adrian, Part B was written by Brooks, and Part C was written by Josh.

Joshua’s Status Report 3/7/2026

Overview:

Firstly, I focused a lot on refining our requirements further, and made a proper outline of all of our Use Case Requirements in as concise of a way possible. I then led a call where I and the team took all of our previous considerations and made Design Requirements directly tied back to these Use Case Requirements. I then transferred this over to our design doc in even more clear language, along with ensuring our Design Requirements had quantitative metrics whenever possible. I also then made most of the tests for our V&V section that satisfied all these design requirements.

Then, with that finished, the main order of business was evaluating all of our parts that we would use again, now that we know what types of parts we would use. While some of the options we picked ended up being our final option, there are a few new things I found. For more depth, see our design document and our trade studies. Most of that was me. But as an overview, I’ll mention some of the important ones:

Part Evaluations:

First up, the IMU. Our initial choice IMU was good for lower power consumption, but considering we are using fairly motors, with significantly more current draw than most sensors, that isn’t necessary for our use case. With some research, I landed on the current robotics industry standard, which is a little more expensive than what we had, but since we had room in the budget for it, it was a clearly better option we should and will use.

Next, the ESP. Brooks and I already put a lot of thought into this,  so it was just finding a good price and vendor. One few new considerations was that the one we had has a camera with an IR filter, but because we are in the dark this is not actually ideal for us. However, we can take this filter off manually, so it is okay.

We decided to use motors instead of servos (thus also needing an H-Bridge), as we don’t really care about encoder type feedback, and since we have an IMU we don’t need the encoders to determine speed loops. (we will need to be cognizant of this fact while implementing the control loops, but it is not inoperable). We don’t need fancy, just reliable, so our chosen options are simple and robust with good user feedback.

While reconsidering UWB for our use case of locating survivors again, infrared and heat-sensing came up as possible replacements. We decided against this because it doesn’t allow for us to locate people out of our line of sight. If we needed a line of sight always to determine if a portion of space is not worthy of a SAR team’s investigation, this would significantly slow our system down, and also potentially miss people. UWB can “see” through walls, which is then clearly better, also helps to mitigate the fact our robots won’t be able to reach all locations.

LiDAR doesn’t get cheaper without significantly losing quality than the one we found, so it’s great, not worth discussing further.

Here’s the finalized electrical diagram with our adjustments:

Next Steps:

All of our parts are submitted for order, and I have started designing how our components will all fit together in housing. To keep up with the schedule, I need to have these designs done and prototype housings ready for print by the end of this week. Regardless of if parts come in, prototypes should be completable using online models / spec sheets, and are thus still on schedule even if parts are delayed.

Environmental Considerations:

Our robots are disposable, in the sense that they are cheap enough that a search and rescue team would not be concerned if they lose a robot or two. However, this means we should consider how our robots may impact the environment when lost, as well as possible interaction with the survivors (although this is minimal it should be considered).

One aspect of this is our batteries. If we were to use LiPo, that would not be very safe to just leave in the environment, especially among such a hazardous environment where the batteries could be punctured. Our batteries are instead NiMH, which while not as performant, are safer and more durable, which is great for this application and consideration.

For the body and wheels, which is the largest portion of mass of our system, our solution approach uses PLA plastic. While there are claims and an argument to be made that some 3D print PLAs are less impactful, it still is not great for the environment. However, once designed where rapid iteration is not necessary anymore, PLA can be exchanged for more environmentally friendly materials.

The rest of our electrical components are difficult to address, but all sensors are quite small, and the non-dev version of our UWB board would also have less impact once consolidated away from using the dev board.

Joshua’s Status Report 2/21 (adjusted 2/26)

My portion for this week was largely surveying what RoboClub had and re-evaluating our design decisions.

One of the largest issues we were worried about was power consumption. Luckily, RoboClub has 3600 mAh 7.2V batteries available. Although this is for sure more than what we need, for extended testing purposes it is nice to have.

The next was our method of locomotion. There are a few beefy motors available to us. However, we would like to not be fully reliant on perfect hardware, as well as still trying to hit around our 100$ budget benchmark. Therefore, we will use HS-311 servos. While servos might seem like a good option, they do not allow continuous rotation at our budget. We therefore will move forward with basic 6V DC motors and an L293D H-bridge to control them.

The diagram below shows how our system will connect together (replace the servos with motors, and buck converter with H-bridge):

One worry I have with the current design is the fact we have so many pieces all on the same 5V line. I worry that they will brown each other out. However, we at least will have the servos motors separate, so that’s good. We may need to similarly separate the UWB from the ESP, but the math suggests we probably won’t.

The last issue we are still working through is our MCU. Initially, the ESP32-S3-WROOM-2-N32R16V DEV BRD seemed like a pretty clear choice as it satisfied all our processing and communication requirements. However, now that our system is a little larger and has more room for components, discussion about teleoperation has opened up again.

If we want that, the ESP32 does not have a built in camera port. This means we either need a separate camera part for this, or we need a different board. The ESP32-CAM 2MP WIFI+BT AI-THINKER or Freenove ESP32 CAM Dev Board Kit are the alternatives currently being considered, but the satisfaction of our system requirements is closer than we would like. We will likely order one to confirm it works, but as the camera / teleoperation with camera feed is more a stretch goal it is not the priority.

The rest of the parts besides our MCU are settled. We therefore can proceed with ordering, and I can proceed with starting housing designs for most of the parts!