
This week I was involved in an extensive amount of testing and assembly with the group. During assembly phase, I was responsible for sending the printed plastic boards that eventually made up the casing of the design. After the general assembly of the entire design, I spent many hours with the group either at Caleb’s place or at the 220 lab debugging, making use of tools such as oscilloscope and waveform viewer to make sure the integration was smoothly done after testing of individual components. After conquering many problems, we figured out that the resonance frequency might have not been what we expected after integration we we were on the track of quickly re-design the primary coil. Next week hopefully we’ll make sure everything runs smoothly and is ready to be presented.
Team Status Report for 04/04/2026
This week there was good progress made overall. The base plate of the housing which all of the circuitry bolts to was fully built and assembled. The coil circuit and audio modulation were confirmed to work as well.
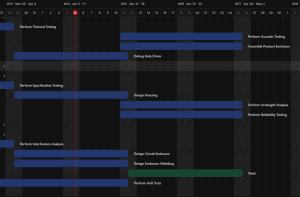
The big risk right now however is the gate driver. This is still non-functional. The initial seen issue was that the oscillator was not outputting low level voltage properly. This was easily resolved however by tying unused inputs to ground. The new issue is what appears to be either ground bouncing or shoot-back in the gate driver IC. Next week’s efforts will primarily be dedicated to resolving the gate driver and performing integration. So far no major design changes are confirmable. An updated schedule has been provided, as well as some evidence of things working properly. 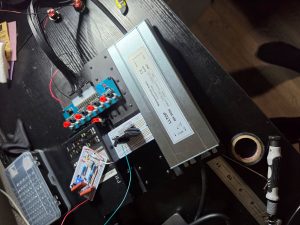
Caleb’s Status Report for 04/04/2026
I’ve spent much of this week attempting to debug the gate driver circuit, and unit testing the others. The audio modulation input is confirmed to work. The coil circuit is also confirmed to work and does switch at an appropriate rate. The current issue is the gate driver. At this point I am undeniably behind schedule. Next week I plan to have the gate driver fully debugged and perform full integration of the circuit, this way we can focus our efforts in the last couple weeks on final integration tests and housing assembly.
Jack’s Status Report for 4/5/2026
We’ve spent most of the time this week testing and creating the housing that will contain our final design, including the analogue designed circuit, the power supply system, as well as Tesla Coil itself that serves as the sound-generating device. I contributed by doing manual calculations when it came to debugging, as well as recording data read from multimeter and oscilloscope. At the same time, as we finished 3D-printing the housing, I helped sanding, polishing, as well as the assembly of the plates. Next week we’ll be done with debugging and put everything together.
Jayson’s Status Report for 4/4/2026
This week I integrated the interrupter circuit with the newly repaired gate driver and ran initial audio modulation tests. The LCR meter finally arrived, allowing me to verify the primary coil inductance and tune the interrupter frequency to match the resonant circuit. I tested the audio input with simple waveforms (sine, square) and confirmed the plasma arc responds to the modulation, though the audio quality needs improvement – higher frequencies (>10kHz) modulate better than bass frequencies. I also adjusted the duty cycle potentiometer range for finer control. Next week I’ll optimize the audio input circuit with better filtering and work on improving low-frequency response for clearer musical reproduction.
Demo Video
Here is a link to our demo video. It can also be found under the Final Project Documents Section of this website.
Jayson’s Status Report for 3/28/2026
This week progress was limited due to waiting on component delivery – the LCR meter needed for precise tuning and testing hasn’t arrived yet due to repeated Amazon delivery failures. I used the time to refine the interrupter circuit design and verify my previous duty cycle fix is still holding stable across the full frequency range. I also assisted Caleb with diagnosing the gate driver failure and confirmed the interrupter output wasn’t the cause – the issue was no output load causing power to dissipate in the chip. Next week once the LCR meter arrives, I’ll work with the team to tune the primary-secondary coil coupling and verify the complete audio modulation chain functions properly.
Team Status Report for 03/28/2026
This week a large amount of progress was made. The interrupter was redesigned and functions as expected now. The gate driver (though damaged in testing and repaired) works as well the primary circuitry. The secondary coil resonant frequency is nearly exactly what is expected. The only issue remaining currently is the primary coil inductance being too high, which will be easy to resolve.
The biggest threat currently is integration issues. Though with all the unit testing we are performing we do not expect to see much of that in the coming week. We feel that we are back near schedule at this point, and are confident that we will have a working demo sometime next week, leaving only some reliability testing and housing design.
Calebs Post for 3/28/2026
This week I performed a large amount of testing as well as fixed the interrupted circuit. Aside from a chip that blew, the gate driver circuit works perfectly (and will not blow a chip anymore). Also I discovered an issue with the primary coil, who’s inductance is much higher than intended.
This coming week I the primary coil issue will be resolved and I will be conducting integration tests. I believe we are pretty much back on schedule, minus the integration not being completed yet.
Jack’s Status Report for 3/28/2026
This week I dedicated most of my time to the testing for each individual component. This will be the final testing period before final assembly. I’ve spent time in the 220 lab testing the resonance frequency of our Tesla coil, input & output correspondence of our circuit, as well as many other important metrics. I’ve also purchased an oscilloscope for better and more flexible individual testing so we don’t have to always run to the lab. For next week we should complete individual testing by fixing the primary coil. After that we will go right into assembly, as well as the fabrication of the housing for the Tesla Coil.