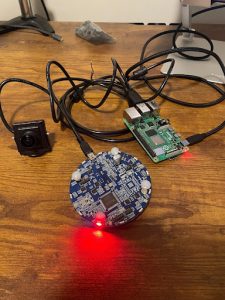
Cole’s Status Report for 04/25/2026

This week I focused on finalizing the physical enclosure and overall appearance of our capstone project in preparation for the final project report and demonstration. Since this is the final weekly status report before our Final Project Report is submitted, my main goal was to make sure the system looked complete, professional, and structurally stable.

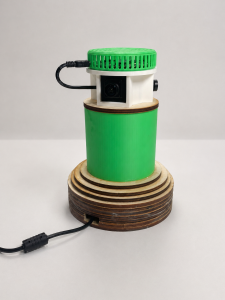
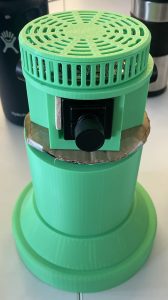
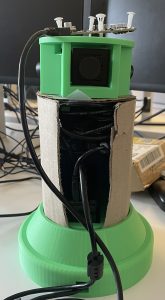
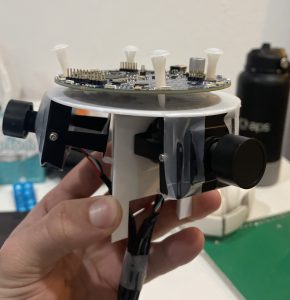
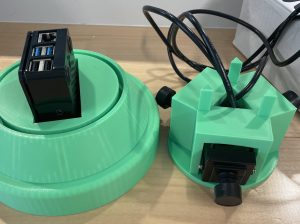
A major part of my work this week was updating and 3D printing the revised camera mount. After identifying areas of the previous mount that could be improved, I printed the updated version and used it to reassemble the camera section of the project enclosure. This step was important because the camera mount is one of the most visible and functional parts of the system, and it needed to properly hold the cameras in position while also fitting cleanly with the rest of the enclosure.

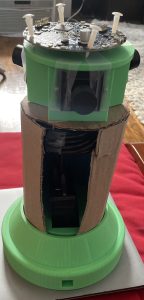
After printing the updated mount, I reassembled the project enclosure with the new component installed. This involved carefully repositioning the cameras, checking alignment, and making sure the updated mount worked with the rest of the physical structure. I also reglued the necessary enclosure pieces to ensure that everything was securely attached and structurally stable. Since our system includes multiple hardware components, wires, and mounted devices, making sure the enclosure was solid and reliable was an important final step before testing and presenting the completed project.

Earlier versions of the enclosure were mainly focused on holding the components in place, but this week’s work focused on improving the final appearance, stability, and readiness of the system. 

Schedule

Our progress is currently on schedule. The remaining work is focused on documentation and preparing the final deliverables.

Next Steps

Next week I will be working on finishing up the demonstration video and completing the final project report.


Team Status Report for 04/18/2026

This week our team focused on two major areas of progress: refining the physical design of the system enclosure and finalizing the method for audio output from the Raspberry Pi to the laptop. 

One of the most important updates this week was a change to the physical enclosure design. We redesigned the base of the system using stacked laser-cut wooden layers rather than relying on the previous approach. This change was made to create a structure that was easier to fabricate while still providing the support and shape needed for the full system. The new base design also better supports the enclosed hardware configuration and improves the overall practicality of the build. 

The second major design update involved the system’s audio output. Initially, our team planned to output audio from the Raspberry Pi directly to the laptop using a USB B to USB C connection. However, during testing we found that the laptop was not able to recognize this connection as a microphone input, which created a major issue for the intended use of our system. To solve this problem, we changed our design approach and instead adopted a Bluetooth-based method using a software-based tool that allows the laptop to recognize the Raspberry Pi audio output. 

Most Significant Risks, Risk Management, and Contingency Plans

One of the most significant risks to the success of the project remains system integration reliability. Since the project depends on multiple hardware and software components working together, there is always a risk that one part of the system will fail or behave unexpectedly when integrated into the full design. Our team is managing this risk through continued testing of the complete system rather than only validating individual parts. By testing the assembled design and the final audio path together, we are better able to identify issues before final validation.

Another important risk involves the audio output method. Because we had to move away from the original wired USB output plan, there is some risk associated with relying on a Bluetooth-based solution. This includes possible latency, connection consistency, and dependence on third-party software or a web-based tool. At this point, the added latency appears to be minimal and not significant enough to jeopardize the project, and the setup process is actually easier than the original approach. To manage this risk, our team will continue testing the Bluetooth output under realistic use conditions. If necessary, our contingency plan is to preserve a stable demonstration setup using the current working solution even if further technical refinement is limited.

A third risk is the possibility of late-stage design changes creating extra debugging work. Because our team is still refining the final physical and output design, any issue discovered during final integration could require additional iteration. We are managing this risk by locking in the current enclosure and audio-output decisions now and focusing on validation rather than large redesigns moving forward. Our contingency is to prioritize the core functionality of the system and avoid making unnecessary changes unless they are required for system operation.

Design Changes

Yes, our team made changes to the existing design of the system this week.

The first change was to the physical enclosure design, specifically the base of the system. We redesigned the base using stacked laser-cut wooden pieces. This change was necessary because it provided a more practical and manufacturable solution for supporting the full system structure. It also helped us move toward a more complete physical prototype while avoiding a more difficult or time-intensive fabrication process. The main costs associated with this change were additional redesign time and fabrication effort. These costs were mitigated by using accessible materials and a relatively efficient laser-cutting process.

The second design change was to the audio output method. Our original plan was to send audio directly from the Raspberry Pi to the laptop through a USB B to USB C connection. This approach proved unsuitable because the laptop did not recognize the signal as microphone input. As a result, we changed the design to use a Bluetooth-based output solution enabled through a software or web-based platform. This change was necessary in order to make the audio output usable in the way required by the project. The main cost of this change is the introduction of a small amount of latency and the need to rely on an additional software layer. However, this cost is being mitigated because the latency is not significant and the new solution is actually easier to set up than the original wired plan.

Updated Schedule

None.


Cole’s Status Report for 04/18/2026

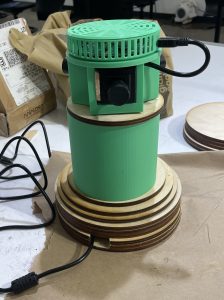
This week I focused on finalizing the physical fabrication of our system. The main work I completed involved laser cutting the base and final enclosure components for the system. This was an important step because it allowed me to move from earlier prototype structures to a more finished and fully enclosed design that can better support testing and demonstration.

Specifically my work focused on creating a new design for the base of the stand. Instead of relying only on previous fabrication ideas, I developed a new approach using laser cut wooden slices that could be stacked together to form the base component. This allowed me to build a stable structure while also using a more efficient fabrication method. I cut and assembled these layers to create the final base, which now supports the rest of the system more effectively.

In addition to fabricating the base, I also made sure that the enclosure design accounted for wire routing and full hardware integration. I cut holes for the wires and confirmed that the cameras, microphone array, and other necessary components could all remain enclosed while still functioning properly. A major part of this process was ensuring that the system was not only physically assembled, but also operational in its enclosed form. 
Plans for Next Week
Next week I plan to continue testing and validating the full enclosed system to ensure it meets all of our design requirements. I will also make any final adjustments needed to improve enclosure fit, wire management, or overall system presentation so that the prototype is fully prepared for demo.

Reflection on New Tools, Knowledge, and Learning Strategies

As I designed, implemented, and debugged my part of the project, I had to learn new tools and new knowledge in several areas. One major area of learning was fabrication strategy. Earlier in the project, much of my work was focused on 3D printed enclosure design, but this week I expanded that by using laser cutting as a practical fabrication method for the final base and enclosure. I had to learn how to adapt my design thinking to a layered construction approach, where individual wood slices could be cut and stacked to form a stable final component. This required a better understanding of how to design parts specifically for laser cutting rather than only for 3D printing.

I also gained more knowledge about physical system integration. It was not enough to simply create parts that looked correct on their own; I needed to ensure that the full hardware system could function while enclosed. This meant learning more about wire routing, spacing, component fit, and how enclosure decisions affect usability and testing. Designing holes for wires and confirming that all hardware could remain operational inside the enclosure helped me better understand the relationship between mechanical design and system functionality.

Another area where I built new knowledge was prototype validation. As the project progressed, I learned that building a physical component is only one step; it is equally important to test whether the fully assembled system still performs correctly. This required me to think more carefully about designing for both assembly and testing, rather than treating them as separate tasks.

To acquire this knowledge, I used several learning strategies. One of the most important methods was hands-on experimentation. By creating the design, laser cutting the parts, assembling them, and then checking how well they worked with the real hardware, I learned through direct trial and iteration. I also used online resources and examples to better understand fabrication options and practical enclosure design methods. In addition, I relied on problem solving through observation when I encountered design constraints, I adjusted the structure based on what I saw in the physical build rather than only relying on the original concept. Team discussion was also valuable, since talking through integration needs and testing requirements helped me better understand how my enclosure work supported the full project.

Overall, this project required me to expand my knowledge of fabrication, enclosure design, and system integration. I learned not only new technical skills, but also how to use practical, hands-on learning strategies to solve real design problems effectively.


Schedule Changes

None.
Cole’s Status Report for 04/04/2026

This week I focused on preparing our system for the interim demo and continuing to refine the enclosure design as we move toward a finalized product. With the system now fully assembled and operational, my work shifted toward ensuring that everything is properly set up for testing and demonstration.

A major portion of my work involved setting up and organizing testing for our device. Since we now have a working system, I focused on making sure all components could be consistently run and evaluated. I verified that all hardware components were properly connected and stable, and that when running the code, the cameras and microphone array were correctly detected and displayed through the UI. This helped ensure that we are able to clearly observe system behavior and identify any issues during the demo.

In addition to testing preparation, I worked on developing the final version of the enclosure design. Based on previous iterations and physical assembly, I refined the design to improve overall fit, organization, and usability. The goal of this work is to have a finalized enclosure ready by next week that is both functional and presentable.

At this point, the system is not only operational but also being prepared for reliable demonstration and final design completion.

Verification

While my primary responsibility is the mechanical design, it is important that the enclosure not only functions correctly, but also supports the system’s goal of enhancing audio through accurate visual and audio input.

To validate this, I evaluated how my enclosure design performs when the system is used in realistic conditions. This involved observing whether the physical structure allows the cameras and microphone array to operate effectively when identifying and tracking a speaker. I ensured that the positioning and orientation of the cameras—determined by the mount—provide adequate coverage of the intended field of view, which is critical for accurate speaker localization.

Additionally, I assessed whether the enclosure supports consistent and reliable audio capture. Since the effectiveness of beamforming depends on clean and unobstructed input from the microphone array, I verified that the enclosure does not introduce physical obstructions, unwanted reflections, or interference that could degrade audio quality.

To analyze this, I compared system behavior with the enclosure fully assembled versus earlier testing configurations. This included:

  • Observing whether speaker detection remains consistent across different positions
  • Ensuring that audio clarity is not negatively impacted by the enclosure design
  • Confirming that the physical layout supports stable and repeatable system performance

Through these validation steps, I determined that my enclosure design not only meets its structural requirements, but also supports the overall system objective. The design enables proper sensor alignment, maintains input quality, and contributes to a stable platform for accurate speaker detection and audio enhancement.

Schedule

Currently on schedule.

Next Steps

Next week I plan to finalize the enclosure design and implement any remaining improvements identified during testing. I will also continue supporting system-level testing and debugging to ensure the system performs reliably for the final demonstration.


Team Status Report for 03/28/2026

This week our team focused on finalizing the physical integration of our system and preparing for our upcoming demo. 

Most Significant Risks & Mitigation Plans

Risk: System Integration Issues
As we combine all hardware components into a single enclosure, there is an increased risk of connection failures, loose wiring, or misalignment that could impact system performance.

Risk Management:

  • Secured all components to enclosure parts
  • Strapped internal wiring down to reduce strain and disconnections
  • Performing tests to ensure connection stability

Contingencies:

  • Quickly disassemble and re-seat components if failures occur
  • Keep spare mounting materials and connectors available


Risk: Software/Hardware Communication Errors
Even if components are physically connected, there is still a risk that the system may fail to properly detect or utilize them within the software.

Risk Management:

  • Verified all devices appear correctly in the UI
  • Tested full system operation under realistic conditions
  • Monitored output to detect failures early

Contingencies:

  • Debug using terminal outputs and device recognition tools
  • Isolate and test each component individually if needed

Changes

No changes made to the design.

System for Demo

Plans for Next Week

Next week, our team will focus on refining system performance and preparing for the final demonstration. This includes improving reliability, addressing any issues identified during testing, and ensuring consistent system operation. Additionally, we will work on finalizing documentation and polishing both the hardware presentation and software interface to ensure a smooth and professional demo.


Cole’s Status Report for 03/28/2026

This week I focused on finalizing additional components of the enclosure and ensuring that our system is fully prepared for the upcoming demo. A major portion of my work involved printing the enclosure for the microphone array. This was an important step in completing the physical structure of our system and ensuring that all major hardware components now have a dedicated and properly fitted housing.

In addition to printing the mic array enclosure, I worked on assembling the system more permanently. I securely fastened the cameras onto the mount and attached the enclosure components together using physical fabrication materials. This allowed me to move from a loosely assembled prototype to a more stable and integrated system. Ensuring that all components are firmly secured was critical for both functionality and presentation.

After completing the physical assembly, I shifted my focus toward system-level testing. I ran the code and verified that all components were functioning as expected. In particular, I confirmed that the cameras and microphone array were being properly detected and that their outputs were visible through the UI. This testing process also helped me identify how the system behaves when components are not functioning correctly, which will be useful for troubleshooting during the demo.

At this point, the system is now physically assembled and operational, with all major components integrated and tested together. This represents a significant step toward having a fully functional MVP ready for demonstration.

Schedule
Currently on schedule.

Next Steps
Next week I plan to focus on final system refinements and ensuring stability during the demo. This will include addressing any remaining minor issues, improving reliability, and making sure the overall system performs consistently under demonstration conditions.

Cole’s Status Report for 03/21/2026

This week I continued working on refining and improving the 3D printed enclosure for our system. After completing the initial draft last week, I shifted my focus toward physically testing and iterating on the design. The main work I completed was printing the first iteration of the camera mount. This allowed me to evaluate how well my estimated dimensions and overall design translated into a real-world model. From this first print, I was able to identify several areas that needed improvement, particularly in terms of fit and stability of the cameras within the mount.

Picture of the first camera mount print:

After reviewing the initial prototype, I went back and revised the design of the camera mount. I made adjustments to better accommodate the camera dimensions and improve how securely they are held in place. I then printed a second iteration of the mount, which showed clear improvements over the first version. In addition to refining this component, I completed a full print of the enclosure design so I could evaluate how all of the hardware components fit together. This gave me a much better understanding of spacing, alignment, and how the wiring will be routed through the system.

Second Iteration of Camera Mount and Raspberry Pi Stand:

At this point, I now have a fully fleshed-out prototype of the enclosure that has been printed once. This is the first complete physical version of our system and serves as a strong foundation for final adjustments. Being able to physically assemble the components into the enclosure has been very helpful in identifying any remaining issues before finalizing the design.

Schedule

Currently on schedule.

Next Steps

Next week I plan on finalizing the enclosure design by making any necessary adjustments to ensure all hardware components fit tightly and securely. All work will be focused on preparing a fully functional MVP for the upcoming demo

Cole’s Status Report for 03/14/2026

This week I focused on finalizing the first draft of the 3D printed enclosure for our system. I initially started by first researching similar projects to see if there was any open source CAD work for the specific hardware components that we are using. I was able to find a very solid enclosure for the mic array that seemed to fit into my thought out design. 

Camera Mount

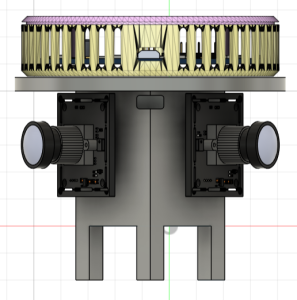
The main CAD design that I worked on was the mount for the cameras. These cameras came with preattached mounts, so getting the exact dimensions of the raw cameras was quite difficult. I was able to estimate using 3D models for the cameras and importing them into the design. The idea behind the camera mount is that each camera will be attached to one side of the triangle mount, and the wires from the cameras will flow through the gap on the bottom and into the middle of the pillar. On top of the mount is where the microphone array sits. This was very straightforward in my opinion since I already found an open source enclosure for the microphone array. Thus, the microphone array easily fits on top of the camera mount and the output wire will fold underneath and into the middle of the camera mount. Another aspect of the camera mount is the prongs on the bottom. There are so the camera mount can simply be placed onto the shaft to connect the parts. 


Full Design Draft

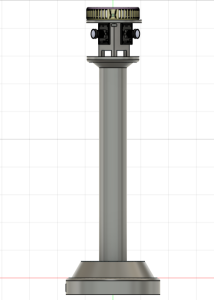
As of right now this is a solid first draft and has promising looks for the rest of the design

Schedule

Currently on schedule.

Next Steps

Next week I plan on 3D printing each component for the first time in order to start making changes and tweaks to the designs. This will ensure that the design is robust before starting to build upon it.


Cole’s Status Report for 03/07/2026

My primary focus was on the physical enclosure design for the system. I determined how all the hardware components would be physically integrated into a single structure that can support the microphone, cameras, and Raspberry Pi.

I began by creating brief sketches of how I imagined the design would look. After looking at a few different designs I started to gather 3D models of components and take measurements where needed. Once the component dimensions were defined, I began designing an enclosure layout that could securely hold all of the components while maintaining proper spacing and alignment. This helped me determine where the components will fit best. However, I spent a lot of time determining where each component will function the best so that it can capture audio effectively without obstruction from the enclosure walls. Additionally, I wanted to ensure that the fan from the Raspberry Pi cooling system does not interfere with the function of the microphone array.

Schedule

Currently on schedule.

Next Steps

Next week I will finalize the exact placement and mounting of all components so that I can generate an initial 3D print of the enclosure. This will put our team in a great position for testing purposes and leave room for hardware integration.

Cole’s Status Report for 02/21/2026

This week I focused primarily on hardware integration and initial system validation. This week all of our components were delivered, so I have begun to work on the initial system build and verification of each component.

Hardware Integration

Once all of the hardware components arrived I was able to pick them up and ensure they were functioning properly. For the cameras I ensured that the device was UVC compliant and operates in a stable mode for 1080p streaming. After working with the components for quite a while I was able to confirm that there were no immediate frame drops or device disconnects under normal load. I spent less time working with the microphone array, but I was able to confirm basic audio input capture from the component. Overall this has ensured that all of our components function as expected before we begin to integrate the components to the entire system.

This phase ensured that all components function as expected before deeper system integration.

Enclosure Design Planning & CAD Development 

This week I also began brainstorming and designing the enclosure for our system. Since this project requires three cameras for 360 degree FoV, the enclosure is critical for arranging the cameras and ensuring they are locked into place.

Once the hardware components were received I was able to take detailed measurements using a digital caliper. This gave me a rough idea of the design we were going to need. Second I measured all of the cable ports and connections that our system requires. This is slightly more complex since there are going to be ports that are not going to be used within our system. 

A couple of things that still need to be considered for this 3D printed enclosure are:

  • Potential Sound Interference of the Microphone Array
  • Airflow for heat dissipation
  • Ease of Assembly


Schedule

My progress is currently on schedule.


Next Steps

Next week I plan on creating an initial CAD draft for the enclosure of the system. This will allow me to get some feedback and thoughts on the design and make any changes before attempting to print. Outside of the enclosure of the system, next week I plan on collecting more quantitative performance data of the system operating under real loads.