Here is our demo video! We hope you enjoy!
Category: Sophia’s Status Reports
The status reports from Sophia King.
Sophia’s Status Report for 04/26/2025
This week I started testing and bug-fixing the automatic import of the height map into Blender through the Blender add-on.
I figured out how to pass the number of the scan ID back to the Blender add-on, because that’s originally found in the Main.py file that’s run as a subprocess, so we can make sure we grab the right height map from the right folder.
There’s some bugs around directory changing and getting the right file path for the height map to import it, but I think it can be ironed out before the final demo. Worst case scenario, it takes a minute maybe to manually make the plane and import the height map to make the object.
Sophia’s Status Report for 04/19/2025
This week, Yon and Theo got alignment working pretty well, so I integrated it into the system pipeline. It occurs after the scans are taken, but before the normal map is done to ensure that the normal map itself is all aligned properly.
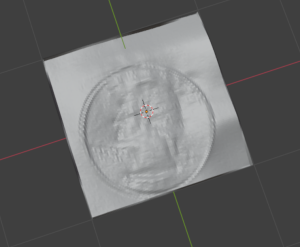
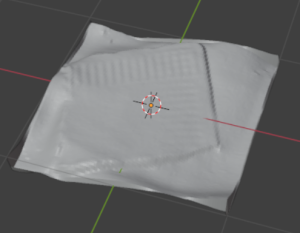
Since the normal map and height map were then sorted out, I figured out how to get a height map as an object in Blender. I did this first through a tutorial using the Blender UI, adding in a plane object, giving it a material, and uploading the height map. By adjusting the “strength” you can get the height differences to be more or less significant and more accurate to what the real-world object is.
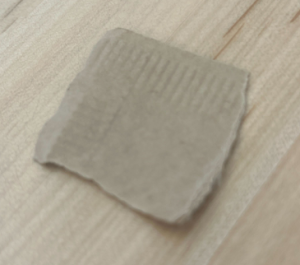
Here are the models for a regular quarter coin and a piece of paper (along with the real-world photo of a piece of paper) that we got from manual height map uploads with a DPI of 100.
After those successes, I also wrote code to automatically do this process in Blender, so after pressing the Flatbed 3D Scan add-on button, a few minutes later you would have the object itself in Blender with no other work. I’ll be testing this first thing next week.
Next steps would be to ensure the automatic object creation works and to see if there’s any way to crop the height map or Blender object to only where the actual object is, so we don’t end up with blank white space on the edges of the models. Yon also has his own normal to height map file algorithm that we are going to try and compare with the one I used from another Blender project, so we can figure out which works better and/or faster.
To be able to accomplish the tasks I’ve done through the project, I mostly used online research, tutorials written and from YouTube, and lots of Stack Overflow posts to learn. Some things I had to learn specifically were how to set up and use a Dotnet project, how to use subprocesses, and navigate file directories to run all of these different files properly. I’ve had to learn a lot about Blender add-ons and the Blender library, also how to use Blender itself because the UI elements translate almost directly over into the Blender library.
Sophia’s Status Report for 04/12/2025
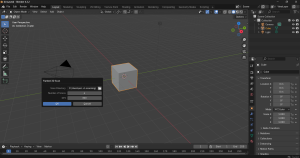
These two weeks, I added in a pop up UI window for the Blender add-on. After you press “Flatbed 3D Scan” in the menu, a window appears where you can select the file path (should be where you store Main.py and other files needed), input the number of scans to take (min of 3 and max of 12, but this isn’t supported in the normal map calculations yet), and the DPI for the scans to use (fully functional).
I also found an existing Blender add-on “DeepBump” that had a module to convert a normal map to a height map. I utilized some of the code and put it into our project to use. It currently is part of the overall system run and produces a height map, though not a very good one because of our alignment issues. We may need to look for a different height map method depending on how well it works on an aligned normal map. This one seems to utilize gradients from the normal map in the Frankot-Chellappa algorithm, but as our project focuses on very small objects, I’m not sure a gradient is the right way to go.
Verification so far has included mostly manual testing of running parts of the software system and ensuring they’re working by running an individual file I worked on, then run it using Main.py, then run it using the Blender add-on, etc. It’s difficult to set up unit testing since many of the functions depend on external signals, image file outcomes, and what the physical hardware does, so running it plugged in usually provides a good idea. Checking that files are saved appropriately and investigating when there is a crash or error has so far led to getting a functioning software subsystem. Future verification for image alignment would be manually checking the files to see if they have properly aligned the object. Verification for the height map would be a visual check of if the height map looks accurate to what we’d expect from the scans. Importing it to Blender would utilize Blender’s built-in errors as well as a manual check of the files, seeing that the .obj is created and appears in the Blender editor. We also run all of these manual tests on Theo’s computer, testing them on a different system (so we ensure it works on systems other than mine and I didn’t build it to something specific to my machine) and on the Linux OS with his dual-boot laptop.
The next step would be to align the images, ensure the height map is accurate enough, and then figure out how to import it into Blender as an .obj.
Yon’s Status Report 3/29/25
This week we ran for the first the my subsystem together with Sophia’s scanner controller. We rotated the coin manually so the normal map is noisy, be we see expected behavior for the areas we don’t spin (flat normal map). I also designed the test object we’re going to use, and printed it.
This sets us up well for the demo this coming week, as Theo just implemented his system so we’ll be able to run a full system test. I’ll also scan the test object on the benchmark scanner and probably try and run it on ours (maybe for the demo) to begin doing qualification. Lastly, I’ve been thinking about how we might threshold the object to avoid performing the pretty computationally heavy normal->depth map operation on the part of the scan we don’t care about. I think this should be simple if we just threshold the normal map, but ill test it and then work it into my subsystem.
Sophia’s Status Report for 03/29/2025
This week, we tested the system from scanning, to if the stepper motor rotates, to saving the scans, to feeding it into the math in a python file to make the normal map. The system, after a bit of directory/save name tweaking, works, even properly starting and working fully from the Blender add-on. The only thing we didn’t test is the manipulator rotating the coin/object itself, Theo did it manually for the testing, because we were waiting on a 3D printed part to mount the suction part on the manipulator device. We were actually able to get a decently clear normal map of the coin, just a regular U.S. quarter. So personally, what I did was make adjustments in the software to be able to integrate in Yon’s math normal-map-making python file.
We’ve decided to put Mac-compatible software on hold, as there’s complications with Mac and the framework we were using to command the scanner. We’ll look into Mac-specific scanning libraries to use after getting the whole system including making the .obj working on Windows and Linux. Better to have at least one OS working completely than have it work only partially on all three.
Next step is expanding the Blender UI so the user can select a file path needed for the scanning process, the COM port for the microcontroller (though maybe we could do that automatically), and possibly the scanning DPI. Maybe somehow getting the command line messages we have with the scanning process progress getting displayed in Blender? Also we need to make sure the suction manipulation works in system run and integrate .obj 3D model creation. I’d say we’re on track and have a pretty good setup for the demos this upcoming week.
Sophia’s Status Report for 03/22/2025
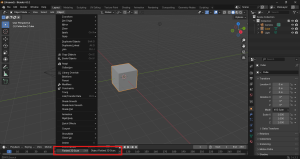
This week, I started on the Blender add-on. I’ve successfully made an add-on with the name “Flatbed 3D Scan” to appear in Blender, and it runs the “execute” function that is inside of its Python file when clicked. So, next week I’ll be making it so it calls the Main.py file from last week which would run the scan. I need to look further into if there’s a way I can input arguments to the add-on, or a way to make a UI window pop-up to enter arguments in.
For Main.py, I refactored it a bit along with scanner-controller dotnet project and the serial_proto.py in order to put them in the right directories and directly call serial_proto from Main.py. So, the sequence looks okay. I need to implement try-catches to make sure the program doesn’t have unhandled errors. The dotnet project still isn’t working on Mac, so we’re going to look more into that next week as well.
So overall, next week will be adding in quality of life updates with the Blender add-on UI and bug fixing with testing the system.
Sophia’s Status Report for 03/15/2025
With Theo’s help, I got the scanner controller software working still using the NAPS2 library. It required changing the scanning contexts to different contexts than she expected, specifically Windows OS had two different scanning contexts and the one that said it was for Windows Forms, not Windows, was needed in this instance.
I started on writing the Main file that would call the scanner controller software, command the microcontroller manipulator device, and eventually will interact with the image processing software and the Blender add-on UI. I chose to do Python for this since there would be a lot of moving between file directories and some command line calls for the dotnet project that encompasses the scanner controller software. I also updated the scanner controller software to account for the Main file creating the scanning directory, so it now just has to make sure it doesn’t repeat file names for new scans.
The next step would be to implement the manipulator device calls into the Main.py file and ensure that the process of scanning and rotating works, building the Blender add-on, and integrating Yon’s image processing software. Initially I thought to make the Blender add-on do all of the calls, but now I think it’d be better to let the add-on be almost exclusively UI with a start button that calls the Main.py file. So, technically I’m a touch behind schedule, but as long as I finish the Blender add-on next week and the Main.py file is working, it should be good since we left two weeks of buffer time.
Sophia’s Status Report for 03/08/2025
The week before spring break, I started working with Theo on the serial code to get communication between the computer and the microcontroller on the manipulator device. Since the device connects using USB, it’s a matter of opening the serial ports and feeding commands at the right time to the manipulator device.
As for the program to automatically capture scans using the flatbed scanner, I’ve encountered. The file works fine before attempting a practical trial with the flatbed scanner. However, when I try to use the scanner with it I encounter a “lost connection with the scanner” error in the middle of scanner. I hear the scanner go off, but then it loses connection and doesn’t save the file. Online search wasn’t helpful, only suggesting to unplug and replug/restart the scanner, which I tried a few times unsuccessfully. I guessed it was something to do with file access permissions on my computer with the scanner, so I tried moving the project to more accessible file locations that definitely wouldn’t require admin, I tried running the script as an admin, I tried to see if there was an access permission the scanner was missing, I double checked that the device drivers were up to date, and nothing seemed to fix this issue. It’s extra confusing because I was able to scan and save just fine from the scanner’s native software and from the NAPS2 library software. I asked Theo to try downloading the project and running it to see maybe if it was an issue with Windows or my machine in particular. However, he encountered a lot of issues with trying to set up the dotnet project and the incompatibilities in the version of dotnet that the project required with his version of Linux.
So, in light of this I believe the best approach would be to pivot from trying to use the universal scan library of NAPS2 that requires a dotnet project. Instead, just a series of files instead that don’t rely on an existing framework. There would be a master file that receives the command from the Blender UI, checks the OS version, and then calls a corresponding file to make the scans based on the OS. This way, we would have a file for each OS version and each OS would be able to use a compatible scanning library. It also makes it so that we could incrementally ensure each OS works, ensuring one is done before moving on to the next. It would also ensure that something in general works, even if not compatible with every OS. Currently, I’m looking at WIA (Windows Imaging Acquisition) for Windows, SANE (Scanner Access Now Easy) for Linux, and ImageCaptureCore (Apple API) for Mac. Since two of these are native to their OS’s and Linux is generally good with setting up libraries, I think these will work out better.