Team Status Report for 04/27

Schedule

Now that we are in the final stretch, we need to test the full system, and continue working on our tasks that involve drawing the properly accurate rectangular red segments and fine tuning the frequency of our data sending/receiving now that we are not limited by it. We are working to improve the UI so that it is actually instructive and intuitive on demo day. Besides the technical improvements we need to make on our project, we need to start working on our presentation materials which include the final video, poster, and the written report.

Risks & Challenges

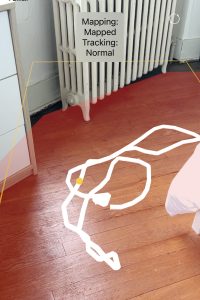
We currently have a little work left to accurately reflect the dirty and clean space on the AR side. The bounding boxes do not perfectly align yet, so we are still tuning the values within our AR app to ensure that the camera view matches the response on the iPhone’s app. Erin and Harshul are working to tune these parameters, and Nathalie is working on final touches with the UI. We still have a couple final tests to run, and we need to mount the active illumination to the system. However, we don’t anticipate any of these tasks to be blocking.

Validation: 

  1. Line Tracking Test
    Using masking take, create a straight, one meter long zig-zag section of four 90° bends which are each half a meter long. Using four 8.5″x11″ US Letter papers, print out a curved line section of the same width as the masking tape, and assemble to create a contiguous line. Then drive the vacuum over the line and verify that the drawn line tracks the reference lines with smooth connectivity and no deviations of perpendicular distance by more than 5cm.
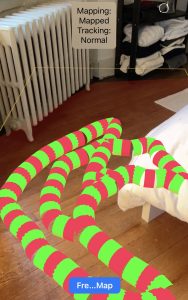
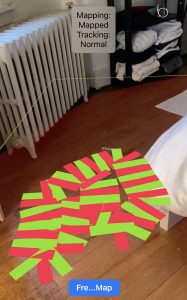
    Results: Verified that we are able to track a range of motions from straight to sharp curves. Instead of mocking this on paper, we used TechSpark’s robot tracking tape path, which had a similar geometry to what was outlined in the test
  2. Technical Requirements Tracking Test
    In our design report, we outlined a 5cm radius for the vacuum head’s suction. Upon setting that radius for the SCNLine, we should see that the lines drawn encompass the length of the vacuum head. Additionally, we also outlined a 0.5s latency requirement for the tracking motion. To test this, we move in a straight line for two meters and verify that upon stopping, the entire motion is captured on the AR application within 0.5 seconds and accurately reflects the movement.
    ResultsTracking is in real time and the line drawn is continuous with no stuttering. This test informed our decision to move to SCNLine rather than our previous naive implementation of segmented cylinders. 
  3. Plane Projection Verification
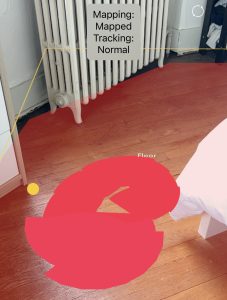
    We will draw an offset at 5cm plus the radius of the SCNLine from the floor plane. Then we will place the phone such that the camera is touching the floor and positioned perpendicular to it. Upon visual inspection, none of the drawn shape should touch or extend past this test plane.
    Results: Verified that this projection method works. It is reliable even after changing from a hit-test to a plane projection
  4. BLE Connection:
    Try to send dirty/clean messages thirty times. Find delay between each test. Consider the summary statistics of this data which we collect. Assuming the standard deviation is not large, we can focus more on the mean value. We hope for the mean value to be around 0.1s, which gives us fps=10. This may not be achievable given the constraints of BLE, but with these tests, we will be able to determine what our system can achieve
    Results: We ran tests and collected over two hundred different sample latency values. We have achieved the desired 0.1s latency. The bottleneck has now become the camera’s frame rate, which is 30fps.
  5. Dirt Detection
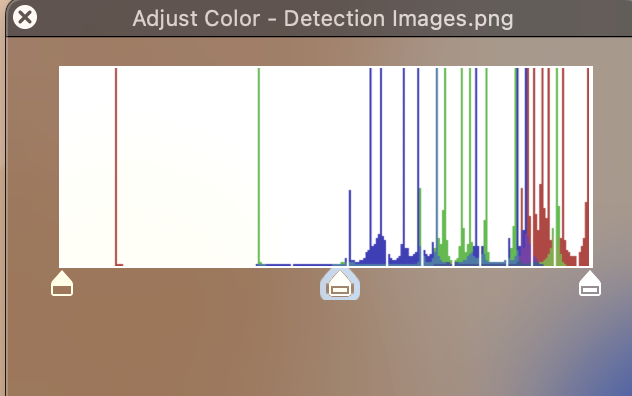
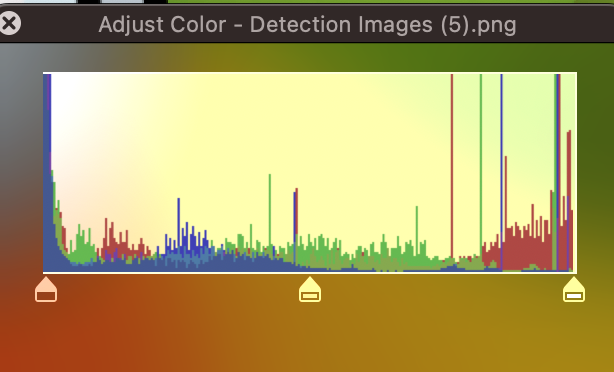
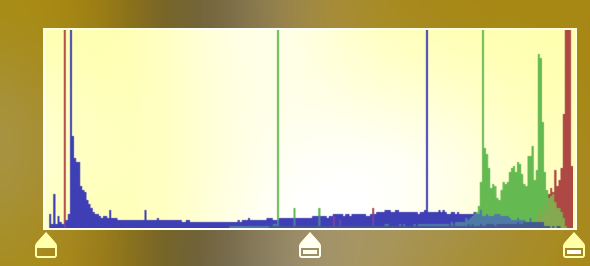
    Take ten photos each of: 1) Clean floor, 2) 
    Unclean floor, sparse dirt, and 3) Unclean floor, heavy dirt. Assert that the dirt detection module classifies all ten images of the clean floor as “clean”, and all twenty images of the unclean floor as “dirty”. If this is not met, we will need to further tune the thresholds of the dirt detection algorithm.
    Results: After running our script on two different algorithms, we achieved the following results. Based on these values, we have chosen the second script. 

    FPV 81.82% 0.00%
    FNV 0.00% 9.52%
    ACC 71.88% 93.75%
  6. Camera Bounding Box Test
    Set up the vacuum system on a table in TechSpark and create little red rods to delimit borders of its field of vision. By accurately determining these parameters, we refined the precise cropping and granularity in our image capturing.
    Results: We have now determined the correct parameters to use when cropping the camera field of view in our dirt detection algorithm.
  7. Jetson Mounting Tests
    Note that these tests were very prototype focused. We created cardboard cut outs with a knife to identify shape and stiffness requirements. We then cut the pieces out of both acrylic and plywood and tested to make sure that there was enough give in the components to be able to still function modularly. We tested our components using tape, hot glue and epoxy for mounting. The tape was flimsy and too vulnerable for jostling our main mount. We opted for hot glue and/or epoxy for mounting fixed components. The initial testing we did with the first mount iterations found that the wheels jostled the mount so we fabricated standoffs to account for this.
    Results: Camera configuration cropping and resolution was initially too narrow. We implemented design changes and updated the camera configuration to capture a bounding box more appropriately sized with the width of the vacuum.
  8. Camera Mounting
    Tested various camera angle configurations against the amount of dirt captured to identify optimal mounting orientation.
    Results: We used this test to select our final mounting orientation for the Jetson camera.

  9. Battery Life Test
    We start the Jetson from a full charge, and run the entire end-to-end system for five minutes. After the five minutes are up, we check the charge on the Jetson. A charge depletion of less than 2.08% would indicate a successful output.
    Results: Over a span of thirty minutes, the power bank battery was only depleted around 10% (across four independent trials). This satisfies our requirements for battery life. 

Harshul’s Status Update for 4/27


We met for a long meeting this week to work on integrating all of the components of our system and test the end to end functionality of the sensor messages being transmitted to the iPhone. Using the offsets that Nathalie measured from the bounding box that was constructed I created an offset node. This node serves as a coordinate reference point to draw a segment marked as dirty based on the location of the jetson camera view at a specific timestep.

I worked on mounting the acrylic back plate for the tracking image onto the vacuum with hot-glue to provide a good orientation and easy replacement of the tracking image. Consideration was given to making it laminated but the team outlined concerns over glare which could compromise the integrity of the tracking. Plates for the active illumination mounts are also ready to be mounted.


One issue with the existing design of how we were coloring in dirty segments was a temporal relience on a previous point in the queue which made segments have inconsistent sixes depending on the motion of the vacuum over time. This resulted in narrow and also large slices which aren’t ideal. We also cannot offset these points arbitrarily as the position of the offset+sphere nodes in the world change over time. To amend this I’ve been working on redesigning the queue structure to store a segment instead of a specific position to instead have the queue node contain a start and end coordinate encompassing the camera bounding box that Nathalie measured out to allow for a more consistent recoloring. This redesign was made possible as a result of the performance improvements we unlocked.

In our integration meeting we sat down to profile the python code on the jetson and discovered a result contrary to our working hypothesis surrounding the latency of the BLE messages. Bluetooth was running at millisecond frequency, but the dirt detection algorithm was taking a lot of time. This was due to the camera library taking multiple seconds to instantiate and sever the camera connection. This was happening every time we tried to send a message as the subprocesssing script was executing the python file repeatedly every iteration adding process overhead as well. The reason we needed this subprocess separation was because the camera needed to run in a python3.6 unlike to the BLE server which depended on asyncio in 3.8. I proposed a solution of using stdin with an input command to block until receiving input to stdin to allow for the camera to be instantiated only once instead of every-time we transmitted a message.  We worked together to implement this range and it led to a considerable speedup from 5 seconds per message down to ~0.1-0.2s per message.

Next steps involve collaborating with Nathalie and Erin on testing the new queue and fine tuning the camera parameters. Big picture wise structuring our poster, collecting footage and testing on our poster board will be of high priority.

Erin’s Status Report for 04/27

This past week I have been working on the final steps of integration for the dirt detection subsystem. This included both speeding up the transmission interval between BLE messages, and fixing the way the data was represented on the AR application once the dirt detection data was successfully transmitted from the Jetson to the iPhone.
The BLE transmission was initially incredibly slow, but last week, I managed to increase the transmission rate significantly. By this time last week, we had messages sending at around every 5.5 seconds, and I had conducted a series of tests to determine what the statistical average was for this delay. Our group, however, had known that the capability of BLE transmission far exceeded the results that we were getting. This week, I timed the speed of the different components within the BLE script. The script which runs on the Jetson can be broken down into two parts: 1) the dirt detection component, and 2) the actual message serialization and transmission. The dirt detection component was tricky to integrate into the BLE script because each script relies on a different Python version. Since the dependencies for these script did not match (and I was unable to resolve these dependency issues after two weeks of research and testing), I had resorted to running one script as a subprocess within the other. After timing the subcomponents within the overall script, I found that the dirt detection was the component which was causing the longest delay. I had also discovered that sending the data over BLE to the iPhone took just over a millisecond. I continued by timing each separate component within the dirt detection script. At first glance, there was no issue, as the script ran pretty quickly when started from the command line, but the delay in opening the camera was what caused the script to be running incredibly slow. I tried to mitigate this issue by returning an object in the script to the outer process which was calling it, but this did not make sense as the data could only be read as serial data, and the dependencies would not have matched to be able to handle an object of that type. Harshul actually came up with an incredibly clever solution—he proposed use the command line to pipe in an argument instead. Since the subprocess function from Python effectively takes in command line arguments and executes them, we would pipe in a newline character each time we wanted to query another image from the script. This took very little refactoring on my end, and we have now sped up the script to be able to send images as fast as we would need. Now, the bottleneck is the frame rate of the CSI camera, which is only 30FPS, but our script can now (in theory) handle sending around 250 messages per second.
Something else I worked on in this past week was allowing the dirt detection data to be successfully rendered on the user’s side. Nathalie created a basic list data structure which stored timestamps along with some world coordinate. I added logic which sequentially iterated through this list, checking whether the Jetson’s timestamps matched the timestamp from within the script, and then displaying the respective colors on the screen depending on what the Jetson communicated to the iPhone. This iterative search was also destructive (elements were being popped off the list from the front, as in a queue data structure). This is because both the timestamps in the queue and the timestamps received from the Jetson are monotonically increasing, so we never have to worry about matching a timestamp with something that was in the past. In the state that I left the system in, we were able to draw small segments depending on the Jetson’s data, but Harshul and I are still working together to make sure that the area which is displayed on the AR application correctly reflects the camera’s view. As a group, we have conducted experiments to find out what the correct transformation matrix would be for this situation, and it now needs to be integrated. Harshul has already written some logic for this, and I simply need to tie his logic to the algorithm that I have been using. I do not expect this to take very long.
I have also updated the timestamps on the Jetson’s side and the iPhone side to be interpreted as the data type Double. This is because we are able to achieve much lower granularity and send a higher volume of data. I have reduced the granularity to 10 messages per second, which is an incredible improvement from one message every 5.5 seconds from before. If we wish to increase granularity, the refactoring process would be very short. Again, the bottleneck is now the camera’s frame rate, rather than any of the software/scripts we are running.
Earlier in the week, I spent some time with Nathalie mounting the camera and the Jetson. I mounted the camera to the vacuum at the angle which I tested for, and Nathalie helped secure the rest of the system. Harshul designed and cut out the actual hardware components, and Nathalie and I worked together to mount the Jetson’s system to the vacuum. Harshul handled the image tracking side of things. We now only need to mount the active illumination in the following week.
One consideration I had though of in order to refactor/reduce network traffic is to simply not send any bluetooth message from the Jetson to the iPhone in the case that something was clean. This at first seems like a good idea, but this was something I ended up scrapping. Consider the case where a location was initially flagged as dirty. If a user runs the vacuum back over this same location and cleans it, they should recognize that the floor is now clean. Implementing this change would cause the user to never know whether their floor had been cleaned properly.
As for next steps, we have just a little more to do for mounting, and the bulk of the next week will presumably be documentation and testing. I do not think we have any large blockers left, and feel like our group is in much better shape for the final demo.

Nathalie’s Status Report for 4/27

Testing the Bounding Box of the Vacuum Camera

In order to properly track the segments and label them, I set up an experimental testing process that would allow us to calibrate the camera’s field of vision. I set up the vacuum system on a table in Techspark and created little red rods to delimit borders of its field of vision. By accurately determining these parameters,  my goal was to refine the precise cropping and granularity in our image capturing. Then we ran scripts to see what the camera was outputting,  making sure that the red straws were in the corner of the frames. I found that our initial cropped camera vision was too small compared to the range that the camera could actually capture. Our group performed several iterations of this testing to get accurate measurements so that we could translate this to the XCode/iPhone side of things. I measured the distance of the box length to be 19cm, distance from the beginning of the box to the handle to be 12cm, the width of the bounding box to be 28cm.

Improving the UI for Enhanced User Experience

Recognizing the importance of user-friendly interaction, I refined the user interface of our system. While this continues to be a work in progress, I’ve been rewriting the messages and changing which features are displayed on the main page.  I still have to do testing with users and will be adding more obstructive coaching that forces instructions in front of the users faces (currently, it’s easy to dismiss and not read the directional instructions).  When demoing, one goal is to reduce our need to interfere with the user’s experience with the product.

Implementing a Green Transparent Tracking Line

Now that we have our accurately drawn mechanisms in place, I decided to have an additional green line drawn from the back of the vacuum, indicating coverage irrespective of the back camera’s dirt detection. This transparent green line will update with red segmentation for spots that are marked as dirty. This feature provides users with real-time feedback on the vacuum’s progress, allowing them to monitor its trajectory and efficiency. The inclusion of this visual element not only enhances the user experience but also incorporates feedback mechanisms that empower users with greater control and insight into the system’s performance, ultimately leading to more efficient cleaning processes. The bounding box work has also been effective in allowing the traced green line to not extend beyond the initially mapped area. The picture below shows an example tracing of the green line that I created in TechSpark while testing. We can see texture of the red parts and the stripes in the lines, but I’ve modified it so that the green line appears under the red lines (so the red lines are more visible). I’ve also done work to calculate the proper width of the vacuum for coverage purposes, and adjusting the appearance of the green line as such.

Troubleshooting Data Transmission Latency

As mentioned in the presentation this week, Erin, Harshul, and I worked together to try and figure out why Bluetooth latency was ~5s. This was a problem because there were more tracked times and coordinates that did not have an associated dirty/clean classification and therefore would be drawn green by default even when everything was supposed to be marked dirty. By printing times and calculating the latency of each instruction, we were able to locate the issue. At first, we thought it was the data transmission and the limitations of BLE that take a long time to send and and can only accommodate a certain amount of data. It turns out, it was actually the dirt detection script. The multi-second delay was attributed to toggling the Jetson camera on and off constantly. The reason why it was getting turned on and off was because there are compatibility issues between different Python versions needed for different parts of our scripts. Namely, the Nanocamera package only exists in 3.6 while the async calls needed for BLE exist only in 3.8. So we PIPE’d the camera in and found a way to work around this problem so that the camera was only turned on once at the beginning and once at the end.  While before we had a 5s delay in data, now it is essentially real time with data coming at ~0.15 seconds with potential for further increase. Through iterative testing and refinement, we aim to minimize latency and ensure seamless communication between devices, thereby enhancing the overall reliability and responsiveness of the system. We need to now record on the iPhone side the same number of data at the same frequency.

Hardware Mounting and Material Selection

I also worked on mounting hardware involved careful consideration of materials and techniques to ensure stability and functionality. We made sure to discuss the components that we may want to adjust or remove later, distinguishing between permanent fixation with epoxy and the components suitable for temporary attachment using hot glue and duct tape.  For example, we wanted the portable charger to be removable in case we need to charge or replace it, but used epoxy for the laser cut wood pieces to solidify them together. By selecting appropriate materials and techniques for each component, we have a solid mounting of components that meets the demands of our application.

Next Steps

Moving forward, I’m going to be working on integrating CoachView as part of the UI to further enhance usability and accessibility. Erin Harshul and I  are going to work together on trying to on refining timeQueue usage and pick the optimal data frequency, figure out the border/script granularity needed, and then conduct comprehensive system integration and testing. While getting the system ready for our demo, we need to simultaneously prepare for the final presentation, meaning that we need to work on our video, poster, and plan out how we are going to demo and organize our space.


Team Status Report for 4/20

Risks & Challenges

Our efforts are directed towards sketching out the hardware, involving laser cutting acrylic for mounts. This is a potential risk because the mounting hardware may not actually act as intended, in which case we would need to come up with a new hardware approach with different materials, like 3D designing a mount and then gorilla gluing it to mount. Luckily, the hardware components are not extensive because we only need to mount a small camera and two lights. Nathalie’s research led to consideration of SCNPath for indicating the covered area. However, this has challenges in modifying attributes like color retroactively based on real-time data and keeping lines in memory as it is with SCNLine. She has been working on path coloration logic, but this is dependent on the process of integrating it with Bluetooth message reception. Issues with the Bluetooth include its reliability and speed. Erin has been working on attempting to speedup the BLE data transmission. Unfortunately, it may be bottlenecked, and we are unsure if we are able to get any additional speedup beyond what our current system offers. Our biggest challenge is time with the final demo looming, so effective prioritization of tasks is super important.

Schedule

Thankfully, we are back on track this week after figuring out all the issues with the BLE transmission. We have mounted the AR detection image, as well as the Jetson camera. The Jetson computing source has yet to be fully attached to the system, as we are keeping it independent in the case that we need to continue development. The phone mount has also been attached to the vacuum system. We are currently working on final stages of testing and verification, as well as the final presentation, demo, and poster.

As you’ve designed, implemented and debugged your project, what new tools or new knowledge did you find it necessary to learn to be able to accomplish these tasks? What learning strategies did you use to acquire this new knowledge?

Tools used: laser cutting, material management, setting objectives for each meeting

Learning strategies: constant communication, goal setting for each meeting so that we knew what needed to be accomplished in the work sessions, selecting a Plan B/C alternative in case our original plan doesn’t work

We’ve encountered various challenges that required us to learn new tools and knowledge to overcome them. Most of our ECE experience has been with software, so we had to learn and coordinate designing mounts using laser cutting materials of acrylic and wood. Something else we learnt was how to handle Apple documentation about ARKit and how to handle the official documentation/implementations alongside the developer community’s add-on solutions ARKit. SCNPath and SCNLine are created by a freelance developer before (maxfrazer) before he began working for Apple.

To acquire these new skills and technical knowledge, we relied on constant communication and goal setting for our meetings. We made sure to discuss our progress and challenges regularly, setting clear objectives for each meeting to ensure that we were aligned on what needed to be accomplished. That way, we could prioritize which  tasks were related to our system integration, and then allow feature improvements to occur asynchronously on our own time.

Erin’s Status Report for 4/20

Over this past week, I have been working on the bluetooth transmission system between the Jetson and the iPhone, as well as mounting the entire dirt detection system. I have also been working on tuning the dirt detection algorithm, as the algorithm I previously selected operated solely on static images. When working with the entire end-to-end system, the inputs to the Jetson camera are different than the inputs I used to test my algorithms. This is because the Jetson camera is limited in terms of photo quality, and it is not able to capture certain nuances in the images when the vacuum is in motion, whereas these details may have been picked up when the system was at rest. Moreover, the bluetooth transmission system is now fully functional. I obtained a 800% speedup; I previously was working with a 45 second average delay between messages. After calibrating the Jetson’s peripheral script, I was able to reduce the delay between messages to be just 5.5 seconds (on average). This is still not as fast as we had initially hoped, but I recognize that running the dirt detection script will incur a delay, and that it may not be able to granulize this window any further. I am still looking to see if there are any remaining ways to speed up this part of the system, but this is no longer the main area of concern which I am working with.
Additionally, prior to this past week, the BLE system would often cause Segmentation Faults on the Jetson’s side when terminating the script. This was a rather pressing issue, as recurring Segmentation Faults would cause the Bluetooth system to require reboots at a regular rate. This is not maintainable, nor is it desired behavior for our system. I was able to mitigate this issue by refactoring the iPhone’s bluetooth connection script. Prior to this week, I had not worked too extensively with the Swift side of things; I was focused more on the Python scripting and the Jetson. This week, I helped Nathalie with her portion of the project, as she had heavy involvement with the data which the Jetson was transmitting to the iPhone. After a short onboarding session with my group, I was able to make the cleanliness data visible from the AR mapping functions, rather than only within scope for the BLE connection. Nathalie now has access to all the data which the Jetson sends to the user, and will be able to fully test and tune the parameters for the mapping. We no longer have any necessity for backup Bluetooth options.
Beyond the software, I worked closely with my group to mount the hardware into the vacuum system. Since I was the one who performed the tests which determined the optimal angles for which to mount the camera, I was the one who ultimately put the system together. Currently, I have fully mounted the Jetson camera to the vacuum. We will need to affix the active illumination system alongside the Jetson camera which I am not too worried about. The new battery pack we purchased for the Jetson has arrived, and once we finish installing WiFi capabilities onto the Jetson, we will be able to attach both the battery system and the Jetson itself to the vacuum system.
I have since started running some tests on the end-to-end system; I am currently trying to figure out the bounding boxes of the Jetson camera. Since the camera lends itself to a bit of a “fisheye” shape, the image that we retrieve from the CSI camera may need to be slightly cropped. This is easily configurable, and will simply require more testing.
Over the next week, I intend to wrap up some testing with the dirt detection system. The computer vision algorithm may need a little bit more of slight tuning, as the context in which we are running the system can highly change the performance of the algorithm. Moreover, I hope to get WiFi installed onto the Jetson by tomorrow. This is causing issues with the BLE system, as we are relying on UNIX timestamps to match location data from the AR app with the Jetson’s output feed. Without a stable WiFi connection, the clock on the Jetson is constantly out of sync. This is not a hard task, and I do not foresee this causing any issues in the upcoming days. I also plan to aid my group members in any aspect of their tasks which they may be struggling with.

Harshul’s Status report for 4/19

This week I mainly worked on fabricating the physical components for our hardware mounts. This involved prototyping candidate mount designs and discussing with Nathalie and Erin the needs of our hardware to effectively mount the Jetson and camera while also avoiding getting in the way of vacuum functionality and the user.

we first did an initial prototype in cardboard to get an idea of the space claim and dimensions and then I took those learnings and iterated through a few mounting designs. The initial mountplate was found to make contact with the wheels which applied an undesirable amount of force on the mount/could make it harder to move the vacuum around so I laser cut and epoxied together some standoffs to create some separation. Below you can see the standoffs and the final mount. An acrylic backplate was cut for the tracking image as well.to avoid it bending and avoid it dangling in the vacuum head’s space.


When it comes to the image tracking I initially used this plane image as a baseline as it came from a tutorial  on image tracking so I had it as a baseline that would be well suited for tracking. However, this week we conducted some testing with candidate images of our own that have a better design language rather than being an airplane. Below is a snippet of the images we tested. However every candidate image including a scaled down version of the airplane would be trackable at a distance but performed poorly at being detected at the distance we need from the phone mount to the floor.

example of a histogram from one of our test images rejected by apple’s ARReference image

the histogram of the plane image from the tutorial (our best performign image)

While apple purely mentions a even histogram distribution punctuated with features and high contrast with low uniformity in our testing we found that scaling an image impacts its detectability with smaller images requiring that we get closer in order to track. However despite attaining a good uniform color distributed histogram it still underperformed in comparison to the image. This requires further investigation but one thing we observed was that the plane image has very clear B,G,R segments. Ultimately with more time it would be worthwhile creating a fiducial detection app in swift so that we could exact more control over the type of image detected. However, Apple’s Reference tracking seems to be more adept at recognizing the plane image so we have elected to make the design tradeoff of a more unintuitive image for our product with the benefit of the enhanced user experience from not having to be careful about needing to remove the phone from its mount to re-detect the image every time it gets occluded or disrupted.

Lastly, this week I also worked on limiting the plane drawing to the boundaries of the plane. Our method of drawing on the plane involves projecting the point onto the plane which allowed for the user to move outside of the workspace of the plane while still being able to draw on the floor.  My first approach, involved using the ARPlaneAnchor tied to the floor plane, but despite not updating it visually ARKit still updates the anchor dimensions behind the scenes so the bounding box was continually changing.

My next approach entailed extracting the bounding box from the plane geometry itself. Apple’s definition for the way bounding box is defined with respect to nodes and geometry required a shift in coordinates that was different from the rest of ARKit (which has y being the vertical coordinate and the floor being the XZ plane) which used an XY plane for the floor. This approach worked and now the SCNLine will not be drawn outside the plane boundaries.

This video demonstrates the initial tests I’ve started with testing tracking to a shape using the old mobot paths in techspark as a path for it to track along with the feature of the tracking stopping once the plane boundary is crossed.

Next steps involve working on end to end testing, working on the UI design and preparation for the final demo/presentation/video/report. Preparation for a demo and verifying its robustness is of utmost priority.

As you’ve designed, implemented and debugged your project, what new tools or new knowledge did you find it necessary to learn to be able to accomplish these tasks? What learning strategies did you use to acquire this new knowledge?

Swift was a new programming language for all of us. Due to the compressed timeframe structured learning would be inefficient so a lot of our learning stemmed from learning by doing, looking at the example code apple makes available as well as scouring the documentation. Since it’s a statically typed object oriented language the syntax is the key thing that differs along with the library implementations. There was a lot of documentation to sift through so through sharing our knowledge of the respective components we’ve done deep dives on we managed to get our bearings. This capstone was also an opportunity for me to revisit mech-E skills of laser cutting and CAD in the fabrication aspect of our project. The main new knowledge I’ve acquired outside of systems engineering experience is learning about AR apps & computer graphics. Some of this content such as affine transformations was taught in computer vision but a lot needed to be learned about parametric lines and how a graphics engine actually renders shapes and understanding the movable parts of the renderers and views and models etc that make up our app.  Learning this came from taking deep dives on function definitions and arguments coupled with skimming tutorials and explanations that outline the design and structure of an AR app.


Nathalie’s Status Report for 4/19

This week’s tasks

I spent this week working on integrating our AR components together: the image detection and tracking + offset for the back Jetson camera that we demonstrated  during our weekly meeting. This was a proof of concept that we could actually map the fixed area offset between our frontal camera positioning and the back of the Jetson using the airplane image. This image can be substituted out, but serves as a reference point. I’ve also sketched out the hardware laser cutting acrylic that needs to be completed for the mounts.

On top of that, I’ve been working on finding the optimal way to create a path. Our initial proof of concept was to use a SCNLine module type, which essentially draws a line on the plane. After further researching, I discovered another potential module type that we could use to indicate the covered area called SCNPath. The declarations are relatively similar, but they have different UI aspects and plane drawing memory capabilities. Specifically, SCNLine provides more granular control over individual segments of the path and draws the points in a single line, whereas SCNPath allows drawing of different segments which could be easier to color (the parallel task that I’m also working on). In the below images, you can see the differences between radiuses and width and the visual representation that it gives on the screen. I think I prefer the SCNPath visuals, but the backend itself and line management system is different.

Figure 1: SCNLine with a radius of 0.05
Figure 2: SCNLine with a radius of 0.01
Figure 3: SCNPath with a width of 0.02


I’ve also worked on drawing a path in order to indicate its level of dirtiness. To accomplish this, I delved into experimenting with various metrics of the SCNPath and SCNLine attributes. I found that it lacked some flexibility needed to retroactively modify attributes like color based on real-time data. By changing attributes within the materials of these node objects, we are able to the color of the path. These different colors are important because they are the user indication of the varying levels of dirtiness. I can easily change the different colors of the path but doing so in a patched-way (changing line segments, drawing different lines of different colors) has been more challenging than I expected.

Green color changes in SCNPath

As shown below, I’ve been able to edit the code such that it colors different segments and can capture the segmented floor, unfortunately, there seems to be some gapping betweent he segments when turning. This is demonstrated in the images below, but the effect is still present which serves our use case. I’m going to look further into how I can mediate those gaps going forward, but the positive side is that the coloring does not seem to affect latency.

Coloring with SCNLine
Coloring with SCNLine (2)
Coloring with SCNPath


In addition to path coloring, I worked closely with Erin and Harshul on hardware integration, designing our final mount for the vacuum and actually putting the pieces together. We worked a lot in TechSpark this week and have needed each of our subsystem pieces to make progress since we are in the refinements/mounting/integration stages of our process. I fixed some bugs with reference to the freezing plane logic, and also refined the UI to actually reflect the work that we are doing rather than what was part of our initial prototype.

Next Week’s Tasks, Schedule & Challenges

Harshul and I have been working with Erin to make sure that the Bluetooth part is making progress. Integration has been really difficult for us due to the setbacks from last week of the Jetson being broken, but we are trying our best to troubleshoot and make progress now that it’s been resolved. I need to polish up the path coloring logic, and connect that to the actual messages that are being received by the Bluetooth. This is really hard, especially because it depends on the Bluetooth connection integration actually performing, and the Bluetooth has not been as reliable as we had hoped. We got something working this week that needs to be fully flushed out and refined, so our next steps are defining specific test cases to actually test the accuracy of our mapped mount system.

In addition to the technical challenges we face with Bluetooth integration and hardware mounting, there are several other factors to consider as we move forward with our project. We planned the testing and validation of the integrated system, but need to actually perform this testing so that we can make sure our system performs as we had initially set out in our use case and technical requirements.. This includes testing the reliability of the Bluetooth connection under various dirt conditions and scenarios to ensure completeness, and making sure it can perform at a reasonable speed. To get this done, we need to collaborate and communicate as a team members to troubleshoot any obstacles that may arise along the way because we each had a hand in developing some part of a subsystem so all expertise is required.

Given the time constraints leading up to our final demo, it’s essential to prioritize tasks and allocate resources efficiently. This may involve making tough decisions about which features are essential for the core functionality of our system and making these decisions really quickly. This is evident in our hardware mount decisions which are designed specifically for the demo rather than an “industry standard” prototype. We have backup Bluetooth communication protocols and hardware configurations that may offer better performance or reliability, but are not the most optimal in terms of design and technical specifics.

Harshul’s Status Update for 4/6

This week I worked on 2 main features. The first was working in parallel to Nathalie on the optimization approaches outlined in last week’s status report. Using the SCNline package that Nathalie got working led to an improvement but the stuttering still persisted which narrowed down the rest of the performance bottleneck to the hittest. I then worked to try various approaches such as varying the options I pass into hittest to minimize the calculations needed, but this did not pan out. Ultimately, using the unprojectPoint(:ontoPlane) feature to project a 2d coordinate onto a plane ended up being a much faster calculation than the hittest that sent a ray out into the world until it intersected a plane. Unproject combined with the new SCNLine enabled our drawing onto the floor plane to be realtime with no hangs in time for our demo.

Smooth Drawing Video

As we move towards integrating our App with the physical hardware of the vacuum we needed a way to embed a ground truth point in the camera view to give us a fixed point with which we could track and draw the movement of the vacuum. The reason we needed this fixed point was that vacuum handles can alter their angle which if we had a hardcoded point/calibrated point in the 2d viewport only that would insufficiently tack when the user changed the orientation of the vacuum handle. Solving this problem entailed implementing image tracking so that with a ground truth reference image in our viewport no matter how we changed the angle the point we ‘projected’ the 3d image position onto the viewport would be consistent.

Apple was rather deceptive in outlining documentation to do this apple’s image detection tutorial  stated that “Image anchors are not tracked after initial detection” A forum post outlined that this was possible, but it was using RealityKit instead of SceneKit. Fortunately an ML based ARKit example showed the case of detecting a rectangular shape and tracking its position. Using this app and this tutorial  we experimented to understand the limits of ARKits image detection capabilities. We ultimately found that high contrast images with uniform histograms work best along with color.

image showing Xcode asset UI warning about a certain fiducial image having a poor histogram and uniform color distributions

Taking those learnings from the tutorial + our experimentation I then integrated the image tracking configuration into our main AR project and managed to create a trackable image.

Trackable Image Video

I then edited the plane projection code to instead of using the center of the 2d screen plane to instead project the location of the image onto the screen and use that 2d coordinate to ‘unproject’ onto the plane. I then tested this by taping the image onto my vacuum at home.

Vacuum image tracking video

As shown in the video despite any translational/orientation changes the line is always drawn with reference to the image in the scene.

Next steps entail making it so that we can transform the location of the drawn line behind the vacuum, testing the image detection on our vacuum with the phone mount attached.

Subsystem Verification Plan:

In order to Verify the operation of this plane projection/drawing/image I’ve composed 3 tests:

1. Line Tracking Test

Tape out with masking tape a straight section 1 meter long a zig zag section of 4 90 degree bends each 0.5 meter  and using 4 US Letter pieces of paper to print out a curved line section of the same width as the masking tape assembled to create a contiguous line and then using the vacuum drive over the line and verify that the drawn line tracks the line with smooth connectivity and no deviations of perpendicular distance from drawn line to reference line by more than 5cm.

2. Technical Requirements Tracking Test
In our design report we outlined a 5cm radius for the vacuum head’s suction so upon setting that radius for the SCN line that should encompass the length of the vacuum head.

Additionally, we also outlined a 0.5 s latency requirement for the tracking motion. To test this we are going to move in a straight line 2 metres and verify that upon stopping our motion there is <0.5s elapsed in order for the line to reflect that  movement.

3. Plane Projection Verification
While this is a relatively qualitative test to impose an error bound on it I will draw a test plane offset 5cm+the radius of the SCN line (cm) from the floor plane. Then i will place the phone such that the camera is touching the floor and positioned perpendicular to it and visually inspect that none of the drawn shape touches or extends past this test plane.

Erin’s Status Report for 4/6

This past week, I have been working on further integration of BLE (Bluetooth Low Energy) into our existing system. Last Monday, I had produced a fully functional system after resolving a few Python dependency issues. The Jetson was able to establish an ongoing BLE connection with my iPhone, and I had integrated the dirt detection Python script into the Bluetooth pipeline as well. There were a couple issues that I had encountered when trying to perform this integration:

  1. Dependency issues: The Python version which is required to run the dirt detection algorithm is different from the version which supports the necessary packages for BLE. In particular, the package I have been using (and the package which most Nvidia forums suggest) has a dependency on Python3.6. I was unable to get the same package working with Python3.8 as the active Python version. Unfortunately, the bless package which spearheads the BLE connection from the Jetson to the iPhone is not compatible with Python3.6—I had resolved this issue by running Python3.8 instead. Since we need one end-to-end script running which queries results from the dirt detection module and send data via BLE using the bless Bluetooth script, I needed to keep two conflicting Python versions active at the same time, and run one script which is able to utilize both of them.
  2. Speed constraints: While I was able to get the entire dirt detection system running, the granularity at which the iPhone is able to receive data is incredibly low. Currently, I have only been able to get the Jetson to send one message about every 25-30 seconds, which is not nearly enough with respect to what our use-case requirements have declared. This issue is further exaggerated by the constraints of BLE. The system is incredibly limited on the amount of data it is able to send at once. In other words, I am unable to batch multiple runs of the dirt detection algorithm and send them to the iPhone as a single message, as that message length would exceed the capacity that the BLE connection is able to uphold. One thought that I had was to send a singular timestamp, and then send over a number of binary values, denoting whether the floor was clean or dirty within next couple seconds (or milliseconds) following the original timestamp. This implementation has not yet been tested, but I plan to create and run this script within the week.
  3. Jetson compatibility: On Monday, the script was fully functional, as shown by the images I have attached below. However, after refactoring the BLE script and running tests for about three hours, the systemd-networkd system daemon on the Jetson errored out, and the bluetooth connection began failing consistently upon reruns of the BLE script. After spending an entire day trying to patch this system problem, I had no choice but to completely reflash the Jetson’s operating system. This resulted in a number of blockers which have taken me multiple days to fix, and some are still currently being patched. The Jetson does not come with built in WiFi support, and lacks the necessary drivers for native support of our WiFi dongle. Upon reflashing the Jetson’s OS, I was unable to install, patch, download, or upgrade anything on the Jetson, as I was unable to connect the machine to the internet. Eventually, I was able to get ahold of an Ethernet dongle, and I have since fixed the WiFi issue. The Jetson now no longer relies on a WiFi dongle to operate, although now I am able to easily set that up, if necessary. In addition, while trying to restore the Jetson to its previous state (before the system daemon crashed), I ran into many issues while trying to install the correct OpenCV version. It turns out that the built-in Linux package for OpenCV does not contain the necessary packages for the Jetson’s CSI camera. As such, the dirt detection script that I had was rendered useless due to a version compatibility issue. I was unable to install the gstreamer package; I had tried everything from Linux command line installation to a manual build of OpenCV with the necessary build flags. After being blocked for a day, I ended up reflashing the OS, yet again.

This week has honestly felt rather unproductive even though I have put in many hours; I have not dealt with so many dependency conflicts before. Moving forward, my main goal is to restore the dirt detection and BLE system to its previous state. I have the old, fully function code committed to Github, and the only thing left to do is to set up the environment on the Jetson, which has proven to be anything but trivial. Once I get this set up, I am hoping to significantly speed up the BLE transmission. If this is not possible, I will look into further ways to ensure that our AR system is not missing data from the Jetson.

Furthermore, I have devised tests for the BLE and dirt detection subsystems. They are as follows:

  • BLE Connection: Try to send dirty/clean messages thirty times. Find delay between each test. Consider the summary statistics of this data which we collect. Assuming the standard deviation is not large, we can focus more on the mean value. We hope for the mean value to be around 0.1s, which gives us fps=10. This may not be achievable given the constraints of BLE, but with these tests, we will be able to determine what our system can achieve.
  • Dirt Detection
    • Take ten photos each of:
      • Clean floor
      • Unclean floor, sparse dirt
      • Unclean floor, heavy dirt
    • Assert that the dirt detection module classifies all ten images of the clean floor as “clean”, and all twenty images of the unclean floor as “dirty”. If this is not met, we will need to further tune the thresholds of the dirt detection algorithm.