Katherine’s Status Report for 2/24

After last week’s report, we completed the slides for the design review. On Monday, I presented the design review slideshow in class.

I have mostly fulfilled last week’s deliverable to order all parts. Because the PCB design is not completely designed at this time, the PCB was not ordered. However, the boost converter (https://www.pololu.com/product/2564) and battery (https://www.digikey.com/en/products/detail/adafruit-industries-llc/2011/6612469), the remaining electronic components, were ordered. In addition, all of the following physical components were ordered: plastic wrap (https://www.amazon.com/dp/B09PJQNMCM), 10 feet of plastic tubing (the smallest available length) of 1” inner diameter with a thickness of 0.25” (https://www.mcmaster.com/products/tubing/tubing~/soft-plastic-tubing-for-air-and-water/), polyester cord (https://www.amazon.com/dp/B07TZW1DBW/), and plastic cord locks (https://www.specialistid.com/products/black-adjustable-neck-cord-lock-2135-4001). I have also updated our purchase tracking spreadsheet to reflect our latest purchase requests. Also, since the microcontroller and LED orders have arrived, it is now possible to begin electronic prototyping.

For the next status report, I want to have a finished PCB design and place the order for multiple rigid PCB prototypes. Furthermore, I want to start electronic prototyping with available materials; I plan to use the Beetle to display a test message in order to familiarize myself with how it works. Since the report for the design review is due next Friday, I will also participate in completing the design review report.

Freda’s Status Report for 2/24

This week, I helped write the Design presentation, created a Solidworks model of the rough idea for how the components would look like, finalized ordering for plastic parts, and discussed more design decisions with the team.

The CAD model really helped cement some of our design decisions such as the configuration the lights would be placed (we decided in a row would look better than zig zag), and the exact spacing of parts (such as deciding the mics will go 1⁄4 and 3⁄4 of the way along the length for equidistance from the center). Because we’ll control all the Neopixels with 1 pin, this means that 1 side of the lights must be on the opposite side as where the pin is, so this will mean our PCB will have traces that travel under the microcontroller to get to the other side. This will probably be fine, since that is a design practice used in industry as well, and it won’t be traveling too far.

To finalize the size of the tubing, we chose ones with the thinnest walls because we’re still trying to minimize the size, but also I did some estimated calculations of choosing an inner diameter tubing that’s slightly smaller than the current width of the PCB. This is because we’re going to try changing the tube shape technique mentioned last week, so the compressed oval should have the dimensions we need. A final consideration that I can think of is to remember to cut some holes on the ends of the PCB so I can tie string to them to help pull the PCB through the tube, since that’ll probably be easier than pushing. Last resort for the tubing would be to cut it open and reseal, but that sounds like we might as well try the plastic sheet idea.

Finally, the idea of swapping batteries came up, so I had some ideas to add velcro to the plastic wrap surrounding it for more convenient access instead of permanently sealing it, but that remains to be seen when we interview our user group on Monday, as discussed in the team report.

Last week, I said I’d try to get to the PCB and Beetle, but unfortunately this week was pretty exhausting for all these deadlines for classes so I didn’t get to that (in addition, the Beetle didn’t get here in time early enough in the week to pick it up and start testing). PCB used to not be on the Gaant chart,and now it is. I would really like to have a PCB prototype done by the end of next week in order to utilize spring break “waiting time for shipping” effectively. The electronic prototyping with the Beetle was scheduled for next week anyways, so that’s still on track technically.

Team Status Report for 2/17

This week, we worked on finalizing design choices in preparation for the design review next week. We also attended Professor Dueck’s class, where we could collect some preliminary data points for dB, check out some of the different rooms available, and ask for user feedback of what kind of product they’d prefer.

What are the most significant risks that could jeopardize the success of the project? How are these risks being managed? What contingency plans are ready?

One of the most significant risks we identified today is the possibility that the sizes of the materials we have chosen make it impossible to meet the sizing requirements we have set. We are managing this risk by relaxing our sizing requirements. We are also trying different prototyping methods that still try to minimize size as much as possible.

Were any changes made to the existing design of the system (requirements, block diagram, system spec, etc)? Why was this change necessary, what costs does the change incur, and how will these costs be mitigated going forward?

We have created a battery life requirement of 8 hours, which is the maximum amount of music-interaction time without a break that was brought up in conversation with participants in the music studio.  That creates the need for these relatively large batteries.

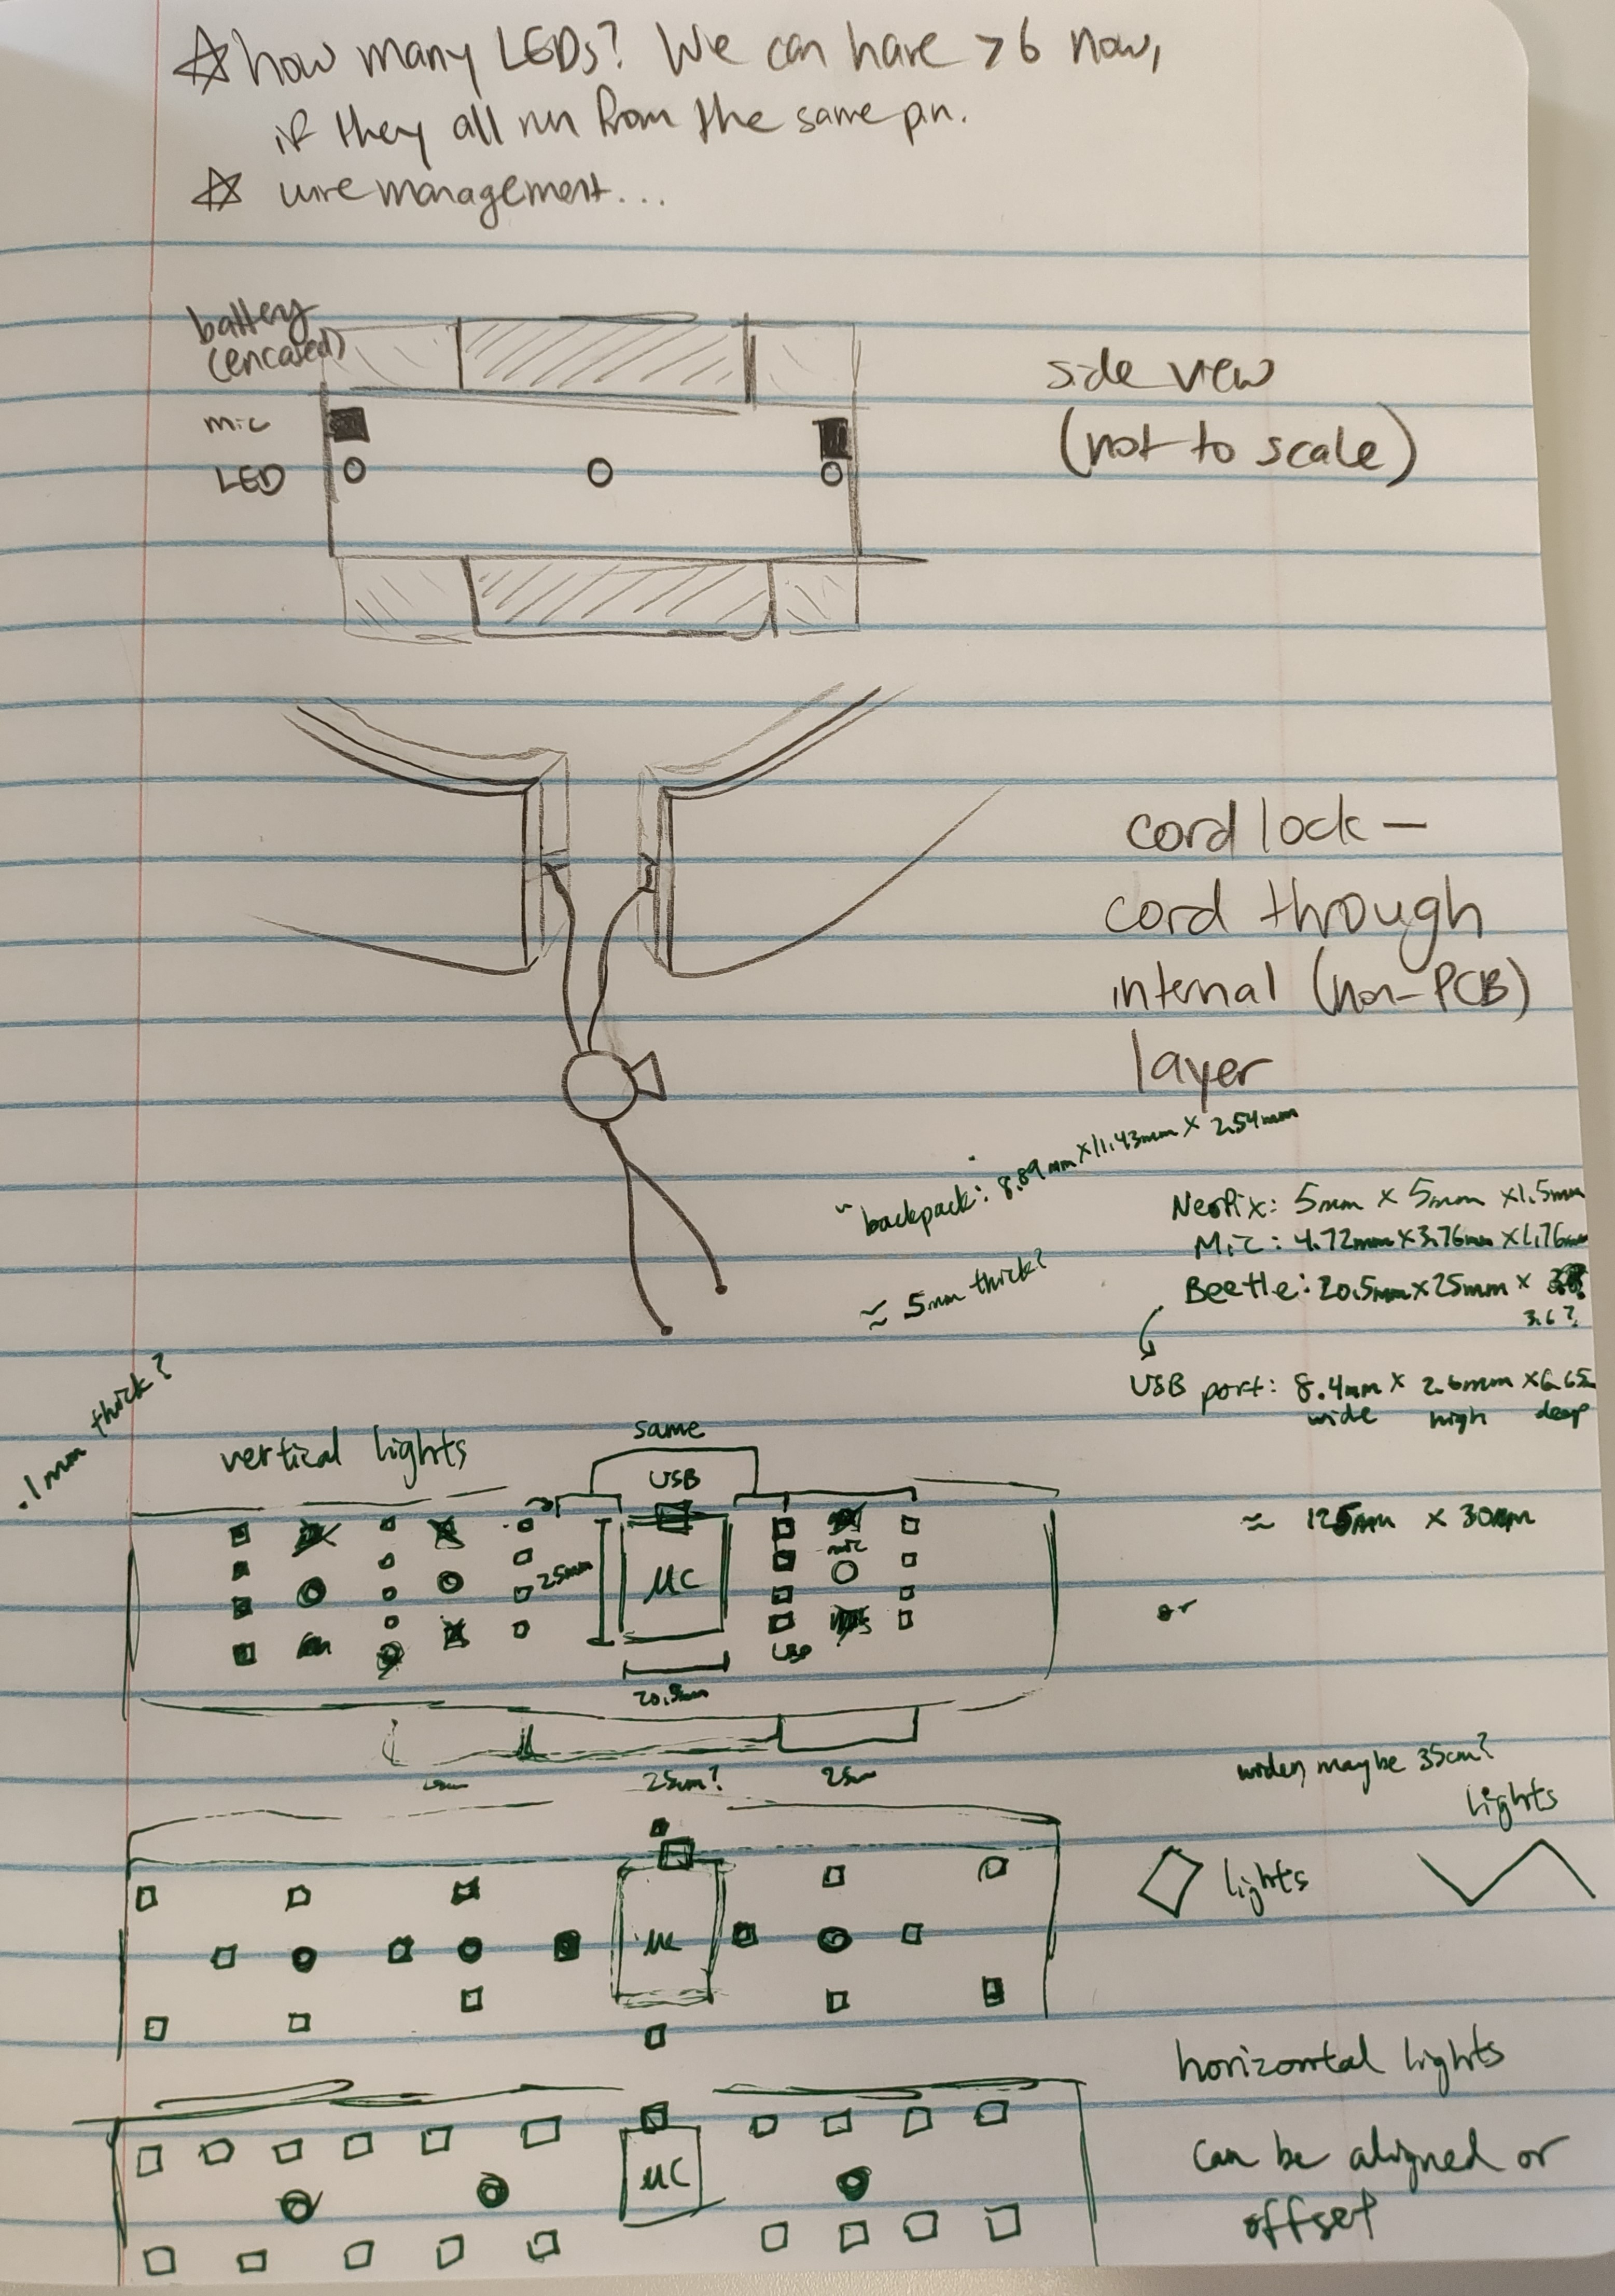
We are eliminating our thickness requirement. When considering preliminary sizing, we realized that the given dimensions of the parts we have agreed on (battery, microcontroller, LEDs, microphones, and boost converter) would not be feasible given the thickness and height requirements we had created. From there, we had a choice of eliminating the height requirement (creating a chunky bracelet) or the thickness requirement (creating a cuff/armband style of bracelet). We chose to eliminate the thickness requirement because eliminating the height requirement would make the bracelet stick out too much to be comfortable to wear (and would also make it more prone to damage). One concern with this solution is that it could interfere with wrist movements; given that our potential users include pianists, this is an important concern. We decided that the bracelet should be adjusted to be worn sufficiently far back that it does not cover the wrist or interfere with wrist movement. We will still attempt to minimize thickness, and rely on user feedback to determine if this is a satisfactory solution.

In our weekly meeting, we confirmed that connecting our components via a PCB is necessary. The alternative had been to individually solder/wire each component together, but this is probably impossible because of the size of the components. We are going to connect all non-battery components together on a flex PCB, and include a place to plug in the battery. This results in an increased cost for our system (from ordering the custom PCB).

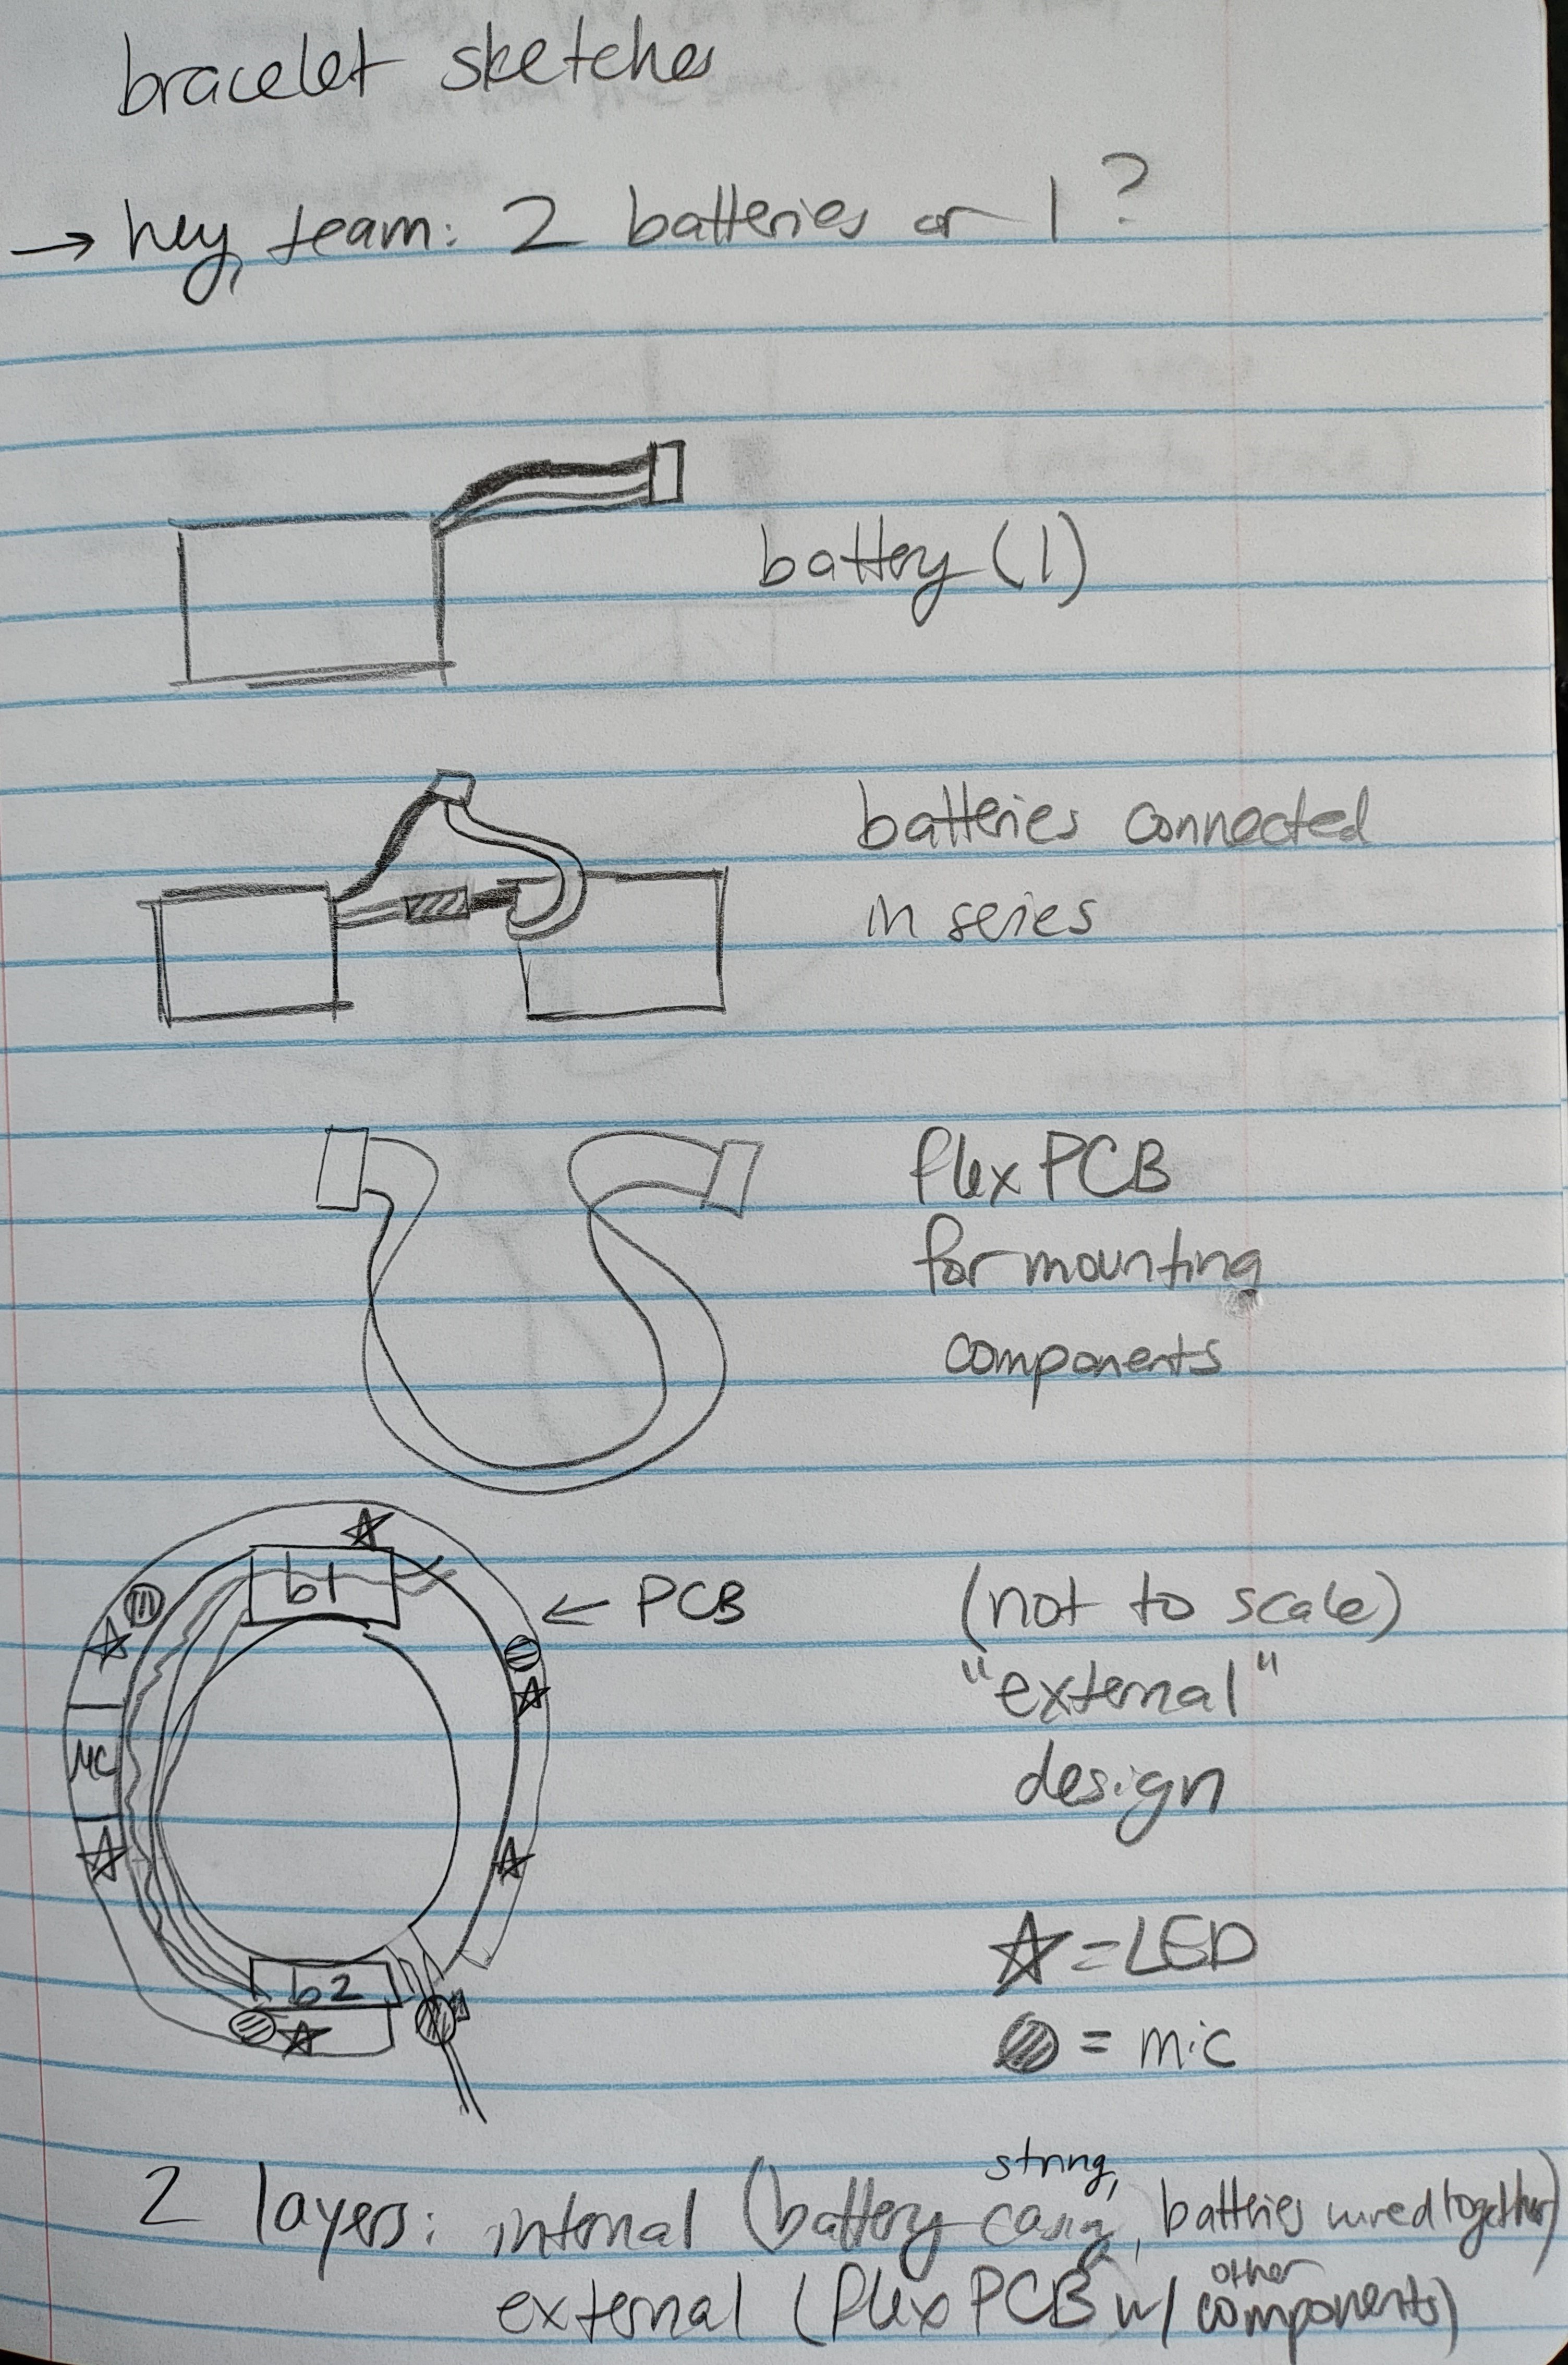
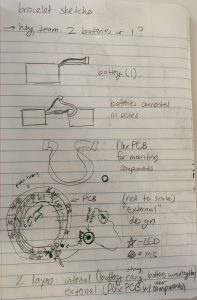
Also in our weekly meeting, we discussed the idea of using 2 small batteries (instead of 1 large one); the battery life requirement dictates that we use larger batteries, but maintaining a relatively small size is important. Our plan is to use 2 small batteries, one on either “side” (above or below the wrist) of the bracelet, and have them wired in series to provide one red/black battery connection to the PCB. The risk is that, if done incorrectly, this can ruin both batteries; however, we are going to verify that our plan is safe before carrying it out, and take safety precautions while wiring the batteries together. In addition, if we test the bracelet and discover it uses less power than we thought, it’s probably easier to decrease the number of batteries than to increase it retroactively.

Provide an updated schedule if changes have occurred.

We have pushed forward tasks related to materials to account for the delay in finalizing and therefore in ordering materials. The tasks covering finalizing materials, ordering and receiving parts, electronic prototyping, Arduino-Bluetooth connection, LED signal setup, and the Bluetooth-webapp connection have all been moved forward to the week of February 25th. Also, software task deadlines have been moved forward because it took some time to get familiar with React Native; therefore, the deadlines have been moved to the 23rd and 25th, respectively.

This is also the place to put some photos of your progress or to brag about a component you got working.

Here are some sketches of our physical design.

A sketch of the bracelet with the outer layer labeled "plastic tubing" and the inner layer labeled "wire wrapped w/ string". A battery connection to the PCB is indicated. A stopper made of laser-cut acrylic is at each end of the plastic tubing.

Three side-views of the bracelet. One has vertical lights in line with the mics, one forms a diamond of lights around each mic, and one has horizontal lights which can be aligned or offset from the mic. Notes estimate component sizes, and show that lights can be arranged in a zigzag pattern.

How will our product meet a specified need…

with respect to public health, safety, or welfare? [Freda]

As mentioned in our introduction page, hearing loss was the leading sensory disorder in the US. Other than obvious uses such as listening to music and friends, our ears are also important to help with balancing, and even mild hearing loss doubles the risk of dementia [1]. In addition, people may not be as good at accurately interpreting the “loudness” of sound vs the actual decibel value, due to our ears being more sensitive to certain frequencies [2]. An objective way of measuring decibel levels, such as a phone app, would be nice, but inconvenient to pull out every time you want to check. Thus, a wearable device such as a bracelet would be a helpful way to monitor volume continuously throughout the day. This can be useful for musicians or other workers in loud environments, or anyone who wants to be more mindful of their surroundings. Once people are more aware of potential risks, they can take steps to mitigate and protect their hearing preemptively.

[1] The Hidden Risks of Hearing Loss | Johns Hopkins Medicine

[2] Equal-loudness contour – Wikipedia

with respect to social factors? [Lucy]

Our bracelet meets social needs by providing a convenient method for users to be more aware of their overall sound surroundings. With the adjustable light and color customization, our goal is to offer a product that caters to a diverse set of users, extending beyond those with full sight. Individuals with disabilities, like colorblindness, can also fully use our bracelet by customizing the colors to best suit their needs and preferences. Additionally, in settings where bright, flashing lights may be inappropriate, the bracelet can be customized to emit a softer glow. The light intensity can easily be adjusted to suit whatever the current social setting is.

with respect to economic factors? [Katherine]

The bracelet-webapp system is not meant to replace existing decibel meters and apps; therefore, it should have no effect on the production and distribution of these goods. While its goal is to create mindfulness of sound levels, the overall effect of this mindfulness remains to be seen. It is possible that increased mindfulness leads to users producing or consuming less music, because they are limiting their exposure. However, it is also possible that increased mindfulness will give users a better knowledge of when to take breaks, letting them engage with more music and therefore increasing their overall production and consumption.

Lucy’s Status Report for 2/17

What did you personally accomplish this week on the project? Give files orphotos that demonstrate your progress. Prove to the reader that you put sufficient effort into the project over the course of the week (12+ hours)

This week, I officially started working on the web application. I spent my time designing the frontend of the web application using React Native and Expo. I used the following tutorials to help me build our app: Deploy a Native App and Creating React Native Pages. These tutorials have taught me a lot on how to use react native effectively to create user friendly interfaces. I have started working on the screens for login, homepage, and sign up, and am currently experimenting with design choices for our app.

Is your progress on schedule or behind? If you are behind, what actions will be taken to catch up to the project schedule?

I am slightly behind schedule since I was busy this week. Also, there were a few issues with connections so the frontend is taking a little longer than expected. However, I will catch up this week by dedicating more time to finalizing the frontend design of our web app.

What deliverables do you hope to complete in the next week?

Our priority is to finalize the design review slides so it can be presented next week. Afterwards, I hope to continue working on screens for the frontend and finalizing those designs. Next, if I have the time, I hope to start looking into incorporating a database to store the sound data that is received.

Katherine’s Status Report for 2/17

Following up from last week’s report, I made sketches of the physical design of the bracelet.

Sketches of a battery, two batteries wired in series, a flex PCB, and a bird's-eye view of a bracelet with batteries encased on the inside and other components attached to a flex PCB on the outside.

A sketch of a side view of the bracelet with microphones directly above and a battery directly behind LEDs; another sketch of string from a hole in the ends of the bracelet's inner layer being connected by a cord lock.

Drawing these made me think of some discussion topics for our group meeting.

  • Are we proceeding with designing the bracelet to use 2 batteries in series rather than one large battery? (Yes– the bracelet can have a more even weight distribution and more easily meet size requirements if it uses two small batteries.)
  • How will wire management work? Now that most of our design will be on a PCB, the major wire connection remaining is the battery cable.
  •  How many LEDs do we want to use? Because an array of NeoPixel LEDs can be connected to one output pin on the microcontroller, we can include more than the 6 LEDs we originally planned to have; however, more LEDs will draw more current, which will then decrease the battery life. Similarly, we can afford to have more than 3 (digital) microphones now, but it remains to be seen if this is necessary for our design.

In another follow-up to last week’s assignment, I created an optional Google Form survey for the music studio. Results from the Google Form seem to indicate that potential users would want a device with a long battery life. From the form answers, the longest duration of a music session could be 4 or 6 hours. Involvement with the music studio means that our use case is now more specific; we are aiming our product toward people who are regularly creating music and want to make sure that their practice/rehearsal environments are safe. With these two assignments completed, my progress matches our schedule.

This week, I submitted orders for the Beetle microcontroller (https://www.dfrobot.com/product-2778.html) and NeoPixel LEDs (https://www.adafruit.com/product/3094) that we intend to use in our bracelet. Since we need to have all design decisions finalized by Sunday at midnight, which includes knowing all components that we will buy, I am assigning myself the task of submitting all orders for materials in the coming week. (I also changed this website’s header image to a picture from Pixabay, which is free to use.)

Freda’s Status Report for 2/17

This week, I read some Beetle documentation, wrangled WordPress into displaying weekly reports properly, and made some more design decisions for the layout and materials/manufacturing.

First, I looked into finding polyester cord and cord locks. The reason I chose polyester is because I believe it would be less likely to fray other materials, and is also quite silky so it feels nice. In terms of size, I went with 3mm because it should be compatible with the cord lock size I chose (it has a small size and a simple mechanism), and seems decently thick enough to be strong.

Not only will the cord be used for adjustability, but I think it’s a decent way of protecting wires that connect the batteries as well (wrap/knot the thread around the wires, friendship bracelet style). Since this could be done last, it would be easier than putting tubing around the wires because that would need to be done before the soldering (unless you want to cut and reseal the tube, which is painful).

To attach the cord to the bracelet, I came up with using “stoppers” that fit the holes on the ends of the plastic tube, with a hole in the middle for the string to go through. Basically, it looks like a metal disk washer. The stoppers could be glued into place to help seal off the components from outside damage like dust/water, and a knot on the end/some glue can also prevent the cord from slipping through the hole.

Unfortunately, plastic tubing to protect the PCB was a lot more painful to find, which I will get into later.

My initial plan was to CAD model some designs so we can have a more concrete idea of what the bracelet will look like. Unfortunately, that requires some designs first, and drawing on paper is much faster, so see those sketches in the team report. The idea with those sketches was to aesthetically space out the lights such that there wouldn’t be a black hole where the microcontroller is, although it might be a bit hard to tell since they’re not drawn to scale. We’re also not sure what number of lights will be sufficient to not look empty, but also balance power usage. The reason the microcontroller is in the middle instead of the edge is to minimize the max length needed for the traces. Although if there are sufficient benefits to putting the microcontroller on the end, perhaps we will consider doing that instead.

Another annoyance is that the Beetle doesn’t have all the desired dimensions (the 25mm length doesn’t include all of the USB port, and no height listed), so we will just have to guesstimate in the CAD and PCB. At first, it seemed like the height of the PCB + components would only be about 5mm, which is great because many plastic tubes can be that size. Unfortunately, since tubes are circular, we also need to consider our width dimension, which is going to be about 30mm when accounting for some buffer room because of the length of the Beetle. We can’t rotate the Beetle to make the width “smaller”, because then the USB port would be hard to access for the user (perpendicular to the PCB board length is easier to reach, instead of being along the PCB length because of the angle the wire would have to bend to avoid other components). Finding a 25mm tube was a lot harder, and it’s also a bit of a waste of space in the height dimension. Bendable, oval tubes are also quite hard to find. So we have some options that we are going to experiment with and hopefully at least one of these prototypes will work:

  1. Buy a smaller diameter plastic tube, and use heat and weights to smush into an oval shape. McMaster-Carr
  2. Buy those plastic sheets that are used to cover tables, and cut out the correct shape, use hot glue to wrap into a tube shape. Amazon.com: NECAUX Custom Multisize 1.5mm Thick Clear PVC Table Cover Protector – 14 x 14 Inch Waterproof Crystal Soft Plastic Square Tabletop Protective Pad for End Table/Night Stand/Side Table, 2pcs : Home & Kitchen

Since we initially thought we didn’t need a PCB board and now we do, we will be designing that concurrently while waiting for the orders of the other parts to come in, so I don’t think we have encountered any “blocking” actions and can be relatively on schedule. If the other parts come by next week we can unit test/sanity check some things before we put it onto a PCB. I’m not sure if it would be ambitious to have a PCB ordered by spring break? That way we can use spring break to wait for the shipment.

For next week, I plan to:

  • Design some CAD models of bracelet layout (they are going to be simplified boxes with guesstimated dimensions if I can’t get pre-made CAD of the objects)
  • Try PCB prototypes if CAD goes well
  • Read more Beetle documentation
    • If the beetle comes in I can start poking it with hello world and other sanity checks
  • Think of more ideas for materials/prototyping/edge cases for how it’s built?

Lucy’s Status Report for 2/10

What did you personally accomplish this week on the project? Give files or photos that demonstrate your progress. Prove to the reader that you put sufficient effort into the project over the course of the week (12+ hours).

This week, I worked on the proposal presentation with my group, finalizing the design of our project and creating a block diagram for our slides. I also spent a few hours practicing for the presentation.

After the presentation, I spent time doing more research into web app development. I started looking into tutorials on how to get started with React Native, since I didn’t have much experience with the framework. I played around with some features and set up a new project. I also spent some time learning Django for the backend of our web apps.

Is your progress on schedule or behind? If you are behind, what actions will be taken to catch up to the project schedule?

I am currently on schedule.

What deliverables do you hope to complete in the next week?

Next week, I hope to start building the frontend of our web apps. I will also help my group create a CAD model of our bracelet so we can finalize the components we need.

Freda’s Status Report for 2/10

I spent some time searching for small microcontrollers. There seemed to be many promising results at first, but I’ll go into more detail below:

Conclusion: although these candidates ended up being eliminated, these possibilities were still important in helping us narrow down our use cases and think more deeply about implementation. The first big takeaway is that we’ve proved that we only need 1 LED pin to individually control a whole array of lights (with the help of the libraries listed in the Gemma pendant link tutorial), which also helped us discover that NEOPixels were a nicer alternative to LEDs. Second, we had a good discussion about ranking what we value most in our parts, such as whether Bluetooth or LEDs were more important, and also how to charge the battery. Initially, we thought it would be fine to take the battery out to charge, but since the battery wires are likely going to be soldered to the switch, that’s probably not possible. This isn’t something we would’ve thought of if it weren’t for comparing all the different features of the microcontrollers we had available and ranking what we valued in our use cases.

I think the project schedule is on-time with the new Gantt chart changes, now that we have our main parts decided upon. However, we shouldn’t slow down the pace given that it did take changing the Gantt chart.

Next week, I plan to start finding 3D models of all the components we will be using, and trying out different arrangements to see how they’ll fit together, so we have an estimate and can be prepared before parts arrive. We can also analyze responses from our user survey to see if there are other design implementations we can narrow down, and go from there.

Katherine’s Status Report for 2/10

This week, I researched possible battery and microcontroller choices for the bracelet.

I was behind on finalizing materials.

Before next week’s meeting, I will sketch the physical design of the bracelet. Before class time on Monday, I will create a Google Form with the questions we want to ask the music studio participants.

Team Status Report for 2/10

Summary of Accomplishments

This week, we presented our proposal and received feedback from faculty. Here are our thoughts:

  • Robustness of the audio system is a good idea: we need to factor in making our data collection more robust to “noisy”/bad data.
  • In average mode, the average incorporates data gathered since the beginning of the session.
  • The intended device use time = 8 hours before recharging, since that’s about how long Professor Dueck says people work for.
  • The timespan of instantaneous = 1 second (response time goal).
  • Bracelet networking is an interesting idea, but we envision our device as an individual solution.
  • Directionality will be incorporated. With multiple microphones, data about varying sound levels in different directions can be gathered.

We also met with Professor Dueck, Assistant Professor for Collaborative Piano and Vocal Coaching, whom we are collaborating with for our project. She introduced some use cases, such as how some practice rooms they were given weren’t designed with acoustics in mind so they weren’t very comfortable to use, or how orchestral musicians are concerned for their hearing because they are surrounded by loud instruments but still have to hear details in the music. We are looking forward to meeting with her and her students on Monday so we can interview more potential users to better understand what features would be most beneficial for them and what else we can improve for our design.

What are the most significant risks that could jeopardize the success of the project? How are these risks being managed? What contingency plans are ready?

Currently, the most significant risk we foresee is that parts will be damaged in the fabrication or testing processes. To mitigate this risk, we intend to order multiple copies of electronic components (5+ of each?).

Were any changes made to the existing design of the system (requirements, block diagram, system spec, etc)? Why was this change necessary, what costs does the change incur, and how will these costs be mitigated going forward?

Firebase will no longer be used; its purpose can be fulfilled by Django. The LED strip choice was changed to Neopixels, because it runs on a lower current, so our battery can last longer. The design now has a specific choice for microcontroller: the Beetle ESP32 C6 Mini Development Board, for its BLE capability, small size, and safety (wearable safety is not explicitly stated, but two of the applications on the store website are wearable devices). Our battery choice is two 3.7V 2000mAh lithium-ion batteries to facilitate a longer use time while still meeting our size requirement. With these components decided, our plan for layout is to have the batteries on the top and bottom of the wrist, with the microcontroller between them on one side, leaving the fastening mechanism on the last “side”. The microphones can be placed about equidistantly around the wrist, so it’s likely they’ll land on top of the batteries/microcontroller area.

Provide an updated schedule if changes have occurred.

The Gantt chart has been updated to reflect that materials were not finalized until 2/10 instead of 2/7. Also, ordering parts will begin on 2/12 instead of 2/8.