Ethan’s Status Report – 5/8/2021

This week was a big flashback to freshman year calculus as a lot of integration was happening!

We finally cut out and constructed our final enclosure and installed all the electronics and the camera. After a few technical issues were debugged we began work on our final video and poster. We hope to finish both of those tomorrow!

Team Status Report 4/24/2021

This week was a continual refinement of all the components of our project. We received all the components for our PCB and hope to have that fully assembled early next week. We also continued to work on and train our classification system. This week we achieved 98.0% validation accuracy and 97.5% test accuracy with our CNN. (A card is classified correctly if both the rank and suit are correct.) It takes approximately 50ms to classify a single image on the Jetson Nano, so we have plenty of headroom to achieve the 2s latency requirement. We plan on increasing our training dataset by taking more images this week (hopefully with the PCB). We also made some updates to the logic of our webapp to better support other games besides poker (namely blackjack). We also began work on designing our final, laser-cut, assembly.

We believe we are still on track to complete our project based on our current schedule.

Ethan’s Status Report 4/24/2021

We finally got all of our parts for the PCB in this week we began trying to assemble everything but ran into difficulty soldering everything to the board. Some of our components were just too small to hand solder so we likely will have to reflow it.

I also began work on designing a new enclosure for our project:

The plan is to laser cut it out of black acrylic (with the base that the cards sit on our of clear acrylic so the camera and ir sensor can “see” through). Then the plan is to glue the pieces together with epoxy. Once the PCB is completed I’ll begin work on assembling this.


Ethan’s Status Report – 4/10/2021

This week I finished the PCB design! I have a minor change I need to make regarding the input resistance on the base of BJT controlling the LEDs but otherwise it should be good to go! Currently looking to have it fabricated early next week from OSHPark. Based on their lead times and shipping estimates, we should have it by next week for integration into our project (replacing our prototype protoboard).

We also had some issues with our camera module this week that we diagnosed as a hardware defect and have since shipped it back and received a new one. Hopefully, we don’t run into any more issues with the camera!

Ethan’s Status Report – 4/3/2021

This week we’ve pretty much finalized the physical design of our project. We began work on creating the first fully-realized prototype. We found that the way we created the cutout and blacked-out the rest of the frame gave jagged edges and impacted how much of the card we could get into the image field. So we started work on modifying a new card shoe (which we ordered this week). This time we painted the underside instead of using black tape:


We will likely drill holes tomorrow for both camera cutout and the standoff locations for the pcb. Speaking of the PCB, I’ve begun work on a first draft. I hope to have something ready to order early this week so it can be shipped and return in time for our interim demo in two weeks!

Ethan’s Status Report 3/27/2021

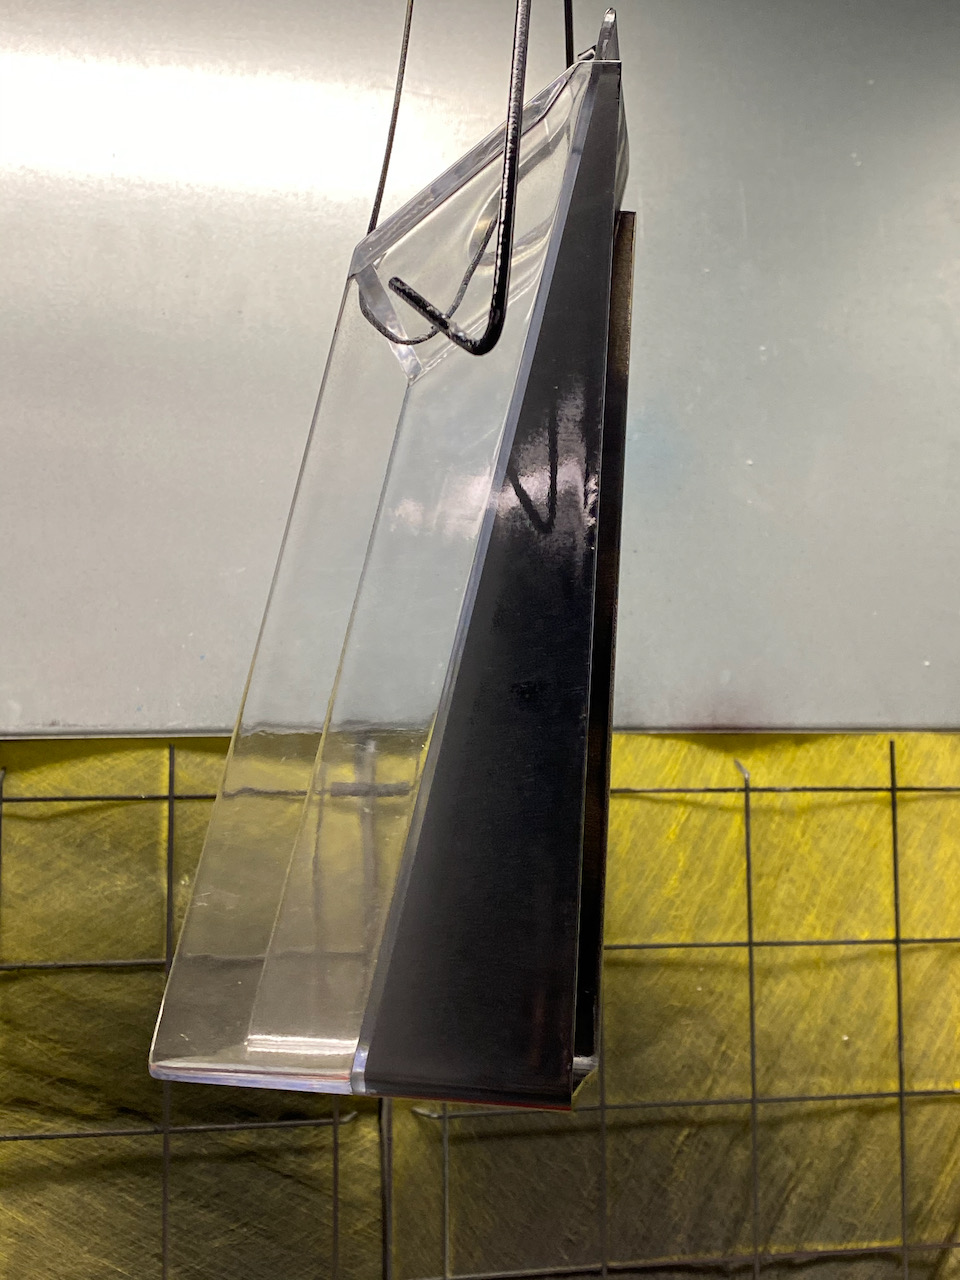
We’ve continued our work on the triggering system this week. After testing several different triggering methods, we found that the QRD1114 reflectivity sensor module was the most accurate and unobtrusive. We created a prototype circuit board using some protoboard.  We then experimented with different heights of sensor placement, drilling holes in one of the card shoes and mounting the prototype board and the camera using standoffs.

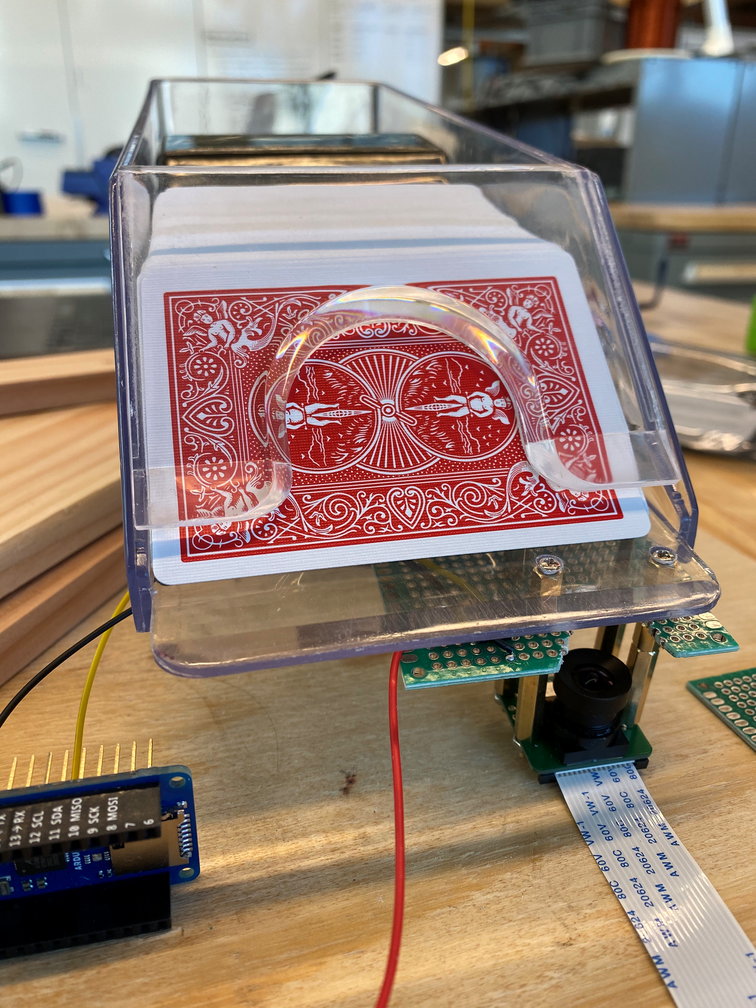
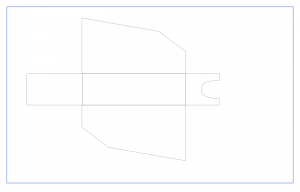
Using an Arduino, we were able to get very precise readings of when the card crossed the sensor. We then moved on to finding better ways to mount the camera. With our current setup, the image is partially obscured by the standoffs and the PCB. We decided to mount the camera/PCB stack using only the back standoffs and widened the cutout in the PCB.

We then moved on to optimizing for height. Since we want the shoe to be as usable as possible, reducing height was necessary to ensure the cards slid onto the table properly. We wanted to make sure we maintained the sensor height so we began removing standoffs between the PCB and the camera. We found that ~1cm of standoff height could be removed without impacting image quality for classification.

We also began working on the software for the trigger. However, we found that the Jetson Nano doesn’t have an onboard ADC. Since our sensor is analog, we are looking into getting an external ADC. We found a couple modules that may work, but ultimately we  plan on integrating the ADC into our PCB design.

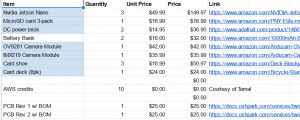
We’re currently on schedule for all the hardware components except shipping out the PCB. After looking at various board houses, we found that we could have a design ordered and received with a 5-day turnaround time. This is significantly less than the initial 2-week process we initially planned for. I am confident that the additional testing and prototyping we did in the last two weeks will allow us to only need 1 revision of the PCB. Given our 2 weeks of additional slack time in case a revision is necessary, I believe that we will finish on schedule

Ethan’s Status Report – 3/12/2021

Exciting week at Pokercam HQ! On Thursday the first batch of parts arrived! Since I was the address listed on the order form, I unboxed everything (video coming soon /s), packaged them up into kits for the other team members and flashed the OS onto the micro SD cards.

Prior to the first shipment of parts arriving, I began work on designing the PCB (much easier with all the parts in-hand) As a group we decided to, rather than include the camera module on our PCB, build our additional circuitry as a stackable board. Here’s a sketch I did of how that would work:
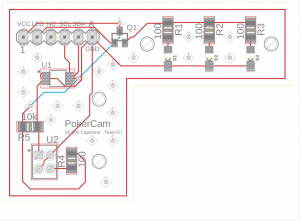
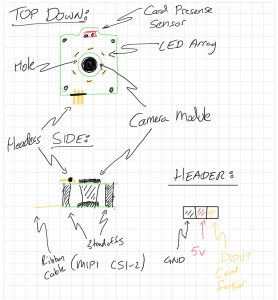
It uses the Arducam module boards we already have and allows us to simplify our design as well as get the LEDs closer to the base of the card shoe (creating a better lighting environment in the process). There will be an additional header (currently debating whether to include a separate PWM-enabled power input for the LEDs to allow for dimming (however this includes its own challenges when it comes to the video and syncing everything together).

More research is to be done (and likely a prototype made) however I’m confident in our ability to make up the lost time from the parts arriving late.

Team Status Report – 3/12/21

This week, the team worked together to solidify design decision for the design presentation. We considered the project’s risks and technical challenges, including selecting an image to use for classification based on priors. As a team, we have begun drafting the design review, clarifying the decisions we presented on Monday with the MATLAB scripts and napkin-math we have done so far.

Since our parts arrived on Thursday, we met to bring-up everybody’s Jetson Nano. We distributed parts such that Ethan and Jeremy have a single camera to work on and each member has their own card shoe and deck. Once Jeremy finishes the imaging pipeline in the coming weeks, he and Sid will swap hardware so Sid can train the ML model to classify cards.


While the parts arrived one week later than expected, we still believe we can maintain our original schedule. See the individual progress reports for more details on which tasks are challenging.

Next week, we will finish our design review and continue working to finalize decisions on the camera system so Ethan can get a PCB sent out for manufacturing.

Ethan’s Status Report for 3/6/2021

This week we finally ordered our first round of parts!


We settled on getting one Nvidia Jetson Nano for each team member so we all have access to a developer kit. We also got two camera modules to test out: the OV9281 and the Sony IMX219. Both of them are pretty promising, however the IMX219 is also available as just the module (as opposed to on an adapter board for the Jetson) so, if we want to, we can mount it to our own pcb more easily.

We hope to receive our parts and begin working on a prototype. I’ll also begin working on the PCB design once we know which of the camera modules we plan on using.

Ethan’s Status Reports

We decided this week that the Jetson Nano was the platform that we wanted to pursue. Mainly because of the CUDA cores and MIPI camera interface.
Speaking of cameras, Jeremy and I began looking at camera modules this week. There’s actually a surprising amount of them supported by Nvidia. I’ve been scouting around around on some forums to get a feel for what the common choices are for projects similar to ours. Two that i’ve had my eye on are the OV7251 and the OV9281.

https://www.uctronics.com/arducam-ov7251-mipi-camera-module-0-3mp-monochrome-global-shutter-camera-jetson-nano.html

https://www.uctronics.com/arducam-ov9281-mipi-camera-module-1mp-global-shutter-mono-camera-130-jetson-nano.html

The 7251 is a 0.3MP camera which is usable up to 360fps@160 x 120. The 9281 is a 1MP camera which has a whopping 1280 x 800@120 fps. Currently looking into whether the 9281 supports higher framerates and also whether the additional resolution is necessary (160×120 up close shouldn’t be an issue, but would rather be safe than sorry).

Both modules are pretty cheap so we likely will get both to test and see which works better for our project. Jeremy was also looking at modules with interchangeable lens systems. However, i think the focal length on the default lens for all these cameras should work.