For this week, I focused on solely the phone side of our system. We had proved that it was possible to send signals from the phone to the Flask server through sockets. Now, I built off of that by creating a UI to represent 8 buttons the left-hand fingers would press. Each of these buttons corresponds to a command from 1-8 that is received by the Flask server. I also implemented a UI for changing the key that the current user is playing in. This status is also kept in sync with what the server knows. Along with UI, I also experimented with the accelerometer on the iPhone using the Expo accelerometer package. The API is easily accessible and can be customized by things such as update speed. Will plan to apply peak detection algo Michael worked on to detect bends in the left hand. The goal would be to match these bends to pitch bends generated from garage band.

Team Status Report
Updated Gantt Chart
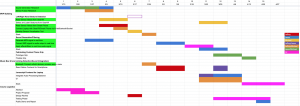
https://docs.google.com/spreadsheets/d/1f5ktulxfieisyMuqV76F8fRJTVERRSck8v7_xr6ND80/edit?usp=sharing
Control Process
Selecting Notes
The desired note can be selected from the smartphone controller by holding a finger down on the note grid. The eight notes represented on the grid are solfege representations of whatsoever key and tonality (major/natural minor) selected from the smartphone menu. For example, a selection of the key of C Major would involve a grid with the following notes: C, D, E, F, G, A, B, C.
Octave Shift
To shift the range of notes in the smartphone note grid up or down an octave, swipe the thumb right or left on the touchpad of the VR controller (in the right hand). Swiping right once would denote a single octave shift up, and swiping left would denote an octave shift down.
Chromatic Shift
To select a note that may not be in the selected key and tonality, the user can utilize the chromatic shift function. This is done by holding your right thumb on the top or bottom of the VR controller touchpad (without clicking down). Holding up would denote a half step shift up, and holding down would denote a half step shift down. For example, playing an E-flat in the key of C Major would involve selecting the “E” note in the left hand and holding the thumb down on the right hand touchpad. The same note can also be achieved by selecting “D” and holding the thumb up on the touchpad.
Triggering a Note
To trigger the start of a selected note, pull and hold down the trigger on the VR controller. The selected note will be played for as long as the trigger is held down, and any additional notes toggled on the left hand will be triggered as the note is selected in the left hand. If no notes are selected while the trigger is pulled, no sounds will be outputted.
Note Separation
If the user wishes to divide a selected note into smaller time divisions, there are two options:
- Release and toggle the trigger repeatedly
- Use motion to denote time divisions
The system recognizes a change in controller direction as a time division. For example, to subdivide held note(s) into two subdivisions, one would initialize the note with a trigger press and initiate the subdivision with a change in controller motion. The same outcome can be accomplished with just repeatedly pulling the trigger.
Polyphony
Polyphony can be simply achieved by holding down multiple notes on the smartphone grid while the trigger is pressed.
Toggling Effects
Four different effects can be toggled by clicking on any of the four cardinal directions on the VR controller touchpad.
Updated Risk Management
In response to the current virtual classroom situation and progress with our project, the risk has changed a bit.
For the phone grip, it doesn’t seem very feasible to build it in the same manner/design we had originally intended. We had planned to build the grip with a combination of laser cutters and maker space materials. Instead, we have decided to go for a simpler approach for attaching the phone to the users left hand. Instead, we want to use a velcro strap that would go around the user’s hand. We would then have the other end of the velcro attached to the back of the phone.
Another area of risk we found was the limitations of the current Javascript package we are using to generate sound. While there are many features in the library such as accurate pitch selection and instrument selection, there were some features we didn’t see. One of these features we wanted to use was the ability to pitch bend. A workaround we have brainstormed is to use a Python bending that does support pitch bending library. We could run this in parallel on our Flask server with the front end Javascript to achieve features we want from both libraries.
Jeffrey’s Status Report 3
This week, I initially focused on restructuring the code in our project. For our front-end, all the packages we had installed were installed manually by downloading and moving Javascript files for that library into our project folder. We knew this wasn’t scalable if we wanted to install more packages. So I set up NPM within our project so that packages could be installed with a package.json file and a command-line instruction. In this way, we wouldn’t have to manage versions for packages and could instantly get this project set up easily on any new computer. From this initial setup, I was able to install Socket.IO and Tone.js, the package we decided to use for sending MIDI instructions.
Additionally, I also experimented with buttons and sending specific inputs from the React Native phone application to the computer. I also looked into how to give user feedback from pressing specific buttons. Currently, there are several packages that give me the ability to send a vibrate command to the phone with a function.
Besides this, I spent the rest of my time preparing for the presentation and making slides. Specifically, making the block diagram for the project gave us all a better understanding of how each component would work and the functionality of our system.
Jeffrey’s Status Report 2
For this week, I focused on solving the problem of not being able to establish a stable connection with the remote from my phone. I tried different sequences for how commands were sent for notifications and in a certain order/timings and were unsuccessful. I also tried to automatically reconnect to the remote after disconnecting by having a listener on disconnect. This also was also not a viable option because the time between disconnect and reconnect was about 400 ms. This disconnect would happen anytime between after 10 – 15 seconds after connecting so connecting to the remote from our phone just didn’t seem like a possible solution anymore.
Because of this, we had the idea to use the laptop as a place for central processing again and use Web Bluetooth since that was the only example that was able to work. To use this data from a front-end application, we needed a central place where one program could interpret both phone input from the user and sensor data from the Gear VR. To solve this problem, we decided to restructure the architecture by having a Flask and Socket server receive data. To connect the remote to this server, data was still being streamed to a front-end web application. However, once this data is received, it is instantly socketed over to Flask by using Socket.IO. For the phone, I installed Socket.IO in React and was able to use the phone as a client and send messages to the server. One thing is that the phone and laptop must be connected to the same network.
Jeffrey’s Status Report 1
For this past week, I attempted to understand how we would connect to the Gear VR remote controller. We had several options to consider that each had specific tradeoffs. The controller could either be connected to the laptop and have sensor data be streamed there or we could have the controller stream data directly to the phone and eliminate the middle man (laptop). Initially from our research, we found someone that was able to successfully connect to the controller to a laptop. However, this was through the Web Bluetooth API and at the time seemed restricting since we would have to make our application on the web. For this reason, Michael decided to tackle the task of trying to connect the VR remote to a python program so that we would have access to this data from within python.
I focused on a different approach by trying to figure out how to connect the remote to the phone directly without having a laptop involved. In this case, the remote would act as the Peripheral and the phone would act as the Central instead of the laptop. We considered this approach because it would be a much more user-friendly experience to only have 2 components to use our application instead of having 3.
I initially started by looking into ways to develop for the phone and found React Native to be the most compatible and easy way to develop for either iPhone or Android. I started by looking into the best platforms to develop with React Native and found Expo.io. However, after trying to install the Bluetooth4 packages, I realized they were not compatible so instead decided to build a React Native application from scratch. After setting up the project, I tried two different Bluetooth packages: react-native-ble-manager and react-native-ble-plx. For react-native-ble-plx, I was able to successfully connect to the Gear VR but was unable to send notifications. I then tried the other package and was able to successfully connect and receive sensor data but was unable to establish a stable connection.