Tushaar’s Status Report for 12/9/2023

This week, I worked on 4 main tasks:

  1. Fixing a firmware bug with the internal timer overflowing
  2. Changing the LED pattern while the system is idling to change colors
  3. Working on the final presentation
  4. Working on the final poster

When I was testing with Owen, we ran into a really strange bug where the guitar would zoom through songs in performance mode about 50 minutes after we rebooted. Owen suggested it could be the microseconds timer overflowing. We stored the microseconds value in a signed long (which is 4 bytes on the Teensy4.1). This gave 31 “data” bits (excluding the sign bit).  After doing the math,

(2^31 / (60*10^6)) = 36 minutes

I realized overflow was likely the problem. After changing calls to the micros() function with call to millis(), which would overflow at roughly 30*1000 minutes, the system was stable for over an hour.

Since the core functionality of the firmware was finished, I started working on more cosmetic things. I helped Owen change the LED pattern in the WIAT_FOR_START state to oscillate between orange and green. This also served as a “heartbeat” for us to know the system was still active.

Lastly, I worked on documenting the project in the final presentation and poster.

Owen’s Status Report for 12/9/2023

This week I mainly worked on setting up the firmware to take in a metronome volume in the MIDI file. This involved modifying Tushaar’s MIDI file parsing code to take in an additional parameter at the beginning of the file. I then transformed the 0-10 volume provided by the Pi into a PWM value to provide to the buzzer and then passed this into the metronome functions I wrote last week.

I also worked on downloading various MIDI files and uploading them to the system. This was done to verify that the system can properly handle numerous different MIDI files. This also allowed us to build up a library of songs for people to play during the demo.

While Ashwin was working on the statistics collection, I play tested the various songs and generated data for him to display. This also allowed us to verify that the firmware fix Tushaar implemented earlier in the week was functional. The issue was that after around 40 minutes various system values would overflow, since ~36 minutes corresponds to approximately 2^31 us. We experienced no issues with the system.

Additionally, I worked on making the ‘in waiting’ LED pattern on the guitar slightly more dynamic.

In order to more easily show off the Pi-Hat and Teensy electronics, I finished soldering our backup Pi-Hat board and assembled it with my personal RPI 4B and Teensy 4.1. This will prevent us from needing to take the electronics out of the guitar during the demo.

My final main tasks for this week were working on the poster, which consisted of taking photos of the assembled system and taking the electronics out of the system for imaging.

Progress is on schedule and future work only consists of final preparations for the demo and working on the final video and report.

Team Status Report for 12/9/2023

Unit testing throughout semester:

Strum Detection Testing:
In order to detect strums, we initially planned to use an audio-based approach. However, after Owen assembled the system and tested it, he found that the system was quite slow to respond, had an accuracy well below the 99% target, and was too sensitive to external noise. We found that for a beginner that will accidentally strike strings while moving their fingers or cause strings to chatter while playing, this method of detection would pick up on these noises and trigger a false positive strum.
We created a pick with an electrode and found that this method was far more accurate and was less intrusive than we originally thought, so we pursued this method.

Fretboard PCB Testing:
The fretboard PCBs were tested using a RPi Pico hooked up to a perfboard, as shown below.
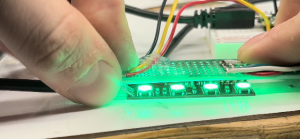
The Pico would provide the D-flip-flop various inputs and would analyze the output of the D-flip-flop. These inputs included things such as having the inputs rise at the same time, rising with varying delays, etc. The results of the tests were outputted on the LEDs on the PCB, where a green indicated a pass on all tests. This unit testing discovered a soldering flaw on one of the fretboard PCBs

Once soldered together the flip flops were tested by providing a signal that would shift a single “1” down the line of flip flops and probing the output of each flip flop using an oscilloscope. This revealed an issue with our first revision of PCBs, which we believe was due to timing violations caused by propagation time along the connecting wires.  To resolve this, an RC lowpass was added between the output of each flop and the input to the next flop. This served the purpose of delaying the data line signal by around 1us with respect to the clock line. The second revision of PCBs had no issue with this test. The maximum short circuit current from the fret connection to ground was also tested and verified to be below 1mA, allowing us to be confident we would come in under the 1mA current requirement.

Pi Hat PCB Testing:
The Pi Hat was tested using various lab bench tools before ever connecting it to the Teensy or Pi. This consisted of connecting the 5V input to a lab bench power supply and measuring the voltage on the power pins for both the Pi and the Teensy. An E-load was used to draw the maximum expected current from each power pin as well to ensure the power distribution was functional. The logic level conversion was tested by connecting the Teensy, outputting a signal, and using an oscilloscope to measure the input and output to the converter. As expected, the waveforms looked identical other than the voltage being converted from 3.3V to 5V.

“Virtual” Guitar Testing:
While the final product has the virtual guitar synced to the user’s playing on the physical guitar, work on the virtual guitar was started well before the web app was communicating with the firmware/hardware. In order to do this, Ashwin implemented a “simulate strum” button on the web app which allowed for him to test the functionality of the virtual guitar without interacting with hardware at all. When we were ready to integrate the system with the hardware, we simply had to replace the simulate strum button with the signal sent from the Teensy. This made integration fairly straightforward.

Firmware Testing:

Since the full assembly of the guitar was not completed until later in the semester, Tushaar needed to be able to test his systems on other hardware. Within the first week of work, we were able to secure both a Teensy and WS2812 LEDs. This allowed Tushaar to test the functionality of the NeoPixel library for the Teensy, the function of the state machine using interrupts attached to pins, etc. With slight modifications to fix the issues with the Rev 1 fretboard PCBs, Tushaar was also able to test running MIDI files on a set of 5 fretboard PCBs and test the functionality of the finger placement sensing using a mini practice fretboard.

The first thing tested was the functionality of all fretboard finger placement sensors and LEDs. I did this by using Tushaar’s functions and writing some firmware to light up the LED under where the user is pressing. With this in place, I tested each of the 56 possible finger placements 5 times each, and the corresponding LED lit up each time the sensor was tested. This has also been continuously tested as we have been testing various songs on the guitar during integration testing. This means that the control of the LEDs and the reading of the finger placement is 100% accurate.

Firmware-Software Integration Testing:
The communication between the firmware and software consists of UART in each direction and a series of interrupts sent from the Pi to the Teensy on GPIO lines. We tested both forms of communication from the Pi to the Teensy fairly early in the semester by sending a MIDI file and verifying the byte count sent and received. Tushaar was also able to use the interrupts sent by the Pi to control the state machine. With this tested, the firmware and software were developed independently and were able to be easily integrated later in the semester.

Assembled Fretboard Testing:
After attaching all the fretboard PCBs to the guitar, Owen used a RPi Pico to control the fretboard LEDs. This allowed us to verify the functionality of all the LEDs on the system. Owen also once again used an RPi to send a series of signals to the D-flip-flops and used an oscilloscope to verify that each fret was driven high at the proper time.

System Testing

More details on system testing can be found in Owen’s report for 12/2/2023.

Current Through User:

Our requirements state that this must be below 1mA, which is why we implemented a 3.3kOhm series resistor for each fret. Testing was performed with a lab-bench ammeter capable of 0.01uA precision. The average short circuit (assuming the user is a 0 Ohm short) was 5.37uA. This dropped to approximately 0.80uA when put through various individuals. This is over 1000-fold below our target average current, so this test was a success. Average current is so low because the fret sensors are only sampled for a handful of microseconds, and the full firmware loop is on the order of milliseconds. A 47Ohm series shunt resistor and an oscilloscope were used to measure the peak short circuit current as 0.762mA, which lasts for 10us. This is ensured to be below 1mA by the series 3.3kOhm resistor and by a ~0.5V voltage drop on a diode.

By modifying Tushaar’s firmware with code to time the main loop, we were able to find that the system’s main loop time was 1555+-10us for both system modes (training & performance). This loop time directly corresponds to an LED refresh rate of 1555us, or 640Hz.

Strum to LED update delay was determined using an oscilloscope set to trigger on a strum. This was done by probing the string the pick struck (while the pick was at ~3.3V minus a diode drop) and triggering on a falling edge, meaning the pick has left the string. Owen then probed the LED data line and determined that there is a 1850us delay between the strum and when the final LED on the fretboard receives its data.

Current consumption was measured for each component. The results were:
Pi: 0.45A
Teensy + Fretboard flip flops: 0.12A
LED current at 1/2 brightness rainbow*: 0.39A

We found that the Pi drew far less current than we planned for, meaning the LEDs are able to be run at maximum brightness if desired. However, we found that maximum brightness was too bright for most users.

Strum rate was tested by strumming each string 200 times to the beat of a metronome and using the Teensy to count strums. I was able to strum up to 300BPM before strums began to be dropped (requirement was 200)

Buzzer audio level was 75 dB at the average user position

System battery life was tested while we were performing debugging of the web app (all systems were verified to be drawing nominal current despite the work occurring on the webapp). We found we were able to achieve around 3.5 hours of battery life without overdischarging the battery.

One thing discovered during this test was that after around 40 minutes, the firmware would begin acting strange. Owen and Tushaar were able to identify the issue as an overflow of the micros() function. Tushaar was able to resolve this issue by switching to the millis() function for determining note timing, which still provides more than enough timing accuracy.

User Testing:
In order to verify that we were meeting use case requirements, we tested the system on a handful of people with no guitar experience. We had the users play “Twinkle Twinkle Little Star” a handful of times. After interacting with the system, the users were provided with the following questions:

Questions: Points (1-10)
How intuitive is the interface? 8.5
How responsive is the website? 10
How aesthitecially appealing is the website? 7
How unintrusive are the guitar modifications? 10
How visible are the LEDs? 10
Responsive is the guitar? 9
How cohesive is the entire experience? 10

The average values reported by the 5 testers so far are also shown. Overall the feedback was very positive and all the user testers felt the LEDs were effectively able to guide them in the playing of songs. We plan to continue user testing throughout this week.

Weekly Update

There are no risks jeopardizing the project. We have removed the scales feature from our target goals. While this likely would not have been difficult to integrate, we believe that the current system provides more than enough functionality for a beginner to get started with playing songs. No changes have occurred to the team schedule.

The main work this week was on fixing some minor issues with the web interface and adding statistics to the web app. We also added volume control for the metronome via the web app and worked on uploading numerous songs to the web app for demoing.

Most work this week was focused on the final presentation, poster, and prep for the demo.
Tushaar’s Status Report for 12/2/2023

Since last update, I have nearly polished the embedded software and nearly done integrating wish Ashwin. I  finished the performance mode, which involved continuously lighting LEDs on and off, and determining the user’s note accuracy as well as timing accuracy. I also compute  accuracy feedback in training mode. I can send these over UART to Ashwin, and he can successfully receive it.

We ran into issues with the python webapp inconsistently receving the statistics. We realized this was due to imporper use of the Teensy and Python serial API. On the Teensy side, we discovered writes with the “.write()” method only send a single byte or string, not an integer (it will cast to a byte). Furthermore, the result of “.print()” if buffered until a newline is sent, even for the HWSerial interface (I though it was just like that for regular Serial). On the Python side, I idenfiied and fixed issues with imporperly parsing the bytes from the Teensy.

Besides the file length, Ashwin added tempo and playing mode information to the preamble of the notes file he sends me. I am able to correctly parse this and have it affect the User Experience’s opertaion. Thus, we don’t need to hardcode the user experience mode; they user can select it from the website and the Teesny will act accordingly.

We also ran into issues with the Teensy seemingly freezing (it would not appear to react to signals from the RPi) when we tried to send it a song after the first send. After drawing out the signals on a whiteboard and adding strong assertions to narrow down the issue, I realized the source of the problem was improperly sending digital inputs to the state machine.

I was only reading 1 digital pin for each state when I shoudl be reading all 3, since some states can transition to other states based on more than 1 interrupt. After making this change, we didn’t observe the Teensy freeze.

The main task left is working out a bug with some LEDs never turning off in certina songs (we suspect this is due to chords where simulatneous notes don’t leave any time inbetween the constituent notes to detect whe nthe note is about to end before the next one starts).

Owen’s Status Report for 12/2/2023

This week, I worked on a handful of tasks. These included:

  • Testing various system latencies and metrics
  • Finishing up some mechanical work on the guitar
  • Working on fixing the Pi’s reading of the Teensy’s UART data
  • Implementing the buzzer on the Teensy
  • Helped with determining the tempo of songs in the Pi software

System Testing:

The first thing tested was the functionality of all fretboard finger placement sensors and LEDs. I did this by using Tushaar’s functions and writing some firmware to light up the LED under where the user is pressing. With this in place, I tested each of the 56 possible finger placements 5 times each, and the corresponding LED lit up each time the sensor was tested. This has also been continuously tested as we have been testing various songs on the guitar during integration testing. This means that the control of the LEDs and the reading of the finger placement is 100% accurate.

The next requirement I tested was the current that can pass through the user. Our requirements state that this must be below 1mA, which is why we implemented a 3.3kOhm series resistor. This value was verified with a 0.1mA accurate multimeter before continuing with system construction and testing, but this week I performed formal testing with lab-bench equipment capable of 0.01uA accuracy. The average short circuit (assuming the user is a 0 Ohm short) was 5.37uA. This dropped to approximately 0.80uA when put through various individuals. This is over 1000-fold below our target average current, so this test was a success. Average current is so low because the fret sensors are only sampled for a handful of microseconds, and the full firmware loop is on the order of milliseconds. Using a series shunt resistor and an oscilloscope I measured the peak short circuit current to be 0.762mA, which lasts for 10us. This is ensured to be below 1mA by the series 3.3kOhm resistor and by a ~0.5V voltage drop on a diode.

By modifying Tushaar’s firmware with code to time the main loop, I was able to find that the system’s main loop time was 1555+-10us for both system modes. The similarity is because by almost all of the loop time is spent reading from the fretboard sensors and writing to the LEDs, which both modes do identically. This loop time directly corresponds to an LED refresh rate of 1555us, or 640Hz. This exceeds our requirement of 50Hz.

Strum to LED update delay was determined using an oscilloscope. I set the oscilloscope to trigger on a strum. This was done by probing the string the pick struck (while the pick was at ~3.3V minus a diode drop) and triggering on a falling edge, meaning the pick has left the string. I then probed the LED data line and determined that there is a 1850us delay between the strum and when the final LED on the fretboard receives its data. One interesting finding is that this is longer than the system loop time. I did observe that the system loop actually alternated between 1ms and 2ms, so I believe that 1. The NeoPixel library does not block on the functions used to write to the LEDs and 2. the library occasionally slows down the loop to 2ms to clear its output buffer. Nevertheless, the LEDs update far more frequently than our requirements, to the point where we are at the absolute limit of how frequently a strip of 60 NeoPixels can update.

Current consumption was measured for each component. The results were:
Pi: 0.45A
Teensy + Fretboard flip flops: 0.12A
LED current at 1/2 brightness rainbow*: 0.39A

The Pi draws far less current than expected, so we could run the LEDs at max brightness, but from our testing, this is too bright anyways.
*We color code each string, so this test was performed by lighting up each LED to its corresponding color

Strum rate was tested by strumming each string 200 times to the beat of a metronome and using the Teensy to count strums. I was able to strum up to 300BPM before strums began to be dropped (requirement was 200)

Buzzer audio level was 75 dB at the average user position

System battery life was ~3.5 hours, but this can be extended to around 4 hours. I take very good care of my LiPo batteries though and 3.5 hours corresponded to as discharged as I was willing to go for a test.

Metronome:
The main other task I worked on was implementing the buzzer firmware to alleviate some work from Tushaar. This involved doing some things with arduino that I was relatively unfamiliar with, such as working with structs, creating .h files, etc. I ultimately was able to create an easy to use function that takes in a BPM, which I had Tushaar provide via the data received over UART. I also worked on reading in the BPM from the MIDI file on the software, although we ultimately ended up going with Ashwin’s approach since my function failed on a select handful of MIDI files.

I am currently on schedule and have no hardware tasks remaining besides testing strum to webapp latency, which our current estimates put right around 250ms.

For next week I will be mainly working on the final poster, prepping materials for the demo, and working on the final report. I will also continue to offer firmware/software debugging help as needed

Team Status Report for 12/2/2023

Currently, the project is in decent shape. No significant risks are jeopardizing the project. The main tasks left are displaying the statistics and making the system slightly more user-friendly and less buggy

No changes have been made to the overall system block diagram and the main progress this week has been finalizing some integration and adding minor features. Owen chose to rephrase the strum rate requirement to be “200 strums / minute” instead of “100BPM 1/8th notes” for clarity, but the required value did not change. We also slightly changed the LED current requirement from being at 1/2 brightness white to 1/2 brightness for the standard color on each string. We color-code the strings rather than setting them to white, so this is a more meaningful requirement

The main team progress this week was working on the communication between the Teensy and the Pi. Pi to Teensy communication has been in place for a while, but the communication from the Teensy to the Pi, and then to the web app, proved to be more complex. Tushaar implemented the UART communication on the Teensy side, and Ashwin implemented the communication from the Pi to the webapp. Owen and Ashwin worked together to read in the UART data on the Pi. This took quite a while to make work consistently, but the communication is now reliable and quite rapid.

The data sent back consists of a single integer, which contains whether the user played the note correctly or not and how incorrect their timing was. This information can be used to update the webapp graphic and will eventually be used to provide statistics as well.

A video of the communication to the webapp in action can be seen here: https://youtu.be/G2P06dhhFrA 

We also finally implemented the communication of the system state from the Pi to the Teensy. Previously, the system had to be switched between “performance” and “training” mode by modifying the firmware on the Teensy. We have now implemented a selection on the webapp for the mode. This data is included in the UART communication to the Teensy. The Teensy then uses this information to set the mode.

Finally, we worked on implementing the buzzer/metronome, which was the final major system requirement that we had not started on at all. This turned out to be relatively quick on the firmware end and was not too difficult to implement on the Pi. The Pi uses the MIDI file to find the song tempo and sends this info to the Teensy, which then sets the buzzer to this tempo.

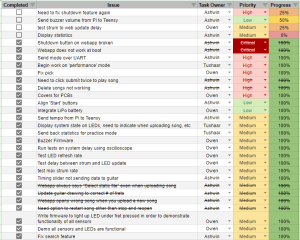
No changes in the schedule have been made. As indicated on our schedule, we are mainly working on integration and the final project documents. We have also been maintaining a list of bugs/to-dos in addition to the Gantt chart that helps us quickly sort in-progress tasks and take care of them

Currently the main tasks remaining are fixing minor bugs and working on the final presentation, video, and report, as well as prepping for the demo

Ashwin’s Status Report for 12/2/2023

This week I prioritized my time on integrating the Raspberry Pi further with the Teensy. This mainly included receiving feedback from the guitar and forwarding it to the website.
In order to implement this feature seamlessly from the front end, I took a top-down approach to transferring information between the systems. The main issue at focus was properly synchronizing the physical guitar’s state to the virtual one on the website. So to ensure the website always stays up-to-date, I added a javascript function that constantly requests feedback from the server once every 100 milliseconds. The feedback returned includes whether or not the player strummed correctly and a timestamp of the strum. If a note is correctly strummed, then the website updates the virtual guitar to stay in sync with the guitar and teensy. For the Raspberry Pi to retrieve feedback from the Teensy, it constantly reads from the Uart port for packets that include feedback from the user’s playing. We removed the blocking feature for reading from the Uart port as this incurred a significant time penalty for the website’s updates. Instead we opted for immediately returning even if there is nothing to read. This was the website can send multiple requests for feedback every second without waiting for actual user input. In addition to receveing information from the Teensy, I have reworked to the file transmission and now the Pi now sends even more metadata to the Teensy including the tempo for the speaker metronome, the volume for the metronome, and the playing mode.
For next week I would like to implement a way for the user to view the statistics gathered from their playing data. Additionally, I am looking to implement the “scales” mode that just shows the user all the notes of a particular scale.

Team Status Report for 11/18/2023

The biggest risk that we are currently facing is the ambiguity over the time synchronization between the website and the guitar. Since both of them are displaying to the user the song at the same time, it is crucial to have them synced up to a reasonable amount. Thankfully, based on early testing, the delay between when the website inputs a query and when the backend receives the query over local wifi is small enough for the user to not notice. However, if the wifi gets slow and causes the connection delay to increase, then it is possible that the website could become completely detached from the guitar during the song. So we decided that the guitar timing information will be calculated on the teensy itself instead of sending pulses to the webpage so that at least the statistics will be correct for the users playing even if the website is delayed.

Progress is also on schedule with the Gantt charts presented during our Interim Demo.

This week our team made further progress in the integration of the whole super fret system. While Ashwin and Tushaar worked further on making the Raspberry Pi cooperate with the Teesy via Uart communication, Owen managed to carve out all the necessary channels in the fretboard of the bass guitar and applied all the PCBs.

Our team’s growth this semester has been evident in the strategic delegation of tasks and clear role understanding. Ashwin took charge of software development, Tushaar led firmware efforts, and Owen spearheaded hardware tasks. This division allowed us to capitalize on individual strengths and expertise. Effective communication was maintained through consistent updates and discussions on Slack, ensuring that everyone was informed and aligned with the project’s progress. Trust in each team member’s abilities enabled a collaborative environment, allowing us to efficiently tackle challenges and achieve our goals.

As a team, we have all learned how to better communicate the needs of our individual components of the project. We have learned that although we can each develop our components on our own, without constant communication, there will be issues with integration and ensuring that everyone has the same goals for the project. For example, Tushaar and Ashwin have had to be in constant communication to ensure that they both have the same views for each mode of the guitar. In the middle of the semester, we realized that we each had our own views for the guitar, so it was important for us to up our communication as a team and discuss our visions for the final product

Ashwin’s Status Report for 11/18/2023

This week I focused the majority of my time on the integration of the Raspberry Pi and the Teensy microcontroller. This involved further development of the communication standard between the two devices. Initially, I tried to use the pretty midi python library to aid in the processing and transmission of the midi file. The processing itself included adjusting the timing of the notes played based on the speed the user wished to play the file at, and stripping the file of any unplayed instruments. However, after further inspection, we noticed that the library took too many liberties with the byte representation of the file making it difficult for the teensy to parse its data. So we decided to create our own format for sending the necessary data. We decided on this protocol:

Preamble: first 4 bytes of file, contains length of file including length bytes
Each entry represents a note and is 5 bytes:
First 4 bytes: start time of note in millis
Last byte: bits 0-3 are fret, 4-5 are string

Using these rules, the teensy will be able to parse the data with much less complexity. This method was implemented on the Raspberry Pi using Uart.

This progress on the Uart communication puts me on track for the schedule we decided. For the next week, I want to continue to work on the communication between the pi and the teensy. Now the teensy should send back information to the pi about the user input. In order to implement this, we will need to define another protocol over Uart to send packets of information containing the time the user played a strum and whether the note was correct or not. In the future the Pi will use this data to generate statistics of the user’s playing and display on the website.

Owen’s Status Update for 11/18/2023

This week, I worked on a wide variety of tasks. These tasks included:

  • A board/program to test the assembled PCBs
  • Redesigning 3D printed covers for the fretboard PCBs
  • Carving out the channels in the guitar fretboard
  • Connecting the fretboard PCBs together
  • Connecting the Pi Hat PCB to the guitar strings, pick, and fretboard PCBs
  • Testing the hardware with Tushaar
  • Designing a 3D printed cover to protect the wires on the bottom of the guitar


Starting with the testing of the PCBs, this was done since the new PCBs featured the fix required for the D-flip-flops.

Shown above is a perfboard with header pins mounted to it. In the absence of proper pogo pins, I angled the headers at around 45 degrees to allow the pins to firmly contact the fretboard PCB. A Raspberry Pi Pico ran a series of tests on the D-flip-flops, providing a series of clock and data inputs and reading the output. The results of the tests were then displayed on the fretboard LEDs, which doubled as a verification of the LED functionality. Not including the time required to assemble the tester, this allowed for all of the boards to be tested in only around 5 minutes. The tester did properly find one soldering issue on a board, likely saving quite a bit of time worth of debugging if we had proceeded without testing.


While preparing to mount the boards, I also designed a cover for the PCBs. Our previous plan was to conformal coat the boards, but that would mean the user is still pressing onto an uneven surface. With a cover for the PCB, this prevents the user from touching the electronics and gives them a flat surface to press on. The design for the covers is shown above

Once the boards were assembled and ready, I began carving out the channels in the guitar. This was ultimately done with files and a dremel and was quite time-consuming. Tushaar was able to help out and do around 6-7 of the channels while I began soldering the fretboard PCBs together. There were a handful of mishaps while performing the carving. These included knocking off the guitar nut (the part that guides the strings at the top of the guitar) and breaking off a fret. Both of these were able to be fixed with very little evidence of repair.


To connect the PCBs together, I used 30 AWG wire-wrap wire and 26 AWG silicone wire. The D-flip-flop connections were done with thee 30 AWG wire due to the low current required. While not entirely necessary, the 4 wires between each fret were bundled together with heatshrink. These connections are shown above. The LED connections were done with 26 AWG wire due the higher current required.

To connect the Pi to the strings, pick, and fretboard PCBs, I used numerous banana plugs. Banana plugs were likely not the best choice of connector since they need to be done individually, but I did not have any JST connectors on hand. These banana connectors enable the rapid connection of the Pi/Pi-Hat to the rest of the guitar and enable it to be removed for repairs if needed. Holes were drilled in strategic locations around the guitar to route wires through, allowing for external wiring to be minimized.

Once the guitar was assembled, Tushaar and I used Ashwin’s webapp to upload songs to the Teensy and verify the functionality of all the LEDs and the finger placement sensors. We tested a variety of MIDI files and were able to get the firmware to a point where the training mode is almost complete from a hardware and firmware perspective.

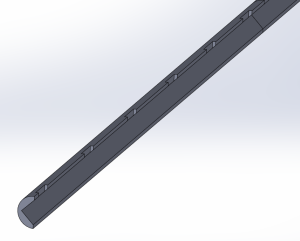
One issue we did have was with the wires along the bottom of the guitar being sensitive to being moved, which is not ideal considering the user will be moving their hands up and down the guitar fretboard. We had this disconnect one of the 30 AWG wire connections and break the fret sensors. To resolve this, I designed a 3D printed device to cover the wires and protect them, with the added benefit of making the guitar more comfortable. The CAD model for this is shown below

This was then attached to the guitar, as shown below

So far this has proven quite effective at protecting the wires on the guitar and cleaning up the overall look of the guitar.

I am currently on schedule and my main tasks for next week will be performing the required hardware testing and verification and installing the PCB covers. We have held off on the covers while verifying functionality since placing the covers on will make repairs significantly more difficult.

My main deliverables for next week will be results for some of the hardware testing and the guitar fret covers installed. I also may work on some stretch goals, including adding the option to battery power the device. As discussed previously, for safety reasons we have no intention of implementing a charging circuit for an internal battery. Charging is when lithium batteries are most likely to combust, so removing charging from the equation makes battery power much safer. This would mainly be a quality-of-life feature for demoing, as it would remove the need to be tethered to an outlet. When testing though, Tushaar and I did not have any problems with the wall adapter, so this remains a perfectly viable solution for powering the device.