Tushaar’s Status Report for 12/9/2023

This week, I worked on 4 main tasks:

  1. Fixing a firmware bug with the internal timer overflowing
  2. Changing the LED pattern while the system is idling to change colors
  3. Working on the final presentation
  4. Working on the final poster

When I was testing with Owen, we ran into a really strange bug where the guitar would zoom through songs in performance mode about 50 minutes after we rebooted. Owen suggested it could be the microseconds timer overflowing. We stored the microseconds value in a signed long (which is 4 bytes on the Teensy4.1). This gave 31 “data” bits (excluding the sign bit).  After doing the math,

(2^31 / (60*10^6)) = 36 minutes

I realized overflow was likely the problem. After changing calls to the micros() function with call to millis(), which would overflow at roughly 30*1000 minutes, the system was stable for over an hour.

Since the core functionality of the firmware was finished, I started working on more cosmetic things. I helped Owen change the LED pattern in the WIAT_FOR_START state to oscillate between orange and green. This also served as a “heartbeat” for us to know the system was still active.

Lastly, I worked on documenting the project in the final presentation and poster.

Tushaar’s Status Report for 12/2/2023

Since last update, I have nearly polished the embedded software and nearly done integrating wish Ashwin. I  finished the performance mode, which involved continuously lighting LEDs on and off, and determining the user’s note accuracy as well as timing accuracy. I also compute  accuracy feedback in training mode. I can send these over UART to Ashwin, and he can successfully receive it.

We ran into issues with the python webapp inconsistently receving the statistics. We realized this was due to imporper use of the Teensy and Python serial API. On the Teensy side, we discovered writes with the “.write()” method only send a single byte or string, not an integer (it will cast to a byte). Furthermore, the result of “.print()” if buffered until a newline is sent, even for the HWSerial interface (I though it was just like that for regular Serial). On the Python side, I idenfiied and fixed issues with imporperly parsing the bytes from the Teensy.

Besides the file length, Ashwin added tempo and playing mode information to the preamble of the notes file he sends me. I am able to correctly parse this and have it affect the User Experience’s opertaion. Thus, we don’t need to hardcode the user experience mode; they user can select it from the website and the Teesny will act accordingly.

We also ran into issues with the Teensy seemingly freezing (it would not appear to react to signals from the RPi) when we tried to send it a song after the first send. After drawing out the signals on a whiteboard and adding strong assertions to narrow down the issue, I realized the source of the problem was improperly sending digital inputs to the state machine.

I was only reading 1 digital pin for each state when I shoudl be reading all 3, since some states can transition to other states based on more than 1 interrupt. After making this change, we didn’t observe the Teensy freeze.

The main task left is working out a bug with some LEDs never turning off in certina songs (we suspect this is due to chords where simulatneous notes don’t leave any time inbetween the constituent notes to detect whe nthe note is about to end before the next one starts).

Tushaar’s Status Report for 11/18/2023

This week, I worked on 2 main tasks:

  1. Integrating the embedded system with Ashwin’s RPi and web app. We uncovered a few quirks of the User Interface.
  2. Helped Owen integrate the final fretboard PCBs onto the real guitar

I worked with Ashwin and Owen to integrate the embedded electronics as the “glue” between the web app and the electronics. I worked with Ashwin to flesh out how the restart, start, and pause signals would work, and it worked with the Pi and Teeny. We also uncovered an issue with the MIDI library Ashwin was using to parse the MIDI file, creating different outputs than my existing MIDI parsing code on the embedded side was expecting. After realizing the Teensy doesn’t care about the MIDI file, it just the locations and timing of notes on the fretboard, we transitioned from having the Pi send a MIDI file to instead sending a list of times and (fret, string) coordinates of where along the fretboard a note should be played. This also eliminated the need for the Teensy to run Ashwin’s note-to-fretboard coordinate algorithm on the Teensy. This change has been implemented, and the RPi can successfully send the coordinate and timing information over UART  to the Teensy. This works from start to end: a user can upload a MIDI file to the web app, and the RPi can convert that to a list of coordinates, which the Teensy can successfully receive and parse. Overall, this change resulted in significant simplification of the embedded code.  Furthermore, I refactored the embedded code to be in different files to organize it and make it easier to change and edit.

I also removed the assertion that would fail when the user was done with a song in Training mode, becuase it was unnecessary. Now, the system correctly loops back to the beginning WAIT_FOR_START state once the user experience is done (at least in training mode).

I made the color of LEDs on the fretboards light up with the same color as the notes on the web app:

I started the week by transitioning from having the Teensy4.1 on the breadboard to being on the PiHat PCB and controlling the LEDs and Flip Flops using the PiHat.


Later in the week, I worked with Owen to integrate the final fretboard PCBs on the guitar. I helped Owen carve channels in the guitar’s fretboard to keep the fretboard PCBs recessed:

I also soldered some wires between the PCBs to connect them together:


Now, we can take a MIDI file from the internet, upload it to the web app, and have the Teensy conduct the User Experience in Training mode on the actual guitar with the final fretboard PCBs!


Tushaar’s Status Report for 11/11/2023

This week I worked on several tasks:

  1. Testing and verifying the training mode of the user experience
  2. Integrating more interrupts from the RPi with Ashwin
  3. Modifying the state machine
  4. Starting to move from the breadboard to the more final Pi Hat PCB

I tested the training mode in the user experience, and I showed it off working correctly during the 3 demos this week. This is significant because it is an MVP for the embedded system. The only issue I ran into was an assertion mysteriously failing when the training mode finished. I will need to debug this.

Now that I am starting to integrate my embedded software with the RPi, I worked more closely with Ashwin and discussed, in detail, how we expect the user to use the system and what that means for communication between the RPi and Teensy. We realized a single pause interrupt can pause the system (when the pause signal rises) and resume (by checking when the pause signal falls). Ashwin implemented the pause interrupt on the RPi, and we tested to ensure the Teensy could respond to the interrupt.

We realized some incorrect and missing transitions in my state machine, so I added those in. The main changes were to the PAUSED state:

  1. Adding transitions from WAIT_FOR_STRUM and USER_EXPERIENCE to the initial WAIT_TO_START state upon receiving a restart interrupt. Previously, the only way to restart the state machine was to enter the PAUSED state and then transition to the initial state vis a restart interrupt, but this added an unnecessary visit to the PAUSED state; the state machine should reset to the initial state from any state upon receiving the restart interrupt.
  2. Redirecting the transition starting from the PAUSED state and ending in the WAIT_FOR_STRUM state to instead end in the USER_EXPERIENCE state. We realized the previous way involved an unnecessary intermediate state transition, which would interrupt the user experience.
  3. Leaving the paused state based on the resume condition (pause signal falls) instead of based on a strum

This is the state machine before the changes:

After the changes:


Since Owen was able to finish the Pi Har PCB, I could use it to test if it can properly relay signals between the RPi and Teensy. I moved the Teensy from the breadboard to the Pi HAT, changed some pins, and got the Teensy receiving interrupts from the RPi. This is a good step towards integration.

This progress is on track. The main tasks left for me are:

  1.  Testing the continuous part of the user experience
  2. Computing statistics on the user’s performance and sending that to the RPi
  3. Writing code for the buzzer

ABET #6 says … An ability to develop and conduct appropriate experimentation, analyze and interpret data, and use engineering judgment to draw conclusions

Now that you are entering into the verification and validation phase of your project, provide a comprehensive update on what tests you have run or are planning to run.  In particular, how will you analyze the anticipated measured results to verify your contribution to the project meets the engineering design requirements or the use case requirements? 

I plan to write unit tests to verify the embedded software to ensure small modules work correctly. So far, I have been manually testing the interrupts to ensure the state machine works, but this is time-consuming, and having an automated way to test this would be nice.

Also, to verify strum detection and note detection, I plan to strum the guitar several times and have the system count how many times it believed a strum occurred. Same for note detection. On top of what we already mentioned in the design review, I realized there is another important test to run besides testing for the system detecting the correct note – we should also play the wrong note and ensure the system can tell that it is a wrong note. That way, we can test for false positives and false negatives.


Tushaar’s Status Report for 11/4/2023

This past week, I worked on 2 main tasks:

  1. Writing the fretboard & strum detection software
  2. Implementing a first pass at the 2 training modes for the user experience.

After Owen could fix the fret detection hardware with RC filters on the digital lines, I wrote code to sample the fretboard and pick. The involved applying a voltage stimulus to each fret in a serial fashion, reading each of the 4 strings, and repeating 14 times. This whole process takes under 1 millisecond, which is good. The sampling is done every 10ms.

As for strum detection, we decided to use an electrified pick. The PGIO connected to the strings senses a high voltage when the pick contacts the string. This sampling is done every 10ms, and a “strum” is detected when the pick leaves the string (i.e. when the previous “strum-sample” detects the pick on the string but the current sample doesn’t) and it has been sufficiently long (10ms) since the last strum (this is software debouncing). Since the Teensy itself uses a GPIO pin to apply a voltage stimulus to the pick and reads the return signal on the strings with 4 GPIOs, there is no need for having a strum interrupt. So, I removed that interrupt.

After talking as a group, we have determined the user experience should consist of 2 selectable modes:  “TRAINING” and “CONTINUOUS” modes. In TRAINING mode, the system will wait for the user to play the lit-up note before lighting up the following note. Here, the user’s timing in playing the notes is not critical because the point of this mode is to show the user where the notes are, not when to play them. In CONTINUOUS mode, the system will not wait for the user to play a note; instead, it will continue flashing notes on the fretboard at the rate indicated by the MIDI file. The system will keep track of the time between when a note should’ve been played and when it was actually played, and store the difference as a statistic.

The following pictures show the code for the 2 training modes.

TRAINING mode:

CONTINUOUS mode:

Since Owen had to take the hardware to do hardware development with the newly arrived Pi-Hat PCB, I didn’t get a chance to test my code for the 2 user experience modes. But this is okay since I could still write the code, and hopefully, next time we meet, it will just be a debugging session instead of spending time writing the code in the first place.


Overall, I was able to recover from 2 tasks that slipped:

  1. The task “Able to read finger placement sensors on fretboard PCBs” is now finished
  2. The task “Able to read in strum signal” is now finished

Upcoming tasks include testing the 2 user modes and integrating the rest of the interrupts with Ashwin.

Tushaar’s Status Report for 10/28/23

I have finished implementing the state machine and the rest of the interrupts that it will take in. I also tested it with the shift register fret-detection but ran into issues with the fret detection not working. I spent several hours with Owen trying to debug it, and I tried a variety of things to try to rule out software as an issue. One attempt at this was adding delays (using delayMicroseconds() and delay() calls) in between the digitalWrite() calls that controlled the digital clock and data-in signals for the shift register in case they were changing too fast for the DFFs to register the signal. This did not help, and after viewing the signals on a scope and reviewing the code logic carefully, Owen and I decided the software was not the issue.

So, we were pretty sure it was a hardware issue, with the flip flops not propagating the data correctly through the shift register. We had several theories for why this could be:

  1. The hot-plate method of soldering SMD components on the fret PCBs killed the D-Flip-Flop chips.
  2. We were damaging the chips with ESD
  3. We were running into setup/hold time issues
  4. The clock was ringing so much that the digital assumption broke down.

More details are documented in Owen’s status report, but the gist is that we don’t think the issue is 1 or 2. To have less ringing on the clock, I suggested adding an RC delay between the stages to allow for a smoother clock signal, and after Owen tested that out, the results seemed to improve. This may have helped 3 and/or 4.

As for the state machine, I implemented the final 2 interrupts (pause and restart) and the done signal. The “done” signal is asserted when the song finishes – when all notes in the MIDI file are read.

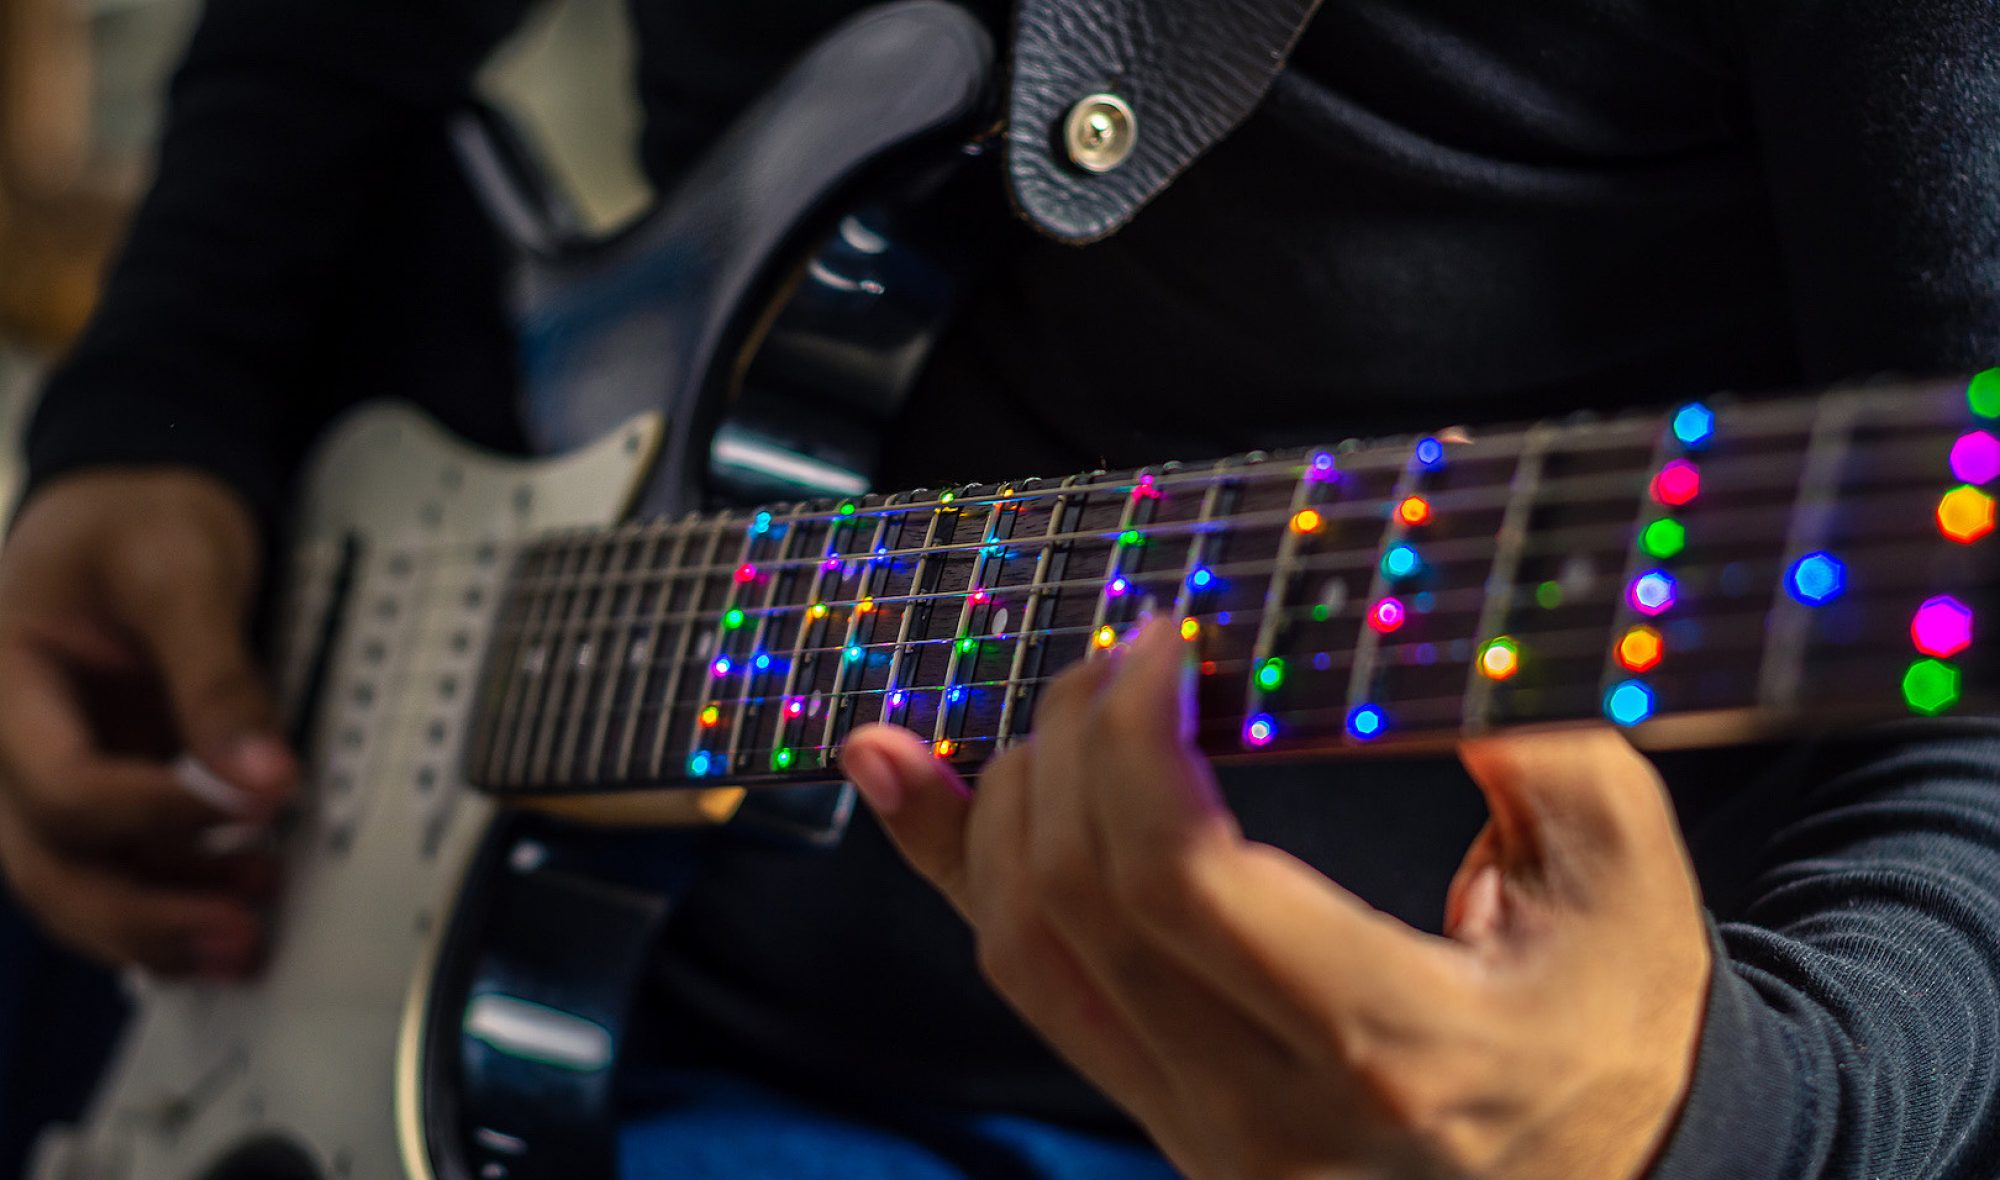
To start integrating the fret detection, I implemented sampling of the fretboard, but as described, I ran into issues with the shift register malfunctioning. The following images show the code for sampling the fretboard:

The clearShiftRegister() function ensures no voltage stimulus on the fretboard before we start reading. This is done by propagating a 0 through the fretboard twice for good measure. loadShiftRegister() loads a single 1 into the shift register, which is later propagated through the DFFs. The sampleFrets() method calls the previous 2 and does the “shifting” of the shift register by pulsing the clock and reading the GPIO pins connected to the strings (this is another task that I implemented this week). sampleFrets() is called periodically,  and when the “sample” contains an interesting value (a string is pressed down on a fret), the state machine prints a message for debugging.


This progress is on track. Despite the hardware side of the fret detection keeps slipping, the software part is back on track after slipping last week. Going forward, we must build confidence in the RC delay solution or pivot away from a shift register and use 14 individual GPIOs to provide electrical stimuli to the frets.

Next week, I will need to work on the 2 different user modes – “training” mode, where the system waits for the user to play a note before moving onto the next note, and “continuous” mode, where the system keeps flashing LEDs according to the timing set in the MIDI file even if the user can’t keep up. I have also realized that the time specified in the MIDI file for holding a note is meaningless for a guitar because there isn’t a concept of “holding” a note for a duration on a guitar. Thus, the timing I care about is the duration from starting a note to starting the following note, as opposed to knowing both the duration from starting a note to ending it and the duration between ending a note and starting the next note. This gives more clarify on how I will implement the 2 different playing modes.

Tushaar’s Status Report for 10/21/23

Since the last update, I was able to:

  1. Continue implementing the state machine and integrate it with the MIDI file receiving and parsing code
  2. Implement the necessary interrupts for the state transitions
  3. Verify that the interrupts trigger the state transitions using an analog circuit

After talking with the teammates more about how the user experience will work, we decided the RPI will do light parsing of the MIDI file (to strip out unnecessary information that the Teensy doesn’t care about), so the Teesny only needs to parse the note and timing info.

Since the last update, I included a much more final version of the state machine, including support for the “file_transmission”  and “pause” interrupts, which will eventually originate from the RPi. Implementing these 2 interrupts was challenging due to being rusty with the Arduino ecosystem, but those 2 alone account for half of all the state transitions. The next interrupts will be easier given that I already know how to do this now.

The above image shows the 2 interrupts I implemented and how they affect the state machine. The following image shows how code is executed in the main run loop based on the state stored in the FSM:

This picture also shows that I have integrated the MIDI file parsing code into the body of the state machine. This unifies 2 previously disparate bits of code.

Since I didn’t have easy access to the RPi (Ashwin is using it for his development), I had to figure out a way to mimic interrupts from the RPI. Since plugging a wire in and out of a breadboard rail will give multiple edges, it was not feasible to generate clean interrupts. Instead, I resorted to a purely analog way of generating the interrupt. By taking the signal that would otherwise contain multiple edges and feeding it through a simple RC low pass filter with a time constant on the order of 1 millisecond (10k resistor + 100nF capacitor), I can achieve “analog debouncing.”

The following picture shows a bank of such RC filters so I can mimic multiple interrupts. The “paper flags” indicate the name of the interrupt being simulated. The yellow wires that arch over are plugged into and out of the breadboard power rails to create rising and falling edges. Pull-down resistors (not pictured) pull the interrupt pins down to 0V so they are not floating when the yellow wires are not connected to either logic level.


This progress is on track as I finalize the structure and implementation of the code. The next big tasks are verifying fret detection (this has actually slipped) and creating the user experience modes (scale + song).


As you’ve now established a set of sub-systems necessary to implement your project, what new tools are you looking into learning so you are able to accomplish your planned tasks?

As I integrate more with Ashwin’s web-app, I might need to learn about his code. This may involve learning web-app frameworks in Python (something I have never done before) so I can understand what his code does and how it can easily input the data that will flow between it and the Teensy. Also, since we decided to offload some parsing onto the RPI, I may need to learn about low-lever byte manipulation libraries in Python, so I can communicate with Ashwin about how he can transition my existing C++ parsing code to Python. I don’t have much experience with such python libraries, so that will be new.

Tushaar’s Status Report for 10/7/23

This week, I accomplished 4 main tasks:

  1. Rehearsed and presented our design review
  2. Wrote code for the Teensy to parse a MIDI file and light up LEDs according to the rhythm of Twinkle Twinkle Little Star.
  3. Able to get the Teensy to read in a MIDI file from the RPi
  4. Modified the state machine design and did a first pass at implementing it on the Teensy


Able to programmatically parse MIDI file and use it to light up LEDs:


Able to get the Teensy to read in a MIDI file from the RPi over UART:

I implemented an interrupt on the Teensy to look for a signal indicating when it should start listening for bytes making up a MIDI file. I also got the Teensy to read in bytes over UART (Serial channel 2). During testing, I found some interesting behavior:

  1. At 9600 and 19200 baud, the Pi can reliably send a MIDI file to the Teensy:
  2. At 115200 baud, some bytes tend to get lost in the middle. In other words, the Teensy will receive the starting bytes of the file, most of the file’s body, and the end bytes, but the total number of bytes received is less than the file size.  So, some bytes are getting lost in the middle. Somehow, faster baud rates cause bytes to be dropped either at the receiving or sending end.


I modified the state machine and implemented it on the Teensy:

Before:

After:

State Machine code:

I used 2 engineering principles while implementing this week’s tasks:

  1. Making the system modular: By separating the code for the state machine, parsing the MIDI file, handling interrupts, and lighting the LEDs, I could test each function separately. This was especially helpful when developing functionality that would eventually depend on external hardware and sensors that I didn’t have at the moment. For example, the state machine relies on interrupt signals from the Pi. However, by abstracting the state machine into its own class that is updated through a member function, I can avoid having the logic of the state machine strewn across the bodies of several Interrupt Service Routines.
  2. Considering the system as a whole when debugging: When trying to test UART communication from the Pi to the Teensy, the Teensy would not receive any bytes from the RPI. It turns out the RPi was not blocked for the duration that it was transmitting the MIDI file, so it proceeded with its program to prematurely toggle the file_transmission interrupt pin low. This caused the Teensy to think the file was done being sent, even though the RPI hardware was still transmitting the file. By realizing the hardware and software of the RPi operated on different timelines, I realized that adding a delay before toggling the pin low could help the bytes have time to leave the Pi before the interrupt when low. This ended up working.


This week’s progress is on schedule. I closed a task on the Gantt Chart – “Read in song data from Pi”.


Tasks for next week:

  1. Finish the state machine and test it with the rest of the interrupts from the pi
  2. Detect finger placements on hardware that should come in this week.

Tushaar’s Status Report for 9/30/2023

This past week, I worked on 3 main things:

  1. Figuring out how the embedded software will work at a high level (state machine) – this involved knowledge from 18-240 for creating an FSM
  2. Getting started with the electronic hardware (Teensy4.1 and making sure I can individually address the LEDs) – this involved
  3. Figuring out how to parse a MIDI file – this involved lots of binary and hex conversion, a 15-122/18-213/18-240 skill

This is the proposed state machine for the embedded code:

Magenta shows inputs that originate as interrupts set by the RPI (teensy reads the input on its digital pins).

Red are inputs to the FSM originating from other parts of the microcontroller software.


I am able to address the LEDs individually:


I got a MIDI file from the web and manually parsed it according to the MIDI file standard to ensure I understood what we were working with. Here are my notes:

This progress is on schedule. I obtained a sample MIDI file by the time outlined in the Gantt Chart. I also procured a Teensy from Owen by the date we set in the schedule. The schedule says to be able to parse a MIDI file by Oct.8, and I am on track for that. We need to individually address each LED by Oct.15th, and I can already do that (but I will need to revisit this when the PCBs arrive).

Tasks for the next week:

  1. Give the Design Review Presentation
  2. Light up LEDs according to the frequency and timing specified in the MIDI file
  3. Implement a preliminary state machine in the embedded software

Tushaar’s update

I went back and forth with Owen about the strum detection. I have broken  down the embedded effort and identified  4 tasks:

  • LED signaling
  • Reading the frets
  • Detecting strum – this is currently identified as the hardest technical challenge
  • Interfacing with the pi – this will probably be UART