
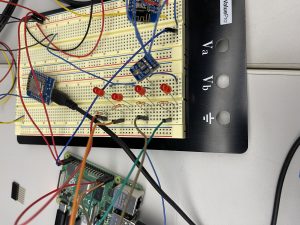
This week I was able to run the source code following the tutorial I found online to allow a user to ultimately control the PIR sensors and microphones. The website contains JavaScript that controls the 4 LED lights on the breadboard which is triggered by events such as a mouse click on the appropriate button or sliding the toggle button. The webserver is started on the Raspberry Pi terminal using node js and is run locally, which allows users to visit the webserver on any device by going visiting the ip address of the Pi on which it is running. Web sockets are also used to establish a connection to the client’s browser which allows the server to then send appropriate data to the specified GPIO pins. At the moment, the GPIO pins are controlling LED pins (as illustrated in the image below) but our final project will entail the LED strips being connected directly to the GPIO pins on the Raspberry Pi.
During our weekly meeting with Professor Yu and our TA, I received feedback saying the webserver portion of the project needs to be better motivated and justified. Currently, the scope of the webserver is just to allow users remote control access to the LED grid. However, in order to address this, I decided to incorporate a feature that will allow users to determine the weight of each sensor (microphone vs PIR) when the Raspberry Pi is deciding which thread count to decrement according to the presence of sensor data.
At the moment I am just incorporating buttons that allows users to specify to the central Hub to ignore data from microphones or PIR sensors. This will be done by using the MQTT protocol. The webserver will instantiate MQTT messages whenever buttons to toggle sensor weights (and turning on the light) are pressed and publish this to the destination of the communicate.py code running on the Raspberry Pi. The central code can then check for which messages are incoming using cases and send a signal to the appropriate thread in control of the LED grid section.
We plan on implementing this using a block signal (sent from the webserver in the event of a button click to turn an LED on) that the central communication code will place onto a queue of messages for the thread to process. If this block signal is seen by the thread, it will stop decrementing the counter for the light switch which turns off when the count is set to 0. Likewise, an unblock signal will be sent if the user turns off the button for the lightswitch which will eventually signal the thread to start decrementing again.