Malavika’s Status Report 12/4

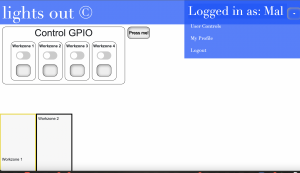
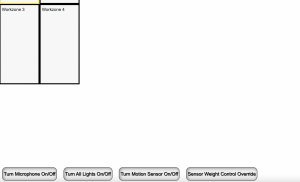
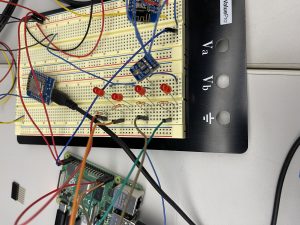
This week was the final presentations and I presented for our group on Monday. I spent most of the week working on the final presentation by putting together slides and meeting with my teammates over Thanksgiving break to outline and fill in our slides. Sunday mostly entailed testing the product in the lab and getting videos for our presentation (as shown below). I got a video of two work stations turning on when controlled from the web server as well as the work zones changing color on the web server’s GUI. I also got a video of the lights on the GUI changing colors when the lights turned on due to sensed movement rather than the web server sending a signal. We also performed testing to illustrate how our product has met our requirements in terms of latency, accuracy, and distance.

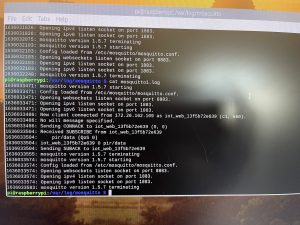
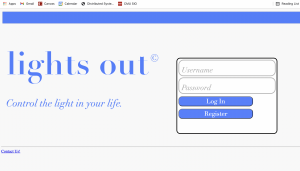
Wednesday entailed of watching more final presentations and filling out the peer review google forms. This week we plan on going into the lab on Wednesday to make our final video, do more testing, and have a full scale MVP to demo the final product. The web server is fully functional at this point and supports all the features previously mentioned such as authentication, controlling the individual lights, sensors, setting the weights of each sensor using user input, displaying the current weights, and a GUI to illustrate to the user exactly which zones are on.

Malavika Status Report 11/20

This week was mostly integrating all parts of our system together and performing tests. The functionality of the website is complete including bidirectional communication which allows the user to turn one or more of the work zones on, turn off all lights, enable a security protection mode to turn off microphones and motion sensors, and control the weighting of the sensors manually.

I added a range input element in the form of a slider which allows users to control the percentage of weight from PIRs to microphones on their own end sending the information to the Raspberry Pi. Diva and I worked together to design the optimal way for the weights to be implemented when being changed in the system. We decided that there will be two base weights (one for the PIR and one for the microphone) which serve as the value by which the counter for each work station increments when a sensor detects a positive value. Multiplying these by the percentages the user sends to the Raspberry Pi when moving the slider will change the increment value, and thereby a PIR sensor will be “worth more” and increase the counter threshold by a larger value than a microphone, should the percentage be specified as so.

We also performed preliminary testing with three base stations in the 18-500 lab. I worked on some of the circuitry for disconnecting and attaching the LED lights to the breadboards to be set up as stations in the four work zones we will have (we currently have three). I also ordered another set of PIR sensors as we were missing a fourth one for our final station.

The rest of the week primarily entails testing all of our edge and use cases and working on the final presentation which I will be presenting. Diva and I spoke with Professor Yu on Wednesday about our testing plans, and he mentioned it would be useful to think about how to best present our testing data. We need to demonstrate the physical range of our sensors and so we plan on having plots that illustrate this with distance from the center of the PIR in feet on the x axis and the value the sensors (logical 0 or 1) on the y axis. We will also perform a similar series of tests for the microphone application.

We also want to make a user survey to conduct behavioral testing of individuals and their preferences and comfort level with data gathering sensors such as microphones and plan on doing this this upcoming week.

Malavika Status Report 11/13/21

This week we had the interim demos and showed the Professors and TAs what we have so far of our MVP. On the webserver side, I was able to illustrate the connection the webserver makes to the Raspberry Pi and also the messages it sends to it. For the later demo, I was able to get bidirectional communication working so the webserver can also read messages sent from the Pi by subscribing to a separate topic especially for incoming communications. The webapp publishes messages to the pir/data/web topic. Interaction can be seen in the images below.

The STATION:ON:1 command was received from the Raspberry Pi — currently, the webapp is simply appending the message to the div by adding the string as an HTML element. Ultimately, these messages will be parsed and this page will change the workzone user graphics accordingly.

Diva and I went into the lab yesterday to finalize our commands between the Pi and the server. We also performed testing for the microphones but could not find an appropriate sensitivity. We accounted for all edge cases such as making sure the pir was on while the mic was off when moving and making no sound (and vice versa).

Malavika Status Report 11/6/21

Continuing from last week’s status report, this week entailed presenting the use cases for the website as well as the layout for the graphical controls interface users can interact with in order to control the lights as well as the sensors in the system. I showed Professor Yu and our TA the vision I had in mind which includes four separate switches on the webserver which can turn each of the four light switches on or off. The controls page will also contain a switch to override the automatic weighting of the PIR and microphone sensors and allows users to turn a knob and specify the relative weights of the sensors when deciding to turn on or off a light.

Professor Yu suggested that when the webserver is not overriding the Raspberry Pi, users should be able to view what the control weight settings currently are in automatic mode to allow them to make a more informed decision when manually setting the sensor weights.

I also established in our weekly meeting that there will be a bidirectional communication channel between the webserver and the Raspberry Pi, which serves as the broker in the Mosquitto communication protocol our system uses.

The rest of the week I was going through the MQTT tutorial to interact from the web server to the Raspberry Pi. I established that the next immediate step was to communicate to the Raspberry Pi, and worry about the other direction later. I got the dummy website I was building through the tutorial to connect with the Raspberry Pi after debugging with Ryan, Diva, and Professor Mukherjee (see images below). While the webserver can establish a connection with the Pi through the websockets protocol on a specific port and subscribe to the pir/data topic, it is unable to actually send messages, which I will debug after the demo. As of now, it is simply a matter of transferring the functionality from the dummy server to the controls user interface on the actual website and editing the current JavaScript to support this action.

For the demo, I will display the website and graphical interface itself as well as its ability to connect to the Raspberry Pi.

Malavika Status Report 10/30/21

This week I was able to run the source code following the tutorial I found online to allow a user to ultimately control the PIR sensors and microphones. The website contains JavaScript that controls the 4 LED lights on the breadboard which is triggered by events such as a mouse click on the appropriate button or sliding the toggle button. The webserver is started on the Raspberry Pi terminal using node js and is run locally, which allows users to visit the webserver on any device by going visiting the ip address of the Pi on which it is running. Web sockets are also used to establish a connection to the client’s browser which allows the server to then send appropriate data to the specified GPIO pins. At the moment, the GPIO pins are controlling LED pins (as illustrated in the image below) but our final project will entail the LED strips being connected directly to the GPIO pins on the Raspberry Pi.

During our weekly meeting with Professor Yu and our TA, I received feedback saying the webserver portion of the project needs to be better motivated and justified. Currently, the scope of the webserver is just to allow users remote control access to the LED grid. However, in order to address this, I decided to incorporate a feature that will allow users to determine the weight of each sensor (microphone vs PIR) when the Raspberry Pi is deciding which thread count to decrement according to the presence of sensor data.

At the moment I am just incorporating buttons that allows users to specify to the central Hub to ignore data from microphones or PIR sensors. This will be done by using the MQTT protocol. The webserver will instantiate MQTT messages whenever buttons to toggle sensor weights (and turning on the light) are pressed and publish this to the destination of the communicate.py code running on the Raspberry Pi. The central code can then check for which messages are incoming using cases and send a signal to the appropriate thread in control of the LED grid section.

We plan on implementing this using a block signal (sent from the webserver in the event of a button click to turn an LED on) that the central communication code will place onto a queue of messages for the thread to process. If this block signal is seen by the thread, it will stop decrementing the counter for the light switch which turns off when the count is set to 0. Likewise, an unblock signal will be sent if the user turns off the button for the lightswitch which will eventually signal the thread to start decrementing again.

Malavika Status Report 10/23/21

This I made progress on the templates and static files for our website (as pictured below) as well the ethics assignment we had. For the ethics assignment, we read two articles, one by a historian, and the other by the ethics guest lecturer we saw in class in Wednesday that highlighted how we should think about the design decisions we make as engineers and how it affects the community in which it exists. We got to consult with other teams on the use case and possible vulnerabilities of our project, and received valuable feedback on how to improve our system to be more ethical and secure.

I also designed the login, register, and main page of the website on which each zone of the LED will be controlled. Using django and OAuth, I implemented the login feature which allows authenticates already existing users using their username and password which is stored in a sqlite database. New users that want to make an account on the Lights Out webapp and connect to their in home device can register a profile on the register page (I still need to use forms to implement this).

Malavika Status Report 10/9/21

This week I did more research into how to have the web server interface with the GPIO pins on the Raspberry Pi. I found a well documented tutorial on how to implement this using Node.js and web sockets. I also began working on the design report after we divided the report between ourselves.

Malavika Status Report 10/2/21

This week I spent time researching ways to have the website interface with the Raspberry Pi to accordingly update the logic for turning on and off each of the four lights. There are options such as PiUi to control the Raspberry desktop from your phone but it doesn’t allow a web server to interact with the GPIO pins on the Pi. Most alternatives I found have the same issue. Most of the week entailed working on finishing and finalizing our design presentation after taking into account modifications and feedback suggested by our Professors, TAs, and other students in the class. I also retrieved our packages with our materials we ordered from Scott Hall.