Demi’s Status Report for 12/4

This week I mainly worked on making the full game work. I added a function for user to press the push button after moving for the AI, to allow our CV to compare two frames between the human player’s move. I added code for the human player to press the button at the start of the game to capture the initial board state. I also made some changes to how the LEDs light up and tested them. After human and computer players’ moves, we check for the game end state. When it is checkmate, all the LEDs light up in the color of the winner of the game, either red or blue. I also unified the paths for the captured and cropped images. There also was an issue with our new webcam setup and image orientation, which I fixed by rotating the images to the correct orientation before handing it over to the CV pipeline.

Next week I plan to do end to end testing and work on the final video and report.

Team Status Report for 11/20

This week the team continued to work on integration and started testing to get metrics for the final presentation. Yoorae updated the valid logic module to handle castling and fixed errors in integration regarding coordinates. Demi integrated LEDs, push button, webcam, and Stockfish AI to the game. Demi and Anoushka spent a significant amount of time fixing an issue with installing the neural network for cropping images on the RPi. Yoorae tested the valid move logic, and Anoushka tested CV correctness.

There are no serious risks, and we are on track with the schedule. Next week, we will work on the final presentation and do more testing.

Demi’s Status Report for 11/20

This week I finished integrating the LEDs, push button, webcam, and Stockfish AI with the game controller. We now have the game working end to end from push button to webcam taking pictures of board to CV detection, lighting up user move, validating user move, and finally generating and lighting up AI’s next move.

I spent most of my time this week on integration issues for running the neural net submodule on RPi. After spending many hours in the lab trying different solutions with Anoushka, we were able to make it work by upgrading tensorflow. I also spent time setting up the webcam with the new webcam stand and taking images for CV testing.

Next week, I will be working on the final presentation and generating metrics for LEDs.

Demi’s Status Report for 11/13

My main goal for this week was to have the board completely done. I successfully installed the LED matrix and connected the push button to the board. The WS2812B LED strips that I initially used were too weak, so I had to switch to a different LED strip WS2811. I chose WS2811 because they are stronger and do not require any soldering. I also had to redesign the board completely, laser cut the pieces, and assemble them. I wrote a script that takes coordinates as inputs and lights up the corresponding LEDs. This was shown during Wednesday’s demo.

I installed Stockfish AI on our RPi. I also wrote an example script to enter moves and get the next best move of the AI. Lastly, I have set up the webcam with the RPi. I downloaded the necessary libraries and wrote a shell script that captures an image with the specified resolution.

I am on schedule. I have tested all the modules I have been working on individually: LEDs, push button, webcam, Stockfish AI. Next week, I will focus on integrating them with the CV and valid move logic module.

Demi’s Status Report 11/6

My goal for this week was to have the LED matrix installed. Since the spacing between the LEDs do not match the length of our chessboard grid, I had to cut the strip into 64 LEDs and solder them. So far I have soldered 42 LEDs together. The soldering process is very time consuming and tedious as each LED have 3 connections.

I tested the chess game logic Yoorae wrote. I wrote simple test cases and found that there was an error with checking for vacant squares along the path. It should only check for the squares between the start and end position but was also checking whether the start square was vacant. This issue is now fixed.

Since the LED matrix is not completed, I am behind schedule. Completing the LEDs is my priority, and I am confident to have it done by Wednesday’s demo. For the rest of the week, I will begin working with Anoushka with CV / board integration and camera setup. I hope to get the board completely done next week, so I can focus on integration and testing for the rest of the semester.


Team’s Status Report for 10/30

This week, we continued to work on the three main areas of our project. Creating our custom chessboard, detecting moves with CV, and implementing the chess logic to check for valid moves. We are still working individually but am starting to think about integration on what information needs to be communicated between different modules.

There was one challenge regarding the sample chessboard for CV testing. Working with two chessboards did not work out as well as we expected. The sample chessboard was supposed to be taped together because gluing takes a long time. However, it was difficult to keep the pieces together with tape, and the gaps between pieces made edge detection hard. To mitigate this challenge, we decided to keep the main chessboard in the lab instead of having it in Demi’s apartment for the rest of the semester. Until this week, we mostly worked remotely in our apartments, but from now on we plan to work together in the lab with the main board.

There are no major changes made to our schedule.

Demi’s Status Report for 10/30

This week, I mainly worked on making the case for the chessboard. I chose to use cardboard for the first prototype because cardboard is cheap and easy to cut and drill. I created dxf files using SolidWorks and went to Tech Spark to laser cut them. I also finished gluing the chessboard top, ordered a push button, and connected the LEDs to the RPi and tested controlling the LEDs using the NeoPixel library.

Below is an image of the grids and case glued together with the chessboard on top. The grids are used to separate the light from one LED to other LEDs to ensure that only the correct squares light up. The grids have small holes on the bottom to allow the LED strips to go through. I still have to make the top cover of the electronic case and install the LEDs and push button.


Next week’s goal is to have the full 8×8 LED matrix installed under the board. This will require cutting the LED strip into 64 LEDs and soldering them together. I will test the LEDs lighting up correctly given a coordinate. I will also install the push button once it arrives.

Demi’s Status Report for 10/23

10/10-16
I mainly worked on the design document. I created a system diagram to illustrate the overall flow of our project and recreated the block diagram. I also wrote the requirements section for LEDs and trade study sections for LEDs and board integration.

10/17-23
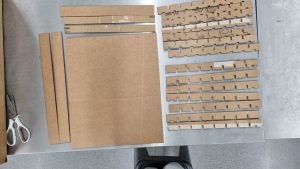
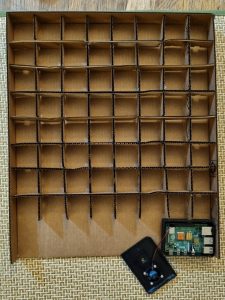
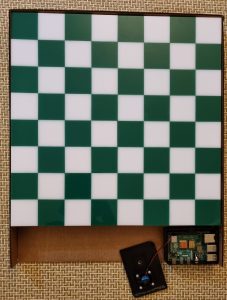
Earlier this week, I laser cut the squares for the second chessboard. Due to time and cost constraints, the plan is to only make one complete chessboard with the LEDs and push button installed. The second chessboard will just be the chessboard top without any LEDs, to allow Anoushka and Yoorae to test CV while I make the main chessboard.

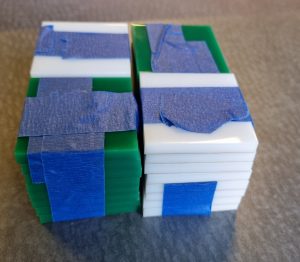
The weld-on glue has arrived, so I have started gluing the squares. As of 10:30 pm, I have been able to glue 24 squares. The gluing part is taking longer than expected. The initial bond forms within a few minutes, and I have to hold the pieces together during this 2-3 minute period before moving on to the next piece. My goal is to finish welding all 64 squares by Sunday night. Due to time constraint, for the sample chessboard, instead of using glue, I will use tape to hold the pieces together.

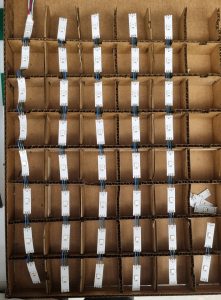
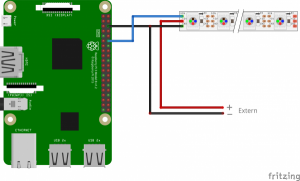
I have set up the Raspberry Pi. There was an issue at the beginning. When I connected the RPi for the first time, I got a missing HDMI output message on the monitor. I tried every solution on the internet but could not solve it. As a last resort, I decided to use a different SD card to see if the SD card was the issue. I formatted and installed NOOBS on the new card and was able to see a signal on the monitor. I have installed the NeoPixel library for the LEDs. Because of the initial SD card error, I was not able to test the LEDs with the RPi yet.

Next week, I am planning to connect the LEDs to the RPi and test them. I will also laser cut the internals of the chessboard for the LED matrix. Lastly, I am going to place an order for the wooden sheets and push button.

Demi’s Status Report for 10/9

This week I laser cut the chessboard squares and handed it over to Anoushka for CV testing. Once the acrylic weld-on arrives, I will glue the squares together. I decided that it would be convenient to have two sets of chessboard. In that way we can work in parallel, building the chessboard and testing with CV, so I ordered another pair of green and white acrylic sheets. I also made orders for the WS2812B 30 pixels/m LEDS, 5V 10A power supply, and acrylic weld-on and picked up the Raspberry Pi which we borrowed from the capstone inventory.

I have researched how the WS2812B LED strips are connected and controlled by RPi. I will be using the rpi_ws281x library. From our proposal presentation, we got feedback on how we will be controlling 64 LEDs with the limited number of pins on the RPi. I looked into it and concluded that we only need one GPIO pin since there is only one data line for the WS2812B LED strip.

I am on track schedule wise. I now have most of the parts needed for creating the board and have finalized the details of the design. I plan on to work on the design report early on next week. For the rest of the week, I will test the LEDs with the RPi and make an additional chessboard.

Demi’s Status Report for 10/2

This week I finalized the specifics of the board. Each square will be laser cut into 2×2 inches using green and white translucent acrylic sheets. The squares will be welded together using acrylic weld on glue. An 8×8 RGB LED matrix will be installed under the board. The front of the board will be laser cut to fit the push button and LCD screen in.

My goal for this week was to have the squares ready. It is important for us to have the top of the board as soon as possible so Anoushka and Yoorae can start testing with CV. However, the acrylic sheets have not arrived yet. In the meantime, I made a drawing for the squares using SolidWorks, so I will be able to laser cut the squares as soon as the sheets arrive.