LiquiFire
Concept
The concept is to have an artistic element in the project by the usage of LED Lights and the elements in the project will be interative by the use of sensors. This project is targeted to households who want to have beautiful and creative art within their home.
Motivation
- We looked at this dandelion art project where the users were able to spread the petals of the dandelions by blowing on sensors which would activate additional dandilion petals to show up by switching on LEDs behind the painting
- Uses
- Wall art
- Interactive painting
- Multiple users can interact with the art at once
Competition Analysis
Technical Specficiations
Water IC:
- 1 servo
- 1 pump
- 1 transistor
- 10 blue LEDs
- 10 amber LEDs
- 1 ATmega
- Hot animation: Water flow reduced by half, LEDs are amber
- Cold animation: Water flow constant, LEDs are blue
- Interactivity: None
Fire:
- 7 lines of orange LEDs (for candles)
- 1 cluster of yellow LEDs (for roof)
- 2 lantern strips, each containing:
- 1 touch sensor
- 5 red LEDs
- roof lights up simultaneously, candles lights up layer by layer according to brightness
- lantern strips light up when stroke
Cherry Blossoms:
- 3 microphones
- 3 microcontroller
- 10 green LEDs
- 10 red LEDs
- When a microphone is activated, cherry blossom petals will radiate outward from the branches
- Interactivity: Microphone
Stars:
- Arduino Mega
- 5-7 Microprocessors
- 25 White LEDs
- 20 Blue LEDS
- 5 Red LEDS

Requirements
- Programmable LED clusters
- User interactivity through touch sensors computer inputs
- Must look beautiful
- Multiple users can interact with the art at the same time
- 3 layer painting:
- 1. Backboard: Circuit with resistors, microcontrollers, LEDs and servo pumps
- 2. Rice paper: The painting
- 3. Water resistant layer: Protective funnels to direct the water safely
- Themes:
- Hot vs Cold
- Light vs Dark
- Features:
- Each interactive element of the project is activated by the use of one sensor
- Touch sensors
- Sound sensors
- Heat sensors
- Elements:
- Cherry Blossoms
- Waterfalls
- Stars
- Pagodas
Risks & Mitigation Strategies
| Risks | Mitigation |
|---|---|
| Large scale design, heavy wiring. | Focus on modularity. Rather than a single microcontroller working all LEDs, each distinct element will have its own standalone command module that handles the LED cluster. Therefore failures, if any, will be isolated and easily identified on the module level. |
| Water issues. | Protective water resistant layer over electronics and painting. |
| Drawing too much power through the power source. | Mathematically calculate the circuits breaking point. |
| Unfamiliarity with large scale and structural design. | IC for structure/water components do research and complete proof of concept models before it is incorporated into the final design.. |
| Several discrete elements for the final design. | Tasks are allocated with separate ICs dedicated to troubleshooting the various components. Project will be built from bottom up with most critical/basic elements completed first, and complex elements added on in subsequent weeks.. |
Test Cases
| Name of Test Case | Why | How |
|---|---|---|
| Power Down Test | To make sure that our project shuts down safely and quickly. | We are going to remove the power and time how long the device takes to turn off. We will measure this test using a stopwatch. We will report mean, mode, min, and max for the times it takes to shut down. We aim to achieve reproducibility by making sure we are powering down the device from the same state every single time. We are not able to automate this test. |
| Power on test | To make sure that our project turns on safely and quickly | We are going to turn on the power and time how long it takes everything to get up and running. We will measure this test using a stopwatch and report mean, mode, min, and max for the time it takes to shut down. We aim to achieve reproducibility by making sure we power on everything with the same amount of sensors and lights every time we test |
| Quantity of Lights | We are going to do this test so we can test how many lights can be powered by the arduino and the power supply. | We want to run this test so we can see how many leds we can power from the power supply. This is to ensure that we do not overload the system. We are going to get a number on the max number of LEDs that we can support on the painting. |
| Sensor Sensitivity Test | To make sure that sensors do not over-react or under-perform so that we can ignore trivial environment influence on the sensors and also that user feel comfortable interacting with the painting. | We will test out the sensitivity of each sensor by monitoring the sensor outputs on the arduino IDE. We will choose the most appropriate range of sensitivity thresholds and use it in our codes. |
| WaterProof Test Case | To make sure that the fountain we use does not damage the painting | Run the water with the painting and make sure that neither the painting nor the electric parts are damaged. |
| Simultaneous Sensor Test | To make sure that different sensors do not interrupt each other because we don't want other sensor actions to stop or change current sensor action. | We will activate multiple sensors at the same time and record their behaviours. We will use random tests to try out different combinations of sensor inputs. |
Progress
- Week 8 - Working on Animation with multiple levels to each object in the painting
- Week 6 - We have the lights responding to the microphone. We ordered the last sets of parts for our project. We are getting the lights to respond to the heat sensor but it is being a challenge as it is very insensitive.
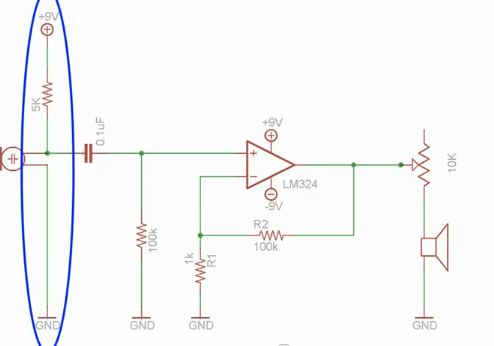
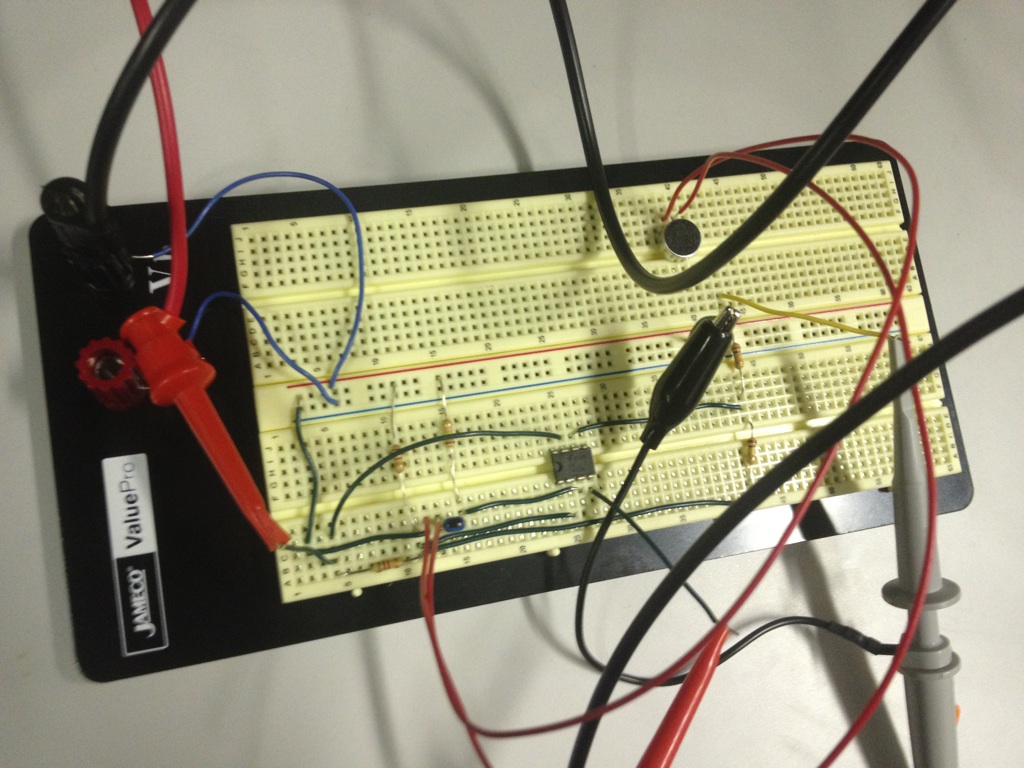
- Week 5 - We started testing all our parts together. We are starting to make a section of the final picture with the lights. We also started making an amplifier for the microphone and connecting it to the microprocessor.
- Week 3/4 - Parts Arrived
Pictures
Microphone Amplifier

Breadboard of our microphone amplifier

Talks/Video
- Project Proposal and Requirements
- Design & Architecture
- Mid-semester Project Status (NOT DONE)
- Test Plan & Experimental Validation (NOT DONE)
- Final Project Presentation (NOT DONE)<
- Project Poster (NOT DONE)