Testing the Bounding Box of the Vacuum Camera
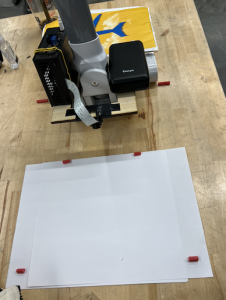
In order to properly track the segments and label them, I set up an experimental testing process that would allow us to calibrate the camera’s field of vision. I set up the vacuum system on a table in Techspark and created little red rods to delimit borders of its field of vision. By accurately determining these parameters, my goal was to refine the precise cropping and granularity in our image capturing. Then we ran scripts to see what the camera was outputting, making sure that the red straws were in the corner of the frames. I found that our initial cropped camera vision was too small compared to the range that the camera could actually capture. Our group performed several iterations of this testing to get accurate measurements so that we could translate this to the XCode/iPhone side of things. I measured the distance of the box length to be 19cm, distance from the beginning of the box to the handle to be 12cm, the width of the bounding box to be 28cm.

Improving the UI for Enhanced User Experience
Recognizing the importance of user-friendly interaction, I refined the user interface of our system. While this continues to be a work in progress, I’ve been rewriting the messages and changing which features are displayed on the main page. I still have to do testing with users and will be adding more obstructive coaching that forces instructions in front of the users faces (currently, it’s easy to dismiss and not read the directional instructions). When demoing, one goal is to reduce our need to interfere with the user’s experience with the product.
Implementing a Green Transparent Tracking Line
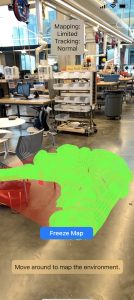
Now that we have our accurately drawn mechanisms in place, I decided to have an additional green line drawn from the back of the vacuum, indicating coverage irrespective of the back camera’s dirt detection. This transparent green line will update with red segmentation for spots that are marked as dirty. This feature provides users with real-time feedback on the vacuum’s progress, allowing them to monitor its trajectory and efficiency. The inclusion of this visual element not only enhances the user experience but also incorporates feedback mechanisms that empower users with greater control and insight into the system’s performance, ultimately leading to more efficient cleaning processes. The bounding box work has also been effective in allowing the traced green line to not extend beyond the initially mapped area. The picture below shows an example tracing of the green line that I created in TechSpark while testing. We can see texture of the red parts and the stripes in the lines, but I’ve modified it so that the green line appears under the red lines (so the red lines are more visible). I’ve also done work to calculate the proper width of the vacuum for coverage purposes, and adjusting the appearance of the green line as such.

Troubleshooting Data Transmission Latency
As mentioned in the presentation this week, Erin, Harshul, and I worked together to try and figure out why Bluetooth latency was ~5s. This was a problem because there were more tracked times and coordinates that did not have an associated dirty/clean classification and therefore would be drawn green by default even when everything was supposed to be marked dirty. By printing times and calculating the latency of each instruction, we were able to locate the issue. At first, we thought it was the data transmission and the limitations of BLE that take a long time to send and and can only accommodate a certain amount of data. It turns out, it was actually the dirt detection script. The multi-second delay was attributed to toggling the Jetson camera on and off constantly. The reason why it was getting turned on and off was because there are compatibility issues between different Python versions needed for different parts of our scripts. Namely, the Nanocamera package only exists in 3.6 while the async calls needed for BLE exist only in 3.8. So we PIPE’d the camera in and found a way to work around this problem so that the camera was only turned on once at the beginning and once at the end. While before we had a 5s delay in data, now it is essentially real time with data coming at ~0.15 seconds with potential for further increase. Through iterative testing and refinement, we aim to minimize latency and ensure seamless communication between devices, thereby enhancing the overall reliability and responsiveness of the system. We need to now record on the iPhone side the same number of data at the same frequency.
Hardware Mounting and Material Selection
I also worked on mounting hardware involved careful consideration of materials and techniques to ensure stability and functionality. We made sure to discuss the components that we may want to adjust or remove later, distinguishing between permanent fixation with epoxy and the components suitable for temporary attachment using hot glue and duct tape. For example, we wanted the portable charger to be removable in case we need to charge or replace it, but used epoxy for the laser cut wood pieces to solidify them together. By selecting appropriate materials and techniques for each component, we have a solid mounting of components that meets the demands of our application.
Next Steps
Moving forward, I’m going to be working on integrating CoachView as part of the UI to further enhance usability and accessibility. Erin Harshul and I are going to work together on trying to on refining timeQueue usage and pick the optimal data frequency, figure out the border/script granularity needed, and then conduct comprehensive system integration and testing. While getting the system ready for our demo, we need to simultaneously prepare for the final presentation, meaning that we need to work on our video, poster, and plan out how we are going to demo and organize our space.
