Mudit’s Status Report for February 25

For this week, I worked on parts of the Design review report, factoring in the feedback given from the design review presentation.

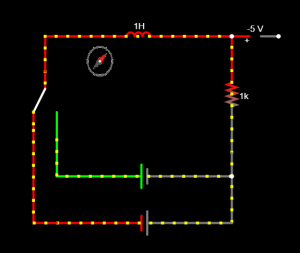
I also made a mockup of the Ampere-Maxwell Experiment to ensure that it would work with the actual components we purchase. This mockup experiment was done with readily available materials in TechSpark, using a 9 volt alkaline battery, a 9V to 5V Power Supply converter, a spool of wire, a 1KOhm resistor and a breadboard. A voltmeter was connected across the resistor to ensure that the resistor was consuming most of the voltage rather than the coil of wire (for safety considerations and to ensure the coil of wire can last over long periods or repeated reuses). I used my phone’s compass to check if the deflection was working as expected, since the phone uses its magnetometers to orient the compass as well, similar to an actual compass. The deflection noted was significant, moving the needle from 298 degrees North-west to 160 degrees South. Since the mock up of the experiment is working, I will now purchase the actual parts that will be used to build the actual experiment.

My progress is on schedule as I have designed the mockup of the experiment and tested it to make sure it is working. In the next week, I will put in the order for the materials together with Shizhen’s equipment for the Faraday Experiment so that we can streamline our component/circuit design choices such that our experiments look consistent with another aesthetically, rather than appearing as 2 separately designed parts of the booth. While waiting for the component delivery, I will work with Shizhen to test the delivered Arduino chip with the mockup experiment. The aim will be to ensure the Arduino can detect the voltage polarity of the Ampere Maxwell experiment, and can send this data to a MySQL database or through a wired connection to a laptop.

Aaron’s Status Report for February 25

This week, I prepared and practiced for my presentation of the Design Review, and continued implementation of the web application.

Static Updates: I removed AJAX for displaying on the modules page, because after reviewing the design, it is not necessary to update the modules page in real time. I added features such as navigating between modules, updating the user interface, and ensuring only the information for a given module was displayed on the page.

Images: I worked on implementation of adding images. First, I added a “page image” field in edit-modules, and had it display using AJAX. However, I have not figured out how to display the image itself using AJAX, though the user can upload images that are sent into the database and saved. I also got the uploaded image for modules to properly display on the module page.  For example, for module 1, this is the current page.

Next, I worked on being able to add images within the content blocks, rather than just an overall page image. This is a trickier task, because the content blocks are added into the edit pages using inner HTML and updated with AJAX, so I cannot pass forms through the context and have them update properly when I pass the images this way. This makes it slightly different to create user inputted images and have them update with AJAX in the edit-modules, so I am still experimenting with solutions on how to do this. I have been doing research and looking online for how this might be possible, and I believe that I am close and it should be completed for next week. After that, I will be working on quiz exercises to be easily added in the module. This seems easier to do, as it will not require a file upload which is the main problem with the images so far.

Experiments:

I also worked on updating the UI and edit-experiments page, and have been planning my design for how I will implement exercises and animations. I have been looking into using REACT for animations, because I believe they will provide smooth and interactive animations for the experiment page.

I also discussed with Shizhen and Mudit further details about implementation, and how we will update the database using an arduino-python module, since this project is run on python anyway. This should provide a smooth integration experience.

Overall, I believe I am on schedule. I had some slight hiccups because the image implementation took longer than expected and has been slightly more challenge than I thought, but I will work to catch up next week and over spring break so the web application can be prepared for integration as soon as possible.


Team Status Report for February 18

This week, we modified the block diagram slightly, since we identified that both experiments will be gathering voltmeter data that will be sent to our hardware bridge, which will then be accessed by the web app via a MySQL server. Furthermore, we developed schematics of the Faraday’s Experiment and the Ampere-Maxwell Experiment. The wireframe for the web application was also developed, along with some pages of the web application itself, and a 3D model of the booth was made. Our schedules remain unchanged but the Gantt chart was updated to reflect the assignment of each task to a certain individual for more clarity.

Risks and Risk Management

We are still working on confirming the hardware bridge. We have ordered a Wifi-enabled Arduino and plan to use that to take in voltmeter readings and direct that to the MySQL server. We intend to test this once the Arduino is delivered. If the Arduino is unable to send the voltage data to a MySQL server, we will consider alternatives such as using a TCP/IP Voltmeter device which is slightly more costly ($60) but guarantees voltmeter readings being fed into a MySQL database.

Changes to the Existing Design

After discussing with Professor Sullivan about transmitting data read by sensors (e.g. voltmeters) to the database for the web app, we decided for now we can just send the data to a local machine through wired connection, instead of sending the data to the cloud, such as AWS, to simplify the design and focus more on the core of the project. The schedule, however, wouldn’t actually change because we will spent the time allocated for implementing the wireless connection on developing wired connection.

Principles of Engineering, Science, and Math

Idea generation and selection: We came up with a few viable experiments to demonstrate Faraday’s and Ampere’s laws, and we decided on the ones that most align with our goal of making the system instructive yet simplistic, after considering the pros and cons of each option.


Shizhen’s Status Report for February 18

This week I mainly worked on designing the Faraday’s law experiment, and making the design review presentation.

Faraday’s Law Experiment

I decided that a simpler, more straightforward experiment would be more instructive for students than a complex demonstration. Therefore, instead of proceeding with the design of a Faraday disk generator, I opted to design an experiment involving changing the magnetic flux through an induction coil by moving a bar magnet through it (shown below).  I believe the linear motion of the magnet can be more easily understood than the circular motion of a Faraday disk, but nonetheless captures the essence of Faraday’s law. Moreover, by showcasing two induction coils with different number of turns, we can also demonstrate the key concept that the induced electromotive force is directly proportional to the total number of turns. Furthermore, the induced voltage likely can turn on an LED, which can make the experiment more engaging, whereas the voltage generated by a Faraday disk is probably too small to do so.

I then made a block diagram for the design, shown below.

ECE Courses

To develop this design, I relied on my knowledge about analog circuits (18-220) and electromagnetism, especially Faraday’s law (18-300).

3D Model of the Booth

After discussing with Mudit and Aaron about the design of the booth, I used TinkerCAD to create a 3D illustrative model to be used in the design review presentation, shown below. Essentially, there are two transparent cases housing the experiments and circuitry on a table, and there is a touch-screen display in the middle that would show the web app. The user would be able to see how the experiments are constructed, and interact with the experiment by sliding a magnet or flipping a switch, etc.

Overall, I believe I am on schedule. Next week I plan to order the parts needed for the Faraday’s law experiment (induction coil, magnet, etc), and build a demo circuit on a breadboard to determine its viability. I will also discuss with Mudit and Aaron about transmitting measured voltages locally from the sensors to the web app.

Aaron’s Status Report for February 18

This week, I continued working on development of the web application, discussing key design choices with Shizhen and Mudit, and working on the Design Review presentation.

Authentication:  I picked up where I left off last week and finished implementation and authorization of OAuth, and set up the basic frame for users to be authenticated as administrators to access admin web pages.

Admin Capabilities: Adding Educational Modules:

For now, I have designed a few Django models: Module, Content, and Text. Each “Module” corresponds with a certain chapter or topic, for example “Basics of Electrostatics”. Within each “Module”, we can have any number of “Content” blocks, which describe a section of the larger topic (for example, “Gauss’ Law”). Within each “Content”, we can also have any number of “Text” blocks, which would correspond to the actual educational text. All these models are saved and stored within the database, so they are not deleted when the server is reset.

Here is an example of this  in action:

Modularizing the design this way allows increased customization for Admins who are creating educational content using our platform, and can view exactly what the site users will view (similar to this very wordpress page!). Next, I plan on adding increased options, such as adding images, or quiz exercises along the modules. Then, I will improve the front end design and look of the editing page.

Javascript and AJAX:

Additionally, to make adding modules simple and dynamic, the admin page where editing pages is possible updates in real time whenever a change is made using AJAX, so the admin can visually view the page update as they are modifying it without refreshing. The edit_admin HTML page is constructed from live info from the database for easy usage.

I also implemented the user-view, so non admin users will be able to view all the modules, but are not able to change any of the information in them. Individual Modules are also split up so that they each correspond to a different page, to avoid endless scrolling on the user’s end.

Before integration, I want to add more core features to the website to prepare for smooth integration, such as being able to add images to the educational modules, exercises, and the end of module quiz, along with improving the front end design of the website to make it more user accessible.

Overall, I believe I am on schedule. Next week I plan to work with Mudit and Shizhen in discussing integration, and continue to add more features to the web application.

ECE Courses:

17-437 Web Application Development

18-330 Introduction to Computer Security

18-213 Introduction to Computer Systems

18-300 Fundamentals of Electromagnetics

Mudit’s Status Report for February 18

This week I personally worked on defining the Ampere-Maxwell Experiment that will be housed in our booth. I had an idea of what the experiment required: a solenoid with current flowing through it and a way to depict the magnetic field produced. I did some research and read about how the first time a magnetic field was observed from a current was when a compass was coincidentally placed near the wire. I decided to incorporate this fact in the experiment and then had to figure out how to alternate the polarity of the voltage source. This lead me to reading about Single Pull Double Throw (SPDT) switches that could alternate the connection of the solenoid between two oppositely oriented batteries. I designed the Circuit Schematic on an Online simulator, as shown below.

For this section of the work, I relied on my knowledge from the following ECE Courses: 18-220 (in making Circuits and simulating them) and 18-300 (to understand the Electromagnetic theory behind the Ampere Maxwell Experiment).

As for the blocker from the previous week (bridging the experiment hardware to our web app software), I researched on voltmeters that could direct our variables to a MySQL server that could be accessed by the web app. I decided to streamline the two experiments by using voltmeter readings in both to affect the animation in our web app.

Furthermore, I worked on parts of the design review presentation, specifically in designing the Testing and Validation requirements, the Ampere-Maxwell schematic and the Gantt Chart for the project management section.

I believe my progress is good, according to the schedule we have in our Gantt Chart. In the Next week, I plan to start building a mock up of the Ampere Maxwell Experiment with the components I already have, and start putting in orders for the other circuit components I will require (SPDT switches, Compass, etc.).

Team Status Report for February 11

Beyond engineering: The broader considerations of The Well of Maxwell

Our project includes considerations for education, safety, and socioeconomic inequalities. Since our goal is to teach students electromagnetism and inspire them to explore the field further, we want the educational modules to be accurate, authoritative, and effective. Moreover, we want learning to occur in a safe environment, so our system must be robust and not harm the user. Lastly, we want to provide a way for students who don’t have the resources to experiment with E&M to learn by doing.

Risks and Risk Management

One of the most significant risks would be our ability to convert the hardware stimuli (voltage source polarity, direction of induced current and magnitude of induced voltage) to digital data that will be taken in by our Web Application. This is the major connection between the hardware and software aspects of our project. This is the main blocker for our project progress, since the components we use to build the experiments will change depending on how we digitize the hardware data. As a contingency, we could use a digital multimeter with a built-in Web Interface or we could attempt using ADALM and Scopy, though these methods would be more ‘clunky’.

Changes

The design of the system has not been changed since last week.

Progress

We made a rough block diagram with regards to the design of our system and we intend to use it to guide us throughout our project.

We also made a wireframe specifically for the web application and built the skeleton for the web application, and partially implemented OAuth admin logins, welcome page, and basic home page. 

According to our current schedule, we should be finalizing the hardware to digital data conversion mechanism within the next two weeks, while starting on a rough design of our two experiments such that we can finalize the values of the circuit components we need. Additionally, the rough build for the web app without any integrated components should be finished within the next two to three weeks. That will allow us to purchase components within 2-3 weeks for the experiment setup.

Mudit’s Status Report for February 11

This week I personally worked on defining the scope of the project, the testing criteria, as well as the MVP definition of the project. I discussed these details with my team members before and after to ensure that we all had the same idea and were on the right track. I also identified the hardware components that would be required for the two experiments we intend to place in the well. I then defined the physical hardware data points that we would need to digitize for the web application (Voltage source polarity for the Ampere-Maxwell Experiment) (Direction of induced current and magnitude of induced voltage reading for Faraday Experiment). I also contributed to the development of the project proposal slides and building it our schedule and division of tasks on the Gantt Chart. I believe I am on schedule, having defined the requirements for this project accurately. I believe as a team we all have a very specific idea of what we want to achieve in the final product. For the next week, I hope to solve the blocker that we currently have: figuring out how to digitize the physical hardware data points for use in our web application. We cannot really purchase specific components until we have an idea of how to digitize those readings. My focus will be on the Ampere-Maxwell Experiment and identifying all the circuit components required to build this experiment.

Aaron’s Status Report for February 11

This week, I worked on design and started implementation of the web application. Before any programming, I constructed a wireframe for how the HTML pages would be set up and how the content would be displayed: 

Then, I built the main foundations for the Django web app; I set up a local development folder (which I plan to upload to GitHub next week), and began a Django project. I added a few dummy HTML files based on my wire frame. I wrote a basic HTML file for base.html, which all other html files except for welcome.html will extend. I added URL connections for each web page. Additionally, I started brainstorming about what Models I would need to implement all the capabilities, initialized the SQLite database, and wrote a starter file for views.py. After I made sure the basic web pages were displaying and a user could navigate between “Welcome” and “Home”, I started looking into OAuth. I set up a google project and gained a secure key for OAuth for our project, and migrated OAuth into the project. For now, after clicking “Login as Admin”, it will ask the user to log in with a google account using OAuth. I have not yet implemented which google accounts will be recognized as admins yet, or what to do if a non-admin unsuccessfully tries to log in.  Next week, I plan to implement admin recognition, and build a few basic navigations for the educational modules and figure out how I want information on the page to be displayed and updated easily. I also want to set up the pages for each experiment, and add some educational information and touch up the front-end aspects of the web pages. I believe that I am on track, as I plan to finish the non-integration aspects of the web application within the next two weeks, and I got a good start on the foundations of the web application this week.

Shizhen’s Status Report for February 11

At the beginning of the week, I mainly worked on finalizing the project proposal slides, and practicing the presentation. Overall, I was satisfied with my presentation, as it was interactive, logical and cohesive. However, to improve my presentation skills in the future, I should be calmer and speak more slowly to be more clear and articulate.

After giving the presentation, I reviewed the relevant electromagnetism concepts, such as Faraday’s law and the Lorentz force law, and started thinking about what specific experiment we can implement to demonstrate Faraday’s law clearly. I came to the conclusion that creating a homopolar generator (or Faraday’s disc)  may be a feasible option because:

1. the device should not be too complicated to build, but shows the principles of Faraday’s law well;
2. it is the the first electromagnetic generator, and including a section about its history may draw the attention of students who are more humanities-inclined.

However, it may be a little difficult to explain to students how the magnetic field varies and induces an electromotive force since the motion is circular, not linear.

A Faraday disk generator
Source: Émile Alglave, Public domain, via Wikimedia Commons

Lastly, I tinkered with the WordPress website, and customized it such that it meets all the requirements and everyone is pleased with the design. My progress appears to be on schedule.

Next week, I hope to develop the hardware design for the Faraday’s disc and create a bill of materials, in preparation for the Design Review in two weeks’ time.