We’re currently in the Design Review stage, and we currently don’t have many parts for prototyping. So we’re making do with components scavenged from the lab.
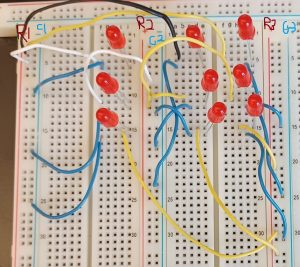
The circuit above is meant to simulate the circuit below; it is the matrix used for the keyboard. The purpose of the circuit is to test if the Raspberry Pi can detect if a switch is open (or closed), and if so, which row and column. That is, the circuit itself can’t do that; it’s a problem for the software to handle.
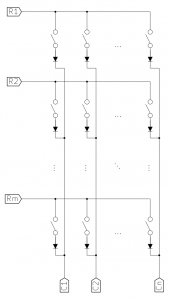
The blue wires are ‘real’ wires, while the other colors are pseudo-switches. The point of this circuit is to check if the Raspberry Pi could detect changes in switches, so you can pull (and replace) the non-blue wires to simulate a switch opening or closing.
This may violate some rule, but R1, R2, R3, etc. are the Vcc columns, and C1, C2, and C3 are the Gnd columns. Real Vcc and Gnd can connect elsewhere.
In other words, all LEDs on the top row connect to R1, or the leftmost Vcc. All LEDs in the middle row connect to R2, or the center Vcc. All LEDs on the left column connect to C1, or the leftmost Gnd. It may be hard to see, but they’re labelled.
We couldn’t test it this week because we need a part to connect the Raspberry Pi to the breadboard.
Next week, we can look at the mouse.