Heidi’s Status Report for 5/8

This past week we had our final presentation. Afterwards I spent time debugging our script and a permission error on the Jetson with Vaheeshta. We wanted to have our python script run on boot, however, since we were accessing camera, audio, and writing files we had some sudo permission errors. After switching to a usb webcam Vaheeshta and I were able to get the on boot script to work. The issue was in the folder we had our script. We checked that it worked with the Raspberry Pi camera module as well. Additionally, we improved our frames per second from about 8 fps to 15 fps. This was accomplished by decreasing the size of the cv2 window the Jetson was seeing. However, if the frame was under a width of 300, the face was too small for detection so our adjustments for videos and testing was to make sure the frame width was over 300. While Vaheeshta and Danielle focused on the final video editing, I finished the poster for the public demo next week.

Progress is on schedule. We have completed our MVP so we just have to focus on the final deliverables.

This next week, I will be working with my team to finish up the video which we will present at our public demo and will work on the final report.

Heidi’s Status Report for 5/1

This past week I added more images to the head pose estimation. When testing on the jetson this week, we realized that it is more sensitive when dealing with all four directions. With Danielle and Vaheeshta’s help I added more front facing photos to help provide a wider range of “forward” facing positions for the driver to not be alerted at the smallest change. Additionally I changed the calculation for the head pose ratio. When testing in the car, the distance of the driver’s face from the camera impacted the reliability of estimation. Instead, now it is doing the left cheek area divided by the right cheek area to have a ratio that is independent of size of the face. It is still more sensitive than we would like, but with the metrics we collected I am happy with it’s estimation. Using sklearn’s accuracy score calculations, I ran the model with 80/20 and 50/50 train/test split. Additionally, using the random state variable which shuffles the photos this helped test for robustness of faces used for training. I was able to get an average of 93% accuracy for head pose estimation. The lowest was 86% and this was with fewer photos and a random state of 42. This makes sense as the range of photos for each direction was less so increasing the shuffling variable affects the accuracy more. In combination with Vaheeshta’s eye classification, we now have a complete system. I also worked on creating a systemd service to run a bash script on boot for the jetson however as mentioned in the team status report, I ran into permission issues with gstreamer and we spent time as a team debugging but prioritized gathering our metrics. 

While some of my work was redone progress is still on schedule. We completed our final presentation and the major blocks of our project.

This next week, I will be working with my team on the video demo and poster in preparation for the public demo’s coming up. With feedback from the presentation on Monday/Wednesday we can make a good outline for our final report as well.

Heidi’s Status Report for 4/24

I have continued working on the head pose algorithm. I was able to get 4 directions to be identified, left, right, forward and down. As our professor suggested the hardest part was differentiating between forward and down. I did several iterations for the ratio calculated for the SVM classifier. The method that finally worked was to add another triangle to the equation. For the interim demo I had two triangles, one for each side of the face over the cheek area and I would subtract the area of each and divide by 2. This gave a good distinction for forward and right poses. Then when I added left this method still seemed to work. But to include the down direction, I added a third triangle that looked at the area between the nose, left jaw and right jaw. This new method takes the left cheek area subtracts the right cheek and divides by 2 just like before but then also subtracts the new triangle area. This ratio gives an even better distinction between the poses than before. I first got this version working on my laptop and then tested on the jetson and experienced similar results. I tested this on myself and a friend.

My progress is still on schedule, although now we are towards the end and have to pick up the pace. I will be pushing to get more data for the head pose to be as robust as possible for the final demo.

This next week, I will be collecting more head pose data to add to our pretrained model. Will also be working with the rest of my groupmates to collect our metrics for the presentation coming up.


Heidi’s Status Report for 4/10

After some trial and error, and advice from Professor Savvides I have implemented the new version for head pose calibration and classification. Following Vaheeshta’s example for eye calibration and classification I was able to do the same for head pose. I was struggling at first because I was attempting to use the entire landmark vector of 68 points. From our meeting on Wednesday, Professor Savvides explained that similarly to the EAR ratio the eye calibration and classification was using, I needed a ratio for my implementation. For this ratio I did the area of the left and right cheeks. If the driver looks to the right, the area of the left cheek is larger on the screen and vice versa for the left side. Right now I just have two classes, forward and right. Now that this version is working, I will also add left, up, and down directions. Additionally this week I worked on integrating my previous head pose algorithm with her eye classifier. We now have a working version of our code combined on the Jetson which is exciting. I also began the ethics assignment. Updated code has been pushed to our Github https://github.com/vaheeshta/focused.

My progress is on schedule. I will be finishing up the new version of the head pose between today and tomorrow. 

This next week, we will practice for our demo on Monday and implement the feedback we receive on Monday. Also I will be adding the left, up and down directions and finishing the ethics assignment.

Heidi’s Status Report for 4/3

After our meeting on Monday with Professor Savvides and Abha, when I was showing the progress of the head pose code, a background object in my laptop webcam was detected as a face. I added a check that when the face detector from dLib is looking for faces, it only chooses one face and that one face is the largest one in the frame. I tested this with Vaheeshta and I both in the frame, where her face in the video was smaller than mine. Her face was not detected, and only my face was. When she came closer and our faces were about the same size then the detector would switch between the two of us. Additionally, I compared my current method of calibration with that of the eye classifier coded by Vaheeshta. Her method collects vectors from the user’s face to train a classifier based on the person’s vectors to determine if the user is drowsy or not. My method was just having the user hold still and create a mean facial landmark vector to create the axis. I am working on implementing her method of calibration and training to simplify the integration of the head pose and eye classifier. My classifier will detect down, right, forward positions to start and, once this proves successful, I will then add up and left positions.

My progress is still on schedule. The head pose algorithm is in a good place and the updated calibration implementation will be completed this weekend. I was not able to test on the Jetson this week so I will test the new calibration implementation and head pose this coming week. 

This next week, I will work to integrate the head pose algorithm with Vaheeshta’s eye classification algorithm and finish the new calibration and training method. At the least we want our calibration steps to be integrated by interim demo.

Heidi’s Status Report for 3/27

Since the last status report I worked with my group mates to finish and submit our design report. I have a version of the head pose algorithm. Based on a discussion at our weekly meeting with Professor Savvides and Abha, the initial approach of following examples that take 2D points and convert them to 3D points for head pose estimation was changed due to the conversion of 2D to 3D could cause a decrease in performance time and add unnecessary complexity to our project. Instead I am implementing the axis method we discussed with our professor that draws a x and y axis over the driver’s face with the origin being the landmark point of the tip of the nose. There is a calibration period, currently for the head pose I have it at 20 seconds, that the driver is prompted to stay still and an average of the facial landmarks are taken from each frame to determine the origin points. After that period is over, if the tip of the nose landmark is a negative distance from the origin, then they are labeled as distracted. I was working under an assumption that the user would be most still toward the last 5 seconds and was only calculating the average based on those last seconds. At the next weekly meeting with Professor Mukherjee and Abha, I described the progress of the algorithm and from additional feedback I will no longer be using that assumption and instead use all landmark detection in the 20 seconds window and doing a mean square average instead of a basic average calculation. I also added a threshold to the head pose code. This threshold will be updated once we have video of us driving. We also got the Jetson up and running and was happy to see that we were getting 10 fps without any gpu acceleration with the example algorithms I had from earlier and the current head pose code I have been working on. The updated code can be seen on our GitHub repo https://github.com/vaheeshta/focused.

I think my progress is on schedule. I made up the time from the last status report and did a quick change to a different method for head pose. Right now I have threshold and distracted versus normal classification just based on the y axis (up and down). I need to finish the left and right direction and I plan to complete that this weekend. 

Next week I hope to test the current version of the head pose estimation on the Jetson in a controlled setting and then integrate with the eye classification algorithm.

Heidi’s Status Report for 3/13

This week I worked on the head pose example. The example I found works with input images and requires passing in the landmark vector to be able to calculate the angle the face is looking at. It uses the 2D points to create a 3D model of the face to determine where the person is looking. Unfortunately I have run into integrating the landmark example with this one for video input. I also tested to see how many fps my laptop webcam was getting for the face detection and landmark examples. These two I’m getting between 0.75 and 0.8 fps, which makes me hopeful for having enough fps with the power of the Xavier. I started working on the design report as well, contributing to the requirements section of the report. 

I am a little behind schedule. I was hoping to have a head pose example working by today but ran into some issues getting it the head pose example to use the landmarks array from my previous example. Will have it done by the end of the weekend so I’ll be back on schedule quickly. Most of our equipment has arrived, so I can test the fps we will be getting for the examples developed last week. 

This next week I hope to finish the head pose example and start working on building our custom dataset. From our feedback on the design presentation, professors and TA would like to see the beginning of the dataset. Also this next week, I will be working with my teammates on finishing the design report.

Sources:

https://learnopencv.com/head-pose-estimation-using-opencv-and-dli

Heidi’s Status Report for 3/6

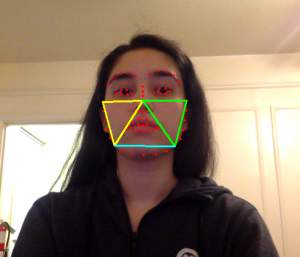
This week I worked with my team members on the design presentation. From last week, I was able to follow along with an existing example to get a simple face detection python script to work. The script uses OpenCV to read in the frames from my laptop webcam and using dlib’s HoG Face Detector. Additionally, with the face detector working I was able to also continue and follow a facial landmark example using dlib shape predictor. From observation, detection works pretty well, head pose does effect detection, if I look down or up the bounding box no longer appears over my face. The dataset that dlib’s face detector uses is the LFW (Labeled Faces in the Wild). This dataset has 2585 images. Last week I was looking at the CMU Multi-pie face dataset and was hoping to train the dlib face detector with this one instead. This dataset is extremely large with about 750,000 images of 337 people with 19 illumination conditions. As I’m not sure if we will be able to use this dataset (since we would require a license), this data set and the Yale face database did help consider how we would label our own dataset, to build upon the LFW dataset. We can classify images as either center-light, left-light, or right-light which is what the Yale face database does, but we could also classify as bright-light, normal-light, and low-light. I also looked at an example of face landmarking training that uses dlib for a custom shape predictor.  Both code examples were uploaded to our team’s GitHub repo.

Progress is still on schedule. We ordered our equipment on Monday and in the meantime I am trying to play around with pre-trained models to see how the face detection would work with landmarking and continue to research how we will be training our models. Design presentation is on Monday/Wednesday and based on the feedback we receive we can start writing the design report. 

This next week I hope to use this face detection script but with a different dataset to practice training a model with a new dataset. The dataset I plan to train with is the DriveFacce or the Yale face database. Additionally we can hopefully build on top of these and create our custom dataset following this format, especially when considering different light conditions. Also this next week, I will be working with my teammates on the design report.


Sources:

Face Detection Example

https://learnopencv.com/face-detection-opencv-dlib-and-deep-learning-c-python/

Face Landmark Model

https://github.com/davisking/dlib-models/blob/master/shape_predictor_68_face_landmarks.dat.bz2

Face Datasets

http://vis-www.cs.umass.edu/lfw/

https://search.wellspringsoftware.net/opportunity/FBX2:4283?qd=CMU%20Multi-pie

http://adas.cvc.uab.es/elektra/enigma-portfolio/cvc11-drivface-dataset/

Dlib official Face Landmark Example:

http://dlib.net/train_shape_predictor.py.html

http://dlib.net/imaging.html#shape_predictor

Training Example:

http://dlib.net/train_object_detector.py.html


Heidi’s Status Report for 2/27

This week I practiced for the proposal presentation on Wednesday. Based on the feedback we received about upgrading from the Jetson Nano to the Jetson Xavier NX, I went back and did some more research between the two microprocessor options. The Xavier NX has a plug-in WLAN and Bluetooth module with antennas which would save us the cost of buying an Intel Wifi Card to add onto the Nano. From the introduction video, one of the demo’s they showed included Gaze estimation which used NVIDIA facial landmarks which uses the CMU Multi-PIE Face Database. This gave a bit more clarification for me on the region keypoint pixel error that was mentioned during our proposal presentation for facial landmarking metrics. From our feedback on our status reports, I moved away from research papers to project examples. I looked into an example with OpenCV, Dlib and Python to begin experimenting with facial detection and landmarking. I have downloaded the necessary packages, including Dlib and its requirements to my laptop to begin working. There were various updates I needed to add to my laptop for Dlib to properly install. I also looked into data sets for head poses, as an option instead of our data collection. The DriveAHead data set and UAH-DriveSet seem like they will be the best for our needs, particularly the UAH-DriveSet.


Progress is on schedule. The proposal presentation went well and we have discussed as a group how to address the suggestions we received and will bring this up in our meeting on Monday with Abha. Our plans to order immediately after the presentation were pushed back because we received the suggestion to upgrade to Xavier NX but after discussing with Abha we should be able to submit the order on Monday.


This next week, we will order the Xavier NX and other hardware components. I will work with my teammates to prepare our design presentation and ensure that we have updated our requirement metrics. I hope to also have a simple facial detection python script working with Dlib and OpenCV. 


Sources:

NVIDIA Jetson Xavier NX Developer Kit

https://www.jetsonhacks.com/2020/05/16/nvidia-jetson-xavier-nx-developer-kit/

https://developer.nvidia.com/embedded/learn/get-started-jetson-xavier-nx-devkit#intro

Facial Landmarks Estimation

https://ngc.nvidia.com/catalog/models/nvidia:tlt_fpenet

Facial landmarks with Dlib, OpenCV, and Python

https://www.pyimagesearch.com/2017/04/03/facial-landmarks-dlib-opencv-python/

https://towardsdatascience.com/facial-mapping-landmarks-with-dlib-python-160abcf7d672

Dlib Setup

https://stackoverflow.com/questions/54719496/installing-dlib-in-python-on-mac

Data set

http://www.robesafe.uah.es/personal/eduardo.romera/uah-driveset/

https://cvhci.anthropomatik.kit.edu/download/publications/2017_CVPR_Haurilet.pdf

The CMU Multi-PIE Face Database

http://www.cs.cmu.edu/afs/cs/project/PIE/MultiPie/Multi-Pie/Home.html


Heidi’s Status Report for 2/20

This week I worked with my team members on the proposal presentation. I created the gantt chart template in excel for our group to use and primarily worked on the requirements and design slides of the presentation. Since I’ve been assigned to work on the facial detection, landmarking and head pose aspects of our project, I have collected a few sources in these areas to help familiarize myself with the technology and algorithms behind them, including some tutorials. From these sources, I’ve decided to code in Python for the face detection and head pose algorithms because I am most familiar with Python and it is compatible with OpenCV. I have also collected tutorials for the initial set up of the Jetson Nano and setup with the wifi bluetooth card and camera module.

Progress is on schedule since the proposal presentation is this coming Monday. In the gantt chart the time before receiving the materials, we will be researching. Once we receive feedback from the professors I will go ahead and order the hardware we agreed to use. 

This next week I hope to use the sources that I found to work out some simple face detection examples on my laptop to better understand how to use OpenCV and determine if any other libraries will be necessary before switching code over to the Jetson Nano. Unless we receive feedback that tells us otherwise, ordering the Nano and the other hardware components will also happen this week, and while waiting for the equipment to arrive, I’ll practice on my laptop.

Sources

Jetson Nano + Wifi + Bluetooth

https://desertbot.io/blog/how-to-add-a-dual-wifi-bluetooth-card-to-a-jetson-nano-intel-8265

https://www.jetsonhacks.com/2019/04/08/jetson-nano-intel-wifi-and-bluetooth/

https://learn.sparkfun.com/tutorials/adding-wifi-to-the-nvidia-jetson/all

Jetson Nano + Raspberry Pi Camera

https://www.jetsonhacks.com/2019/04/02/jetson-nano-raspberry-pi-camera/

Face Detection

https://towardsdatascience.com/face-detection-in-2-minutes-using-opencv-python-90f89d7c0f81

https://realpython.com/face-detection-in-python-using-a-webcam/

https://ieeexplore.ieee.org/abstract/document/8203730?casa_token=5ykY6xwCRgIAAAAA:BFeXXcQDtJOs7EvsYlFwoBGgsddHWTLQpzI4VrZz3EFs5QAztw2gbq5hBaHs7IgUuX2Bwi4a9A