Week 2 Status Report – Chris Reed

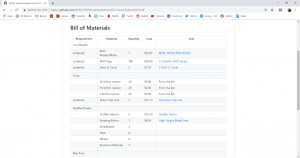
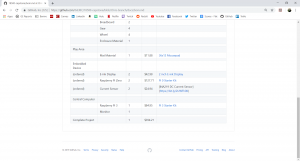
This week for our project, since we were just starting to get parts in, I decided to focus more on the design aspects of the project. I created the numbering scheme that we will be writing on all of our RFID tags, as well as creating our Solidworks model of the rotating card tray we’ll be dealing into.

I solidified our bit numbering scheme for our RFID tags for each playing card to make it easier to recognize each card’s bit code when we were detecting them. The last 4 bits encode the rank of the card, while the two before that encode the suit. I have attached a picture detailing the exact bit code for each card below. Once our RFID tags come in, I’ll stick them on each card and start working on writing each of their codes.

I also created a design and Solidworks model for our dealer base, which we are considering 3D-printing to produce for our project. I first drew up a diagram of the rotating base, including six trays for the cards to be dealt to (four for potential players, one for the community cards and one for the burn cards). I then made a one-sixth model on Solidworks which I then expanded into the full 360 degree part. Once we solidify how we are putting the shuffler together and dealer on top, we can easily attach this bottom part to it. It is designed so that our dealer will only have to deal in one direction, and the appropriate tray will rotate to receive each card in the proper order. I have attached photos of the one-sixth model and complete dealing tray below.

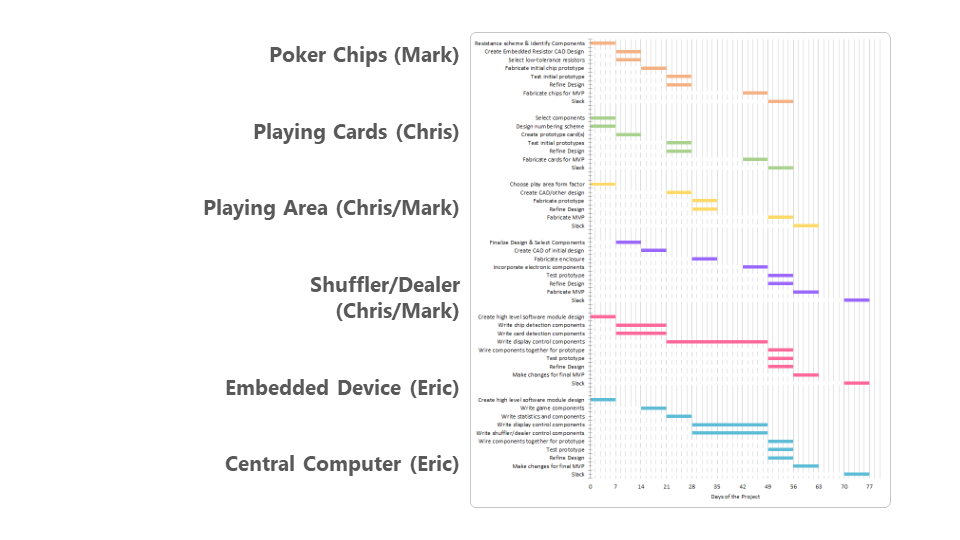
Our project is on schedule. Due to parts coming in this week, I had to move up the design of the dealer to this week, but our schedule is very flexible for what parts get done when as it is comprised of a bunch of individual parts that do not depend on each other.

Next week, since our RFID tags and reader will be in, I will focus on hooking up the RFID reader to the Raspberry Pi Zero with Eric so that we can set up the card detection once we encode each tag with the bit code we want.


Design Diagrams Week 2

Week 1 Status Report – Eric

Component Selection

One thing our team as a whole focused on this week was choosing the correct components for our project. I personally worked on the embedded platform, as well as the specific sensor components for both RFID reading/writing and resistance measurement.

We had already chosen to use a Raspberry Pi Zero for our play areas, and after briefly reviewing the models, I decided that it was worth the extra money to get the newest version with built in wifi. This will allow all the components to communicate wirelessly which will give us a better form factor. It also means we don’t have to worry about using a switch.

I researched e-ink screens and chose one that we could use with the Pi. We needed a screen that was controllable using SPI, and simple enough that I could write a driver for it in a relatively short amount of time. I looked at a number of options that were available in “hat” format, meaning they fit over the Pi, similar to an Arduino shield, but ultimately decided that a naked screen would work best, and allow us to fit it into our play area better. I was able to find one designed to be used with the Pi.

For RFID reading/writing, I looked at projects people had done with a Pi/RFID and noticed that they primarily used a single RFID chip. I researched that chip, found that it would fit our needs, and was able to pick an appropriate module that used that chip. I also assisted Chris with finding cheap RFID stickers that were compatible with the chip (a surprisingly difficult task).

For resistance measurement, our initial idea was to use an RC circuit and measure how long a capacitor with a known capacitance took to charge to a certain level. We could then calculate resistance of that circuit. However after reading more about this method, I had doubts about its accuracy. Instead, I found that there are devices called current shunts that measure current. I was able to find one with an I2C interface that I’ll be able to read using the Pi.

Software Research

Finally, on the software side I began creating a general design, and looking for python libraries to perform the low level tasks required to interface with our sensors and other peripherals.

Once the design is finished (at the beginning of next week) I’ll be able to include a diagram in my status report. Ultimately it will be difficult to evaluate the software libraries until I begin to use them with our hardware, however I chose hardware such that there were multiple library options. Also, in the worst case I can directly write the C to do both SPI and I2C communication.

My progress is on schedule, and I believe our progress as a whole is as well. Finding parts took somewhat longer than we thought but we aren’t off track. We also all have work we can do while we wait for the parts to arrive, which will help to keep us on schedule.

My main deliverable for the next week is a complete diagram of the architecture of the software. It will include the play areas, the central computer, and how they will it be networked together, and it will inform my design for the rest of the project.

As a secondary deliverable, I would like to have written the main game components of the software. This will largely be a state machine for the game and associated code. This was initially planned to be completed during week 3 but in the absence of our parts I will work on it next week.

Week 1 Status Report – Mark McKinzie

Mark McKinzie – Team C8

This week I researched which parts we would need for the chip value detection system. This included choosing resistor values corresponding to the chip values which were chosen as follows $50 = 2kOhms $10 = 10kOhms $5 = 20kOhms These high resistance values were chosen in order to reduce the error in calculated chip value. The most necessary part to order was the poker chips themselves, I chose a basic plastic chip, but if necessary we could potentially 3D print custom chips based on the CAD model I created. Though even if we use the premade chips, our resistor embedding will look like the CAD model anyway. In addition we purchased some current sensors which will make chip value reading much easier, with the raspberry pi zeros, only needing to use the voltage into the chips and out of the chips and the current value measured by the sensor to know the total resistance and thus the total chip value.

For the play area we looked into purchasing a mat, but decided not to do that yet, before having all the components which need to be inserted into said play area.

For the shuffler and dealer I looked into examples of automated shufflers and dealers to see which gears and motors would be needed. Since we will probably 3D print or assemble our module out of acrylic, I did not research form factors yet, as that will depend on how the motors, gears, and wiring all fit together. Small high speed motors will initially push the cards together to shuffle them as well as eject cards from the dealing part of the module, whereas a higher torque servo motor will handle the rotation of the module to allow dealing to certain areas. Since only the servo motor requires PWM and the high speed motors are simply run by DC it will run easily from the Raspberry pi. I researched gears for the automated shuffler but could not get any definitive measurements, so this coming week I will order a gear set with many different sizes so I can experiment which of them work best for optimal performance while still keeping the model as small as possible, however I feel I am in a good place knowing what will be driving the module.

I am on progress as I have created a model for the chip and chosen resistance values, so the next step is prototyping, which is what I intend to complete next week. For the play area we are a little behind not having chosen a form factor, but I am confident I can decide that as well as making the CAD model next week. For the shuffler and dealer next week I want to order the gears and motors so the following week Chris and I can begin prototyping.

Week 1 Status Report – Chris Reed

This week for our project, since we had just finished our project presentation, we moved our focus onto getting all our parts for the project. We all worked together to start finding cost-effective options to purchase everything, so we could start testing our devices. I was tasked to find the parts for the RFID card reader and the physical materials we’ll be using to make the playing area itself. After looking up some examples of RFID playing cards and seeing that a pre-made deck would be too expensive for our project, I moved to our second plan of placing RFID stickers on the backs of a regular deck of cards. I coordinated with Eric to make sure that the components we found would be compatible with the Raspberry Pis we wanted to use. After looking through many options on Adafruit, Amazon and other websites, Eric found some RFID stickers on eBay that were a much cheaper option. I found very cheap cards on Amazon, along with a set of poker chips, as well as a mousepad that we wanted to use as the playing mat and install all our components into.

As we were looking for our parts, I took charge in making our bill of materials, so that we could get a head start and help keep track of all the prices and quantities that we needed for everything. I broke it down by requirement, and listed the materials, quantity and cost of everything. As everyone found their parts, they would send it to me for documentation and I was able to calculate our total cost to make sure we were within our budget.

Once we saw that we would be within our budget, I started submitting parts to order to Quinn so we could start putting things together next week. I submitted orders for the Raspberry Pi Zeros, the Current sensors, the E-ink displays, the RFID Tags and reader/writer, the playing cards and poker chips.

I am on schedule with our project. If our parts start to come in next week, we’ll be in a good position to start creating our custom chips, displays and RFID cards and test them. I’ll be creating the numbering scheme for the cards next week once I get the tags and can see what I can store in them. I also want to be able to hook up our RFID reader/writer to the Raspberry Pi with Eric so I can put the tags on our cards and start assigning them their bit values according to their rank and suit. I will also start working a little more in depth with Mark for the design of our shuffler and dealer. I would want to make a CAD model of the whole device so that we can order the motors for it and start prototyping.


Week 1 Status Report – Team

The most significant risk that is going to jeopardize our project’s success is attempting to build the card shuffler and dealer. None of the members of our team have extensive experience with electromechanical work, so making sure that we create a good apparatus and hook up all of our motors, gears and wheels to correctly move the cards around may be more difficult than we anticipate. We have been researching other people’s projects online who have tackled these tasks in search of inspiration and guidance on how to go about designing our mechanisms. We will also be taking apart an electric card shuffler that we already own to see its inner workings to help with our design as well. We have a couple of contingency plans in place. If we cannot get either part to work, we could always just purchase an automatic card shuffler and deal manually, but that takes away a big component in our project. If we get our shuffler to work but not our dealer, we can also deal manually. If only our dealer works, we could either shuffle manually or purchase a card shuffler and then place the shuffled deck into the automatic dealer to get the game started.

Instead of using an RC circuit and measuring the discharge time to figure out our resistance for our chip detector, we chose to purchase current sensors we can hook up to the Raspberry Pi because they are much more accurate. We will be shifting the schedule around a little bit due to the parts that will be coming in next week. There is somewhat more work associated with this approach, as the current shunt we have chosen is an I2C device. This means we will need to find an I2C library for python or write the code ourselves in C. There are a number of good I2C libraries available so this shouldn’t be too much of an issue. The current shunt also costs more, but less than $10, and we only need one per play area.

Eric will be writing the game components this coming week as opposed to a week from now because we don’t anticipate getting the parts we’ve ordered this week. This will allow us to stay on schedule and begin writing code for the sensors once we receive them and the Raspberry Pis.

Project Summary

Hello! We are team C8: Domo Arigato Poker Roboto, and we will be building a smart poker environment for our capstone project. All three of us enjoy playing poker, but felt that the “home game” experience was a bit lacking in comparison to the professional poker environment. We have identified four features that we want to improve in the everyday poker game:

  1. We want to automate the shuffling and dealing of cards at the beginning of each hand
  2. We want to be able to calculate every player’s chip totals as soon as they place them down on the table
  3. We want the players to be able to see the community cards and their own hand without even picking it up
  4. We want the audience to be more involved by being able to see each players’ hands, chip totals and winning odds

We want our project to be an easy way to make the everyday poker game an even better experience for both the players and anyone watching.