Author: ekhoffma

Emma’s Status Report (4/26/2025)

Emma’s Status Report (4/26/2025)

This week, I presented the final presentation in class. I practiced the presentation Monday and Tuesday and gave the presentation on Wednesday. I also constructed the walls of the boat, and did all of the additional waterproofing with Abie and Maddie. I went with Abie 

Emma’s Status Report 4/19/25

Emma’s Status Report 4/19/25

This week, I spent time integrating and testing our system. On Monday, I helped Abie put together our pH sensor, but it ended up not working, so we ordered a temperature sensor instead that would be easier to integrate into our system, and give us 

Emma’s Status Report (4/12/25)

Emma’s Status Report (4/12/25)

This week, I worked on soldering the Arduino and the new waterproof motors to a solder board. I tested the motors on the solder board to make sure that the speed adjusts according to the Arduino Cloud dashboard. 

I also have been fine tuning the focus on the images we are taking. The camera sometimes sends blurry images, but I was able to get it to focus better by adjusting the camera setup. I set the autofocus to manual and selected a lens position that makes objects within 6-12 inches of the camera in greater focus than the background (see image below). Additionally, I increased the exposure time of the camera to make the photos brighter. I also have been looking for diving flashlights that we can put onto the underwater portion of the boat to make the scene brighter. This will increase the quality of the images.

The image code had a few bugs that I was able to fix. First, the ‘s’ key being pressed would not always trigger. This was because I was using a delay function that would only run once per loop, so the code was not waiting for this key to be pressed. To fix it, I was able to store the value of the key that was pressed, and then execute the corresponding action desired. Also, I was not able to pause the live stream and then restart the live stream. This was fixed by instead of breaking from the loop when it was paused, another function is called to wait for another queue to restart (the key ‘g’) and then it will return to where it left off in the original loop. This made it so the live stream could be paused and restarted, without overwriting any of the images taken beforehand.

I have also been working on what we will be using for the underwater portion of the boat. A few ideas that came to mind were a small plastic water bottle with counter weights – this would be beneficial because we would be able to waterproof it easily while having the ability to cut a slit through it to put the camera cable through. Another idea was to use a waterproof phone pouch, but this may be too big and the image quality would be reduced because of the clear coating over the camera. Also, we were thinking that we could use moldable silicone, and potentially using the PolyCast room in TechSpark to do it. Also, it is possible we could use glass to keep the images crystal clear, where plastic and silicone can distort the images we are taking with the camera. We will be working on this on Sunday (4/13). To secure the camera even more, I ordered a clear case for the camera (but this itself is not waterproof).

I looked into whether we could control the motors and camera on one interface, still using Arduino Cloud, but it seems like it would be best to keep them separate. This is because you would need a premium subscription to Arduino Cloud in order to accomplish it, and you can have both interfaces open on your computer at the same time with little disturbance. 

In the next week, I will be helping the team assemble the boat and begin testing in the water. I will be working on closing the server correctly after the user ends the live stream so there are no broken pipe errors. I am also doing the final presentation, so I will be working on making the slides and practicing the presentation. I do not see big risks moving forward, we just have a lot of testing we need to do.

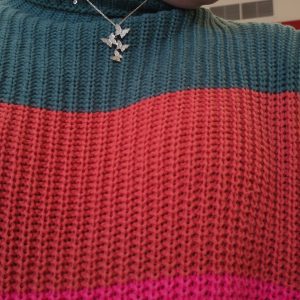
Colors are vibrant and the necklace is in focus!


Emma Hoffman’s Status Report (3/22/25)

Emma Hoffman’s Status Report (3/22/25)

This week, I was able to work on motor control and video streaming. Going into the week, the motor control and video stream were not working together. I spent a long time on Monday debugging the socket server to try and allow us to have 

Emma Status Report (3/15)

Emma Status Report (3/15)

This week, I have spent my time developing the computer interface with Tkinter and the back end connection between the GUI and Raspberry Pi. I am using a socket server to connect the Raspberry Pi and computer, which allows the computer to send commands to 

Emma Hoffman’s Status Report 2/22

Emma Hoffman’s Status Report 2/22

This week I spent time figuring out how to set up the Raspberry Pi. I got the Pi from the ECE inventory but ran into a roadblock when I realized that I needed to upload and customize the OS on the raspberry pi, which required configuring an SD card. My computer does not have an SD card slot, so I needed to find a USB-C to SD card connector. I asked my group if they had one, and nobody did, but one of my group members suggested that I could loan one from IDEATE. Luckily, I did not have to wait for one to ship and IDEATE let me borrow a converter. Once I had this, I was able to follow instructions online to configure the SD card to connect to my iPhone WiFi Hotspot. Ideally I could connect to CMU-SECURE because I feel like this would allow for faster processing speed, but I could not figure out how to set this up. I will try with the hotspot for now and see if it will work. Once I had the Pi set up I was able to troubleshoot an error when trying to SSH into the Pi and get into the device. I made sure Python was installed, changed settings so I can remotely access the GPIO pins for the motor control, and began to figure out how to run python scripts on the Pi. 

I noticed that a lot of people use RealVNC to run python scripts and have a desktop environment on their computer. They have a free version of this that works over the Cloud, and another version that costs $3.69 a month that has LAN access. LAN would be faster, but I’m not sure if we need it right now. I downloaded the free version, and configured the pi and pi camera to take video while writing commands into the terminal on the VNC. It was able to take continuous video, but there was not a way to take video and photos at the same time. I took some test photos and saved them onto the VNC project. The video was a little laggy but the quality was pretty clear. It makes the objects look closer than they actually are in the frame. I tried to set up a live stream using a YouTube tutorial but they used the library picamera instead of picamera2, which I could not download onto the pi. 

I am currently working on designing the user interface and figuring out how we can make an application or website control the raspberry pi video and photos. I’m not sure right now if we want to have all of this on VNC or not. Ideally the user only has to configure the pi to connect to their WiFi and does not have to control the pi directly after that.

I am currently on schedule. I also got the motors and motor driver from the manufacturer so I will be working on setting those up with the pi next. Next week I hope to have the motors working correctly with the pi and have a plan on how to integrate the pi camera with an external application or website.

Emma Hoffman’s Status Report 2/15

Emma Hoffman’s Status Report 2/15

This week, I worked on finding the materials needed to build the boat. I found a tutorial video of someone using waterproof sealant, window mesh, and foam board to make the boat. He put the foam board together with the sealant to form the boat 

Team Status Report (2/2-2/8)

Team Status Report (2/2-2/8)

The majority of our time this week was spent finalizing and rehearsing the proposal presentation (which Abie killed it presenting!) Otherwise, we’ve spent some time individually considering the subcomponents that we’re focusing on first. Because we had yet to finalize our microprocessor and camera module(s), 

Emma Hoffman’s Status Report for 2/8

Emma Hoffman’s Status Report for 2/8

This week I investigated how to connect a microcontroller to a laptop wirelessly. The requirements for this connection include streaming live video and transmitting a signal from a keyboard press. I discovered that bluetooth would not be suitable for our needs because bluetooth does not have enough bandwidth to stream live video. So, I looked for a microcontroller that connected to WiFi. The most suitable processor for our needs seems to be a Raspberry Pi. They are affordable, have WiFi connection, and have a large system of python libraries that can be used to set up live stream video and store photographs. It also has a large number of GPIO pins that can connect to our motors and pulley system for moving the boat and raising and lowering the camera. In terms of the camera, I decided that it would make the most sense to use a Raspberry Pi compatible camera, because the software integration would be much smoother. There were two kinds of cameras I investigated. First, I noticed that they make an AI camera that has space for neural networks that have been pre built or uploaded by the user. This camera was $70. Another camera I found suitable was the Raspberry Pi Camera 3. It boasts 12 MP resolution and a video recording of 50 fps. It also has an autofocus feature that I thought would be helpful to make coral more clear in photographs. I found out that the length of the connector between the Raspberry Pi 4 and camera is 24”, our goal depth for the camera. With the Raspberry Pi 5, the connector length is only 19”. This would present a problem if we needed to use a Raspberry Pi 5 because we would not be able to meet our depth goal. I shared all of these findings with my group in our meeting on Friday and we decided to ask for the Raspberry Pi 4 8 GB from the ECE inventory. This will allow us to decide if the processing speed of the Raspberry Pi 4 is sufficient for our use case.

Once I decided that the Raspberry Pi system would be ideal for our use, I looked into how we would connect the computer to the raspberry pi and set up the live stream video. I found a nice tutorial on YouTube that I will try when we get our Raspberry Pi and camera. 

I also started to investigate how we can control the motors using the raspberry pi. I found out that it has 40 GPIO pins that can output about 3 volts of power. The motors will pull more current than the raspberry pi is rated for, and so we cannot power the motors using the pi itself. We will need to power the motors using external batteries, and then use the IO pins only to control the connection between the motor and battery. I found a motor driver part that we can use to bridge between the motor and the raspberry pi. A key pressed input will be transferred to the raspberry pi using a server (SSH) connection, and control two motors. To turn right, the left motor will receive the on signal. To turn left, the right motor will receive the on signal. To go forward, they both will turn on. I asked to order the converter and the motor set with propeller blades.

An upcoming challenge I am anticipating is controlling the temperature of the raspberry pi. Given how much we are demanding of it, we will need a cooling attachment and possibly multiple raspberry pi’s, one for the video stream and the other for movement of the boat. Next week, I hope to figure out what materials we need to order to build the boat, and watch more tutorials about how to set up the live stream.