Emanuel’s Status Report for 4/27

Personal Accomplishment:

Mandatory Lab (4 hrs)

  • Listened and gave feedback for each group’s final presentation

Team Meeting (8 hrs)

  • Combining each subsystem together
  • Look into alternative solutions for flaws found when combining systems together

Progress:

Since we were limited to still one portion of the track and waiting for the other portions of the track to be printed, we tested where the coil produced the most distance for propelling the carrier across the track while producing a smooth transition. I found that a little bit past the middle of the coil is where the coil produces a strong and smooth magnetic propulsion where the carrier doesn’t do a nose dive into the track. While combining these subsystems together, I realized that the carrier couldn’t pass over the coil since, at first, we anticipated 1 inch of levitation, but now that the carrier has more weight, especially with a battery and breadboard, we are at around 0.5 inches of levitation, which is shorter than the height of the coil spool. This is an issue for now since that means we can’t produce a smooth propulsion for the carrier over the track. So, with that issue existing, I worked with Angel and provided measurements of our current spool in order to produce a shorter spool to allow the carrier to pass over the coil properly. The print of the coil is finished now, and I have to remove the support from the print and then bring it into our next group meeting in order to put this together. Now that we have a new spool print, I have to create a new spool key that can attach to the new spool so that I can add the spool to a power drill in order to produce a new coil in such little time that can achieve tighter turns than creating the coil by hand.

Schedule:

We are on schedule

Emanuel’s Status Report for 4/20

Personal Accomplishment:

Mandatory Lab (4 hrs)

  • Fixing the readings from the Linear Hall Effect Sensor to turn on the coil based on readings
  • Creating new coils with 30 and 32 AWG and testing Ampere output with a power source

Design Research and Self Time (8 hrs)

  • Adjust newly printed carrier and track to fit coil
  • Attach magnets to newly printed carrier and track
  • Create a 3D printed tool to fit the spool to power drill for creating coil
  • Make a new coil with new, tighter turns and a new AWG Copper Wire
  • Work on working with H-Bridge and Coil in terms of turning on the coil based on readings

Team Meeting

  • Meet and work on the final presentation
  • Discuss how to implement different systems together

Progress:

I continued working on the readings from the Linear Hall Effect sensor as an “imitator” from Arduino to Arduino to act like Bluetooth communication to see how I can use those readings to affect the current going through the coil. After researching and mapping data from one Arduino to the other, I could finally allow the current to go through the coil whenever the sensor read a magnetic field for a specific range. I also worked on creating a key tool that can attach to the spool and attach to a power drill to easily create new coils since I had been using my hand, and the recent coils have not had tight turns as desired. Once that was created, I made new coils with the 30 and 32 AWG Copper Wire since those wires are thin enough to have really tight turns and an even larger number of turns in general. After doing calculations on these coils and running tests on the coils, I realized that these were not the proper wires to use and needed to go back to ranges from 20-24 AWG. I created a new coil with 22 AWG Copper Wire that achieves around 230 turns and can transmit above 5 amps with only 10 volts instead of the preferred 15 volts, as that is the limit for the H-Bridges. Since a new design for the track and carrier was made and the prints were done at my apartment, I could start working on gluing the new magnets onto the carrier and tracking and adjusting the carrier itself since there was no space to allow the coil to slip in.

Schedule:

We are on schedule

Additional Information:

Throughout this project, I needed to learn more about using Arduino and the libraries that exist for this tool, more about the different kinds of AWG wires that exist, and understand how each kind of wire has a limit on how much current can pass through it. I also learned more about the magnetic field and its formula for solenoids to record the magnetic field of every coil I created. I also learned more about magnets and readings of the magnetic field from these magnets when using Linear Hall Effect Sensors. The learning strategies I used to acquire this new knowledge were reading articles and graphs, watching videos, asking the TA and professor questions, practicing when creating the coils, and learning from my mistakes throughout the process.

Emanuel’s Status Report for 4/6

Personal Accomplishment:

Mandatory Lab (4 hrs)

  • Interim Demo
  • Discuss adjustments needed from interim demo for final demo

Design Research and Self Time (8 hrs)

  • Create small circuitry to prepare for demo
  • Started working on timing aspect for start and stop system

Progress:

I started working on the timing aspect for the start and stop system. I was able to deal with the issue of the coil heating up by limiting the time the coil is on to 1/10th of a second, and can confirm by holding the coil with my hand for long periods of time to make sure it stops heating up. Certain aspects, such as the carrier and the track not being printed, have caused a little delay in not being able to continue working on the timing aspect of the start and stop system. For now, I am manually pushing the carrier at a speed I believe is reasonable for the carrier to be traveling, in order to set boundaries such as the distance it takes for the linear hall effect sensor to detect change in magnetic field, the time it would take from detecting the change to tell the coil to either turn off, or to turn back on, etc. I also made a new coil since I realized when running tests with previous coils that there was a really strong reaction from the core of the coil, and would attract and repel a magnet at a stronger rate than before. I also made sure the coil didn’t slopply overlap a layer so then it would produce a stronger magnetic field.

Schedule:

We are on schedule, we are just waiting for the carrier and track to be printed

Emanuel’s Status Report for 3/30

Personal Accomplishment:

Mandatory Lab (4 hrs)

  • Discuss changes to the track design
  • Talk to the Professor and TA to prepare for the demo

Design Research and Self Time (8 hrs)

  • Created a new coil (achieving the goal of 200 turns)
  • Tested coil with a cardboard prototype
  • Start looking into the timing aspect of the coil

Progress:

I finally achieved the 200-turn goal I wanted for the speed-up coil. The only issue is that while we were waiting for the 24 AWG Copper Wire to arrive, I had to rely on the 18 AWG Copper Wire, which is thicker. This wire is harder to create turns with, and the coil doesn’t contain the tighter turns that we wanted to have in order to achieve a higher magnetic field. I tested the strength of the coil with just the carrier, and visual confirmation showed that there were much stronger reactions from the carrier when the coil had current running through. I was finally confident enough to test the coil on a cardboard prototype track and carrier system, and the results showed that the carrier would propel but issues such as stability played a role since the carrier would do a nose-dive or fall and lean on one side of the track after being pushed by the coil. This is very encouraging news, but there is still room for improvement, as mentioned. With the anticipated 24 AWG Copper Wire, I anticipate a new coil that would contain a larger radius, more turns, tighter turns, and shorter height of the coil, which would only increase magnetic field production. I am also starting to look into new power supplies even though I am currently satisfied with our current one, but the issue is that the limit in terms of current being fed is 5.1 Amps, and my goal was to feed about 6 Amps through the coil. Of course, from everything mentioned before, from a larger radius, more turns, shorter height of the coil, and more amps using the equation mentioned last week, we are anticipating an even larger magnetic field being produced.
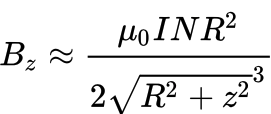


I also started working on the timing aspect of the coil, when to activate it, and when to shut it off to optimize the distance traveled once the coil pushes the carrier. Initial testing showed different results depending on the carrier’s location on the track and its traveling direction. When the carrier was traveling to the right, I saw that it was best to activate the coil when the back of the carrier was within the range from the middle of the coil to the right end of the coil. When the carrier was traveling to the left, I saw that it was best to activate the coil when the carrier was around an inch before reaching the right end of the coil. I also played with the pulse width modulation of the current through the H-Bridge into the coil and saw that lowering the PWM resulted in a stronger reaction from the carrier to the coil.

Schedule:

We are on schedule because we are waiting for the actual carrier’s printing to see the results of the new solenoid we created.

Next Week’s Schedule:

Implement the new coil on the 3D-printed track to test the actual results of our carrier. If the results are the same and we are not creating a strong enough magnetic field to propel the carrier, we will create a new solenoid that would implement tighter turns and a larger radius for the coil turns since we are still waiting for the 24 AWG Copper Wire. We will also apply a new power supply to feed 6 Amps to create a stronger speed-up coil. Since we can now work with Bluetooth, I want to be able to properly receive signals from the carrier to see what I can do with such signals, such as cutting off current or applying current to the coil.

Emanuel’s Status Report for 3/23

Personal Accomplishment:

Mandatory Lab (2 hrs)

  • Ethics Lecture
  • Discussed ethical components regarding our project and other projects

Design Research and Self Time (8 hrs)

  • Worked with Myles on creating multiple versions of propelling coils
  • Researched proper formula for magnetic field production, ran calculations on our coils
  • Worked on ethics assignments to prepare for the ethics lecture

Absent: (Travelled to NSBE National Conference)

Progress:

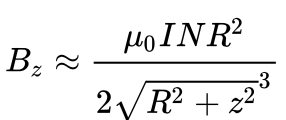
With our first solenoid, we discussed our findings with the professor and our concerns that we were not producing enough magnetic field to propel our carrier across our track. After clarification with the professor, we mentioned the multiple missing components we forgot to implement in our calculations, such as the distance of the supporting bolt along the axis, and the change of magnetic field from the corner of the bolt compared to the outside of the coil. We were pointed to this formula:

And used this formula to calculate the magnetic field we produced with our current coil. We also took some pointers from the professor to create a new solenoid. We implemented a new solenoid with a larger radius for the turns of the wire, the distance of the supporting plastic cast along the axis, and placed the coil above the track compared to underneath the track. We ran calculations under the new conditions of our solenoid to confirm that it produced a larger magnetic field than the previous coil. We also ran tests on a single magnet and visually saw how much stronger the magnetic field had an effect on the magnet, and decided to create an even smaller carrier that doesn’t rely on levitation to see whether or not it would propel the carrier. We were able to confirm that the smaller version of the carrier was able to propel in both directions, which only helps to confirm a portion of the MVP, which is to have the carrier properly propel along the meter-long track in both directions.

Schedule:

We are on schedule because we are waiting for the actual carrier’s printing to see the results of the new solenoid we created.

Next Week’s Schedule:

Implement the new solenoids to the 3D-printed track to test the actual results of our carrier. If the results are the same and we are not creating a strong enough magnetic field to propel the carrier, we will create a new solenoid that would implement more turns and a larger radius for the coil turns since we plan on buying a new 24 AWG Copper Wire.

Emanuel’s Status Report for 3/16

Mandatory Lab (4 hr.)

  • Met with professor and TA to discuss recent design report
  • Discussed with the team about work distribution

Design Research and Self-Time (8 hr.)

  • Worked on the speed-up coil
  • Looked more into how to interpret readings from Linear Hall Effect Sensor
    • Readings from a magnet depending on distance
    • Readings from speed-up coils

Progress:

We started looking into how to interpret the readings from the Linear Hall Effect. At first, we had difficulty interpreting the data, but a discussion with the professor cleared up the confusion. I then wanted to see what the fixated readings from a single magnet look like depending on how far the magnet is from the sensor. At first, when looking at the readings from the magnet with the professor, I was confused about why the readings were decreasing, as they should have increased from the normal base rate of 510, indicating no magnetic field. However, after further research, I learned that it depends on the polarity or the side of the magnet facing the sensor. So, for my individual research with the sensor, I made sure to collect data from both sides of the magnets. The following are the data that I collected:

Linear Hall Effects Readings:

(Same polarity)

3 inches away: 511

2 inches away: 514

1 inches away: 534

.5 inches away: 600

.25 inches away: 745

(Opposite polarity)

3 inches away: 509

2 inches away: 507

1 inches away: 491

.5 inches away: 416

.25 inches away: 284

From this, it’s clear to see that we need to take distance into account if we want to get a clear, distinct change in magnetic field readings when the carrier is running on the track when the carrier is approaching a speed-up coil, etc.

I also worked with Myles on improving the speed-up coil since, for some reason, it decided to no longer work from the first time I created them. We made two new designs for the solenoids with different turns and lengths. We also made sure to find the calculations of these solenoids and share them with the professor and the TA to make sure we were approaching this correctly. After consulting with the professor and clarifying measurement and data, we realized that we were not generating as much magnetic field as we actually anticipated, and we needed to look into incorporating new coil designs.

Schedule:

Since we recently changed our schedule, we are currently on track with the new schedule.

Next Week’s Schedule:

Create new solenoid coils with stronger magnetic field output and implement them into the track to test propulsion with the carrier. Since Myles and I are away at the NSBE National Convention, we will put our complete effort into finalizing these coils. The only thing left for our group is finalizing the track and carrier design and finally printing them.

Emanuel’s Status Report for 3/9

  • Mandatory Lab (4 hr.)
    • Met with TA and Professor to discuss feedback from presentation
  • Design Report (4 hr.)
    • Completed the Introduction, Use-Case Requirements, Design Requirements
  • Design Research and Self-Time (4 hr.)
    • Modified CAD design for straightaway track and carrier prototype
    • Worked on the speed-up coil

Schedule:

As of now, we are behind schedule. Again, we would have liked to have our track and carrier printed out, but since we are still waiting for the 3D printing filament, we are still bound to work with cardboard and try to improve our cardboard designs. I also would have liked to have finished at least one speed-uup coil, but I haven’t been able to either because the available copper wires in TechSpark were too thick to complete the 200 turns we wanted or the copper wire wasn’t conducted, meaning that the current couldn’t pass through the coil. This has caused further research to be done in order to find the exact copper wire that is both thin enough to complete the 200 turns, as well as conducted to allow for the current to run through the coil.

Next Week’s Schedule:

  • Fully printed out carrier and track
  • H-Bridge Circuitry w/ Speed-Up Coil

Emanuel’s Status Report for 2/24

This Week’s Updates:

  • Mandatory Lab (4 hr.)
    • Sat and gave feedback to other team’s design presentation
    • Had to prepare and give our team presentation for our team design
  • Team Meetings (6 hr.)
    • Created a cardboard prototype 
      • Track and test levitation and stability
    • Implemented magnets with the cardboard prototype 
      • Track and test the strength of magnets
    • Adjusted CAD design metrics based on results from cardboard prototype
  • Design Research and Self-Time (2 hr.)
    • Looked into alternative ways to power the nano Arduino
      • Nano needs wireless power since it is moving on the track
    • Soldered battery with wires to the nano
      • Tested for any heating, current/voltage loss, whether the component works
    • Researched ways to decrease the amount of voltage loss when connected to the nano
      • Alternative batteries (Lithium batteries)
      • Implement a switch in between the nano and the battery (most likely solution to go with)

Schedule:

As of now, we are behind schedule. We would have liked to have our track and carrier fully printed out by now, but due to our order request being rejected, we had to create an alternative cardboard prototype for testing. Though we are behind schedule, the cardboard prototype really helped us add and finalize certain details and components for the track and carrier.

Next Week’s Schedule:

  • Fully printed out carrier and track
  • Whole H-Bridge circuitry done (at least one coil)

Emanuel’s Status Report for 2/17

This Week’s Updates:

  • Mandatory Lab (4 hr.)
    • Met with TA and Professor to discuss feedback from presentation 
    • Established a new definition for our MVP
  • Team Meetings (4 hr.)
    • Completed the design for our carrier, adding finishing touches to track
    • Made decisions to change certain components 
      • Magnetometer instead of RFID
      • Ultrasonic Sensor instead of LiDAR Sensor
      • H-Bridge instead of Digital Potentiometer
    • Worked with team members on the Design slides for presentation
  • Design Research (4 hr.)
    • Read data sheets provided with new components about any recommendations
      • Voltage and Current
      • Potential safety components, e.g. Flyback Diodes
    • Assisted in researching the new components
      • Magnetometer
      • H-Bridge Chip
      • Ultrasonic Sensor

Schedule:

As of now we are behind schedule because of the drastic changes that we had to make to our project after talking to the TA and Professor. We had to make the decisions of changing multiple components to our designs such as changing from digital potentiometer to an H-Bridge, from LiDAR to Ultrasonic Sensor, and from RFID system to Magnetometer. With such changes to our design, we had to invest a lot of time into researching these components, as well as creating new ways to smoothly insert these newer components to the ones we are deciding to continue with. We wanted to finish all the 3D printing for the track and the carrier but we were not able to since we haven’t bought any filament for the 3D printer. 

Next Week’s Updates:

  • Have a finished and 3D printed carrier and track, at least so we can get to MVP territory 
  • Buy all the components we would need in order to work on MVP
  • Have circuits ready to implement the power system

Emanuel’s Status Report for 2/10

This Week’s Updates

  • Mandatory Lab (4 hr.)
    • Attended the mandatory labs, watched peer’s presentations and provided feedback
  • Working on Presentation Slides (4 hr.)
    • Worked with teammates to complete the slides for presentations
  • Team Meetings (4 hr.)
    • Met with teammates outside of in class hours
    • Worked on components to buy
    • Worked on track design
    • Watched videos to compare different circuit designs

Schedule

I am on schedule according to our proposed schedule. I am scheduled  to be focusing heavily on the 3D Printing components first which I have been accounting for.

Next Week’s Updates

  • Getting Prototype 1 materials
    • 3D Filament
    • Wires, resistors, digital potentiometer
  • Finishing up our proposed designed track
    • Finalizing the design, using filament to start printing
  • Research alternative power circuit methods
    • Some including digital potentiometer
    • H-Bridges