Sharon’s Status Report for 10/5/24

WORK ACCOMPLISHED:

Technology Decisions:  I decided to proceed with React Native for our mobile app, despite having to learn it, instead of using the Bluefy Browser, which offers BLE functionality but has limitations like no background running and requiring an additional app download. Although Bluefy would have been faster to implement, it posed too many unknowns and potential problems in the long run. React Native, on the other hand, has better BLE support, and though it involves some learning, it’s a well-documented and familiar technology for our team. I also debated using Flutter since it could offer more efficiency, but given my experience with React JS and TypeScript, React Native would be better and the advantage that Flutter offered was a higher efficiency of loading the app and its components.

GitHub Project SetupThis week, I set up the GitHub repository for our SkateBack project, creating an organized folder structure to manage the code. I also configured the necessary dependencies and environment for the project. I added a .gitignore file to exclude unnecessary files like node_modules/ and log files, ensuring the repository stays clean.

Project Environment Setup:  I researched the best tools and frameworks for our project and decided to use Expo for React Native, which eliminates the need to deal with both Android and iOS native configurations. I spent some time playing around with the Expo app example (still in the repo) to get familiar with its structure and capabilities. I also ensured all necessary tools, including Node, Watchman, CocoaPods, and the Xcode Simulator, were installed and configured, making sure all versions were compatible. I ran into a few compatibility issues that required specific versioning:

  • Tailwind CSS had to be downgraded to version 3.3.2 for compatibility with Expo.
  • TypeScript was adjusted to version ~5.3.3 to align with Expo’s requirements.
  • Updated expo-module-scripts to resolve a missing tsconfig.base error.
  • Had to use Node Version 20.

Initial UI Implementation:

I made progress coding the foundational UI components based on the Figma design:

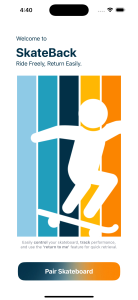
  • Finished the welcome screen for pairing.
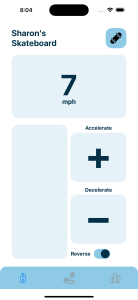
  • Created the initial layout for the remote control (without battery and gauge components).
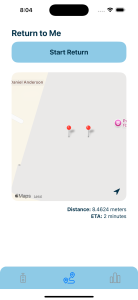
  • Developed the interactive map for the ‘Return to Me’ page, with distance calculations included and a recenter button.
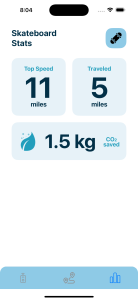
  • Completed the layout for the stats page with predefined values.

Parts List:

  • Helped find some parts and submitted the ordering form!

PROGRESS:

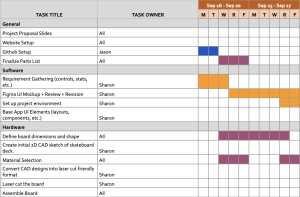
With the GitHub setup and project architecture finalized, I am on track with the tasks outlined for this week. The UI layout is progressing well, and I’ve begun implementing key visual components, such as the interactive map, stats page, and control interface. I had to push back coding the backend a little more but will still be on target. The schedule is below for my progress (my tasks are colored in orange):


NEXT WEEK’S DELIVERABLES:

Next week, I aim to complete the following:

  • Continue coding the remaining UI pages and components specifically finish the remote control. Also, need to make the rest of the connection pages as well.
  • Refactor the code to make it more reusable especially for the coming pages.
  • Start working on the backend and integrate functionality to the buttons.
  • Hopefully, we can start integrating the BLE functionality and connecting the Raspberry Pi to the app since we are waiting for that part.
Tio’s Status Report for 10/5/2024

WORK ACCOMPLISHED:

Part Changes: Accuracy Is Improving and Costs are Going Down –The two major milestones for this week were the design presentation and filling out the ordering forms for our parts. I gave the design presentation on 10/2 and it was well received. We also had our parts finalized by then so we filled out the ordering form after class. A few changes have been made to our design. The course staff have elected to buy an RTK-GPS  breakout for the course inventory, and we will be using it rather than buying one with our own budget. The model they chose was one that we initially considered but was disregarded because at $289 it would’ve taken up close to half of our budget. The SparkFun GPS-RTK Dead Reckoning Breakout – ZED-F9R that we will now be using boasts far superior precision (0.01m horizontal accuracy with a correctional stream from a base station, one of which is located atop Hamerschlag Hall). Similarly, the LIDAR we will be using also has changed. Joshna picked out the Intel RealSense LiDAR Camera L515 from the course inventory which we had not previously considered. With these two part changes, we’re saving about $140, which solves our previous concerns of going over budget. One replacement that hasn’t changed our budget was transitioning from an RPI 5 8GB to an RPI 4 8GB. This was done because of the reduced power consumption demands of an RPI 4, and our decision to power the RPI and its accessories with a rechargeable power bank over USB-C. I think we can expect to begin receiving parts next week, which might allow us to get a bit of assembly work in before Fall Break.

The UTM Coordinate System – Another promising development this week was regarding the coordinate system I mentioned in my last status update. My idea to project longitude and latitude onto a flat x-y grid like system already exists in the form of Universal Transverse Mercator (UTM) coordinates. UTM works by dividing the world into a grid, where each grid cell has a unique identifier. A UTM coordinate consists of the grid cell identifier and the “easting” and “northing” within that grid cell. The easting (x) and northing (y) are in meters, and are relative to the southwest corner of the grid cell. For example, Pittsburgh is in UTM Zone 17T, and Doherty Hall (where I’m currently typing this report has northing: 4477403.01 and easting: 589501.46). After talking to a friend in CIA that works on the buggy’s RTK kits, I found a Python library that CMU Roboclub uses to convert GPS readings to UTM and vice versa. This is a big find, as I was worried that implementing our own grid system and conversions would be fraught with error.

Tracking the Rider via their Phone – This week I explored the different alternatives for determining the location of the rider that the skateboard the user will attempt to find its way back to. So far I’ve thought of two approaches:

  • Using a Wi-Fi or cellular positioning via a geolocation API: When the user decides to start the “return to me” process, the webapp makes a request for the host device’s position using a geolocation API. There are a wide array of APIs available, varying in both precision and pricing, but I doubt any are as accurate as readings from a GPS chip which brings me to our next option.
  • Leveraging the single GPS chip we already have:  The basic idea is that the rider and skateboard share the same location whenever the rider is on the board, so if we could detect a separation event (like the rider falling of) by measuring an acceleration spike using the IMU embedded in the GPS breakout (similar to how HDDs can detect when they’ve been dropped), then we would use the GPS chips last read before separation as its return destination. This has its own limitations though. The user would have to stay where they fell and start the skateboard callback.  And it would be limited by the accuracy of separation detection. Also what if you wanted to simply come back to you from somewhere you placed it?

Ultimately I imagine some combination of these two approaches will be best.

PROGRESS:

We are back on schedule now that we’ve order parts, and I expect we will begin receiving parts next week. We’ll be able to do some early unit assembly and testing once we receive the RPi,  LiDAR and GPS. Even without those parts, I am currently working on the software that will go on the RPi such as location data parsing and collation.

NEXT WEEK’S DELIVERABLES:

I main target to hit next week is to begin work on assembling the board. This is ultimately dependent on when our parts get here, but any progress we make before fall break will be a huge plus. After fall break we need to hit the ground running if we’re hoping to meet the rest our deadlines.

I am a bit concerned about a few design elements that are still up in the air. Working on the design report due next week will help us to finalize these choices and have a single reference point during all the actual implementation that will follow after fall break.


Jason’s Status Report for 9/28/24

WORK ACCOMPLISHED:

Further research into part compatibility has demonstrated the following problem. As we are already facing budget concerns, we are very mindful of any increases to our total costs. I discovered that the battery we selected does not come with a bms or battery management system, a critical component for obtaining live data with regard to battery charge. As this was one of the core requirements we set out for ourselves, we want to push to accomplish this goal.

Our current battery is 10s2p which means 10 in parallel, 2 in series for a total of 20 batteries at $90. Moving to a pack with a bms even at 6s2p, which is 12 batteries brings us up to $185 as seen here: https://www.mboards.co/collections/batteries/products/6s-p42a-battery-pack-transparent-series with very little opportunity for other options.
As a result, we remain undecided.

We consistently have to make tradeoffs between reputation and performance.   For instance, we are able to buy more powerful motors with hall sensors here https://www.amazon.com/Brushless-Belt-Drive-Balancing-Scooters-Skateboards/dp/B07RXWW3DS/ref=sr_1_12?crid=2NEHK9FI43FHT&dib=eyJ2IjoiMSJ9.6_nUl4ZD3ZhjtZRfEZjPpPkI-0W-ird_zf3qSUvrDoYUGkNTVwylh-QgjidNUhGbBe8Qa_XTIE045heaKbB5qKbSCZ6tp3QndVmnl9liKLtqRwtL1AC–_CNs96VuNbYgxfPJvtUo_kl6qI-aVew-xXCn2bupq9aYjwABIzz8FzucCxE36cwUdnpagXtLfcBK5erniMT3015ZyDPIe9Mm4gaoM9hpidCoyrb6UavlVlui1HrwVHDXP2RGIHHI577Q3uZjiODNIhXDbX7rnCcJO6g-03lSZ_WOywLBtRB8rw.E1N2p-XUPUVELYuiIRbatHIXFuBrgDPEFet7I_SFGso&dib_tag=se&keywords=skateboard%2Bmotor%2B6354&qid=1727576364&sprefix=skateboard%2Bmotor%2B6354%2Caps%2C116&sr=8-12&th=1
but without the ratings and brand reputation that our other option gives us.

On top of this, I researched the charger for our battery, antispark switch to power the board, and explored the wirings for our VESC and made note of some converters we will need to purchase.

I also looked into the truck/motor mounting system and found

which we will likely use as it appears to be relatively plug and play

DISCUSSIONS:

I researched the communication methods between the Rpbi and VESC and landed on using UART. Theoretically, we can use UART to send motor speed, temperature, and others to the Rbpi and receive throttle, braking, and other commands back. There is a python module called pyvesc that will allow us to do this seamlessly.

The VESC does not explicitly list compatibility with UART but says it is compatible with VESC software. In the case it is not compatible, we will definitely be able to send PWM signals to the motors from the VESC using RPi.GPIO python module and the GPIO ports on the Rbpi.

I also discussed path planning with Tio and the team and landed on a project of GPS down to a 2d box in which we will use basic x,y coordinates to reach the target.

PROGRESS:


I am still on track as my task this week was to select the path planning algorithm.


NEXT WEEK’S DELIVERABLES:

Next week, my sole goal is to fully and completely finalize the parts list. There is still considerable work to be done on this front and I hope we are able to get this done so we can move on to the actual implementation. This has proved to be significantly more difficult than expected.


Tio’s Status Report for 9/28/24

WORK ACCOMPLISHED:

Parts List: This week, I continued finalizing design choices for our project. One promising find this week was a SparkFun GPS Breakout that comes with an integrated IMU (SparkFun GPS Dead Reckoning Breakout – NEO-M8U (Qwiic)). This breakout would help us save money on parts,  because we would no longer need to purchase a separate IMU, or extra cables. Additionally, this chip supports u-blox’s Untethered Dead Reckoning (UDR) technology which integrates IMU readings to improve GPS accuracy, meaning that we might no longer have to perform these calculations ourselves. This breakout would need an external U.FL antenna. I’ve decided on this model both because its price, and because it comes with an adhesive which would be convenient to stick to the underside of the board.

Also, after an insightful meeting with Prof. Bain and Joshna, I learned a possible solution to the issue of the Pi HAT taking up all the GPIO pins. I found a GPIO expansion/splitter that would allow us put on the Pi HAT, while still having other pins (such as the PWM pins we’ll need for the VESC) exposed.

In this same meeting I proposed my idea for navigation which involved projecting longitude and latitudinal co-ordinates onto an x-y grid of a finite square area. It was met with positive feedback which gave me some confidence about our approach. We also decided that we would draw power from

PROGRESS:

I’m slightly behind schedule, but with good reason. We had planned to have a parts list finalized at this point, but the recent finds are worth the slight delay. Thankfully, the RPi we plan to use is available from the course inventory so I expect that we will be able to get our hands on one fairly soon. The other parts  needed for GPS tracking (the antenna, GPS breakout and Qwiic HAT) are also available with quick delivery.

NEXT WEEK’S DELIVERABLES:

Next week, after acquiring the RPi and GPS, I plan to write the basics of the tracking code such as establishing its location start up, and determining the distance between two points. I’ll also work with Sharon so we’re able to share this data with the webapp.

Team Status Report for 9/28/24

SIGNIFICANT RISKS + MANAGEMENT:

BLE and iOS Compatibility:

  • Risk: One of the biggest risks we encountered this week is BLE (Bluetooth Low Energy) compatibility on iOS devices. Our initial plan was to connect the web app directly to the Raspberry Pi using BLE, but iOS doesn’t support this method without significant workarounds or the use of additional hardware.
  • Management: We are currently evaluating two alternatives to manage this risk:
    1. React Native: This approach would allow us to build a mobile app with BLE support for iOS. However, this requires learning the React Native framework, which could slow our progress in the short term. The benefit is that this would give us more control over app features and a more integrated experience.
    2. Bluefy Browser: This is a quicker, web-based solution that offers BLE support without the need for extra Bluetooth hardware. However, the downside is that it doesn’t run in the background and would require users to download an additional app, which could impact the user experience.
  • Contingency Plan: While there is no immediate need to invest in extra Bluetooth hardware, we will continue to evaluate both options based on development time and usability. We are confident that either React Native or Bluefy will work for our requirements.

DESIGN CHANGES:

  • Connection Method:
    • Change: We’re reconsidering our connection method due to BLE not being supported on iOS.
    • Why: This is necessary to ensure iOS users can connect to the skateboard without needing additional hardware.
    • Cost Impact: Learning React Native could slow development, while Bluefy’s limitations might affect user experience.
    • Mitigation: We’re still evaluating which option will have the least impact on project timelines and functionality.

SCHEDULE CHANGES:

  • The project environment setup and architecture definition were extended to next week due to time spent researching BLE alternative.


PROGRESS:

  • Completed the design for the skateboard connection, control interface, and real-time data display. Prototyped the app flow in Figma, making it easier for the team to understand the functionality. Feedback from teammates was incorporated using Figma’s comment feature.


Part A: Public Health, Safety, or Welfare

(Written by Tioluwani Ajani)

The SkateBack project is designed with a focus on enhancing public safety and personal mobility by providing an electric skateboard that can autonomously navigate and recall itself to its user. This feature addresses the need for improved safety in situations where users might become separated from their skateboard, especially in busy urban environments or recreational areas. The SkateBack system minimizes the risk of accidents or loss by using a combination of GPS and obstacle-detection technology (LIDAR) to ensure that the skateboard can safely navigate back to the user without colliding with pedestrians or obstacles. This greatly reduces the chance of skateboards becoming hazards on crowded sidewalks or streets.

Part B: Social Factors

(Written by Sharon Li)

The SkateBack project is designed to align with a growing social movement towards environmental sustainability and urban mobility. In many communities, there is a strong interest in adopting greener modes of transportation that reduce reliance on gas-powered vehicles. This product caters to those social groups that prioritize environmental responsibility, as it allows users to actively participate in reducing their carbon footprint through a cleaner, electric mode of transportation. SkateBack helps users organize around social interests like climate change, eco-conscious living, and promoting a more sustainable future.

In addition, the project encourages a shift towards a more active and outdoor-oriented lifestyle, which is increasingly valued in many social and cultural settings. As cities become more congested, urban communities are looking for convenient, eco-friendly alternatives to traditional vehicles, and SkateBack provides an innovative solution for short-distance travel. By offering a compact, efficient way to move through urban spaces, it promotes social interaction and engagement with the local environment. The product also supports a sense of community by fostering shared interests in technology, sustainability, and mobility.

Part C: Economic Factors

(Written by Jason Hoang)

SkateBack is a product driven by many economic factors. The first is cost-effective transportation. Especially in very urban areas, having a car is both expensive and impractical. For a fraction of the cost, SkateBack can bring you to and from work often faster than a car would. In an age where vehicle costs and maintenance grow, SkateBack provides a logical and cheap alternative.

The second factor is reducing traffic and hitting environmental goals. From a city perspective, less cars means less carbon emission, less road maintenance, and a reduction in many other costs. Lower infrastructure costs can mean more money goes back to helping the citizens in other ways. Outside of the classroom environment, scalable production means the cost of SkateBack gets dramatically reduced, making it more accessible for everyone.

Sharon’s Status Report for 9/28/24

WORK ACCOMPLISHED:

Figma UI Design:

  • Completed the UI design for the SkateBack web app, focusing on skateboard connection, control interface, and the real-time data display.
  • Prototyped the design in Figma to visualize the app’s flow, making it easier for my teammates to understand how each component functions and how users will interact with the app.
  • Incorporated feedback from my teammates to ensure the design is functional and user-friendly (Figma feature to make comments directly on the UI interface).

Parts List:

  • Helped in finding more cost-effective alternatives for parts to save room in the project budget for additional purchases.
  • Looked into the feasibility and cost of 3D printing components using our school ($0.48/g)–considering buying our own filament as a cheaper alternative.
    • For two trucks, it would be around 200g-300g ($96-$144).
    • Buying own filament and printing it ourselves costs around $0.03/g (>$6).

Discussions: We found that BLE isn’t supported on iOS devices to be able to connect the web app to the Raspberry Pi and we would need extra Bluetooth module hardware to do so, so we’re exploring two alternatives:

  • React Native: Would support BLE but requires learning the language.
  • Bluefy Browser: Offers BLE to connect Pi and webapp without extra hardware but doesn’t run in the background and requires an additional app download.

React Native is more integrated but slower to implement, while Bluefy is quicker but has limitations like no background functionality so we are still considering which option to go with.


PROGRESS:

I’m currently on schedule with the tasks for this week since the Figma UI mockup was finished and reviewed. As for the project environment, it was extended to next week when coding starts since we had some obstacles detailed above and had to mitigate. The schedule is below for my progress (my tasks are colored in orange):


NEXT WEEK’S DELIVERABLES:

Next week, I aim to complete the following:

  • Set up the project environment, ensuring all necessary tools, libraries, and dependencies are properly configured
  • Define the project architecture and establish the initial frontend of the web app, laying out the skeleton of the UI.
  • Begin coding the UI components, focusing on building the visual elements like buttons, sliders, and real-time data displays, without implementing any functionality at this stage.

Jason’s Status Report for 9/21/24

WORK ACCOMPLISHED:

Landed on a solidified architecture for controller to board communication.
The flow will be as follows.

In the event of normal riding, our flow will be input from user on webapp -> bluetooth communication to raspberry pi -> raspberry pi to VESC communication of signals -> VESC to motors

In the event of the “return to me” feature, our flow will be input from user on webapp -> bluetooth communication to rasberry pi -> input from LiDAR sensor to raspberry pi -> path planning calculation on the web app -> directions sent to raspberry pi -> directions sent to VESC -> directions sent to motors.


Part Selection:

  • Landed on an almost-final version of the parts we will be employing.
    • VESC: https://flipsky.net/products/dual-fsesc4-12-100a?variant=9022834638908&currency=USD&utm_medium=product_sync&utm_source=google&utm_content=sag_organic&utm_campaign=sag_organic&gad_source=1&gclid=CjwKCAjw0aS3BhA3EiwAKaD2Zd5iglwJYeZaNOX5BAR4TkeQuqevF_zDt3az7iHfjzF1aVxhLHioOhoC1rkQAvD_BwE
    • 2x 5055 motors: https://www.amazon.com/Hobbyhh-Brushless-5055-400KV-Efficiency-Aircraft/dp/B09BYVKZ5W/ref=sr_1_2?crid=F1IOMBUFCJGT&dib=eyJ2IjoiMSJ9.YIcSePfgaVsN6txie0egmwsARIbLiLZgkDep_XMtgkBZ48uyUE-Bgfs2PnUpL4Tzld0_cKCw4WfuliYydziJmzvCVVH7j8HK2DLiDKXKFYpvkwgklkCSKVAfWKhmS51yGr04LtxTChMIHHGz2P-7HteXbZ5jz4_VQE1rC8LA2kruijlqTRfQe7ytiWh-B36U59Fcbog-XeS5GYgmFXH0S-JPCSWt8fuD1-8DCrpFwQ4eO9xw7Iw0vmxQUxG7mOkWmbkssPNsyoN1JPxpTmU12v4wypoSK778X7mkfMDxETg.V86EyqCGVVZR9GmM6c0lQvJXmOMAs4k0VaUqd1ns8YU&dib_tag=se&keywords=5055+motor&qid=1726985746&s=toys-and-games&sprefix=5055+motor%2Ctoys-and-games%2C289&sr=1-2
    • The build above minimized spending but allows us to meet the requirements we specified in our abstract and in our proposal presentation

Discussions:

  • More info about architecture: The VESC turns out to be necessary due to power consumption concerns: the raspberry pi is unable to regulate and control the amount of voltage and current needed to power the motors. As a result, we cannot circumvent the VESC and must use a rbpi alongside a VESC.
  • On the topic of belt driven vs hub motors, I have elected to go with belt motors as we likely cannot sustain the cost of hub motors. Above is the candidate I have chosen. We are sacrificing ease of configuration for cost and potentially slightly more torque.
  • There are a variety of open source path planning algos but for our sake, I think ML may be unnecessary as we plan to essentially implement a simple “back up and reroute” algo. As a result, I have elected to largely ignore available path planning algos.

PROGRESS:

I am on track as I was supposed to explore path planning algos and assist with part planning and both of those items have been accomplished.


NEXT WEEK’S DELIVERABLES:

Next week, I aim to complete the following:

  • Have a more concrete and mathematical approach to the path planning algo including GPS movement from point A to point B, object sizing algorithm ideas, and ideating on how much to back up in the case of an obstacle occurrence.
  • I want to get my team approval on my parts selection and submit it to the TA for ordering
  • I will also help prepare design presentation slides and write speaker notes to help whoever presents
  • I will also continue to coordinate with professors and our TA as well as make relevant updates to the slack and website

Tio’s Status Report for 9/21/24

WORK ACCOMPLISHED:

Parts List: This week I focused on creating an extensive document that details our choices for hardware components, especially the Raspberry Pi, GPS and IMU. I’ve decided on a model for the RPi and I’ve narrowed it down to two models for the GPS and IMU each.

My decision making criteria were: Price, Accuracy, and Ease of Communication. We’re going to be leveraging the Qwiic ecosystem that SparkFun provides with their components which removes the need for soldering. They’re also daisy chain able, but with the Qwiic HAT for the Pi, we might not need to do that.

I spent a lot of time envisioning how the different parts of the board will communicate. One concern I had is that the Qwiic HAT will take up all the pins on the RPi’s GPIO header. Two of those pins (UART) would be needed to communicate with the VESC (speed controller). After some further research, I discovered that Pi 5 has a UART connector separate from the pins on the GPIO header. I’m not yet sure if that’ll be sufficient for communicating with the VESC.

Additionally, the GPS and IMU components I’ve been looking at don’t have well documented Python Packages. I had been hoping to use Python but Arduino libraries for these components have better documentation.

PROGRESS:

I’m currently on schedule with my tasks. We planned to have a finalized parts list by Monday (09/23) and we’re on track to completing it after a few discussions with course staff.

NEXT WEEK’S DELIVERABLES:

Next week, I plan to focus on outlining the software stack for the RPi, sensors and motors. I’d like to make an additional block diagram focusing on the software components on the Pi that will connect to the webapp, poll the sensors and signal the VESC(if needed).

I would like to get my hands on a Pi5 as soon as possible so we can begin preliminary tests like connecting to the website, creating logs, etc. We can borrow one from the course inventory so I will put in a request ASAP.

Team Status Report for 9/21/24

SIGNIFICANT RISKS + MANAGEMENT:

DESIGN CHANGES:

  • Adjusting the Skateboard Deck Manufacturing
    • Why: After reviewing the budget and discussing the pros and cons of designing vs. purchasing a premade skateboard deck, we opted to go with a premade one to reduce costs and speed up development time.
    • Cost Incurred: Decrease in cost–we save on time and manufacturing resources (laser cutting, materials).
    • Mitigation: By purchasing the deck, we avoid delays in custom fabrication and ensure more time for integration of components.

PROGRESS:

  • Completion of Requirements Gathering for Web App
    • The requirements for the Skateboard Control (Accelerate, Decelerate, Reverse, Recall) and Real-Time Data (Battery Life, Speedometer, Trip Details, Environmental Impact) components have been thoroughly documented.
    • Defined both the UI design and functionality for these components, including how data will be retrieved from the skateboard’s hardware.
  • Figma UI Design Mockups
  • Initial design for the mobile-first UI, showcasing design choices of color palette as well as home page and connection page.
  • Decided on Raspberry Pi model for the board
  • Narrowed down to two choices for the IMU and GPS
  • Performed an early cost estimate for parts

Sharon’s Status Report for 9/21/24

WORK ACCOMPLISHED:

Requirements Document: I compiled a comprehensive requirements document that outlines the functionalities for the skateboard control and real-time data components of the web app. I detailed the design, functionality, data sources, and any additional features for the following:

  • Skateboard Control:
    • Designed buttons and sliders for Accelerate, Decelerate, Reverse, and Recall features.
    • Included considerations for visual feedback such as acceleration curves, braking indicators, and pathfinding warnings.
  • Real-Time Data:
    • Designed the UI for battery life, speedometer, trip details, and environmental impact metrics.
    • Outlined how data is retrieved from hardware components like the Battery Management System, GPS, and motor encoder.
  • Connection Page Design:
    • Created a section for connecting the skateboard to the app via Bluetooth/Wi-Fi, including a flow for scanning and selecting devices, displaying connection status, and offering auto-reconnect functionality.

UI Design:

  • Started designing the mobile UI for the web app in Figma.
  • Focused on mobile-first design since the app will be primarily used on phones.
  • Began thinking about how to create a fluid design that works smoothly on mobile but doesn’t break on desktop screens.

Discussions:

  • Talked to group members about having a simple backend server to store user data–keeping this optional for now.
  • Discussed the feasibility of designing and laser cutting the CAD of a skateboard deck in terms of budgeting and if it is the most financially smart decision for us compared to buying a premade one.

PROGRESS:

I’m currently on schedule with the tasks for this week. The requirements gathering was completed within the expected timeframe, and I was able to start on the initial UI design to which I have a clear plan for the next steps, which will involve finishing and refining the design. The schedule is below for my progress (my tasks are colored in orange):


NEXT WEEK’S DELIVERABLES:

Next week, I aim to complete the following:

  • Finalize the UI design for the mobile web app. I’ll refine the Figma design, adding more details and interactivity to better visualize the user experience. I will aim to make a prototype that we can use to see how the connections and flow of the web application will be.
  • After completing the design, I will ask for feedback from team members and adjust the UI based on their suggestions to ensure usability and functionality.
  • Set up the project environment for the web app. This will include configuring the development environment, installing necessary dependencies, and establishing version control.
  • Start coding the frontend for the web app and creating the simple components and setting up all the pages as well.