Mahlet’s Status Report for 12/07/2024

This week, mainly consisted of debugging my audio localization solution and making necessary changes to the hardware of SBB. 

Hardware

Based on the decision to change motors from servo to stepper, I had to change the mounting mechanism of the robot’s head to the body. I was able to reuse  most of the components from the previous version, and had to make the mounting stand slightly longer to be in line with our use case requirement. Now the robot can move its head very smoothly and consistently. 

My work on audio localization and its integration with the neck rotation mechanism has made significant progress, though some persistent challenges remain. Below is a detailed breakdown of my findings and ongoing efforts.

To evaluate the performance of the audio localization algorithm, I conducted simulations using a range of true source angles from 0° to 180°. The algorithm produced estimated angles that closely align with expectations, achieving a mean absolute error (MAE) of 2.00°. This MAE was calculated by comparing the true angles with the estimated angles and provides a clear measure of the algorithm’s accuracy. The result confirms that the algorithm performs well within the intended target of a ±5° margin of error.

To measure computational efficiency, I used Python’s time library to record the start and end times for the algorithm’s execution. Based on these measurements, the average computation time for a single audio cue is 0.0137 seconds. This speed demonstrates the algorithm’s capability to meet real-time processing requirements.

In integrating audio localization with the neck rotation mechanism, I observed both promising results and challenges that need to be addressed.

For audio cue detection, I tested the microphones to identify claps as valid signals. These signals were successfully detected when they exceeded an Arduino ADC threshold of 600. Upon detection, these cues are transmitted to the Raspberry Pi (RPi) for angle computation. However, the integration process revealed inconsistencies in serial communication between the RPi and the Arduino.

While the typical serial communication latency is 0.2 seconds or less, occasional delays ranging from 20 to 35 seconds have been observed. These delays disrupt the system’s responsiveness and make it challenging to collect reliable data. The root cause could be the Arduino’s continuous serial write operation, which conflicts with its role in receiving data from the RPi. The data received on the RPi seems to be handled okay, but I will proceed to validate the data side-by-side, and make sure the values are accurate.  Attempts to visualize the data on the computer side were too slow for the sampling rate of 44kHz, leaving gaps in real-time analysis.

To address hardware limitations, I have temporarily transitioned testing to a laptop due to USB port issues with the RPi. However, this workaround has not resolved the latency issue entirely.

Despite these challenges, the stepper motor has performed within expectations. The motor’s rotation from 0° to 180° was measured at 0.95 seconds, which meets the target of under 3 seconds, assuming typical latency.

Progress is slightly behind schedule, and the contingency plan for this is indicated in the google sheets of the team weekly report.

Next Steps

Resolving the serial communication latency is my highest priority. I will focus on optimizing the serial read and write operations on both the Arduino and RPi to prevent delays. Addressing the RPi’s USB port malfunction is another critical task, as it will enable me to move testing back to the intended hardware. Otherwise, I will resort to the contingency plan of using the webapp to compute the data. I will be finalizing all the tests I need for the report, and finalize integration with my team over the final week.

Shannon’s Status Report 12/7/24

This week, since I was done with everything I was in charge of, I focused my all into helping Jeffrey catch up on his parts. Jeffrey was able to have the Study Session start working, where when a user clicks start session on the WebApp, the robot display screen is able to start a timer. However, he was unable to get the pause/resume or the end session to work. As such, I sat down with him and we worked on these features. I noticed that he had a lot of debugging statements on the robot, which was good, but he wasn’t really logging anything on the WebApp. Following my advice, he did so and we realised that the event was being emitted from the RPi but it was not being received on the WebApp based on the logs. I also noticed that he had a log for when the WebSocket connected on the start but not on the in progress page and so I recommended that he add that. After he added that, I noticed that on the in progress page, the connection log was not appearing and so we waited until it appeared and then we tested the pause/resume button and it worked. Thus, we managed to debug that the issue had to do with latency. We then resolved this by switching the transport to WebSockets from Polling, and that fixed the latency issue. Then, we worked to debug why the End Session on the WebApp was not being received on the robot end. Once again, based on checking the logs, I deduced that it was probably because the events were being emitted wrongly and so the robot event handlers could not catch them. We tried fixing it to receive that event that was being sent by the WebApp instead and it worked – we finished a standard study session! This was done on Wednesday. After this, I took over all TTS and Study Session related work, but Jeffrey will work on the last part of hardware integration with the pause/resume buttons.

On Thursday, I then integrated my TTS code, and ran into some issues with the RPi trying to play audio from a “default” device and failing. After some quick troubleshooting, I decided to write a config file to set the default device to the port that the speaker was plugged into and it worked! The text-to-speech feature was working well, and there was barely any detectable difference in latency between the audio playing on the user’s computer and on the RPi through the speakers. I tested it some more to make sure it worked with various different .txt files, and when I was satisfied with the result, I moved on to integration with the Study Session feature. I worked on making sure TTS worked only while a study session was in progress (not paused). I wrote and tested some code but it was buggy and I could not get the redirection to work like I desired. I wanted it such that in the case that a Study Session had not been created yet, that the user clicking on the text-to-speech feature on the WebApp would redirect them to the create a new study session and if there was a Study Session that has been created but was on pause, it would redirect them to it. I also wanted to handle the case where if a user was using the text-to-speech feature, and the goal duration was reached, then the user going back to the study session would still trigger the pop-up to occur asking if they would like to continue or stop the session since the target duration has been reached.

On Friday, I continued to work on these features, and I managed to successfully debug them. The text-to-speech feature worked well alongside the Study Session and exhibited the desired behavior I wanted. I then worked on the Pomodoro Study Session feature, which implemented a built-in break for the user based on what they set at the start of the study session. I worked on the WebApp and the RPi, ensuring that the study and break intervals were sent correctly, and then to have it such that the study and break intervals worked, I had to create another background clock that ran alongside the display clock. The standard study session only needed a display clock since the user was in charge of pausing and resuming sessions, but since the pomodoro study session has to keep track of when to pause and resume the session automatically while sending a break reminder audio, it required a separate clock. I wrote and debugged this code and it worked well. This is also when I discovered that the text-to-speech feature could not occur at the same time due to the break reminder being played as well, and so I made a slight design change to prevent this.

Today, I will work on cleaning up the WebApp code, help Jeffrey with any RPS issues that he may face, and start on the final poster.

According to the Gantt chart and the newly linked final week schedule, I am on target.

In the next week I will work on:

  • Final overall testing with my group
  • Final poster, video, demo and report

Jeffrey’s Status Report for 12/07/2024

After finishing the final presentation slides earlier this week, the team got together to plan a final week schedule. In here, we broke down some of the remaining tasks we had to complete. For me, I was prioritizing finishing the Study Session feature with Shannon, as well as the RPS.

While the study session took longer than anticipated, we were able to make it such that the study session (in DSIdisplay.py, and studysession_start.html, studysession_inprog.html, and studysession_end.html contained all the necessary code for expected behavior. We were able to abide by the choices in our design report and ensure that all features were implemented. Now all that is left is verify the study session integration with other features, as well as pushing our Web App to AWS servers. For validation and testing, we worked on verify individual components, such as duration being sent to the RPi, or actions such as pause/resume will trigger the appropriate HTML redirection. For instance, we see “study session in progress” on the Web App, and when we press pause on the DSI display via touchscreen, we see the Web App instantly change to “study session on break”. This kind of low latency behavior is exactly what we expected. Similarly, with studysession end, we address the multiple cases, where we either end a session early (from the Web App), in which case we need to handle the timer stopping completely, or a study session ending upon reaching the desired goal duration. In the latter case, we had to handle two additional cases: 1) Student user chooses to stop studying, and we go back to the default home screen, or 2) Student continues studying, in which case there is no longer a target goal duration, the student can study as they please, but keep the timer running (from where they left off) so they can track their total study time while retaining pause + resume functionalities.

Furthermore, on Thursday and Friday, I worked on the RPS display, and am able to finish our contingency plan, where the user can take a break and play multiple rounds of RPS by sending a number of rounds to play (from Web App). We are able to play X # of rounds, and after the final round, the DSI display screen will redirect back to home. I handle cases such as when no inputs are pressed. All code written is linked in the first 15 pages of the google doc: https://docs.google.com/document/d/17t1l_ZAiQ-rBkdr-X1iHHmmFroEZomcFpkQHONkKzW4/edit?tab=t.0

In the next upcoming week, I will keep working on keypad button integration, as we try to refactor our code from software/touchscreen, to just relying on the hardware components. I plan to do this with evdev and the USB-C keypad we have purchased (listed in our BOM). I also have broken down our frame states, and with Shannon, we drew out the expected behavior of our screen for the RPS feature. We plan to use both keypads for RPS, and pause/resume study session

I have also done a lot of system testing, both individual, and for integration. Overall, the testing helped me uncover a lot of issues to debug on the software side. In terms of design changes, there aren’t any drastic changes from what we had written up in the design report, and in fact, I believe we have been able to make improvements to the UI logic and handling various inputs. For the websocket validation and hardware abstraction, we are still working on integrating those final aspects but with thorough unit testing, we should be able to combine these aspects without running into major issues. 

Team’s Status Report for 12/07/2024


Currently the most significant risk for the audio localization is noise introduced through the USB ports connection using the RaspberryPi. When tested on a local computer, the signals are in the expected range with numerically and visually different outputs for different audio input intensity. However on the RPi, every signal is already amplified and louder audio is indistinguishable from regular audio input due to the resolution range of the Arduino Uno. Lowering the voltage supplied to the microphones to the minimum viable option also doesn’t solve this issue. The contingency plan for this is to perform the audio processing on the computer that hosts the web app. This ties into the system change if we can’t find any other alternative solution for it. No financial cost is incurred due to this change.


Another aspect of the schedule currently worked on is hardware integration of the keypad to the RPi5. I (Jeffrey) am behind on this currently, but am trying to incorporate this with the existing software code that controls the RPS game/logic. We have already adapted the contingency plan, as the current RPS game and logic works with touchscreen display, so we have that prepared in the case that integration with hardware proves more difficult. We haven’t made significant changes to the schedule/block diagram and have built in slack time on tonight and Sunday to ensure that we can continue working on system integration while getting our poster/video demo in by Tuesday/Wednesday night. 


Schedule Changes: 

Our final 2 weeks schedule is included in the following spreadsheet. 

https://docs.google.com/spreadsheets/d/1LDyzVmJhB0gaUmDfdhDsG_PiFwMn-f3uwn-MvJZU7K4/edit?usp=sharing


TTS unit testing:

For the text-to-speech feature,  we tested various word lengths to find the appropriate default string to prevent high latency when using the feature. This included one sentence (less than 10 words, ~0.5s), 25 words (~2s), 50 words (~2.5-3s), 100 words (~6-8s) and a whole page of text (~30s). We also tried jotting down notes as the text was read and 50 words was determined to be the ideal length in terms of latency and how much one could note down as text is being read continuously. During this testing, we also noted the accuracy of the text being read to us and it was accurate almost all the time,  with the exception of certain words that reads slightly weirdly (e.g. “spacetime” is read as “spa-cet-ime”).  


Study Session unit testing:
We tested this by creating multiple study sessions, and then testing out the various actions that can occur. We tried:

  • Creating a Standard Study Session on the WebApp and seeing if the robot display timer starts counting up
  • Pausing on the robot display and seeing if the WebApp page switches to Study Session in Progress
  • Resuming on the robot display and seeing if the WebApp page switches to Study Session on Break
  • Ending the Study Session (before the user-set goal duration) on the WebApp and seeing if the robot display timer stops and reverts back to the default display
  • Letting the Study Session run until the user-set goal duration is reached and seeing if the pop-up asking the user if they would like to continue or to end the session appears
  • If the user clicks OK to continue, the robot display continues to count up
  • If the user clicks Cancel to stop, the robot display reverts back to default display, the WebApp shows an End Session screen displaying session duration information.
  • Created a Pomodoro Study Session and set break and study intervals on the WebApp, seeing if the robot display starts counting up
  • Waiting until the study interval is reached, and seeing if the break reminder audio “It’s time to take a break!” is played
  • Waiting until the break interval is reached, and seeing if the study reminder audio “It’s time to continue studying!” is played


TTS + Study Session (Studying features) system testing:

  • Create a Standard Study Session, test to make sure that while a study session is in progress (not paused), that the user can use the text-to-speech feature with no issues → user can use the text-to-speech feature, return back to the study session, and also if the goal duration is reached while the user is using the TTS feature, when they return back the pop-up still occurs
  • Test that using text-to-speech feature while no Study Session is ongoing is not allowed (if no study session created → redirects to create new study session page, if study session created but on pause → redirects back to current study session)
  • Test that using text-to-speech feature during a Pomodoro Study Session is not allowed 
    • This was a design change as the break reminder sent during a Pomodoro Study Session would interfere with the audio being played while the user is using the text-to-speech feature


Audio unit testing: 

For audio localization simulation, an array of true source values from 0 to 180 have been fed into the program, and have received an output as follows. The general trend it follows is consistent with the expectation, and goal of 5 degrees margin of error. The mean error calculation based on the output turned out to be 2.00 degrees. It is done by calculating the mean absolute error between the true angles and the estimated angles. This mean error provides a measure of the accuracy of the angle estimation. The lower the mean error, the higher the accuracy of the results. 
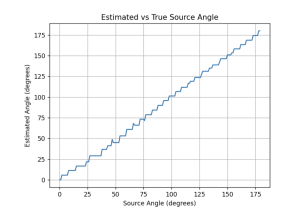
The total time it takes to compute one audio cue is 0.0137 seconds. 

This is done by using the time library in python and keeping track of the start and end times of computation.


Audio + Neck rotation testing: 

Audio testing on the microphones, signal outputs show a clap lands on the threshold of above 600 with the Arduino Uno’s ADC pin resolution. This value is used to detect a clap cue. This input is being sent to the RPi, and there have been results of inconsistent serial communication latency. This issue is still undergoing more testing. The latency is approximately 20 to 35 seconds to send angle computation from the RPi to the Arduino to change the stepper motor’s position. The most frequently occurring latency of communication is 0.2 seconds or less. 

The time it takes for the stepper motor to go from 0 to 180 degrees(our full range of motion) is 0.95 seconds.This value is inline with our expectation of less than 3 seconds for response assuming latency of 0.2 seconds. 

The accuracy testing for audio localization accuracy using a microphone is still under progress due to the latency issue, enough data hasn’t been collected to finalize this. This will be thoroughly addressed in the final report.


RPS logic unit testing:

Tested individual functions such as determine winner, and ensure register_user_choice() printed out that the right input was processed. 

I also tested the play_rps_sequence to display the correct Tkinter graphics and verified that the sequence continued regardless of user input timing. For the number of rounds, I haven’t been able to test the rounds being sent from the Web App to the RPi5, but with a hardcoded number of rounds, I’ve been able to verify that the game follows expected behavior and terminates once the number of rounds is reached, which includes rounds where no input from the user is registered. Furthermore, I had to verify Frame Transitions,
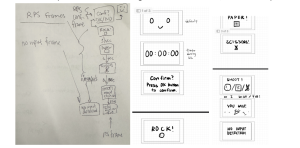
Where we would call methods to transition from state to state depending on the inputs received. For example. If we are in the RPS_confirm, we would want to transition to a display that would showcase the RPS sequence, once OK is pressed (in this case, OK would be an UP arrow key press on the keypad)
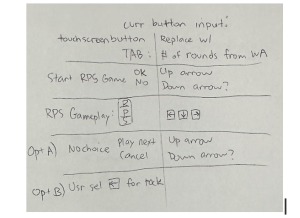
 

Finally, I had to handle websocket communication to verify that information sent from the Web App could be received on the RPi5 (in the case of handle_set_duration). The next step would be ensuring that I can properly parse the message (in the case of handle_set_rounds) to have an accurate retrieval of information sent from the Web App.


For overall system tests, I’ve been working on the RPS game flow, testing that 3 rounds can be played and that the game produces expected behaviors. I found some cases of premature termination of displaying the sequence or missing inputs, but was able to fix that through iterative testing until the game worked fully as expected utilizing touchscreen buttons. The next step from here would be eliminating the touchscreen aspect and transitioning the code to utilize key pad inputs with evdev (a linux based system that the RPi5 can incorporate). Web App integration also needs to be worked on, for the RPS game. For the study session, Shannon and I have worked on those aspects and ensured that the study session behavior works fully as expected. I would also have to start doing overall system tests on the hardware, which would be the keypad presses in this case. I want to verify that the evdev library can properly detect hardware input on RPi5, and translate that into left -> “rock”, down -> “paper”, right -> “scissors”. In the case of the up key, we would expect different behavior depending on self.state. For instance, in the rps_confirm state, an up press would act as a call to start_rps_game. If we are in the results screen, an up arrow press would act as proceeding to the next round. If we are in the last round of a set of rps games, the up arrow would act as a return home button, with the statistics of those rounds being sent to the Web App.

Jeffrey’s Status Report for 11/30/2024

This week, I was focused on the final presentation slides and Web App/DSI display integration


I focused on implementing and debugging the communication between the DSI display and the web app using WebSockets. This involved ensuring real-time synchronization of start, pause, and end session actions across both interfaces. While I am still working on the bilateral communication, I am happy to say that the Web App to RPi5 connection is working very well, where we are able to input the dynamic session parameters (name, duration, etc), and have that sent from the Web App to RPi5, with HTML redirection on the Web App side as well.

I also worked to verify that events emitted from the DSI display (e.g., end session) triggered appropriate changes on the web app. This required adding debugging tools like console.log and real-time WebSocket monitoring.


I will attach screenshots showing WebSocket debugging and synchronized end session 

I am currently on progress but will dedicate additional hours tonight and Sunday to verify end-to-end testing of all SBB components.

I also want to finalize RPS game integration and real-time user interaction using the DSI display and WebSockets.I have existing code that ensures that the RPS logic is sound, so we just need to integrate this with the display. I also have created code this past week that allows the button inputs from the keypad to be processed. We chose the left arrow to be rock, down arrow to be paper, the right arrow to be scissors, and the up arrow to be the input selection.


One risk that can jeopardize the success of the project is websocket synchronization issues, so we are working to ensure that we can have both inputs sent from RPi5 to Web App (currently working), and HTML redirection on the Web App side (work in progress). After discussing with Mahlet today, we realized we should implement more changes in views.py. If I can work with Shannon tomorrow, I am confident we can have redirection working by the middle of next week and that would fulfill the second part of the bilateral communication we desire (from RPi5 to Web App).


We also hope to have our system ready so we can run user survey feedback/tests to see if the SBB is actually helpful in both interaction and productivity when studying.

I have used tools like event listeners and logging to trace and debug issues. Gotten more familiar with HTML and Javascript, as well as incorporating socket events in python to trigger the appropriate responses. I have added robust error handling and reconnection logic to improve reliability.


Shannon’s Status Report for 11/30/24

This week, I focused on finishing up the TTS feature on the robot. Since the feature works well on the WebApp, I decided to integrate it fully with the robot’s speakers. I first ensured that the user’s input text could be sent properly via WebSockets to the robot. Once this was achieved, I then used the Google text-to-speech (gTTS) library on the RPi and had it translate the text into a mp3 file. Then, I tried to have the mp3 file play through the speakers. On my personal computer (a macbook), the line to play audio is os.system(f”afplay {audio_file}”). However, since the RPi is a linux system, this does not work and I tried using os.system(“xdg-open {audio_file}”) instead. This allowed the audio file to be played, but also opened up a command terminal for the VLC media player, which is not what I wanted, since the user would not be able to continue playing audio files unless they quit the terminal first. Thus, I had to look up ways to play the audio file and this led me to using os.system(f“mpg123 {audio_file}”). It worked well, and was able to play the audio with no issues. I timed the latency and it was able to be mostly under 3s for a text with word length of 50 words. If the text was longer and was broken into 50 word chunks, the first chunk would take slightly longer, but the subsequent chunks would be mostly under 2.5s which is in line with our use case and design requirements. With this, the text-to-speech feature is mostly finished. There is still a slight issue where for a better user experience, I wanted the WebApp to display when a chunk of text was done reading, but the WebApp is unable to do so. After some debugging, I found that it was because the WebApp tries to display before the WebSocket callback function has returned. Since the function is asynchronous, I would have to use threading on the WebApp if I still want this display to appear. I might not keep this slight detail because introducing threading could cause some issues and the user should be able to tell when a chunk of text is done reading by the audio itself. Nevertheless, the text-to-speech feature now works on the robot, the user can input a .txt file, the robot will read out the first x number of words and then when the user clicks continue, reads out the next x number of words and so on, so I think this feature is final demo ready.


According to the Gantt chart, I am on target. 


In the next week, I’ll be working on:

  • Helping Jeffrey finish up the Study Session feature
  • Finishing up any loose ends on the WebApp (deployment, code clean-up, etc.)


For this week’s additional question:

I had to learn how to use the TTS libraries such as pyttsx3 and gTTS. I thoroughly reviewed their respective documentation at https://pypi.org/project/pyttsx3/ and https://pypi.org/project/gTTS/ to understand how to configure their settings and integrate them into my project. When debugging issues, I relied on online forums like Stack Overflow, which provided insights from others who encountered similar problems. For example, when I encountered the run loop error, I searched for posts describing similar scenarios and experimented with the suggested solutions. It was there that I saw someone recommending gTTS instead, saying how this issue would be prevented because unlike pyttsx3, it does not use an engine and relies on converting text to mp3 files first and then playing instead of converting and playing as it went. This allowed me to switch over to gTTS, which was what we used in the end. 

I also had to learn WebSockets for real-time communication between the RPi and the WebApp. I read through the documentation online at https://socket.io/docs/v4/ which was great for understanding how the communication process worked. It also taught me how to set up a server and client, manage events, and handle acknowledgments. For debugging, I used tools that I had previously learnt in other classes, such as the Chrome browser developer tools console and the VSCode Debugger with breakpoints and logpoints, which allowed me to diagnose CORS issues and verify if events were being emitted and if the emitted events were being received through the logs/erros diplayed.

Mahlet’s Status Report for 11/30/2024

As we approach the final presentation of our project, my main focus has been preparing for the presentation, as I will be presenting the coming week. 

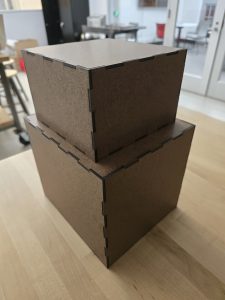
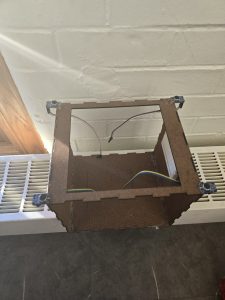
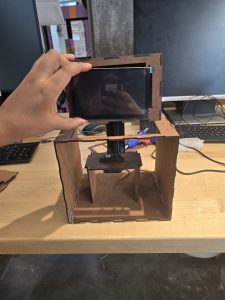
In addition to this, I have assembled the robot’s body, and made necessary modifications to the body to make sure every component is placed correctly. Below are a few pictures of the changes so far. 

I have modified the robot’s face so that it can encase the display screen. Previously, the head was a solid box. The servo to head mount is now properly assembled. The head is well balanced using the stand I used to mount the motor to. This way there is space to place the Arduino, speaker and RaspberryPi accordingly. I have also mounted the microphones to the corners as desired. 

Before picture: 

After picture: 

Mounted microphones on to the robot’s body
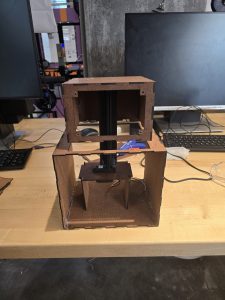
Assembled Body of the robot

Assembled body of the robot including the display screen
 

I have been able to detect a clap cue using the microphone, by identifying the threshold of a loud enough clap detectable by the microphone. I do this processing in the raspberry pi, and once the RPi detects the clap, it runs the signal through the direction estimate function, which spits out the angle. This angle is then sent to the Arduino to modify the motor to turn the robot’s head. Due to the late arrival of our motor parts, I haven’t been able to test the integration of the motor with the audio input.  This put me a little behind, but using the slack time we allocated, I plan to finalize this portion of the project within the coming week.

Another thing I worked on is implementing the software aspect of the RPS game, and once the keypad inputs are appropriately detected, I will meet with Jeffrey to integrate these two functionalities. 

I briefly worked with Shannon to make sure the audio output for the TTS through the speaker attached to the RPi works properly. 


Next week: 

  1. Finalize the integration and testing of audio detection + motor rotation
  2. Finalize the RPS game with keypad inputs by meeting with the team. 
  3. Finalize the overall integration of our system with the team. 

Some new things I learned during this capstone project is how to use serial communication between Arduino and a raspberry pi. I used some online Arduino resources that clearly teach how to do this. I also learned how to perform signal analysis on audio inputs to localize the source of a sound within a range. I learned how to use the concept of time difference of arrival to get my system working. I used some online resources about signal processing, and by discussed with my professors to clarify any misunderstandings I had towards my approach. I also learned from online resources, Shannon and Jeffrey how a WebSocket works. Even though my focus was not really on the web app to RPi communication, it was good learning how their systems work.

Team’s Status Report for 11/30/2024

For this week, one risk that we are taking on is adapting the DSI display touch screen to use the keypad for inputs instead. We want to complete the pipeline of keypad to RPi5 to Web App. The Web App and RPi5 connection is working well currently, using socket.IO to maintain low latency communication. However, the next step is having keypad inputs as opposed to using the DSI display touchscreen while maintaining the low latency requirements. While it is possible that we will have some difficulties with a smooth integration process, we do not foresee any huge errors/bugs occurring. Nevertheless, should we get stuck, the mitigation plan is to use the touch screen of the DSI display.

Another minor but potential risk during the demo is that given that our project assumes a quiet study environment, the audio detection relies on identifying a higher volume threshold for the double clap audio cue. If we are in a relatively noisy environment, there is a risk of interference in the audio detection mechanism. One way to mitigate this risk is to increase the audio threshold in a noisy environment, or performing the demo in an environment the project assumes. 

One major design change is regarding the audio input mechanism. Since the RaspberryPi does not have an analog to digital converter, we have used an Arduino to get the correct values for the audio input for audio localization. This did not affect the schedule, as it was easily integrated into the integration portion of the system. Budget wise, this did not incur any budget constraints as we used an Arduino we have from a previous course. Other than that, we haven’t made any changes to the existing system design, and are mainly focused on moving forward from risk mitigation steps to final project implementations, to ensure our use cases are addressed in each system.

The schedule remains the same, with no updates to the current one. 

Overall, our team has accomplished:

  1. WebApp implementation
  2. Audio Response feature (position estimation with 5 degrees margin of error) 
  3. Partial Study Session implementation (WebApp to RPi communication completed)
  4. Partial RPS game implementation
  5. TTS Feature (able to play audio on the robot’s speaker) 

More details on each feature can be found in the individual reports.

Shannon’s Status Report 11/16/24

This week, I worked on WebSockets with Jeffrey during our Tuesday and Thursday meet-up. Initially, I spent some time helping Jeffrey set up his virtual environment, ensuring that he had access to our GitHub repository, and that ultimately he was able to run our WebApp on his computer so that he could test the DSI display showing correct information based on the WebApp inputs. Jeffrey later ran into some git commit issues that I also worked with him to resolve (he had accidentally committed the virtual environment folder to our GitHub repository, resulting in more than 1 million lines of code being committed and causing him to be unable to git pull due to the sheer volume of content). Unfortunately, as of right now, we are still running into some issues trying to use socket.IO to have the WebApp communicate with the RPi and display. Previously, we were able to communicate with just the RPi itself, however, when trying to draw up the DSI display using Tkinter, Jeffrey ran into issues with trying to communicate between the WebApp and the RPi. While WebApp to RPi communication could work, it did not work the other way around and he is still working to resolve this issue. As such, although I was hoping to be able to test the WebApp display based on the RPi-sent information, since this communication from the RPi to the WebApp is still buggy, I was unable to do so. Hopefully Jeffrey is able to resolve this issue in the next week, and I will be able to more thoroughly test the code I have written. 


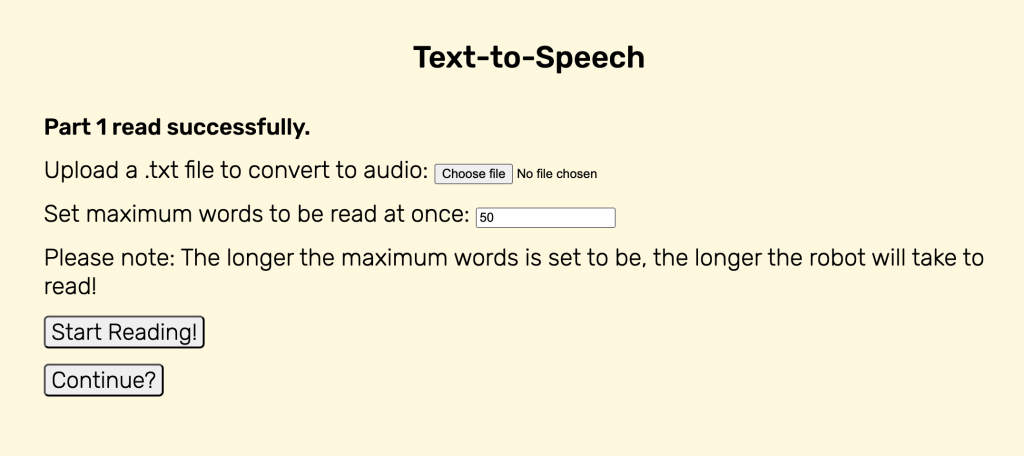
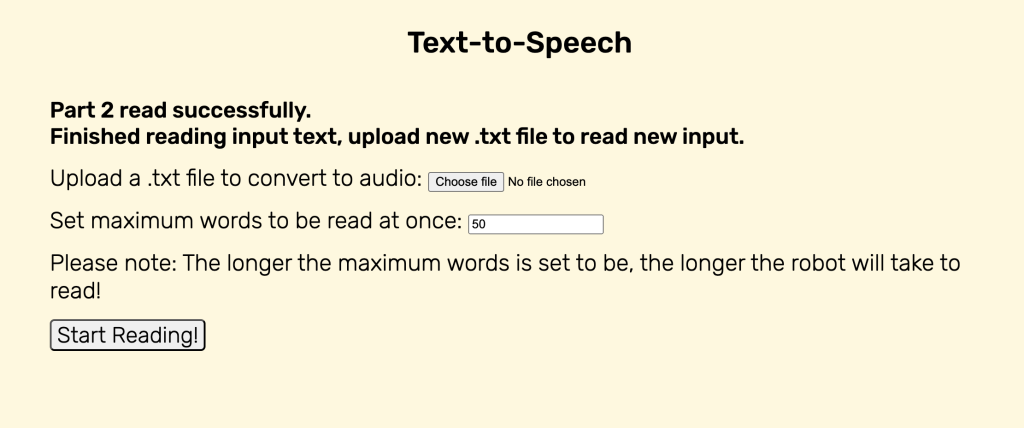
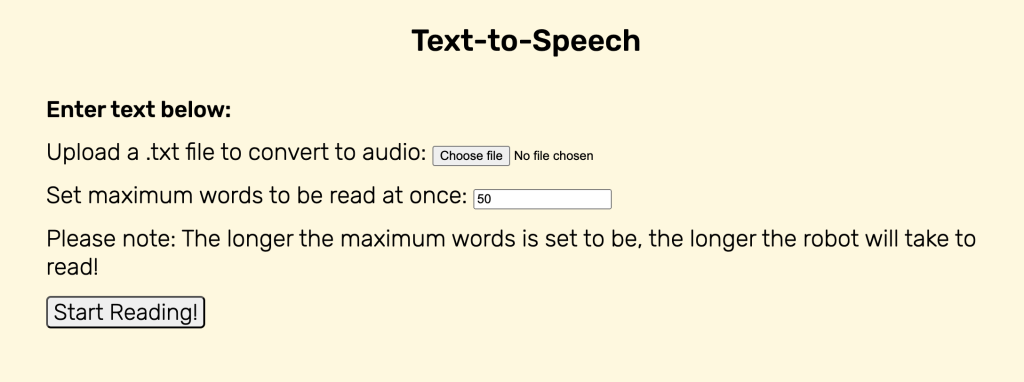
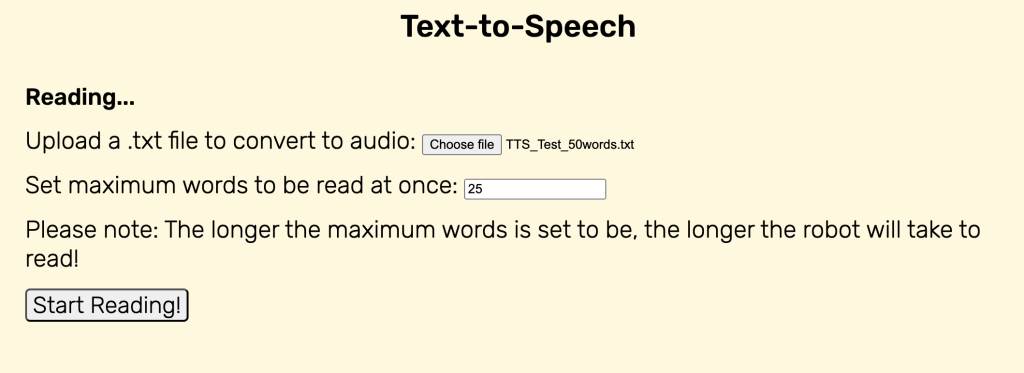
I have also worked on improving the latency of the TTS feature. Previously, there was an issue where upon a large file upload, the TTS would take a long time to process the information before speaking. As such, I have changed the TTS interface to include an option for the user to choose how many words they want in a “part”. If a user inputs 50 words, when they click “Start Reading!”, the input .txt file is processed, the text is split into 50 word parts, and the first 50-word part will be read. After reading, the website will display “Part 1 read successfully” and a new button will appear, saying “Continue?”. If the user clicks on it, the next 50-word part will be read. Once all parts have been read, a message reading “Finished reading input text, upload new .txt file to read new input.” will appear, and the “Continue?” button will disappear. 

User can upload a .txt file, default word count is set to 50 (latency of ~2s,)

Reading a 50-word text with the maximum word limit set to 25 words (should read in two parts).

After the first part/25-word chunk is read successfully, continue button appears:

After second part is read successfully, continue button disappears and the finished message appears.

Lastly, this week I also worked on a slight UI improvement for the website. When a user ends a study session, there is now star confetti! (Similar to Canvas submissions).

According to the Gantt chart, I am on target and have finished all individual components that I am responsible for. All other tasks that I am involved in are collaborative with either Jeffrey (WebSockets – RPi receiving and sending info) or Mahlet (TTS on Robot) being in charge.  Although slightly behind on what I initially planned for the interim demo (Study Session not fully working), everything else I had planned to talk about is working.

In the next week, I’ll be working on:

  • Helping Jeffrey finish up the Study Session feature
  • Helping Jeffrey to start RPS Game feature
  • Implementing TTS feature on the Robot with Mahlet

Jeffrey’s Weekly Report for 11/16/2024

One portion of the project that I am working on is the GPIO inputs -> Raspberry Pi 5 -> Web App connection/pipeline. To test the GPIO, we would connect the arrow keys via wires to GPIO pins. We would want to verify the corresponding output on the terminal. When that is working, we would be able to ensure that signals sent via GPIO can be processed by the Raspberry Pi. From there, we would use socket.IO for our Web App (acting as client) that would listen for messages sent from RPi5 (acting as server). Our goal is to validate that the arrow keypad would increase SBB interactivity with the user. In this case, we would test that the robot can seamlessly transition between states such as break screen to home screen, or play games of rock, paper, scissors with the user. Our main goal in validation is survey feedback, to see if users engaging with the SBB would say that it made a difference on their study session, compared to a group of users who are studying normally. Another goal is to test for Web App latency, to ensure communication between SBB and Web App is <250 ms. That way, users can have an easy time setting up their study sessions to promote productivity. For the display, we want users to be able to interact with the timer. Our validation goal is that the timer is displayed clearly on the DSI display, and users can easily input their study duration 

In summary, our goals are categorized as such:

  1. Ensure Web App (client) can communicate with SBB (server) via WebSockets and accurate data can be received on both ends to display correct information (e.g. WebApp can display study session being paused/resumed, and SBB can display correct information: timer stopping/resuming, synced together)
  2. We also desire seamless communication between subsystems with minimal latency (<250ms per our design report).

In the google doc below (Starting from page 1 to page 8 ), I document some of the work I’ve done this week. With most of my work being on the actual github repo.

https://docs.google.com/document/d/17t1l_ZAiQ-rBkdr-X1iHHmmFroEZomcFpkQHONkKzW4/edit?usp=sharing

We want to verify that RPi/GPIO inputs are wired, and able to be processed on the RPi side. Furthermore, we want to test socket.IO connections, such that the submissions from the Web App are valid and processable by the RPi, via emits and listen, for specific signals, such as “break” or “resume”. I am currently able to verify timer functionality, as it properly ticks up, and when the duration is entered, the timer can start from 00:00:00, and stop when the goal duration is reached. To adapt this, we would want the DSI display to be able to enter a break or default home state depending on if the user pauses the timer, or decides to end a session early.


For validation, we would want to simulate a full study session for the user, and use feedback surveys to gauge how receptive students are about their studying when they use SBB versus without any interactive aid.


I am currently on track, once I finish the Web App to RPi communication, which I plan to work on, on Sunday.  In terms of future goals, I want to set up the Rock Paper Scissors, so this would be adapting the current HTML/JS into a form where we can communicate button inputs to the RPi5, which can then send that information independently to either the DSI display to show sprites or the Web App to show game history.