Ben Solo’s Status Report for 12/7

Following our final presentation on Monday, I spent this week working on  integrations, making minor fixes to the system all around, and working with Elliot to resolve out lag issues when using two drumsticks. I also updated our frontend to reflect the actual way our system is intended to be used. Lastly, I made a modification to the object detection code that prevents swinging motions outside of the drum  pads from triggering an audio event. I’ll go over my contributions this week individually below:
1.) I implemented a sorting system the correctly maps the detected drum pads to the corresponding sound via the radius detected. The webapp allows the user to configure their sounds based on the diameter of the drum pads, so its important that when the drum pads are detected at the start of  playing session, they are correctly assigned to loaded sounds, instead of being randomly paired based on the order they are encountered. This entailed writing a helper function that scales and orders the drums based on their diameters, organizing them in order of ascending radius.

2.) Elliot and I spent a considerable amount of time on Wednesday trying to resolve our two stick lag issues. He had written some new code to be flashed to the drumsticks that should have eliminated the lad by fixing an error we had initially coded where we were at time sending more data than the window could handle. E.g. we were trying to send readings every millisecond but only had a window of 20ms which resulted in received notifications being queued and processed after some delay. We had some luck with this new implementation, but after testing the system multiple times, we realized that the performance seemed to be deteriorating with time. We are now under the impression that this is a result of diminishing power in our battery cells, and are now planning on using fresh batteries to see if that resolves our issue. Furthermore, during these tests I realized that our range for what constitutes an impact was too narrow, which often times resulted in a perceived lag because audio wasn’t being triggered following an impact. To resolve this, we tested with a few new values, settling on a range of 0.3 m/s^2 to 20m/s^2 as a valid impact.

3.) Our frontend had a bunch of relics from our initial design which either needed to be removed or reworked. The main two issues were that the drum pads were being differentiated via color as opposed to radius, and that we still had a button saying “identify my drum set” on the webapp. The first issue was resolved by changing the radii of the circles representing the drum pads on the website and ordering them in a way that corresponds with how the API endpoint orders sounds and detected drum pads at the start of the session. The second issue regarding the “identify drum set” button was easily resolved by removing the button that triggers the endpoint for starting the drum pad detection script. The code housed in this endpoint is still used, but instead of being triggered via the webapp, we set our system up to run the script as soon as a playing session starts. I thought this design made more sense and made the experience of using our system much more simple by eliminating the need to switch back and fourth between the controller system and the webapp during a playing session. Below is the current updated frontend design:
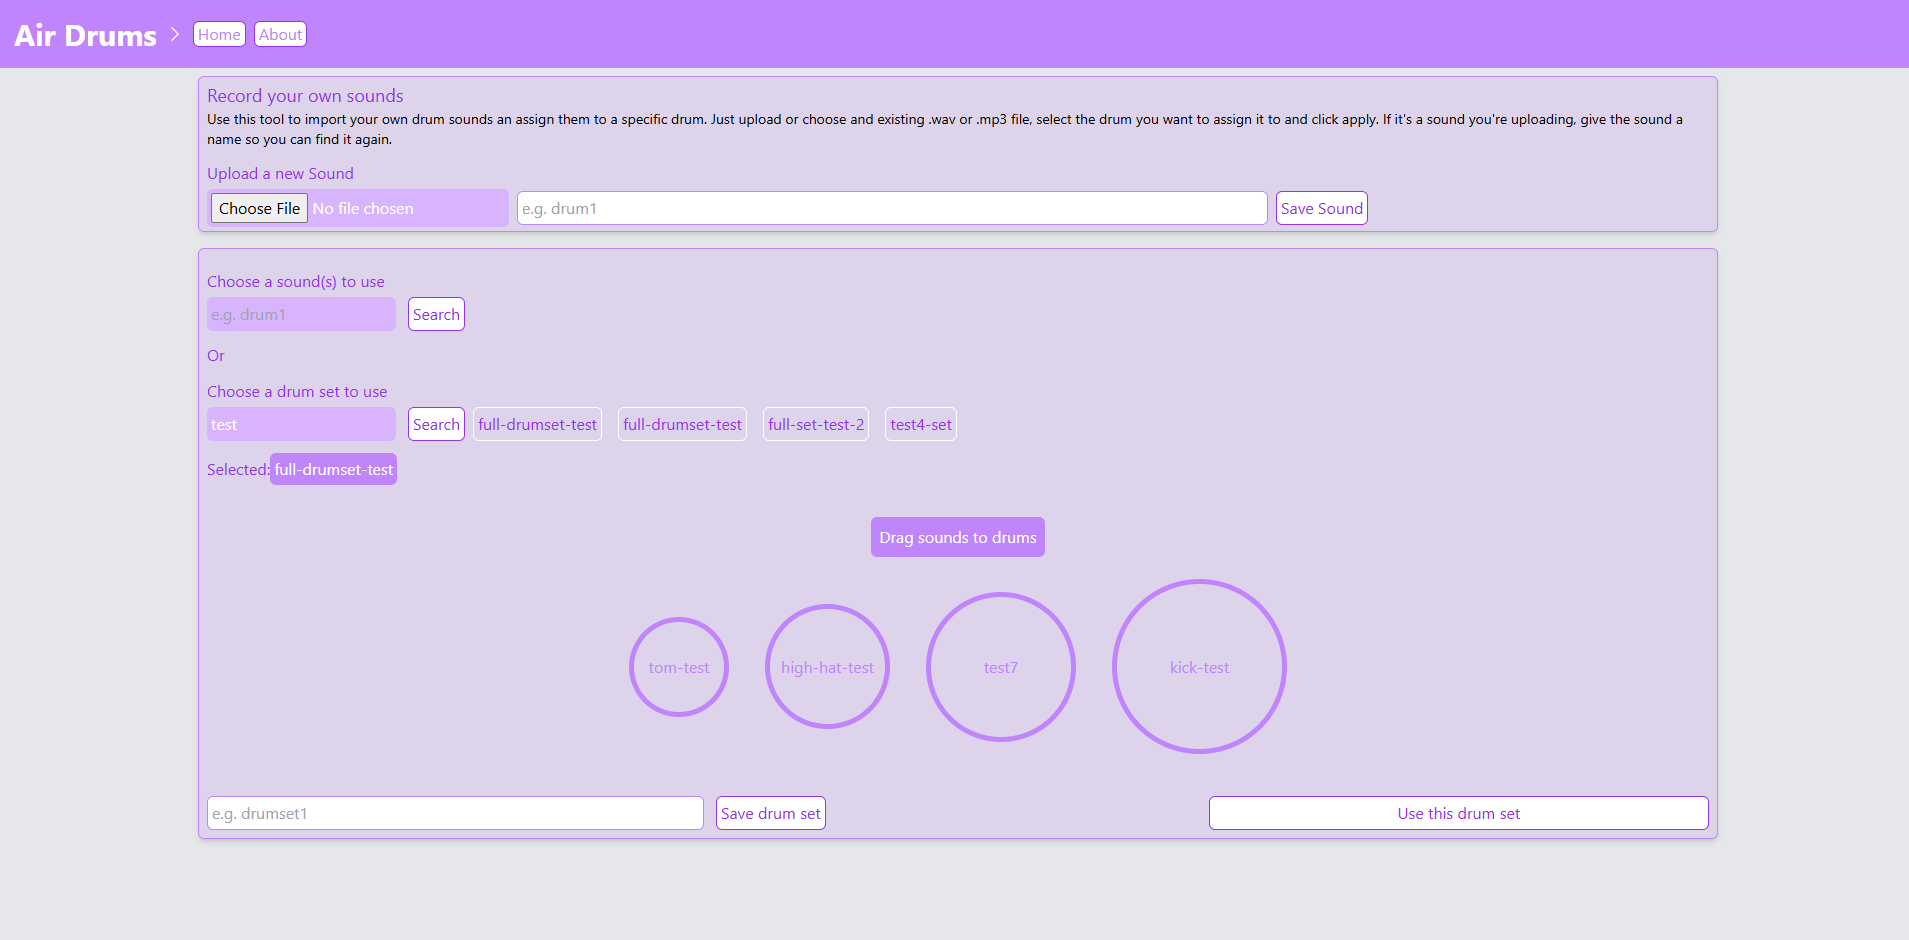
4.) As it was prior to this week, our object tracking system had a major flaw which had previously gone unnoticed: when the script identified that the drum stick tip was not within the bounds of one of the drum rings, it simple continued to the next iteration of the frame processing loop, not updating our green/blue drum stick location prediction variables. This resulted in the following behavior.:
a.) impact occurs in drum pad 3.
b.) prediction variable is updated to index 3 and sound for drum pad 3 plays.
c.) impact occurs outside of any drum pad.
d.) prediction variable is not updated with a -1 value and thus plays the last know drum pad’s corresponding sound, i.e. sound 3
This is an obvious flaw that causes the system to register invalid impacts as valid impacts and play the previously triggered sound. To remedy this, I changed the CV script to update the prediction variables with the -1 (not in a drum pad) value, and updated the sound player module to only play a sound if the index provided ins in the range [0,3] (i.e. one of the valid drum pad indices). Our system now only plays a sound when the user hits one of the drum pads, playing nothing is the drum stick is swung our hit outside of a drum pad.

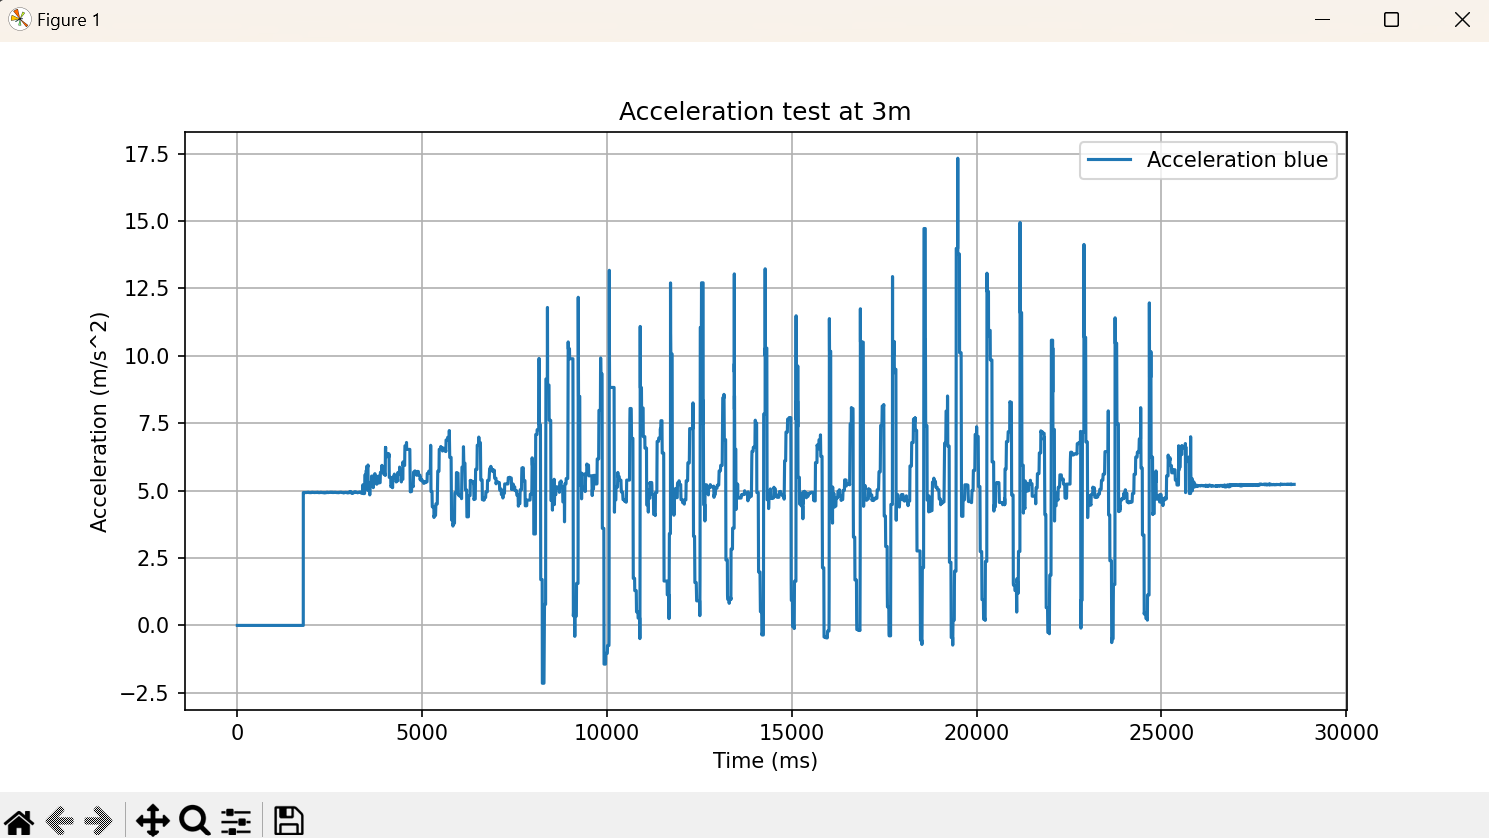
I also started working on our poster, which needs to be ready a little earlier than anticipated given our invitation to the Tech Spark Expo. This entails collecting all our graphs/test metrics and figuring out how to present then in a way that conveys meaning to the audience given our use case. For instance, I needed to figure out how to explain that a graph showing 20 accelerometer spikes verifies our BLE reliability within a 3m radius of our receiving laptop.

Overall, I am on schedule and plan on spending the coming weekend/week refining our system and working on the poster, video, and final report. I expect to have a final version of the poster done by Monday so that we can get it printed in time for the Expo on Wednesday.
Team Status Report for 12/7

In the past week our team made significant progress towards completing DrumLite. As was previously the case the one issue we are still encountering, which at this point is the only real threat to the success of our project, is related to laggy performance when using two drumsticks simultaneously.  Currently, Elliot has written and flashed new firmware to the ESP32’s which we very much hope to resolve the issue. We plan on testing and adjusting our implementation this weekend in preparation for the TechSpark Engineering Expo on Wednesday. Our progress is on schedule and in the coming days we aim to complete our entre integrated system, construct our poster, and start the demo video as to allow for sufficient time around demo day to prepare and write the final report. Additionally, we will conduct further tests highlighting tradeoffs we made for our system which will be included in our poster and final report.

The unit and system tests we’ve conducted so far are as follows:
1.) Ensure that the correct sound is triggered 90% of the time. This test was conducted by running our full system (CV, pad location, BLE, and audio playback) and performing hits on the 4 drum pads sequentially in the order 1, 2, 3, 4. For each impact, the expected audio and actual audio was recorded. Of the 100 samples taken, 89 impacts triggered the correct sound. While this is fairly close to the goal 90%, this led us to realize that we needed a tool allowing the user to select a specific HSV color range to accommodate for varying ambient lighting. Our new design prompts the user to tune the HSV range using HSV sliders and a live video feed of the color mask being applied at the start of each session.

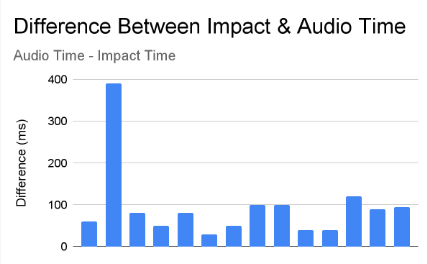
2.) Verify that the overall system latency is below 100ms. This test was conducted by recording a video of performing a series of hits, then analyzing the video and audio recordings to determine when an impact occurred and when the sound was played. The difference between these two time stamps was recorded for each impact and the average was found to be 94ms. This average is however high due to one outlier in the data which had a latency of 360ms. Through further testing we realized that this was a result of our BLE module queueing data when the system was overloaded, and thus triggering an audio event whenever the impact was read from the queue. Elliot thus began implementing new firmware for the microcontrollers that reduces the connection interval and prevents the queuing of events in most cases.

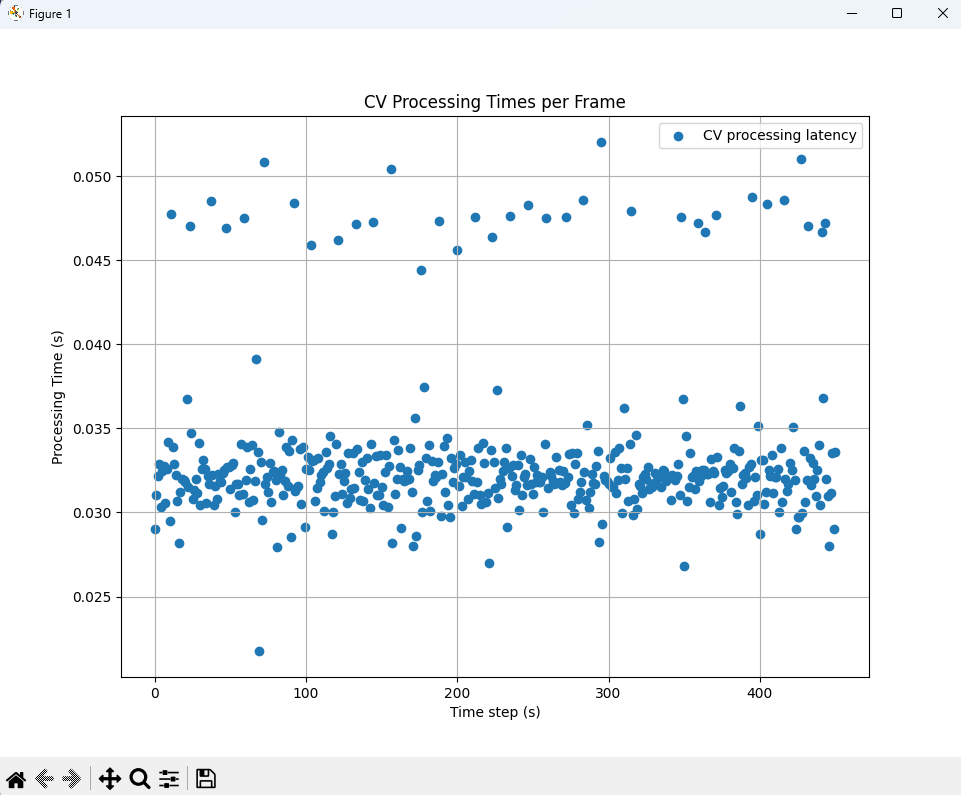
3.) Verify that the latency of the CV module is less than 60ms per frame. This test was conducted by timing each iteration of our CV loop, each of which processes a single input frame. The data plots were plotted and the values average, resulting in a mean latency of 33.2ms per frame.

4.) verify BLE reliability within a 3m range of the user’s laptop. This test was conducted by recording accelerometer data for 20 impacts per drumstick at a distance of 3m from the laptop. By visually inspecting the graph of the accelerometer data, we were able to see that each of the 2o impacts was clearly identifiable and no data was lost.

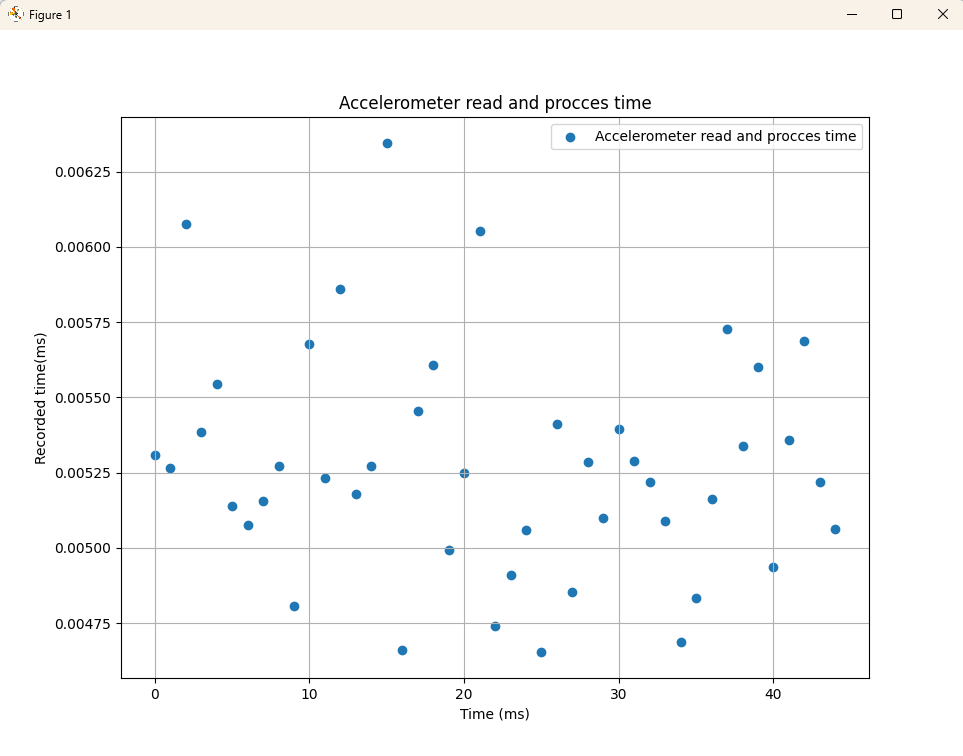
5.) Verify that accelerometer read + data processing delay is sub 5ms. To conduct this test, we placed two timers in our code. One was placed just before the accelerometer data was read, and the other just before an audio event was triggered. About 100 readings were recorded, plotted, and average, resulting in an average delay of 5ms per impact

6.) Ensure less than 2% BLE packet loss. This test was conducted by creating counters which track packets sent ad packets received for each of the two drumsticks. By verifying that after execution, both counters match (or are within 2% of each other), we were able to ascertain a packet loss rate of ~2%.

7.) Verify BLE round trip latency below 30ms. TO conduct this test we started a timer on the host laptop, sent a notification to the ESP32’s, and measured the time at which the response was received at the host laptop. By averaging these recordings, we determined an average RTT of 17.4ms, meaning the one way latency is about 8.7ms.

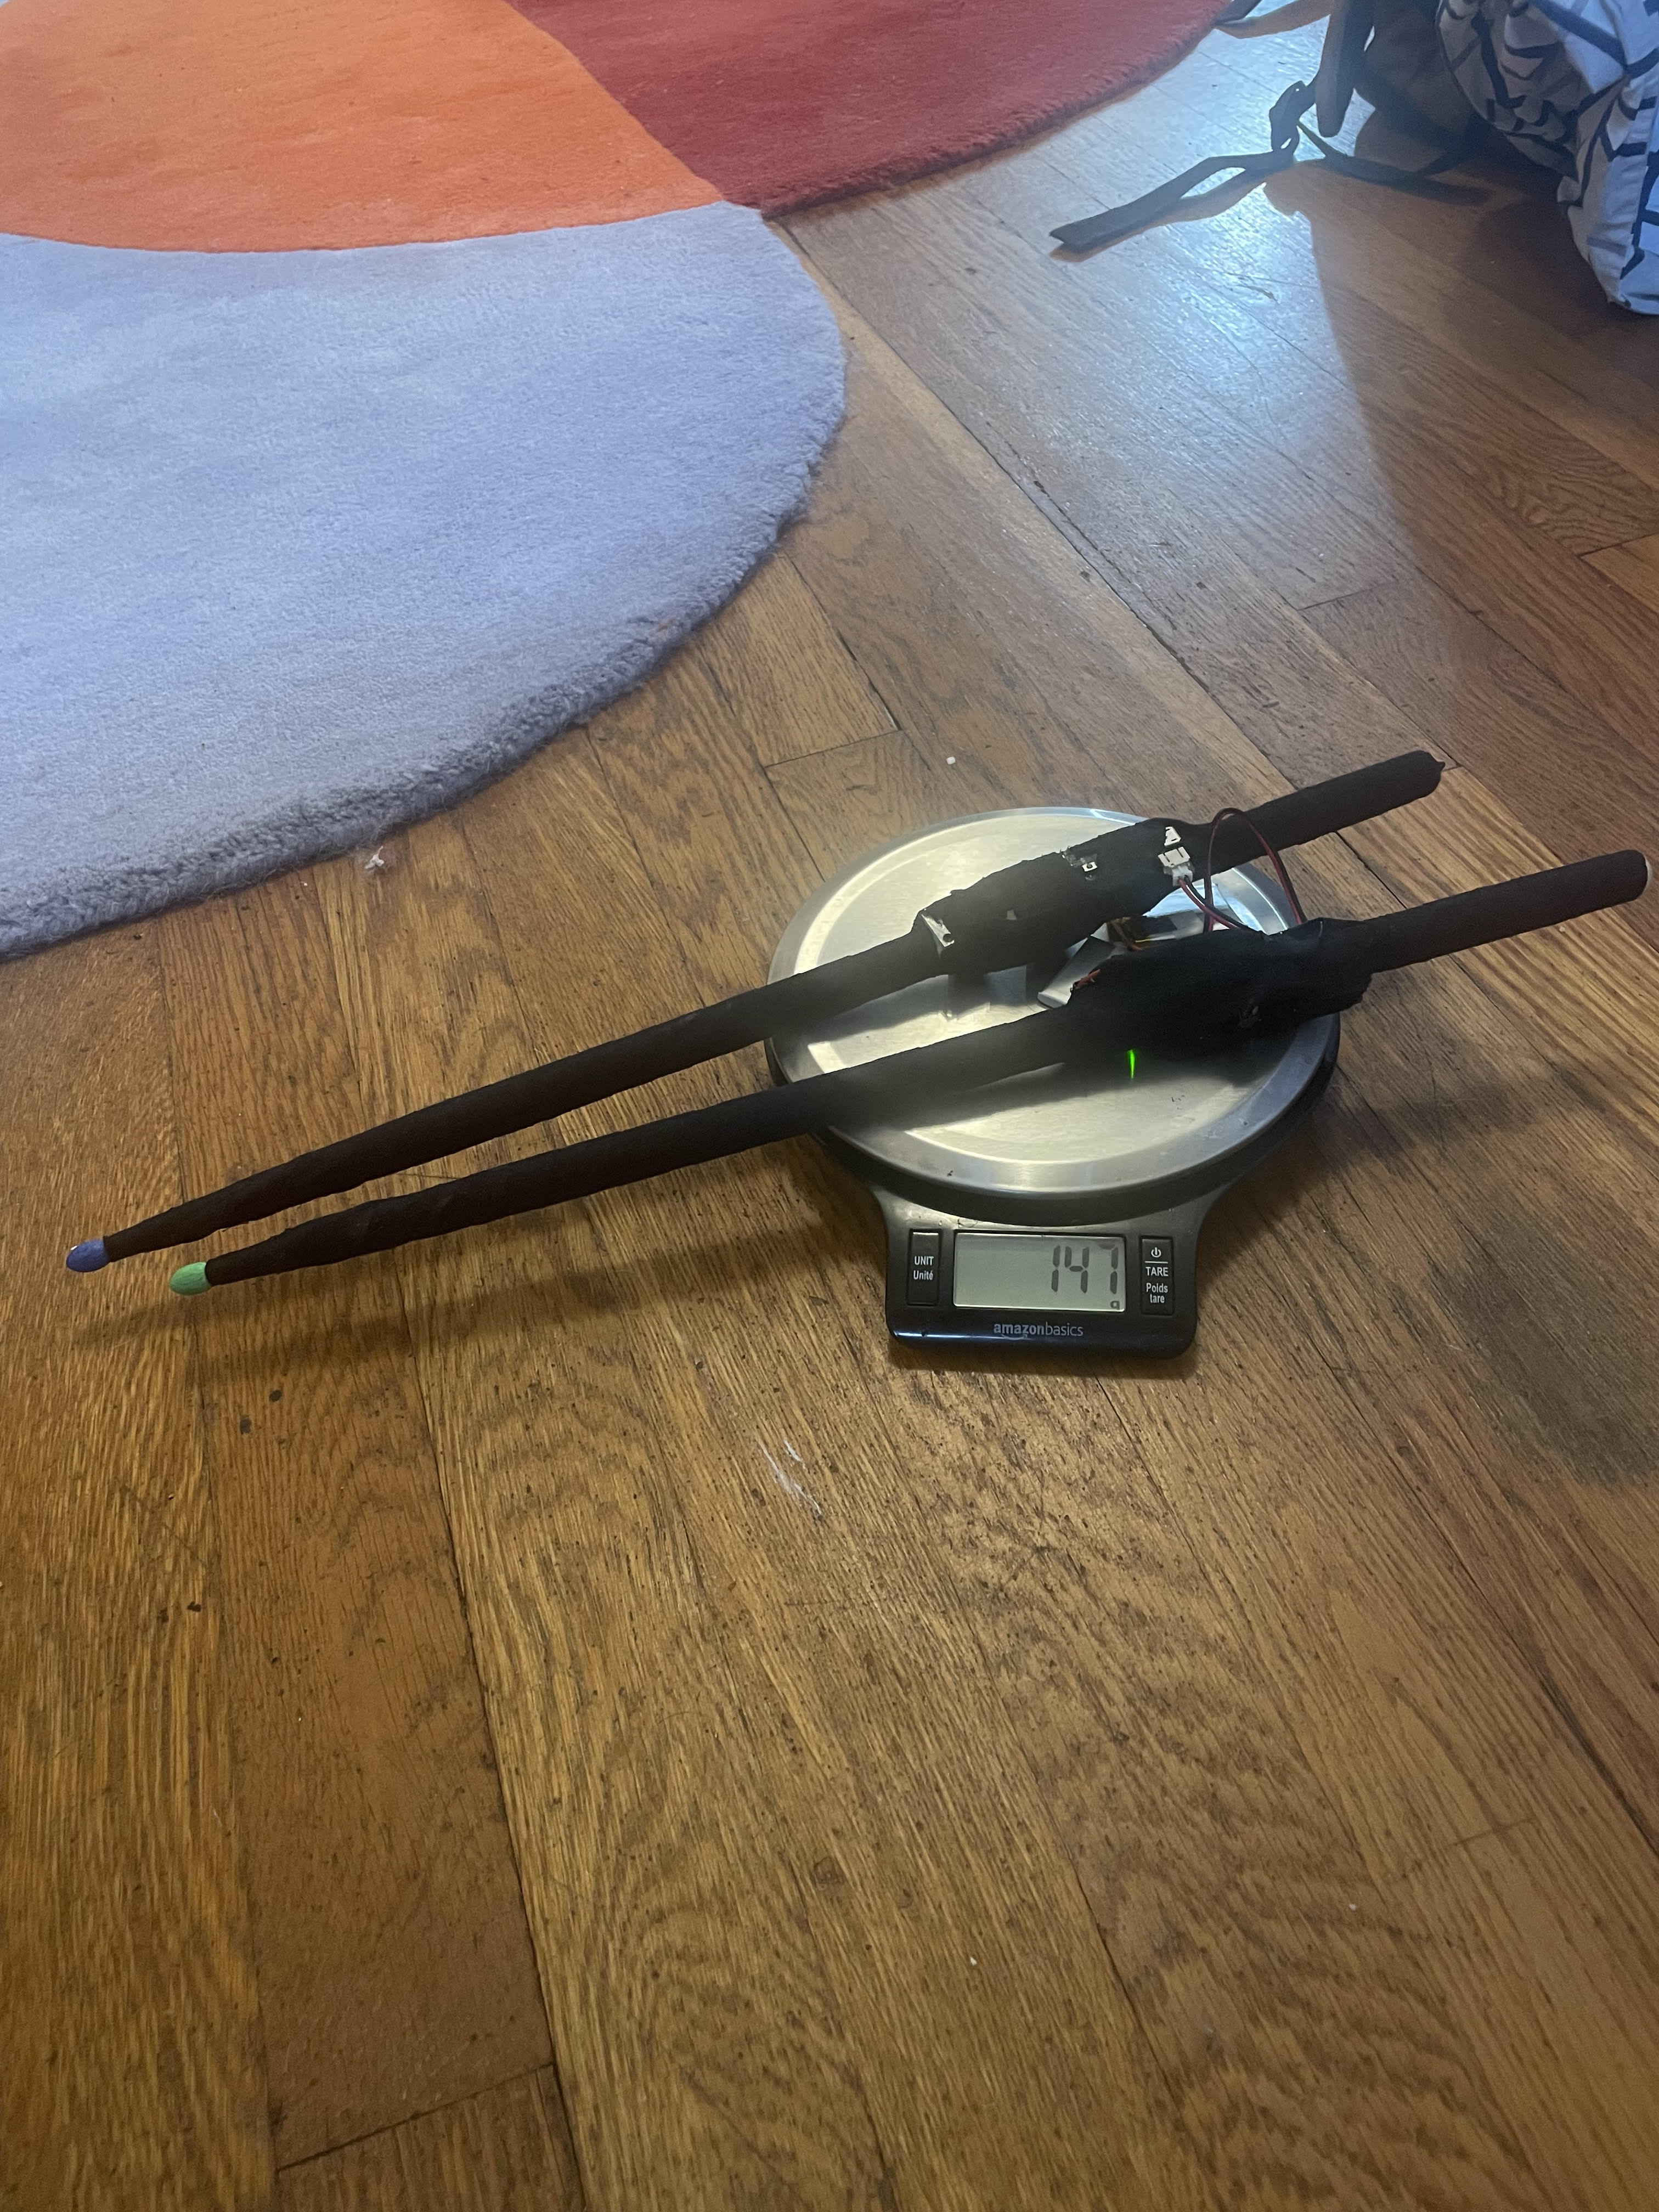
8.) Weight requirements (drumsticks combined less than 190.4g and connective components below 14.45g). To verify these requirements we simply weighed the connective components (i.e. wires and athletic tape) as well as the entire drumsticks. The two drumsticks weighed a collective 147g and the connective components weighed 5.1g, both well below our requirements.

9.) Size requirements (minimum achievable layout area of 1644cm^2). To verify this, we configured the 4 drum pads in their minimum layout (all tangent to one another) and measured the height and width in their maximum dimensions. As expected, the layout measured 1644cm^2

Overall we are making good progress, are on schedule, and hope to complete our project this weekend so we can take our time in preparation for the Expo on Wednesday and get a head start on some of the final project submissions in the coming week.

Ben Solo’s Status Report for 11/30

Over the last week(s), I’ve focused my time on both creating a tool for dynamically selecting/tuning precise HSV values and conducting tests on our existing system in anticipation of the final presentation and the final report. My progress is still on schedule with the Gant Chart we initially set for ourselves. Below I will discuss the HSV tuning tool and tests I conducted in more detail.
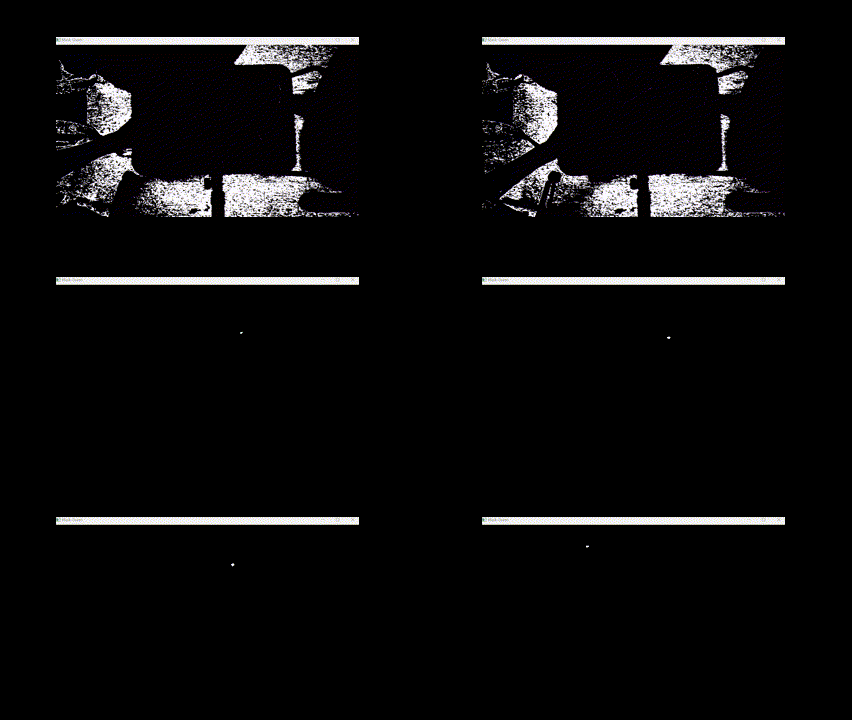
As we were developing our system and testing the integration of our CV  module, BLE module, and audio playback module, we quickly realized that the approach of finding uniform and consistent lighting was pretty much unattainable without massively constraining the dimensions to which the drum set could be scaled. In other words, if we used a bunch of fixed lights to try and keep lighting consistent, it would a.) affect how portable the drum set is and b.) limit how big you could make the drum set as a result of a loss in uniform lighting the further the drum pads move from the light source. Because the lighting massively impacts the HSV values used to filter and detect the drum stick tips in each frame, I decided we needed a tool that allows the user to dynamically change the HSV values at the start of the session so that a correct range can be chosen for each unique lighting environment. When our system controller (which starts and monitors the BLE, CV, and audio threads) is started, it initially detects the rings locations, scales their radii up by 15mm and shows the result to the user so they can verify the rings were correctly detected. Thereafter, two tuning scripts start, one for blue and one for green. In each case, two windows pop up on the user’s screen, one with 6 sliding toolbar selectors and another with a live video feed from the webcam with the applied blue or green mask over it. In an ideal world, when the corresponding blue or green drumstick is held under the camera, only the colored tip of the drumstick should be highlighted. However, since lighting changes a lot, the user now has the ability to alter the HSV range in real time and see how this affects the filtering. Once they find a range that accurately detects the drum stick tips and nothing else, the user hits enter to close the tuning window and save those HSV values for the playing session.  Below is a gif  of the filtered live feed window. It shows how initially the HSV range is not tuned precisely enough to detect just the tip of the drumstick, but how eventually when the correct range is selected, only the moving tip of the drumstick is highlighted.

Following building this tool, I conducted a series of verification and validation tests on parts of the system which are outlined below:

1.) To test that the correct sound was being triggered 90% of the time I conducted the following tests. I ran our whole system and and played drums 1, 2, 3, 4 in that order repeatedly for 12 impacts at a time, eventually collecting 100 samples. For each impact, I recorded what sound was played. I then found the percentage of impacts for which the drum pad hit corresponded correctly to the sound played and found this value to be 89%.

2.) To verify that the overall system latency was below 100ms, I recorded a video of myself hitting various drum pads repeatedly. I then loaded the video into a video editor and split the audio from the video. I could then identify the time at which the impact occurred by analyzing the video and identify when the audio was played by finding the corresponding spike in the audio. I then recorded the difference between impact time and playback time for each of the impacts and found an average overall system latency of 94ms. While this is below the threshold we set out for, most impacts actually have a far lower latency. The data was skewed by one recording which had ~360ms of latency.

3.) To verify that our CV module was running in less than 60ms per frame, I used matplotlib to graph the processing time for each frame and found the average value to be 33.2ms per frame. The graph is depicted below. 

I conducted several other more trivial tests, such as finding the weight of the drumsticks, the minimum layout dimensions, and verifying that the system can be used reliably within a 3m range of the laptop, all of which yielded expected results as outlined in our use case and design requirements.

In response to the question of what new tools or knowledge I’ve had to learn to progress through our capstone project, Id say that the two technologies I had to learn about and learn how to implement were CV (via openCV and skimage), and audio playback streaming (via pyAudio). I had never worked with either of them before so it definitely took a lot of learning before I was able to implement any strong, working code. For CV, I’d say I probably learned the most from reading other people (especially Belle’s) initial CV code. Her code used all the techniques I needed to use for building my HSV range selecting tool as well as the module I wrote for initially detecting the locations and radii of the drum pads. I read through her code as well as various other forums such as stack overflow whenever I encountered issues and was able to learn all I needed in order to implement both of these modules. In the case of audio playback streaming, I’d say I learned it mostly through trial and error and reading on stack overflow. I probably went through 6 iterations of the playback streaming module before I found a solution with low enough playback speed. Because many other applications such as drum machines or electronic synthesizers encountered many of the same issues as I was when trying to develop an efficient playback  module, there was a large amount of information online, whether that be regarding using pyAudio streaming or overall concepts on low latency audio playback (such as preloading audio frames, or initializing audio streams prior to the session)

In the coming week the most pressing goal is to determine why playing with two connected drumsticks at once if resulting in sch a drop in performance. Once we figure out wat this issue is, I hope to spend my time implementing a system that can reliably handle two drumsticks at once. Additionally, I hope to start working on either the poster or video as to alleviate some stress in the coming two weeks before capstone ends.

Ben Solo’s Status Report for 11/16

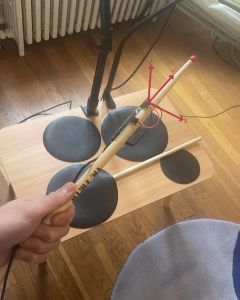
This week I worked on determining better threshold values for what qualifies as an impact. Prior to this week we had a functional system where the accelerometer ESP32 system would successfully relay x, y, z acceleration data to the user’s laptop, and trigger a sound to play. However, we would essentially treat any acceleration as an impact and thus trigger a sound. We configured our accelerometer to align its Y-axis parallel to the drumstick, the X-axis to be parallel to the floor and perpendicular to the drumstick (left right motion), and the Z-axis to be perpendicular to the floor and perpendicular to the drumstick (up-down motion). This is shown in the image below:

Thus, we have two possible ways to retrieve relevant accelerometer data: 1.) reading just the Z-axis acceleration, and 2.) reading the average of the X and Z axis acceleration, since these are the two axis with relevant motion. So on top of finding better threshold values for what constitutes an impact, I needed to determine what axis to use when reading and storing the acceleration.  To determine both of these factors I ran a series of tests where I mounted the accelerometer/ESP32 system to the drumstick as shown in the image above and ran two test sequences. In the first test I used just the Z-axis acceleration values and in the second I used the average of the X and Z-axis acceleration. For each test sequence, I recorded 25 clear impacts on a rubber pad on my table. Before starting the tests, I did preformed a few sample impacts so I could see what the readings for an impact resembled. I noted that when an impact occurs (the stick hits the pad) the acceleration reading for that moment is relatively low. So for the tests purposes, an impact was identifiable by seeing a long chain of constant accelerometer data (just holding the stick in the air), followed by an increase in acceleration, followed by a low acceleration reading.
Once I established this, I started collecting samples, first for the test using just the Z-Axis. I performed a series of hits, recording the 25 readings where I could clearly discern an impact had occurred from the output data stream. Cases where an impact was not clearly identifiable from the data were discarded and that sample was repeated. For each sample, I stored the acceleration at the impact, the acceleration just prior to the impact, and the difference between the two (i.e. A(t-1) – A(t)). I then determined the mean and standard deviation for the acceleration, prior acceleration, and the difference between the two acceleration readings. Additionally, I calculated what I termed the upper bound (mean + 1 StdDev) and the lower bound (mean – 1 StdDev). The values are displayed below:

I repeated the same process for the second test, but this time using the average of the X and Z-axis acceleration. The results for this test sequence are shown below:

As you can see, almost unanimously, the values calculated from just the Z-axis acceleration are higher than when using the X,Z average. To then determine what the best threshold values to use would be I proceeded with 4 more tests:
1.) I set the system to use just the Z-axis acceleration and detected a impact with the following condition:

if accel < 3.151 and accel > 1.072: play sound

Here I was just casing on the acceleration to detect an impact, using the upper and lower bound for Acceleration(t).

2.) I set the system to use just the Z-axis acceleration and detected an impact with the following condition:

if (prior_Accel - Accel) < 5.249 and (prior_Accel - Accel) > 2.105: play sound

Here, I was casing on the difference of the previous acceleration reading and the current acceleration reading, using the upper and lower bounds for Ax(t-1) – Ax(t)

3.)  I set the system to use the  average of the X and Z-axis accelerations and detected an impact with the following condition:

if accel < 2.401 and accel > 1.031: play sound

Here I was casing on just the current acceleration reading, using the upper and lower bounds for Acceleration(t).

4.)  I set the system to use the average of the X and Z-axis accelerations and detected an impact with the following condition:

if (prior_Accel - Accel) < 5.249 and (prior_Accel - Accel) > 2.105: play sound

Here I cased on the difference of the prior acceleration minus the current acceleration and used the upper and lower bounds for Ax(t-1) – Ax(t).

After testing each configuration out, I determined two things:
1.) The thresholds taken using the average of the X and Z-axis accelerations resulted in higher correct impact detection than just using the Z-axis acceleration, regardless of whether casing on the (prior_Accel – Accel) or just Accel.

2.) Using the difference between the previous acceleration reading and the current one resulted in better detection of impacts.

Thus, the thresholds we are now using are defined by the upper and lower bound of the difference between the prior acceleration and the current acceleration (Ax(t-1) – Ax(t)), so the condition listed in test 4.) above.

While this system is now far better at not playing sounds when the user is just moving the drumstick about in the air, it still needs to be further tuned to detect impacts. From my experience testing the system out, it seems that about 75% of the instances when I hit the drum pad correctly register as impacts, while ~25% do not. We will need to conduct further tests as well as some trial and error in order to find better thresholds that more accurately detect impacts.

My progress is on schedule this week. In the coming week, I want to focus on getting better threshold values for the accelerometer so impacts are detected more accurately. Additionally, I want to work on the refinement of the integration of all of our systems. As I said last week, we now have a functional system for one drumstick. However, we recently constructed the second drumstick and need to make sure that the additional three threads that need to run concurrently (One controller thread, one BLE thread, and one CV thread) work correctly and do not interfere with one another. Make sure this process goes smoothly will be a top priority in the coming weeks.

Team Status Report for 11/9

This week we made big strides towards the completion of our project. We incrementally combined the various components each of us had built into one unified system that operates as defined in our use case for 1 drum stick. Essentially, we have a system where when the drumstick hits a given pad, it triggers an impact event and plays the sound corresponding to that drum pad with very low latency. Note however that this is currently only implemented for 1 drum stick, and not both. That will be our coming week’s goal. The biggest risk we identified which we had not anticipated was how much variation in lighting affect the ability of the object tracking module to identify the red colored drum stick tip. By trying out different light intensities (no light, overhead beam light, phone lights, etc.) we determined that without consistent lighting the system would not operate. During our testing, every time the light changed, we would have to capture an image of the drum stick tip, find its corresponding HSV value, and update the filter in our code before actually trying the system out. If we are unable to find a way to provide consistent lighting given any amount of ambient lighting, this will severely impact how usable this project is. The current plan is to purchase two very bright clip on lamps that can be oriented and positioned to equally distribute light over all 4 drum rings. If this doesn’t work, our backup plan is to line each drum pad with LED strips so each has consistent light regardless of its position relative to the camera. The backup is less favorable because it would require that either batteries be attached to each drum pad, or that each drum pad must be close enough to an outlet to be plugged in, which deteriorates our portability and versatility goal defined in the use case.

The second risk we identified was the potential for packet interference when transmitting from two ESP32’s simultaneously. There is a chance that when we try and use two drumsticks, both transmitting accelerometer data simultaneously, the transmissions will interfere with one another resulting in packet loss. The backup plan for this is to switch to WIFI, but this would require serious overhead work to implement. Our hope is that since most of the time impacts from two drum sticks occur sequentially, the two shouldn’t interfere, but we’ll have to see what the actual operation is like this week to be sure.

The following are some basic changes to the design of DrumLite we made this week:
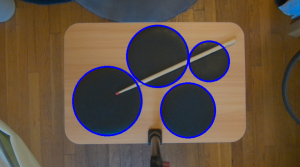
1.) We are no longer using rubber rings and instead using circular rubber pads. The reason for this is as follows. When we detect the drum pad’s locations and radii and use rings, there are two circles that could potentially bet detected: 1 being the outer circle and one being the inner circle. Since the ins no good way to tell the system which one to choose, we decided to switch to a drum pad instead where only 1 circle can ever be detected. Additionally, this also makes getting a threshold acceleration much easier since the surface being hit will now be uniform. This system works very well and the detection output is shown below:

2.) We decided to continually record the predicted drum ring which the drum stick is in throughout the playing session. This way, when an impact occurs, we don’t actually have to do any CV and can instead just perform the exponential weighting on the predicted drum rings to determine which pad was hit.

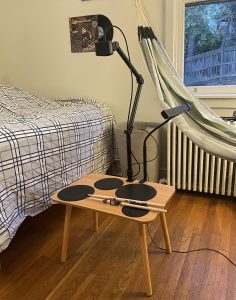
We are on schedule and hope to continue at this healthy pace throughout the rest of the semester. Below is an image of the whole setup so far:

Ben Solo’s Status Report for 11/9

This week myself and the rest of the group spent basically all of our time integrating each of the components we’ve been working on into one unified system. Aside from the integration work, I made a few changes to the controller handles two drumsticks as opposed to 1, altered the way we handle detecting the drum pads at the start of the session, and cut out the actual rubber drum pads to their specific diameters for testing. Prior to this week, we had the following separate components:
1.) A BLE system capable of transmitting accelerometer data to the paired laptop
2.) A dedicated CV module for detecting the drum rings at the start of the playing session. This function was triggered by clicking a button on the webapp, which used an API to initiate the detection process.
3.) A CV module responsible for continually tracking the tip of a drumstick and storing the predicted drum pad the tip was on for the 20 most recent frames.
4.) An audio playback module responsible for quickly playing audios on detected impacts.

We split our integration process into two steps; the first was to connect the BLE/accelerometer code to the audio playback module, omitting the object tracking. To do this, Elliot had to change some of the BLE module so it could successfully be used in our system controller, and I needed to change the way we were previously reading in accelerometer data in the system controller. I was under the impression that the accelerometer/ESP32 system would continuously transmit the accelerometer data, regardless of whether any acceleration was occurring (i.e. transmit 0 acceleration if not accelerating). However in reality, the system only sends data when acceleration is detected. Thus, I changed the system controller to read a globally set acceleration variable from the Bluetooth module every iteration of the while loop, and then compare this to the predetermined acceleration threshold to decide whether an impact has occurred of not. After Elliot and I completed the necessary changes for integration, we tested the partially integrated system by swinging the accelerometer around to trigger an impact event, then assigning a random index [1,4] (since we hadn’t integrated the object tracking module yet), and playing the according sound. The system functioned very well with surprisingly low latency.

The second step in the integration process was to combine the partially integrated accelerometer/BLE/Playback system with the object tracking code. This again required me to change how the system controller worked. Because Belle’s code needs to independently run continuously and populate our 20 frame buffer of predicted drum pads, we needed a new thread for each drum stick that starts as soon as the session begins. The object tracking code treated drum pad metadata as an array of length 4 of tuples in the form (x, y, r). I was storing drum pad meta data (x, y, r) in a dictionary where each value was associated with a key. Thus, I changed the way we this information to coincide with Belle’s code. At this point, we combined all the logic needed for 1 drumstick’s operation and proceeded to testing. Though obviously it didn’t work on the first try, after a few further modifications and changes, we were successful in producing a system the tracks the drumstick’s location, transmits accelerometer data to the laptop, and plays the corresponding sound of a drum pad when an impact occurs. This was a huge step in our projects progression, as we have a basic, working version of what we proposed to do, all while maintaining a low latency (measuring exactly what the latency is was difficult since its sound based, but just from using it, its clear that the current latency is far below 100ms).

Outside of this integration process, I also started o think about and work on how we would handle two drumsticks as opposed to 1, which we already had working. The key realization were that we need to CV threads to continuously and independently track the location of each drum stick. We would also need two BLE threads, one for each drum sticks acceleration transmission. Lastly, we would need two threads running the system controller code which handles reading in acceleration data, identifying what drum pad the stick was in during an impact, and triggering the audio playback. Though we haven’t yet tested the system with two drum sticks, the system controller is now set up so that once we do want to test it, we can easily spawn corresponding threads for the second drum stick. This involved re-writing the functions to case on the color of each drum sticks tip. This is primarily needed because the object tracking module needs to know which drum stick to track, but is also used in the BLE code to store acceleration data for each stick independently.

Lastly, I spent some time carefully cutting out the drum pads from the rubber sheets at the diameters 15.23, 17.78, 20.32, 22.86 (cm) so we could proceed with testing. Below is an image of the whole setup including the camera stand, webcam, drum pads, and drum sticks.

We are definitely on schedule and hope to continue progressing at this rate for the next few weeks. Next week, I’d like to do two things: 1.) I want to refine the overall system, making sure we have accurate acceleration thresholds and assigning the correct sounds to the correct drum pads from the webapp, and 2.) testing the system with two drum sticks at once. The only worry we have is that since we’ll have two ESP32’s transmitting concurrently, they could interfere with one another and cause packet loss.


Team Status Report for 11/2

This week we made significant strides towards the completion of our project. Namely, we got the audio playback system to have very low latency and were able to get the BLE transmission to both work and have much lower latency. We think a a significant reason for why we were measuring so much latency earlier in HH 13xx was because many other project groups were using the same bandwidth and thus causing throughput to be much lower. Now, when testing at home, we see that the BLE transmission seems nearly instantaneous. Similarly, the audio playback module now operates with very low latency. This required a shift from using sounddevice to pyAudio and audio streams. Between these two improvements, our main bottleneck for latency will likely be storing frames in our frame buffer and continually doing object detection throughout the playing session.

This brings me to the design change we are now implementing. Previously we had planned to only do object detection to locate where the tips of the drum sticks are when an impact occurs; we’d read the impact and the trigger the object detection function to determine which drum ring the impact occurred in from the 20 most recent frames. However we now plan to continuously keep track of the location of the tips as the user plays, storing the (x, y) location in a sliding window buffer. Then, when an impact occurs, we will immediately already have the (x, y) locations of the tips for every frame in recent time, and thus be able to omit the object detection prior to playback, and instead simply apply our exponential weighing algorithm to the stored locations.

This however brings us to our greatest risk: high latency for continuous object detection. We have not yet tested a system that continuously tracks and stores the location of the drum stick tips. Thus, we can’t be certain of what the latency will look like for this new design. Additionally, since we haven’t tested an integrated system yet, we also don’t know if even though the individual components seems to have good latency, the entire system will, given the multiple synchronizations and data processing modules that need to interact.

Thus, a big focus in the coming weeks will be to incrementally test the latency’s of partially integrated systems. First, we want to connect the BLE module to the audio playback module so we can assess how much latency there is without the object detection involved. Then, once we optimize that, we’ll connect and test the whole system including the continual tracking of the tips of the drum sticks. Hopefully, by doing this modularly, we can more clearly see what components are introducing the most latency and focus on bringing those down prior to testing the integrated system.

As of now, our schedule has not changed and we seem to be moving at a good pace. In the coming week we hope to make significant progress on the object tracking module as well as test a partially integrated system with the BLE code and the audio playback code. This would be pretty exciting since this would actually involve using drumsticks and hitting the surface to trigger a sound, which is fairly close to what the final product will do.

Ben Solo’s Status Report for 11/2

This week I spent my time working on optimizing the audio playback module. At the start of the week my module had about 90ms of latency fir every given sound that needed to be played. In a worst case situation, we could work with this, but since we want an overall system latency below 100ms, it was clearly suboptimal. I went through probably 10 iterations before I landed on the current implementation which utilized pyAudio as the sound interface and has what feels like instantaneous playback. I’ll explain the details of what I changed/implemented below and discuss a few of the previous iterations I went through before landing on this final one.
The first step was to create a system that allowed me to both test playing individually triggered sounds via keyboard input while not disrupting the logic of the main controller I explained in my last status report. To do this, I implemented a testing mode. When run with testing=True, the controller takes keyboard inputs w, a, s, d to trigger each of the 4 sounds as opposed to the simulated operating scheme where the loop continually generates random simulated accelerometer impacts and subsequently returns a number in the range [1,4]. This allows me not only to test the latency for individual impacts, but also what the system would operate like when multiple impacts occur in rapid succession.
Having implemented this new testing setup, I now needed to revise the actual playback function responsible for playing a specific sound when triggered. The implementation from last week worked as follows:
1.) at the start of the session, pre-load the sounds so that the data can easily be referenced and played
2.) when an impact occurs, spawn a new thread that handles the playback of that one sound using the sound device library.
The code for the actual playback function looked as follows:

def playDrumSound(index)   
   if index in drumSounds:
        data, fs = drumSounds[index]
        dataSize = len(data)
        print(f'playing sound {index}')
        if dataSize < 6090:
            blockSize = 4096
        elif dataSize < 10000:
            blockSize = 1024
        else:
            blockSize = 256
        with playLock:
            sd.play(data, samplerate=fs, device=wasapiIndex, blocksize=blockSize)

This system was very latent, despite the use of the WASAPI device native to my laptop. Subsequent iterations of the function included utilizing a queue, where each time an impact was detected, it was added ton the queue and played whenever the system could first get to it., This was however a poor idea since this introduces unpredictability into when the sound actually plays, which we can’t have given playing the drums is very rhythm heavy> Another idea I implemented but eventually discarded after testing was to use streamed audio. In this implementation, I spawned a thread for each detected impact which would then write the contents of the sound file to an output stream and play it. However, for reasons still unknown to me (I think it was due to how I was cutting the sound data and loading it into the stream), this implementation was not only just as latent, but also massively distorted the sounds when played.
A major part of the issue was that between the delay inherent in playing a sound (simply the amount of time it takes for the sound to play) and the latency associated with playing the sounds, it was nearly impossible to create an actual rhythm like you would see when playing a drum set. My final implementation, which used pyAudio avoids all these issues by cutting down the playback latency so massively that it almost feels instantaneous. The trick here was a combination of many of the other implementations I had tried out. This is how it works:
1.) at the start of the session we preload each of the sounds so the data and parameters (number of channels, sampling rate, sample width, etc.) were all easily accessible at run time. Additionally, we initialize an audio stream for each of the 4 sounds, so they can each play independent from the other sounds.
2.) during the session, once and impact is detected (a keypress in my case), and the index of the sound to play has been determined, I simply retrieve the sound from our preloaded sounds as well as the associated sounds open audio stream. I then write the frames of the audio to the stream.
This results in near instantaneous playback. The code for this (both preloading and playback) is shown below:

def preload_sounds():
    for index, path in soundFiles.items():
        with wave.open(path, 'rb') as wf:
            frames = wf.readframes(wf.getnframes())
            params = wf.getparams()
            drumSounds[index] = (frames, params)
            soundStreams[index] = pyaudio_instance.open(
                format=pyaudio_instance.get_format_from_width(params.sampwidth),
                channels=params.nchannels,
                rate=params.framerate,
                output=True,
                frames_per_buffer=256
            )

def playDrumSound(index):
    if index in drumSounds:
        frames, _ = drumSounds[index]
        stream = soundStreams[index]
        stream.write(frames, exception_on_underflow=False)

Though this took a lot of time to come to, I think it was absolutely worth it. We now no longer need to worry that the playback of audio will constrain us from meeting our 100ms latency requirement, and can instead focus on the object detection modules and Bluetooth transmission latency. For reference, I attached a sample of how the playback may occur here.

My progress is on schedule this week. In the following week the main goal will be to integrate Elliot’s Bluetooth code, which also reached a good point this week into the main controller so we can actually start triggering sounds via real drum stick impacts as opposed to key board events. If that gets done, I’d like to test the code I wrote last week for detecting the (x, y, r) of the 4 rubber rings in real life, now that we have our webcam. This will probably require me to make some adjustments to the parameters of the hough_circles function we are using to identify them.

Ben Solo’s Status Report for 10/26

This week I spent the majority of my time  working on the function “locate_drum_rings” which is triggered via the webapp and initiates the process to find the (x,y) location of the drum rings as well as their radii. This involved developing test images/videos (.mp3), implementing the actual function itself, choosing to use scikit-image over cv2’s hough_circles, tuning the parameters to ensure the correct circles are selected, and testing the function in tandem with the webapp. In addition to implementing and testing this function, I made a few more minor improvements to the other endpoint on our local server “receive_drum_config” which has an error in its logic regarding saving received sound files to the ‘sounds’ directory. Finally, I changed how the central controller I described in my last status report worked a bit to accomodate 2 drumsticks in independent threads. I’ll explain each of these topics in more detail below:

Implementing the “locate_drum_rings” function.
This function is used at the start over every session, or when the user wants to change the layout of their drum set in order to detect, scale, and store the x.y locations and radii of each of the 4 drum rings. It is triggered by the “locate_drum_rings” endpoint on the local server when it receives a signal from the webapp s follows:

from cv_module import locate_drum_rings
@app.route(‘/locate-drum-rings’, methods=[‘POST’])
def locate_drum_rings():
# Call the function to detect the drum rings here
print(“Trigger received. Starting location detection process.”)
locate_drum_rings()
return jsonify({‘message’: ‘Trigger received.’}), 200

When locate_drum_rings() is called here it starts the process of finding the centers and radii of each of the 4 rings in the first frame of the video feed. For testing purposed I generated a sample video with 4 rings as follows:

1.) In MATLAB, I drew 4 rings with the radii of actual rings we plan on using (8.89, 7.62, 10.16, 11.43) at 4 different, non-overlapping locations.

2.) I then took this image and created a 6 second mp4 video clip of the image to simulate what the camera feed would look like in practice.

Then during testing, where I flag testing=True to the function, the code references the video as opposed to the default webcam. One pretty significant change however was that I decided not to use CV2’s Hough circles algorithm and instead use scikit-image’s Hough circles algorithm predominantly because it is much easier to narrow down the number of detected rings to 4, where with CV2’s it became very difficult to do so accurately and with varying radii (which will be encountered due to varying camera heights). The function itself opens the video and selects the first frame as this is all is needed to determine the locations of the drum rings. It then masks the frame  and identifies all circles it sees as present (it typically detects circles that aren’t actually there too, hence the need for tuning). Then I use the “hough_circle_peaks” function to specify that it should only retrieve the 4 circles that had the strongest results. Additionally, I specify a minimum distance between 2 detected circles in the filtering process which serves 2 purposes:

1.) to ensure that duplicate circles aren’t detected.

2.) To prevent the algorithm from detecting an 2 circles per ring; 1 for the inner and 1 for the outer radius of the rubber rings

Once these 4 circles are found, I then scale them based on the ratios outlined in the design report to add the equivalent of a 30mm margin around each ring. For testing purposes I then draw the detected rings and scaled rings back on the frame and display the image. The results are shown below:

The process involved tuning both values for minimum/maximum radii, minimum distances between detected circles, and the sigma value for the edge detection sensitivity. The results of the function are stored in a shared variable “detectedRings” which is of the form:

{1: {‘x’: 980.0, ‘y’: 687.0, ‘r’: 166.8}, 2: {‘x’: 658.0, ‘y’: 848.0, ‘r’: 194.18}, 3: {‘x’: 819.0, ‘y’: 365.0, ‘r’: 214.14}, 4: {‘x’: 1220.0, ‘y’: 287.0, ‘r’: 231.84}}

Where the index represents what drum the values correspond to.

Fixing the file storage in the “receive_drum_config” endpoint:
When we receive a drum set configuration, we always store the sound files in the ‘sounds’ directory under the names “drum_{i}.wav” where i is an index 1-4 (corresponding to the drums). The issue however was that when we receive a new drum configuration, we were just adding 4 more files with the same name to the directory, which is incorrect because a.) there should only ever be 4 sounds in the local directly at any given time, and b.) because this would cause confusion when trying to reference a given sound as a result of duplicate names. To resolve this, whenever we receive a new configuration I first clear all files from the sounds directory before adding the new sound files in. This was a relatively simple, but crucial fix for the functionality of the endpoint.

Updates to the central controller:
Given that the controller needs to monitor accelerometer data for 2 drum sticks independently, we need to run 2 concurrent instances of the controller module. I changed the controller.py file to do exactly this: spawn 2 threads running the controller code, each with a different color parameter of either red or green. These colors represent the colors of the tips of the drumsticks in our project and will be used to apply a mask during the object tracking/detection process during the  playing session. Additionally, for testing purposes I added a variation without the threading implementation so we can run tests on one independent drumstick.

Overall, this week was successful and I stayed on track with schedule. In the coming week I plan on helping Eliot integrate his BLE code into the controller so that we can start testing with an integrated system. I also plan on working at optimizing the latency of the audio playback module more since while it’s not horrible, it could definitely be a bit better. I think utilizing some sort of mixing library may be the solution here since part of the delay we’re facing now is due to the duration of a sound limiting how fast we can play subsequent sounds.

Ben Solo’s Status Report for 10/19

Over the last week I’ve split my time between two main topics: finalizing the webapp/local server interface, and implementing an audio playback module. I spent a considerable amount of time on both of these tasks and was able to get myself back up to speed on the schedule after falling slightly behind the week before.

The webapp itself was already very developed and close to being done. There was essentially just one additional feature that needed to be written, namely the button that triggers the user’s local system to identify the locations and radii of the drum rings at the start of a playing session. Doing this implies sending a trigger message from the webapp to the local server that initiates the ring detection process. To do this, I sent a post request to the local server running on port 8000 with a message saying “locate rings”. The local server needed a corresponding “locate-drum-rings” endpoint to receive this message, which also needed to be CORS enabled. This means I needed a pre-request and post-request endpoint that sets the request headers to allows for incoming POST requests from external servers. This is done as follows (only the pre-request endpoint is shown):

@app.route('/locate-drum-rings', methods=['OPTIONS'])
def handle_cors_prefilght_locate():
    response = app.make_default_options_response()
    headers = response.headers
    headers['Access-Control-Allow-Origin'] = '*'
    headers['Access-Control-Allow-Methods'] = 'POST, OPTIONS'
    headers['Access-Control-Allow-Headers'] = 'Content-Type'
    return response

Though the CV module for detecting the locations/radii of the rings isn’t fully implemented yet, once it is, it will be as easy as importing the module and calling it in the endpoint. This is once of the tasks I plan on getting to in this coming week. Both of the endpoints on the local server “locate-drum-rings” and “receive-drum-config” (which receives 4 sound files and stores them locally in a sounds directory on the users computer) work as intended and have been tested.

The more involved part of my work this week was implementing a rudimentary audio playback module with a few of the latency optimizations I had read about. However, before I explain the details of the audio playback functions, I want to explain another crucial aspect of the project I implemented: the system controller. During a play session, there needs to be one central program that manages all other processes. i.e. receiving and processing accelerometer data, monitoring for spikes in acceleration and spawning individual threads for object detection and audio playback after any given detected impact. Though we are still in the process of implementing both the accelerometer processing modules and the object detection modules I wrote controller.py in a was that simulates how the system will actually operate. The idea is that then when we eventually get these subcomponents done, it will be very easy to integrate them given a thought out and well structured framework. For instance, there will be a function dedicated to reading in stream accelerometer data called “read_accelerometer_data”. In my simulated version, the function repeatedly retruns an integer between 1 and 10. This value is then passed off to the “detect_impact” function which determines whether a reading surpasses a threshold value. In my simulated controller this value is set to 5, so half for the readings trigger impacts. If an impact is detected, we want to spawn a new thread to handle the object detection and audio playback for that specific impact. This is exactly what the controller does; it generates and starts a new thread that first calls the “perform_object_detection” function (still to be implemented), and then calls the “playDrumSound” function with the drum index returned by “perform_object_detection” function call. Currently, since the “preform_object_detection” function isn’t implemented, it returns a random integer between 1 and 4, representing one of the four drum rings.

Now having outlined the controller I designed, I will explain the audio playback module I developed and some of the optimizations I implemeted in doing so. We are using the soundDevice library inside the sound_player.y file. This file is our audio playback module. When the controller first starts up, it calls two functions from the audio playback module: 1.) “normalize_sounds”, 2.) “preloadSounds”. The first call ensures that each of the 4 sounds in the sounds directory have consistent sampling rates, sampling widths, and use the same number of channels (1 in our case). This helps with latency issues related to needing to adjust sampling rates. The second function call reads each of the 4 sounds and extracts the sampling frequency and data, storing both in a global dictionary. This cuts latency down significantly by avoiding having to read the sound file at play time, and instead being able to quickly reference and play a given sound. Both of these functions execute before the controller even starts monitoring for accelerometer spikes.

Once an impact has been detected, the “playDrumSound” function is called. This function takes an index (1-4) as a parameter and plays the sound corresponding to that index. Sounds are stored locally with a formatted name of the form “drum_{x}.wav” where x is necessarily and integer between 1 and 4. To play the sound, we pull the data and sampling frequency from the global dictionary. We dynamically change the buffer size based on the length of the data, ranging from a minimum of 256 samples to a maximum of 4096. These values will most likely change as we further test our system and are able to reliably narrow the range to something in the neighborhood of 256-1024 samples. We then use the “soundDevice.play()” function to actually play the sound, specifying the sampling frequency, buffer size, data, and most importantly the device to play from. A standard audio playback library like pyGame goes through the basic audio pipeline which introduces latency in a plethora of way. However, by interfacing directly with the WASAPI (Windows audio session api) we can circumnavigate a lot of the playback stack and reduce latency significantly. To do this I implemented a function that identifies whatever WASAPI speakers are listed on the user’s device. This device is then specified as an argument to the “sounddevice.play()” function at execution time.

The result of the joint controller and sound player is a simulator that continuously initiates and plays one of the 4 sounds at random. The system is set up so that we can easily fill in the simulated parts with the actual modules to be used in the final product.

As I stated earlier, I caught back up with my work this week and feel on schedule. In the coming week I plan to develop a module to initially detect the locations and radii of the 4 drum rings when the “locate-drum-rings” endpoint receives the trigger from the webapp. Additionally, I’d like to bring the audio playback latency down further and develop more rigorous tests to determine what the latency actually is, since doing so is quite difficult. We need to find a way to measure the time at which the sound is actually heard, which I am currently unsure of how to do.