18-642 Project 4
Page last updated 8/26/2022 (changelog)
Learning objectives: (1) hands-on experience in a formal peer review
setting, including participating in multiple roles (author, leader, reviewer);
(2) add some instrumentation to your system that will be helpful for future
projects while providing a ramp-up to implementing new functionality in this
environment.
NOTE: this project has two independent activities: (1) peer
review project #3 code and fix any issues found; and (2) implement some maze
instrumentation. There is no sequence dependency -- do not wait for
the peer review before implementing the maze instrumentation.
NOTE: in the previous project we let you skip a few style
checklist items. You should use the time before your peer review to FIX all
these items. You do NOT get a free miss on those items this week.
NOTE: some students find this project a relatively light
workload and the next project a somewhat heavier workload. If you find this
project easy, we strongly recommend you start next week's lectures and
homeworks on sequence diagrams and statecharts EARLY since they will feed
directly into Project #5, and Project #5 will involve a heavier code
reorganization workload.
Please exclude the instrumentation code from peer review so there are
not issues with other students unintentionally writing their instrumentation
code in a way that is too close to yours. You can, for example, just
delete it from a copy of your files before you display them for peer review, or
snapshot your files before you start work on the instrumentation and peer
rreview that slightly older version.
Lab Files:
Hints/Helpful Links:
- See the Recitation video and slides on Canvas
- Please follow the handin naming convention: every filename (before the
file extension) must end in [FamilyName]_[GivenName]_[AndrewID].
- Peer review lecture slides from class
- Use the Project #3 peer review list for this review. This is required.
Other style comments can be made by reviewers, but do not need to be fixed this
week.
- Also see the recitation handouts
Procedure -- Peer Review of Proj 3 code
To simplify coordination, use the group assigned in the week #3 group
project for peer review so that the group is active at the deadline for this
project. (This is your GP Ex #09 group, which shows up in the Week #3 module.)
There is no group collective hand-in -- each student hands in peer review
materials separately per the instructions in this assignment. There is no need
to have a TA meeting associated with this peer review meeting (use the TA
meeting to discuss GP Ex #09 instead). Starting with Project 5 we will switch
weekly group activities to be a peer review with TA involvement. Consider this
a warm- up exercise. You can do both peer reviews in the same session if all
group members are ready and you prefer to do it that way.
- Review the course slides about Peer Reviews. Remember the following
guidelines:
- Inspect the item, not the author
- Don't get defensive
- Find but don't fix problems
- Limit meetings to two hours
- Keep a reasonable pace
- Avoid "religious" debates on style (While enforcing what the
Project 3 checklist says)
- Inspect early, often, and as formally as you can
- Schedule some time(s) to meet with your peer review group. Remember that
you will spend about 30 minutes per project, so for a group of 3 this is 90
minutes. (You will be tempted to go fast. If you do, likely you'll pay for it
later with more bugs. Take the time to do a good review now.)
- Conduct a review for handed-in project #3 code each of the students in
your group:
- Use of the project 3 checklist is mandatory (same one you used for Project
3, with the very specific style requirements, not the more general
industry-style one). Look for the link in the Lab Files section above.
- If you are reviewing Alice's code, assign Alice as the scribe. Alice should
only say "OK" to indicate that an item has been recorded, or
"thank you" during the review of her code.
- Assign someone (who is not the author of the code under review) to
be the leader. Rotate this job so everyone gets a turn. After one review per
group member, everyone should have had a turn being the leader. The leader is
in charge of:
- Picking the next few lines of code for everyone to concentrate on
- Making sure that all issues identified have been recorded before moving on
- Making sure everyone follows the process.
- Divide the checklist up into sections and assign one section to each of the
reviewers to improve focus when looking at the code. (Any reviewer can note any
problem, but each reviewer must look at each element in the assigned checklist
portion for each section of code.) The leader can own one of the sections; the
author cannot. If you only have three people in your review group split the
list in half for the two non-authors.
- Project the code onto a surface that everyone can see at the same time.
- Fill out the peer review issue log as you perform the review. Remember, do
not fix issues as they arise!
- Refer back to the Project 3 checklist to enforce style.
- Go through the code systematically -- be sure to talk about every line of
the file.
- After the review, fix all the issues found with your code. We recommend
having reviews BEFORE hand-in day to avoid a last minute time crunch.
- Answer the following questions in a short writeup:
- Q0: Your name (in case we print them out, the file name will be missing)
- Q1: Do you think the review of your own code missed anything? If so, what?
- Q2: Was there anything you think should be left out of the peer review
process? Why?
- Q3: Did you have any problems with your group? If so, what?
Hints:
- Switch statements count as +1 regardless of the number of cases, but
at most ONE switch statement shall be in any procedure, method, or
function. Two switch statements or -- even worse -- nested switch statements in
the same procedure/method/function/etc. is an automatic fail of the peer
review.
- There are a number of possible sources for better types. Any reasonable
header file is fine as long as you go down the path of using
"int16_t" and "uint32_t" and their friends.
- Variable typing has a little flexibility. "bool" is an OK because
it is specific and meaningful. The main thing is we don't want to see
"short," "int," "long." We also don't want to see
char being used for an 8-bit integer value rather than an actual character.
- If there are existing procedures that require types we're discouraging, use
the better types for working variables in your code. Then do an explicit type
cast in the parameter list while calling the procedure, and/or type case the
return value to an approved type as required. You'll get a chance to clean
things up in a later project.
Procedure -- Instrumentation
Note: In this and following projects, $ECE642RTLE_DIR will be used to
refer to ~/catkin_ws/src/ece642rtle
- You are asked to make use of a new function, displayVisits(int visits)
. This function changes the color of the cell the turtle is in when it
returns from the studentMoveTurtle (or moveTurtle, below)
function, based on the visits argument. It is meant to be used to
indicate how many times a cell has been visited. Note that this a
write-only function: it is meant for debugging and display purposes. You
can't read values from this function. (You'll set up a separate array to keep
track of the count internally; but it is NOT done for you by this function.)
This function should be used to plot how many times you've visited a particular
cell during the maze search. It is up to you to keep track of the number of
visits. Think of it as an external actuator that leaves "bread
crumbs" or other markers in a physical maze, and not a software memory
array.
The intended use is for your code to ALSO keep a local map inside of an array,
where the corresponding item in the array is incremented when the turtle visits
a cell. The contents of this array can be displayed using the new helper
function. Thus, that means there are two things going on to keep count of
visits: (1) calls to displayVisits() so you can see what's happening when your
turtle runs, and (2) using an internal array of counters so your turtle can
keep track of what's happening when it runs. The number sent to displayVisits()
comes from this internal array.
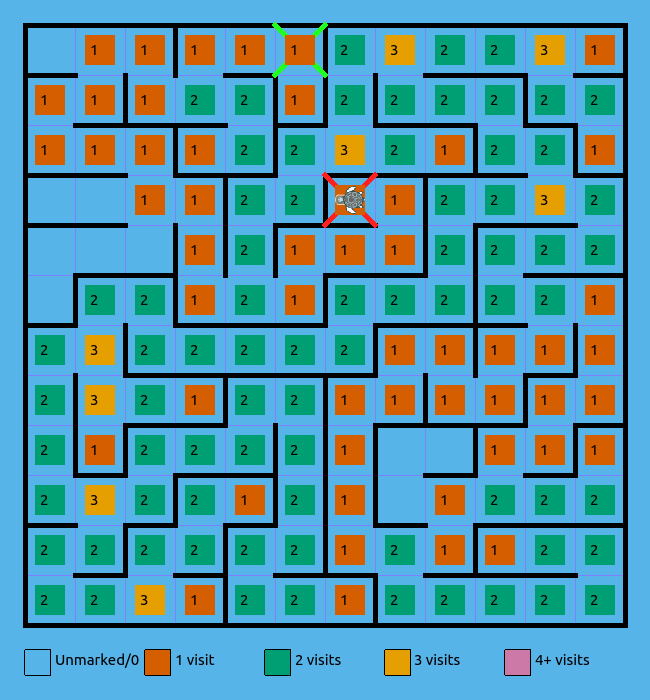
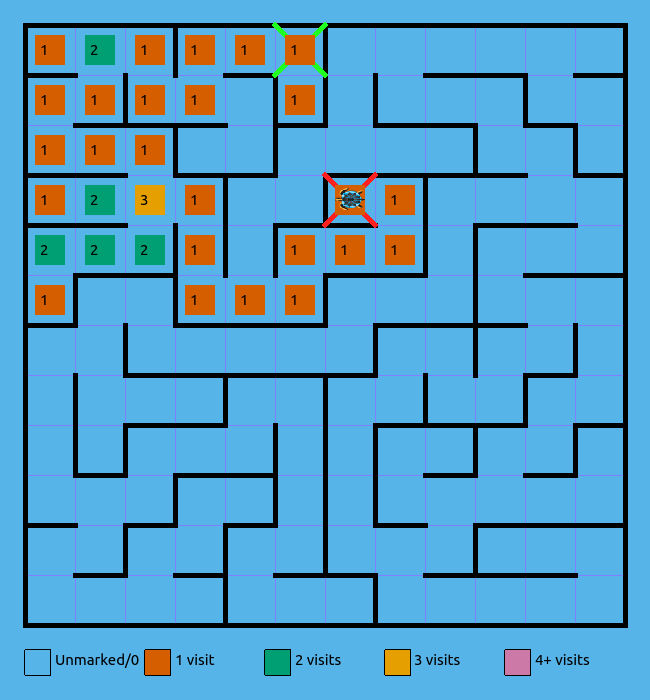
As an example, when we ran the turtle maze solver using the left-hand and
right-hand rules and kept track of how many times each cell was visited, we got
the following maps:
Note: we tried our best to make this color palette colorblind-friendly. If
you are having trouble distinguishing the colors, please e-mail the course
staff for guidance on how to change them.
- Change your code so that it creates and updates a local map and records how
many times the turtle has visited each square. (You might wish to preview
Project #5 about splitting your code to guide your design decisions for
this project, but it's up to you and the change won't be super painful either
way.
- Your code shall use a file static array to keep track of how many times
each square of the maze has been visited.
Remember that the turtle does not know its absolute coordinates, but any map
you will be given will be 12 cells by 12 cells in size, so it is sufficient to
use a 23x23 array and place the turtle in the center of this local map at
startup. The turtle can travel at most 11 cells in any given direction from its
starting point, so if the turtle's initial position is represented in position
{11,11} of the array, no matter how the turtle travels, it can keep track of
its path in the array. This is analogous to a human bringing a piece of graph
paper with them into a maze.
Rather than dynamically resizing the array, we suggest statically allocating an
array that is about twice as big in both X and Y dimensions, and starting in
the center, but you can use any method you like.
- We highly recommend you use getter and setter methods on this array, rather
than directly accessing the elements, in order to better instrument unit
testing in future projects.
- Each time the turtle visits a square it shall update the map display to
indicate how many times that square has been visited.
- Each time the turtle visits a square it shall update its internal array to
record how many times that square has been visited.
- Take a screen shot of your turtle producing a maze 1 display annotated with
the number of visits per cell at the end of the run. Include enough of the
screen so we know it's a screen shot and not a copy of the examples above
(e.g., include a date/time value in a text window also in the screen shot).
Handin checklist:
Individual hand-in: (every student hands this in solo):
- Your name. (If the writeups are printed out, the file name info is lost, so
put your name and Andrew ID in the document text as well)
- Your ANDREWID_student_turtle.cpp file including any post-review fixes,
named p04_ANDREWID_student_turtle.cpp. This code DOES NOT have to
include the turtle position display functionality at your option -- either way
is OK.
- The completed peer review spreadsheet for your code including
"status" column annotations:
p04_review_[FamilyName]_[GivenName]_[AndrewID].pdf. The majority of
"status" should be "fixed" but other annotations are
permissible if appropriate. This peer review should be regarding your PROJECT 3
code. You do not have to hand in project 3 code again; just the peer review
information. ACROBAT FORMAT IS REQUIRED with the same rules as the Group Peer
Review exercise.
- Completed peer review spreadsheets for other students using the same naming
convention as yours. It is OK if status is blank -- you do not need the status
column annotated in other student spreadsheets. Please use the file naming
convention:
p04_review_[YourFamilyName]_[YourGivenName]_[YourAndrewID]_[OtherAndrewID].pdf
for those file names where OtherAndrewID is the Andrew ID of the author of the
code corresponding to that peer review spreadsheet. ACROBAT FORMAT IS REQUIRED
with the same rules as the Group Peer Review exercise.
- Your writeup, addressing the questions above (Q0-Q3) named
p04_writeup_[FamilyName]_[GivenName]_[AndrewID].pdf.
- Screen shot of your turtle's maze after a run showing the displayed visit
numbers. Again, you don't have to hand in the array handling and display
version of the code until the next project. We just want the screen shot to
make sure you got the functionality working. Please submit this as a separate
image file following our naming convention so we can easily find it rather than
including it in the writeup .pdf.
Zip these three files and submit them as P04_[FAMILY
NAME]_[First name]_[AndrewID].zip in the Project 4 (Individual)
submission.
Please do NOT put these files inside a subdirectory. When
unzipped they should not have any directory associated with the file name, and
should just unzip into the current directory. (The file name convention will
retain whose work it is.)
Other requirements:
- Use the usual project naming conventions with a prefix of "p04"
for items other than source code.
- The writeup shall be in a single acrobat file for ease of navigation.
- Fonts for all diagrams and text shall be rendered at no smaller than 10
point font. Smaller fonts will require a resubmission
The rubric for the project is found here.