Overall Status Report for 3/15
Firmware Development (Kayla’s Progress)
This week, progress was made on developing the Raspberry Pi firmware for Bearbot, specifically implementing the OLED display functionality for the robot’s eyes and selection screens. A virtual simulation of the OLED screen was created using Pygame, with plans to use the Luma library for the actual implementation.
Key functions for displaying Bearbot’s eyes and selection screens were developed. additionally, initial GPIO handling for buttons and the rotary encod.er was implemented, allowing mode switching between Study Mode and Fidget Mode. A system hierarchy file was created based on a user flowchart to help structure the firmware development process.
Next week, once the microSD card arrives, testing will begin on the physical OLED display.
Hardware Development (Taylor’s Progress)
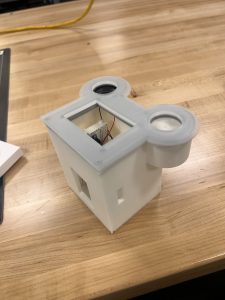
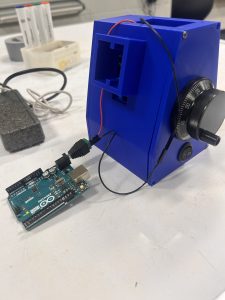
Significant progress was made on hardware assembly, with all key components arriving and some being integrated.
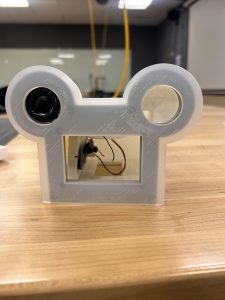
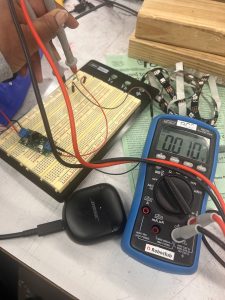
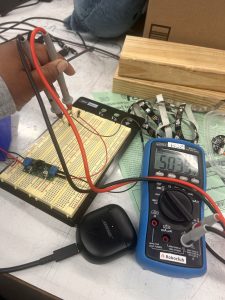
The OLED display was soldered into SPI mode and confirmed functional, now passed to Kayla for programming. The battery pack is operational, providing 5V power with an on/off switch.
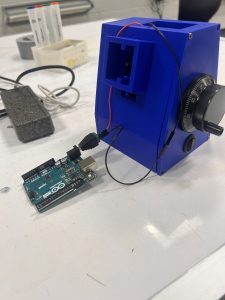
Additional components, including the audio chip, step voltage regulator, humidifier module, and light source, were successfully soldered. Internal component placement was planned, using Velcro and a 3D-printed shelf to secure breadboards while allowing for wire management.
Next week, the plan is wiring the speakers, testing the audio module, humidifier, and lights with the Arduino, managing internal wiring, and securing the servos to Bearbot’s arms. The hardware remains on track for completion.
Interior & Exterior Design (Taylor’s Progress)
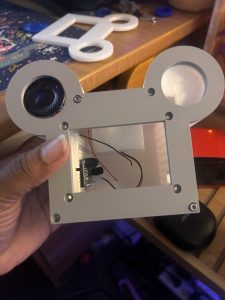
The Bearbot’s interior shell is currently plastic but will transition to resin once Robotics Club’s printers arrive. Backup plans include using the Hunt Library’s printers if necessary. Adjustments are being made to the model, including repositioning the photoresistor, modifying the humidifier module placement, adding a shelf for breadboards, and creating servo mounting holes. Final design adjustments should be completed next week.
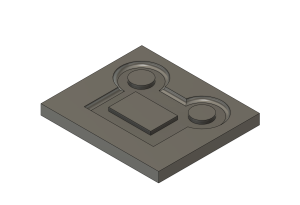
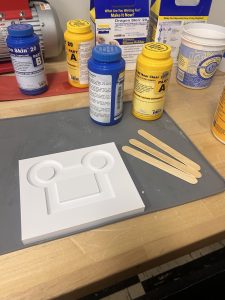
The front silicone mold for Bearbot’s face has been successfully created, utilizing materials from the soft robotics course. The molding process takes about 4 hours to set. Additional 3D-printed cast molds for other exterior parts are scheduled for completion this weekend and next week.
The full silicone body mold and resin interior are expected to be finished before interim deadlines.
Kayla’s Status Report for 3/15
My main goal this week was to begin development on the Raspberry Pi firmware for Bearbot, following the completion of web-app-specific features. Specifically, I aimed to implement the OLED display functionality for Bearbot’s eyes and selection screens. I was able to set up a virtual simulation of the OLED screen using pygame, but in actuality plan to use the luma library.
I began creating functions to draw different things that would display on the OLED screen:


I also begin creating the main script for the raspberry pi using the gpio library. For that part I initialized GPIO handling for buttons and rotary encoder and implemented mode switching between Study and Fidget Mode.
I also established a basic System Hierarchy, in bearbot_physical_heirarchy.txt, based on the user flow chart Taylor and I created a few weeks back. This was to help me organize the firmware code as I work on it.

Next week, once the micro-sd card comes in, I hope to begin running and testing the code on the actual physical OLED.
Taylor’s Status Report for 3/15
Hardware
Good progress has been made on the hardware frontier. With all of the components coming in from the mail, I was able to solder the OLED into SPI mode, audio chip, 4V-12V step voltage regulator, humidifier module, and light source.
The battery pack now works and outputs a voltage of 5V that can be turned on and off by the switch on the back of the Bearbot. The OLED has also been confirmed to work and has been passed onto Kayla to be programmed with the Raspberry Pi.
In terms of where the components will be placed, the top and bottom of the robot will have breadboard that the components fit into. This way, only the wires will be free standing in the robot. The breadboards will be fastened to the interior side of the Bearbot with Velcro and a 3D printed shelf.
For next week, I plan to hook up the speakers to the audio module and test them with the Arduino along with the humidifier module and light before handing it off to Kayla. In addition, the wires need to be managed from the buttons in the interior of the robot, the rotary encoder needs to be wired, and the servos need to be fastened to the arms of the robot and wired. For the hardware, I would say we are on track to have the hardware completed by next week.

Interior
The interior shell of the Bearbot is still made of plastic, but as soon as the resin printers are delivered to Robotics Club, we will be able to make the interior out of resin. I also have some last changes I need to make to the model – mainly changing the placement of the photoresistor, the hole for the humidifier module, adding a small shelf for the breadboards, and adding holes to screw in the mini servos. If the resin printer is not delivered in the next two weeks, then I will go to Hunt library to try and use theirs for a fee. This next week I plan to reprint a couple of parts and have the final design ready for resin printing. I would say we are on track for this part of the project as well.
Exterior
The silicone mold has been created for the front of the face. The cast mold was created in Fusion 360 from the parts I already created. I am able to use the materials from the soft robotics course to create the silicone exterior for the robot. The process takes 25 minutes to mix together the solution and then another 4 hours to wait for the silicone to solidify. In the future, the pieces will be “glued” together with more of the silicone solution, allowing the silicone exterior to be easily taken on and off of the Bearbot. The cast molds for the rest of the pieces will be 3D printed this weekend and upcoming week. For the silicone exterior, I believe we will be on track to complete the entire body mold before interims.