Personal Accomplishments
1. More Gantry Fine-Tuning and Troubleshooting (13hr): During this week, we noticed a phenomenon where the pieces began to move more inconsistently. This led to a lot of troubleshooting where I tried to change the height of the top board, alter the angle of the board, and think critically about why this might be occurring. In the end, I determined that the sharp edges of the 3D-printed pieces would hit the wooden board during movement, which added enough friction to prevent movement altogether. I fixed this by going through and sanding down all of the edges of the pieces, as well as sanding the surface of the board. At this point, officially, all piece types are moving as expected again.
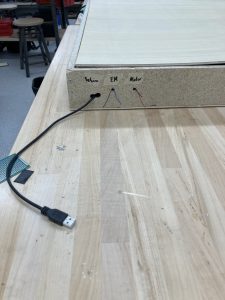
2. Testing Movement and Specific Circuit Components (4hr): After fine-tuning the details above, I tested movements in different directions with the chess pieces. I also wanted to go through the process of verifying the functionality of our circuitry. Therefore, I went through and looked at the roller switches and electromagnet. One thing that I noticed (which we will have to note during demo) is that the electromagnet does not work as effectively if it becomes overheated. To avoid this, we will need to ensure the electromagnet does not stay on for long periods of time. This should be straightforward, as the magnet should only be on for the short period of time during a move.
3. Mandatory Lab Sessions (4hr): During our class sessions this week, we had the opportunity to share our final presentations. It was my turn to present, so I explained our project’s progress so far and the steps we still have to complete. It was great to see everyone else’s project as well, and I took some time to fill out peer reviews for all of the other presentations.
4. Prepare for Final Presentation (2hr): In order to give a good presentation, I spent some time beforehand to prepare what I wanted to say. This time seemed to help a lot, as I felt that our presentation went very smoothly with no major issues.
Progress
The small movement issues were solved this week, but that, unfortunately, prevented me from making much forward progress as I was instead focused on getting back to the functional spot we were before. The purely mechanical nature of the gantry can cause these issues to occur, so I want to iron out as many as possible before our demo this Thursday. I will need to put in some time early this week to finish my portion and get the project to match my initial vision, but I have no doubt we can get it done fully.
Next Week Tasks & Goals
- Give a good demo and show the class what we’ve been up to!
- Finish all final project documentation requirements
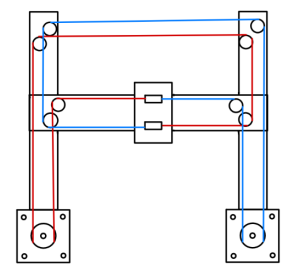
 2. Basic Magnet Testing (4hr): Due to the external delays for cutting the wood, we had to wait to fully test some of the electromagnet functionality. However, in the meantime, we did some basic tests by propping up a piece of wood above the electromagnet at the same height as the box lid. We placed a magnet on top of the wood and turned the magnet on, then moved the gantry using the step motors. We found that the magnet moved smoothly in each direction. I also used some chess pieces that Tarek 3D printed, placed them on top of the magnet, and tested again to determine that we could move these chess pieces around the wood with the electromagnet. That was exciting to see!
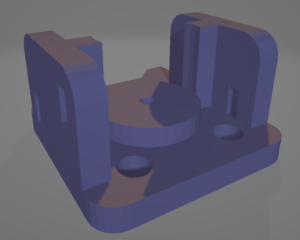
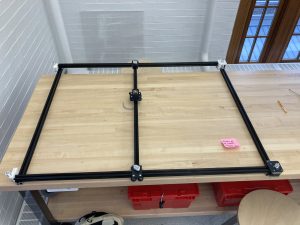
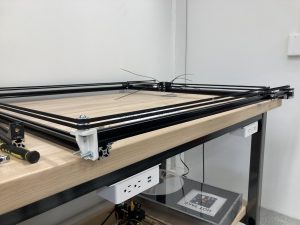 As the image shows, the entire gantry is now assembled. I went through and continued to touch up the angles and tightness of the rails so that the middle bar rolled easily. This took some time to ensure that everything was ready for testing. Then, I worked with Tarek to help him set up his configuration to test his Arduino code with my gantry system. We saw great results in being able to control the gantry with great detail. The entire system moved smoothly and we were able to move it vertically, horizontally, and diagonally. An example video is found here:
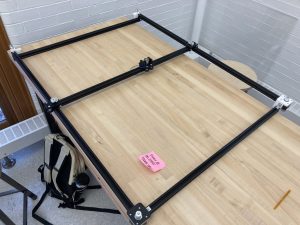
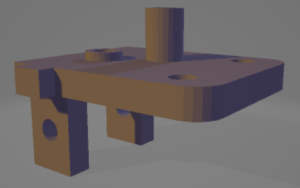
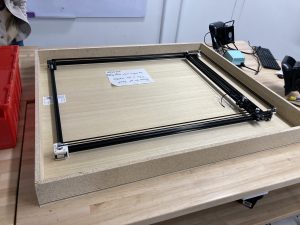
 As the image shows, the bones of the gantry system are all assembled. This involved a lot of measurements, layout, precise angles, and assembly with screws, nuts, and sockets. The middle bar can move freely left and right due to the wheels on the 3D-printed assembly holding it up. The trolley system in the middle was also 3D printed and carries the electromagnet for our design. It can move freely up and down, allowing motion in both the X- and Y-directions. Lots of small adjustments had to be made throughout the assembly to ensure the bars were not pinched or angled in a way that limited movement. Due to some issues with the timing belt, we have to wait for another to be delivered before finishing the entire pulley system. Once that arrives (hopefully Monday), we can finish the entire system and begin testing with Tarek’s Arduino code. This was an exciting piece of progress! It was very fulfilling to see the design begin to come to life, and I am excited to watch it perform during our initial testing.